
Likes
Comments
Share


@OGTrauma
Follow
Hi Potheads,
VEGGING WEEK THREE:
17 days of vegging, only 14 remaining if everything goes smooth as butter , the menace was controlled by the use of aceite springhill + glycerine soap. Plants had a bit on a rough patch because more aggresive plague control means stress , yes, it has its throwbacks but at least plagues were 90% controlled ,with small quantities of flea survivors. Instructions (to evade toxic reaction !) states that next application should be 2 weeks from last spray. thats also fits that's intended to not spray products during flowering stage. Overall , they can still be considered healthy according to their different growing speed and ages.
For plant placement inside the tent , u can use week 1, pic 1 for reference.
G13 Hashplant : They were the ones that received more pest control doses , so they can have some burns and more darker color but still growing at great steps while they almost finished required LST and the pots are almost at 100%.
Santa Bilbo: These one are growing wild and also more tend to be taller than the others on the grow. They are all growing steady, even the one that shares a pot and that was criteria for the next homies.
Eleven Roses: The 4 most healthy topped plants were chosen , transplanted and trained . Because i want to put to have the most colonized soil in JUNE, i put 2 plants per pot, making a total of 12 plants, 4 of each variety.

Likes
3
Share


@RainbowSix
Follow
Fruit King (Clone)
In greenhouse Veg : 18/1/24
Veg : 7-8 Week
To be continue ... thank


Likes
7
Share


@Pjm70
Follow
She has started her bloom. She is growing so well.
This week I took off all her tie downs. Then 2 days later decided to tie her back down.
She has had steady tension on her branches. So when I released her, she tightened back up. With the ties on, there is little reason for defoliation, as of now.
She gained height, but nothing crazy. All her main top branches have always been pulled down to be side branches. Everything else was let to grow that came up the center. Really the side branches are the top of the canopy. Surprised I have not broke a branch.
8/26 2 gallons Fed 8 tablespoons Foxfarm Big Bloom, 15 MLS Tiger bloom and Foxfarm Open sesame 1/2 teaspoon.
8/30 Gallon and a half of tea. Cow and worm poop.
Every year I'm going to grow a photo in a different shape. This year I just wanted to see how many tops I could make.
Looking forward to next year's design. However not as much as I want to see what this voluptuous beauty produces.
Voluptuous seems to be very fitting for her. Love this plant, she has been very fun to grow. She also thought me a lot.
Likes
5
Share

@tuzeus
Follow
All looking healthy and they’re thriving. Just waiting for defol day. I do leaf tucking from time to time. I will change nutrients starting week 4 and add green sensation as give in the plagron feeding schedule.

Likes
21
Share


@Mr_Motalovah
Follow
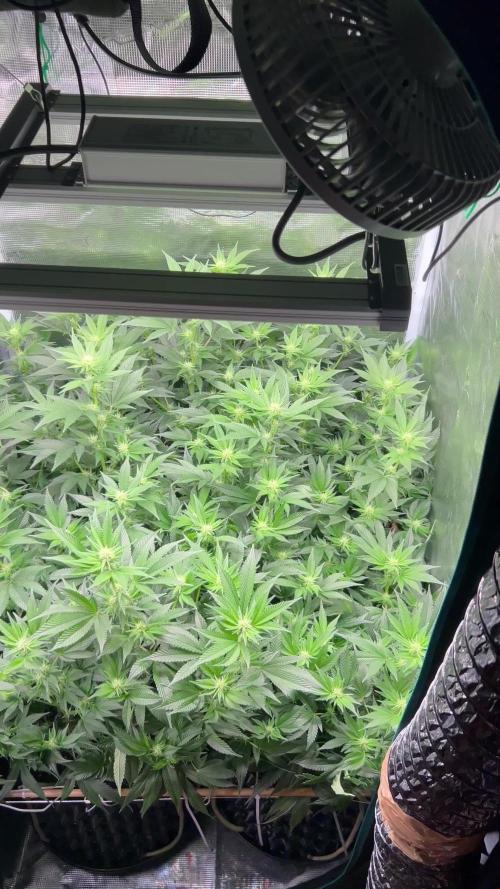
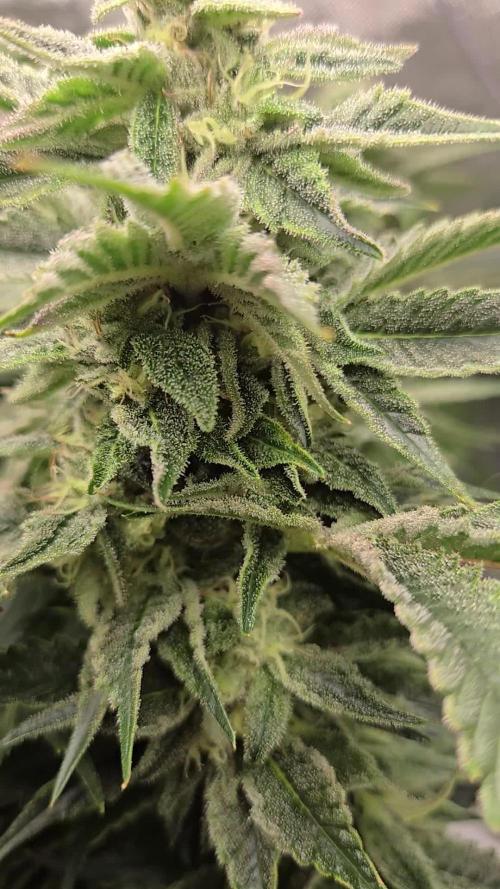
Hello Growers and Tokers! 👋 👩🌾 🧑🌾.🔥💨
THE MOST PHOTOGENIC
Thinking about changing the title of the diary to that.. 😂😂
I swear the camera loves this one..
And it's not the placement because I've tried moving them to that same spot and the pictures just don't come out the same.
I guess the others just need to mature a bit more and they'll be more appealing in pictures because in person they really are.. 😍
Green sensation is really bringing it to the table. Buds are getting fat, stinky and sticky!
I'll have to add a bit of support for sure because some are starting to bend a bit.
Smell is just grrreat!
She's definetly not ready yet so those 40-45 days of flower aren't that correct.. No problem with me though, i'm glad they've got more time to rippen up.
Not much difference in nutrients.. I do use 2ml/L of enzymes every 10 days or so in flower.. Noticed it does great work in the roots during flower.
Hope you enjoy the pics and vids. Taken on day 42 of flower.
Check out the other strains i've got going as well.
Take care out there!
One love!
Likes
19
Share


@valiotoro
Follow
Hello everyone 😎
Week 2 of flower for the Banana Purple Punch auto from Fast Buds 💥
She grew fast with a beautiful green color,for the nutrient 4ml/L terra bloom & 1ml/L power buds from Plagron
Mars Hydro SP-6500 60%
Have a nice day 😋

Likes
2
Share


@Kern420
Follow
Woche über haben sich die Blüten weiter entwickelt. Die Trichome wurden mehr und man fängt an erste Terpene zu riechen.
Wir haben Donnerstag (BT 2) stark entlaubt und schauen jetzt wie die Pflanzen wachsen.
C.C ist bissl kleiner aber trotzdem hat sie starke Triebe und scheint gute Blüten auszubilden. Der Geruch ist aufjedenfall schon funky.
Likes
9
Share


@Mr_nugs_lover_David
Follow
This ladies got pretty big for real, hands down the biggest autos I've ever had grown in 7l pots, excellent performance, and the flowers start to stink really strong, there is one pheno which is more developed than the other 2 phenos but the 3 have developed really good and they are producing a lot of sticky and stinky trichomes! Let's see how this will end up! Can't wait 🤤
Likes
198
Share


@DevilsBud
Follow
New week of flowering for
Marshydro supported grow
Spliff Seeds
CBD Spliff Berry/Afghani Gold
Anesia Seeds
Hyper Glue/IMPERIUM X/Captain Future/Blackberry Moonrocks
👌🏻👌🏻👌🏻👌🏻👌🏻👌🏻👌🏻👌🏻👌🏻👌🏻👌🏻👌🏻👌🏻
There's not a lot to say then loving it
Every strain is doing there own thing and some purple 💜 popping up here and there definitely all Anesia Seeds
The tent is spacious enough to fit 9 plants in for sure there having enough room to get all that light in
Because the FC-4800 ain't no joke
I see the difference between the first grow with miles away ore do i better say milkyways away lol
Marshydro gets your buds frosty and hard as Rock 🤘🏻

Likes
13
Share


@wheedtobeus420
Follow
Day 75 she’s in the dark ice flushing looking beautiful as ever. She smells Devine. I can’t wait for her to finish up so she can get the chop. Her trichomes look so good I can’t even start with her. Beautiful looking lady.
Likes
9
Share


@JeyGanesha
Follow
Purtroppo ancora stanno così perché sul balcone non prende tante ore di luce solare diretta.....beh! Ancora c'è tempo per farla crescere fuori poi la metterò a fiorire indoor

Likes
65
Share


@Dendegrow
Follow
Week 2 of the flowering phase flew by 🌱💨. Unfortunately, I may have overdone it with potassium or kept the water level too high – the classic signs of clawing leaves were evident. Thankfully, they seem to be recovering now and are back under control 💪🍃.
My IR night experiment is showing clear results 🌌: The plants exposed to infrared radiation at night stretched significantly more. This might be especially beneficial for this indica-dominant strain as it leads to better canopy distribution, improved airflow, and reduced risks of mold and disease. Plus, the light distribution is much more efficient now, which I’m excited to see pay off.
On the downside, my Orange Sherbert turned hermaphroditic 😔. It’s hard to pinpoint the cause – overfertilization seems unlikely since I’m using only organic nutrients. I suspect it might be linked to an E-field experiment I’ve been running. To confirm this theory, I’ll conduct a new grow with a similar strain next year to see if the electric field negatively impacts cannabis development.
Stay tuned for updates! Drop a like and follow along for more grow insights 🌿✨. See you next week!
Woche 2 der Blütephase ist wie im Flug vergangen 🌱💨. Leider habe ich wohl etwas zu viel Kalium gegeben oder den Wasserstand zu hoch gehalten – die typischen Anzeichen von Adlerkrallen waren sichtbar. Zum Glück scheinen sich diese jetzt zurückzubilden und sind wieder unter Kontrolle 💪🍃.
Mein IR-Nachtexperiment zeigt bereits deutliche Ergebnisse 🌌: Die Pflanzen, die nachts mit Infrarotstrahlung bestrahlt wurden, haben deutlich stärker gestretcht. Das ist besonders bei dieser indica-dominanten Sorte wahrscheinlich von Vorteil, da es zu einer besseren Verteilung des Blätterdachs führt. Dadurch verbessert sich die Luftzirkulation, das Risiko von Schimmel und Krankheiten wird minimiert, und die Lichtverteilung wird effizienter. Ich bin gespannt, wie sich das weiter auswirkt!
Leider hat meine Orange Sherbert gezwittert 😔. Woran das genau liegt, kann ich schwer sagen. Eine Überdüngung halte ich für unwahrscheinlich, da ich nur biologischen Dünger verwendet habe. Ich vermute, dass mein E-Feld-Experiment eine Rolle spielt. Um das zu bestätigen, werde ich nächstes Jahr einen neuen Durchlauf mit einer ähnlichen Sorte machen und prüfen, ob das elektrische Feld tatsächlich eine ungünstige Rückentwicklung der Pflanze verursacht.
Bleibt dran, lasst ein Like da und folgt mir für weitere Updates 🌿✨. Bis nächste Woche!
Likes
9
Share


@Garamantes
Follow
After 3 days, when the temperature rose above 11 degrees, I could finally remove the greenhouse from the pet bottle.
I did the first fertilizing with Advanced nutrients Voodoo juice, Piranha and Tarantula for better development and protection of the root.
Unfortunately, the pet bottle greenhouse, which was dewy and dirty from snail slime, caused the main stem to pull out more than I would have liked.
I like it when the main stem is low and immediately starts to form secondary branches
Likes
16
Share


@Rando1314
Follow
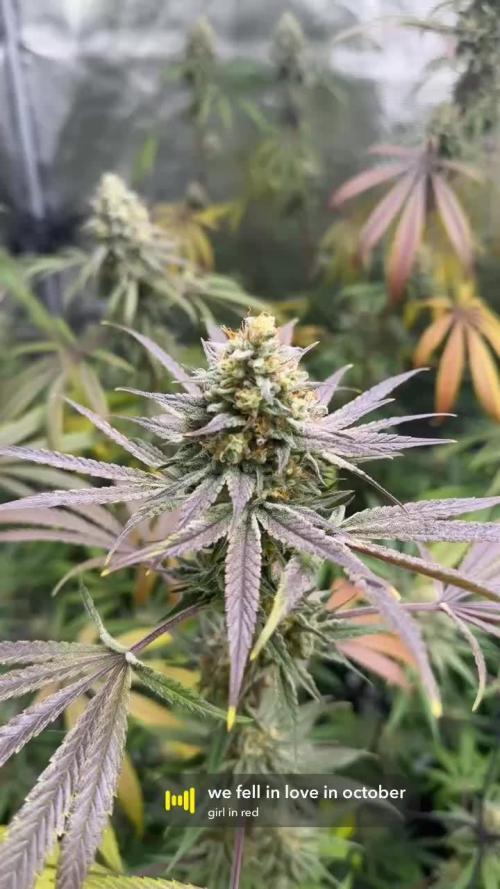
Really just a video from this week but I think I was a week or 2 behind anyways lol just so y’all can see some real color of my girls. Still haven’t named em but I’ll be doing that in the next week I’m switching em to 12 gradually within the next week to experiment with some stretching during the transition compared to a straight 12 switch
Likes
105
Share


@WhiteWidow
Follow
Hello friends, I planted this plant as an experiment as you can see but today in day 17 from seed i decided to share this growth here coz it surprised me with the so far growth. Sorry for lacking photos from week 1 but i didnt take pictures.. she is under the sun whole day and 4 hours 250w HPS... and as you can see some leaves curled in coz she is too young for 250W hps 25 cm from her..
So far I foliar fed her and regularly watered, dilluted 2ml/L of B-52, 2 ml/L fitobacillus (essential bacterias and enzymes) and foliar sprayed her. With every watering so far i put 2ml/l fitobacillus and 2ml/ B-52 and mycorhizae in the very first and second watering.
As you can see her main stem is already fatter than average for that time of growth and the root mass is so dense and thick, also many many hairs ready to absorb some nutes so tmrw will be her first nutes dosage, day 18 that will be from seed.
I am hoping only that the pot size will not restrict her growth, as the roots already reached the bottom and started to curl back in.. but their colour is bright white and i have no worries bout rot or similar, at least so far so good :D
Stay tuned brothers and sisters, all my grows are for you in order to learn ultra fast all the interesting and mind intriguing stuff by following only one grower. @James drop an eye here, you did a good job with genetics on this one..
Kisses to all from white and Team Wolfpack 😎✌️
UPDATE same day LOL
I decided to transplant her to a 3 gallon fabric pot coz those roots got me so surprised and i prepared a good nutes mix for them.. you can
see the health potion in the video that contains myco and nutes
UPDATE 10.10.2107.
Today i applied some more lst to maximally expose side branches to the sun. You will see some interesting pics and vids explaining my low stress training technique. I blv this plant's main goal in life to be LST'd. Dont be afraid, side branches will be thankfull and your harvest will be thankfull..
You can se some lst with side branches and how i tucked the leaves and made sure they stay there using the green wire and forming that shape on the pic.
Today i also noticed a white hair showing up, still not sure if it is starting to flower in her DAY 19 from seed, or is it just "stress defending mechanism".
Seems to me i will find out soon :)

Likes
14
Share

@MrGrowDiarie
Follow
Day 113
The leaves are still a healthy green, with only minor fading visible on the lower foliage, which is expected at this stage as the plant begins to draw stored nutrients from older leaves. The sugar leaves surrounding the buds show a perfect balance of color, and the pistils are gradually turning amber and curling inward, signaling that the harvest window is approaching.
The plant's overall posture is strong, with branches supporting the weight of the buds nicely - a good indicator of strong stems and well-managed airflow. The grow space looks clean and stable, maintaining ideal environmental control for these crucial final days.
Likes
11
Share


@LiamF
Follow
So after 106 days + 11 days drying im finally done with my first grow.
Got 97g dry buds + 30g shake
Way more then i anticipated.
Alot of the buds are pretty airy but the top ones qre pretty solid and all of them have amazing coat of trichomes.
Im so greatful i had this experience. I learnt alot and have way more confidence to grow more and my plan was to have my first grow to anwser all the questions i had.
Im cant believe i spent less then 300$ on this setup and harvested equals to like 1,500 - 1,700 $ of buds(prices in my country) thats definitely going to help me with the economy situation right now. And all this was stealth inside my closet, i had family members comming and didn't notice nothing i just had to turn off the blower fan since it's the only thing in my setup which isn't stealth.
I know i didn't gave her the best conditions but she showed me how strong is a Cannabis plant 😍
Im just starting my 2nd grow - Auto Northen Lights. Stay tuned

Likes
62
Share


@ButterfliesLittleFarm
Follow
Hello Diary.
Medusa F1 is definitely a record holder, in less than 70 days from the time it sprouted, it matured and was harvested.
The second Medusa will wait a few more days, she is not yet completely ready.
But incredibly, 12/01/2023 was planted and 21/03/2023 was harvested. 68 days from the day it sprouted, incredibly fast.
I've always thought that if the plant grows so fast, the result won't be great, but with Medusa, that's not the case. The plant is full of hard fragrant flowers.
As you can see in the photos, the leaves were completely yellowed so I removed them before cutting the branches and putting them in a box to dry.
Since the second plant still needs light, I put the first plant to dry in a box to protect it from light.
This week watering was usual, every three days.
The conditions are great, the humidity is very low, below 40%, which is great because of the drying, and the temperature is around 26 degrees.
Here's what it looked like last week.
15/03/2023 - Day 50.
Watering. I prepared 7 liters of water, lowered the pH. to 6.0 and watered both plants evenly with that amount.
18/03/2023 - Day 53.
Watering. The same procedure as three days earlier.
21/03/2023 - Day 56.
Photographing and harvesting the first Medusa F1.
I'm just really pleased with how things went from start to finish.
Now it remains to harvest the second plant and wait for them to dry to see what kind of fruits I got.
This is all from me regarding the Medusa F1, if anyone has any questions, feel free to write. It was a quick but great trip.
See you soon with the final report.
Likes
9
Share

@S3phwea
Follow
Final stretch, let’s hope I can figure out when to harvest at max potency.

Likes
15
Share


@Herbinator
Follow
Nearly there! The left plant was seeded first so has matured before the right plant. There was a 2 week gap between seeding because one of my first attempts died on me. Defoliating the right plant has created some huge top colas, but it needs another 7-14 days to mature. I'm trying to think of ways to isolate the left plant from the reservoir so I can flush it separately and allow feeding on the right plant to continue.
Signs of nutrient problems. Leaves are yellowing at the tips and showing signs of an imbalance somewhere. Research needed.