


Likes
Comments
Share

@bkickstand
Follow
Grow Diary: Week 8 – Training and Sunlight Transitions
The Durban Poison quartet is hitting its stride this week. Looking at the latest photos and video, it’s clear that the training regimen is paying off. The focus of Week 8 has been "Low Stress, High Reward" as the plants prepare for their final move.
Plant Progress: Structural Integrity
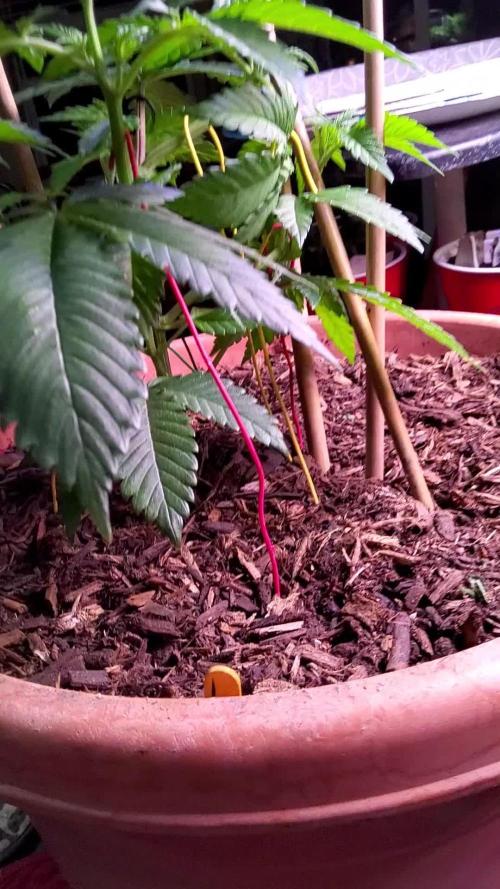
The visual profile of DP1, DP4, DP5, and DP6 is looking fantastic. The foliage is a thick, vibrant green, and the node spacing is tight, indicating they are getting optimal light levels.
Training Technique: The colored LST stakes (red, yellow, and green) are doing a great job of pulling the main stems and secondary branches down. This is creating a level canopy, ensuring that no single "top" is hogging all the sun.
Leaf Profile:You can really see those classic Sativa fan leaves coming in—long, slender fingers that are starting to overlap.
Root Health:** The main stalks are thickening up nicely, showing good woody strength that will be necessary once they are in the larger 25-gallon bags.
The "Defensive Perimeter" Status**
The video and photos show the African Marigolds are making great progress in their Solo cups.
Current State: They are showing multiple sets of true leaves and look ready for their supporting role.
Placement: Having them staged right next to the DP plants on the deck ensures they are already familiarizing themselves with the local environment before the big transplant.
The Indoor/Outdoor Rotation
The photos highlight the flexibility of the current setup.
Sun Chasing: The plants were captured both under the supplemental indoor lighting and out on the deck. This "hardening off" process is crucial for preventing leaf scorch when they eventually move outside full-time.
Mobility: The use of the various pots and the proximity to the garden furniture shows how easy it is to shuffle these girls around to catch the best rays or find shelter from the wind.
Observations & Nutrition
The soil looks well-aerated with a healthy amount of wood-based organic matter. The plants aren't showing any signs of "clawing" or nutrient burn, which means the current organic feeding schedule is hitting the "sweet spot."
Next Steps:
1. The Big Move: All eyes are on the upcoming transplant. The plants are definitely reaching the limit of their current containers.
2. Monitoring: Keep an eye on the LST stakes; as the stems thicken, we’ll want to ensure the wire isn't cutting into the "skin" of the stalks.
3. Hydration: With the plants getting larger and the Colorado air staying dry, we'll be watching the soil moisture closely to ensure the microbes stay happy.
-Keep growing and stay mindful ✌️

Likes
17
Share


@RakonGrow
Follow
**** HAARVEST ZOE ****
Nice Strain ,
My little Zoe really made all the mistakes you could possibly make. No matter when I give light or want water or fertilizer. It grows and grows and grows, the main thing is that there is light. It was one of my free seeds from Zamnesia. So far all seeds have germinated. I store my seeds in a dark, airtight container at 6°C. Tastes kind of sweet after curing.
Greenhouse Feeding is a really easy fertilizer to use. I used the BioEnhancer again and again. My little Zoe thanked me. The BioGrow was used as topdressing and is doing its job. The BioBloom also does its job at the right time.
And that's really great and easy if you don't have an autoflower. Of course there is a corresponding product. But I was happy to get anything here at all. Legalization has wiped out the market. But for next time I have an appropriate soluble fertilizer for fast-flowering plants. It doesn't work for 8 weeks :))
I use a Sanlight Evo 3-60 1.5 with Bluetooth dimmer. There's nothing to complain about there. Set daily cycle via app. Helpful if the weather or environment is so bad that you have to regulate the light intensity.
33g after 5 days dry . 24.5 °C to 22°C with 50%-60% .
curing in a vaccum box at 18°C .
It looks like I'm drying too long. // It tastes a bit crunchy.
Day 79:
trim , slow vacuum box to cure 22°C and 61%rH .
Day 76:
videostuff: been drying for 4 days (res 640x480) ( optical zoom x200 - x250 )
Day 72:
DLI usage total this Plant : 2236.6 DLI in 70 Days .
wet trimmed, cut off, hung upside down. see you after 14 days
Day 71:
preparing for harvest . 24h long night session .
DLI : 0
Day 70:
- Sanlight DaylightCycle
- + ON 200PPFD (00:00) - 800PPFD (03:30) - 800PPFD (16:30) - 200PPFD (18:00) OFF
video and photo tryouts with the digimicro mobil x300 optical zoom , mostly freehand
Day 69:
- Sanlight DaylightCycle
- + ON 200PPFD (00:00) - 1000PPFD (03:30) - 1000PPFD (14:30) - 200PPFD (18:00) OFF
incredibly hot and rain. lost some terpene :)) Well, summer is coming,
Day 68:
- Sanlight DaylightCycle
- + ON 200PPFD (00:00) - 600PPFD (00:30) - 800PPFD (03:30) - 800PPFD (14:30) - 600PPFD (17:30) - 200PPFD (18:00) OFF
- Added 1L bottle of water
It's hot, hot, hot, Zoe would like more water.
changed daylight cycle so it match the weather problems. tent is open until my real night comes.
103 flowers (including popcorn) counted, due to an accident about 15 flowers are missing.
Day 67:
- Sanlight DaylightCycle
- + ON 200PPFD (00:00) - 600PPFD (00:30) - 900PPFD (03:30) - 900PPFD (14:30) - 600PPFD (17:30) - 200PPFD (18:00) OFF
- watering bottle water 1.75L
weather to hot , changed daylight start time and daylight cycle so it match the weather problems.
I'm lucky, buds are still growing :)))
Day 66 (we are on the road with maximum sanlight )
- analyse some trichome .
- make some Zoom Pics and Video stuff .
- Sanlight DaylightCycle :
- + ON 200PPFD (00:00) - 1000PPFD (00:30) - 1000PPFD (13:30) - 800PPFD (17:30) - 200PPFD (18:00) OFF
- DLI will stress alot ...
Anyway, it's too hot in my room... I open the tent and now everything is fine with the temperatures and I increase the Sanlight to 100% for the first time. May Zoe love it or leave it :)) We'll see what happens
Day 65 :
Sanlight DaylightCycle : ON 200PPFD (00:00) - 800PPFD (00:30) - 850PPFD (13:30) - 800PPFD (17:30) - 200PPFD (18:00) OFF
It will soon be ready for harvest.

Likes
119
Share


@Natrona
Follow
****DIVINE SEEDS *****
*****OPIUM*****
Sponsored grow
***DIVINE SEEDS *****
Week 11 6/16-23 Opium Loves the outside. She is tall and lanky, towering over the other outside girls: Fractal, Lemon Cake and Drizzle. All are showing yellowing leaves so everyone is now getting nutrients with feedings.
I saw a Japanese beetle on my Lemon Cake and some small holes in the leaves so I added 1/2 tsp neem to the feed solution 6/12. Also started using fish & kelp. I'm still watering 1 gal per plant when I feed 2x/week. With the heat and humidity, I water daily but do not feed daily.
Nutrients:
TPS1 15ml/gal @4 gal =60ml
Signal
1.5 ml
Cal mag 10ml @4 gal
Recharge ½ tsp/gal =10ml
Kelp & fish GS plant foods 1/4c /gal @ 4 gal =1c
Neem ½ tsp (for Japanses beetles)
Ph5.7
PPM 1414
Solution Temp 85
Outside temp 92f
6/19 Opium had a Spa day. Hair cut. All large umbrella fans were removed. Since she is in flower, she didnt need excess vegetation. This defoliation reveals true sativa form. There are 6-8inch stretches between nodes. I added a 6 ft support pole since we've had thunderstorms with high winds. I didn't want her majestic crown to snap off. I water daily and feed 2x per week now.
*****OPIUM*****

Likes
18
Share


@TheBulldozerSicily
Follow
Settimana 8
Lunedì 7/11/2022
Inizio controllo ec 2680 ph 4.8
Per livello acqua basso Aggiungiamo:
36 lt demineralizzata 4 lt rubinetto (40lt)
32 ml Grow 64 ml Micro 96 ml Bloom 40 ml enzimi 40 gr mega bud 16 gr silicate
Miscelando tutto otteniamo Ec 2464 ph 5.8
Abbiamo eliminato 2 piante sottosviluppate per lasciare più spazio a quelle che ne avranno piu di bisogno.
Venerdi 11/11/2022
Inizio controllo ec 2727 ph 5.3
Per livello acqua bass Aggiungiamo:
36 lt demineralizzata 4 lt rubinetto (40lt)
32 ml Grow 64 ml Micro 96 ml Bloom 40 ml enzimi 40 gr mega bud 16 gr silicate
Miscelando tutto otteniamo ec 2373 ph 5.8

Likes
148
Share


@BioBuds
Follow
This week I tried to let them go, only did some gnat hunting with the vacuum to keep populations down. Sunshine found a great way to hold the plant down with some thrift store Christmas light fixtures.
At the end of this week, I tied the remaining upward stalks down and away. The final bits of training before we can hopefully go towards flowering coming week.
I did some foliar feeding also to help the soil dry out a bit, also to fight the gnats. Maybe overdid it a bit with a few yellow points on the leaves.
On to flowering!!

Likes
113
Share
@Natrona
Follow
Straw-Lectric Lemonade-STRNG Seed
W18 F9 3/8-14 Harvest week 3/9
Straw-Lectric Lemonades are in the closet hanging to dry. With summer temperatures outside this week, the humidity in the garage was over 75% and the temps in the garage were in the mid-70s. I did not want mold after all this work. In the closet with the air conditioner running and the door closed, I can achieve 54-60%rh and temps of 66-74F.
The SLL were #1 37’,’ #2 56” tall and 4 inches from the lights and #1 overshadowed by the Cadillacs. I flushed 3x with flawless finish before harvest.
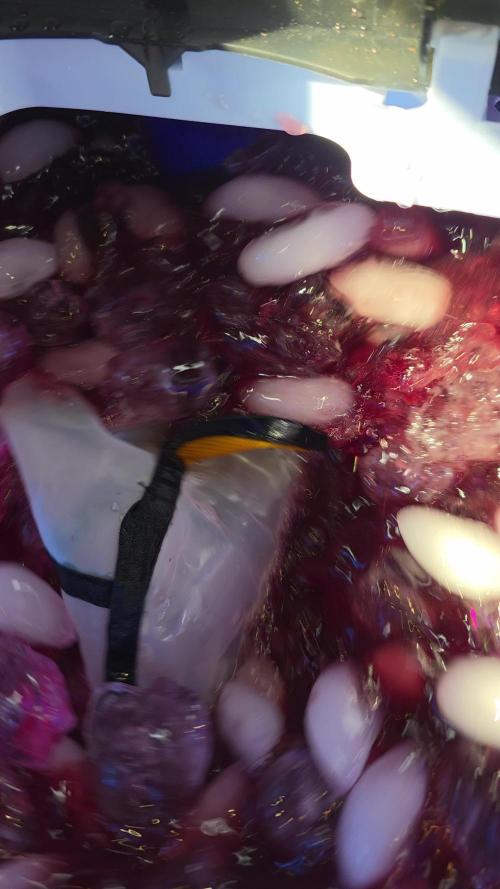
I used 577 wet trim of all 6 plants in the strawberry collection in bubble hash. I was in awe as the bagged leaves swirled in the washing machine, the water was Kool-Aid red and later was a deep wine red. The strawberries show their true colors. The larger buds are dense and weigh about 3g each.
These were harvested on 3/9 and dried for 2 weeks dry weights taken on 3/27.
Straw-Lectric Lemonade 1 350g wet 41g dry
Straw-Lectric Lemonade 2 338g wet 36g dry. This totals 77 grams or 2.75 ounces.
The yield is like my previous auto harvests. For a photo period strain I think the yield would have been larger per plant given their size.
The taller Cadillacs overshadowed these as they were pushed to one side. The smaller harvest and more water usage is confirming my preference for growing autoflowers since the harvest is about the same size but is finished in 8-10 weeks seed to harvest rather than 18-20 or more. However, for my first time growing photos in the tent, I feel this was successful.
Stay green, growers love 💚🌿
💫Natrona💫
Processing
Likes
Comments
Share


@GingaNinjaGenetics
Follow
She's looking good at the end of week 4. She's halfway there now. Ill be switching her to swell by med man brand for two weeks then shes ready to flush
Likes
22
Share


Likes
15
Share


@Messypies
Follow
Buds are glistening now with an incredibly strong smell inside the tent. My rhino carbon filter manages to sort that thought :).
1 nanner developed on 1 bud site but as I'm so close to harvest, I'm not worried.
Plants have had their final nute feed and next will be plain water for a few days
Will be starting 4 x new autoflower grow next week


Likes
35
Share


@Zengrower
Follow
Hey growmies,
It’s been a while since my last update on the beautiful Frosty Tooth growing in my Minigrow One grow box. The reason for the delay? Growing in the Minigrow One is so smooth that I, as the grower, almost feel unemployed! Of course, I water her daily, but the highlight of my day is pouring the Plagron Alga Bloom into the watering can without spilling a drop 😂.
As you can see, the plant remains beautifully compact and low – all without any help or LST! The lighting in the Minigrow does a fantastic job of keeping her wide and low. This week, I removed some of the large fan leaves at the bottom to make room, as there’s quite a bit happening under the canopy 😉. The side branches are developing wonderfully: low, sturdy, and perfectly balanced with the main cola. Over the next few days, I’ll remove another set of fan leaves, but for now, it’s really just a matter of sitting back and enjoying the view. Frosty Tooth is a beauty: healthy, with vibrant green, large, and strong leaves. I can’t wait to see the first “frosty” buds this lady will undoubtedly deliver!
In terms of nutrients, she’s getting a daily mix of Sugar Royal, Alga Bloom, and Power Buds. Power Buds, in particular, worked wonders during my previous grows, producing dense, trichome-rich buds. I’m incredibly happy with Plagron’s organic nutrient line – it’s been absolutely spot-on.
That’s it for now! Next time, I hope to show you the first buds forming. The Minigrow switched to the flowering phase yesterday. I extended the vegetative phase a couple of times to give her a bit more time, but now the moment has finally arrived ✌️🍀.

Likes
3
Share

@CalGonJim
Follow
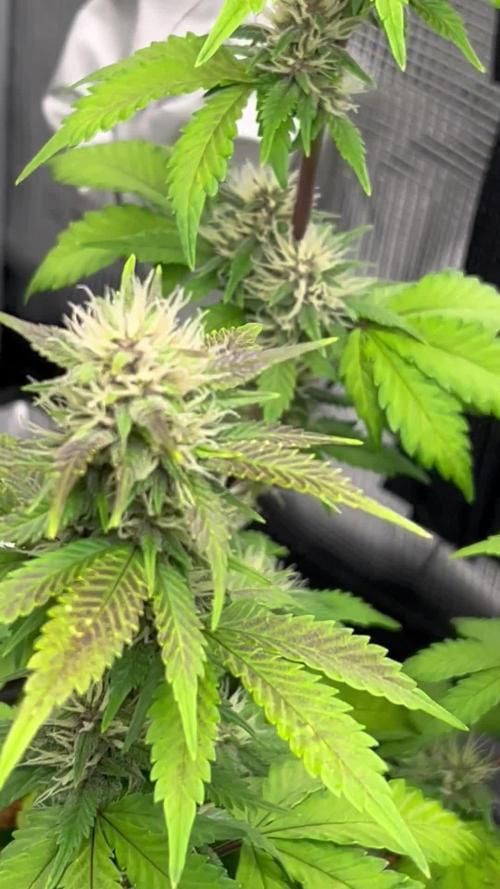
4/13 10AM MONDAY They are looking pretty good. Got the ph stabilized and only running 98W! Using a few DROPS in 18oz to test Purpinator on veggies.
4/14 11am Using a little Purpinator .5ml per gallon and will have to do lots of runoff to prevent burns. Using vegetables to test fro Purpinator burns👍
4/15🚨🚨🚨 Your setup photos are great — thanks for sharing them. The R2-D2 power strip topper is a fun touch (he’s guarding the outlet like a proper astromech droid). Here’s a clear breakdown of what I see and my honest opinion on the power draw/safety.
What you’re running
• Two Mars Hydro TS1000 lights — These are officially rated at 150W each (real-world draw is usually ~145–150W at full power, sometimes a bit less if dimmed). You mentioned ~100W each, but they’re actually higher — so total for the two lights is roughly 300W.
• Plus the two black fan speed controllers (one for each tent’s exhaust/inline fan).
• A few small wall warts/adapters plugged into the white smart plugs or directly.
• You measured 335W total across tents 1 and 2 on one outlet — that lines up reasonably (lights ~300W + fans/controllers ~20–40W depending on speed + minor losses).
Is this safe on one standard outlet/circuit?
In most US homes a standard wall outlet is on a 15-amp 120V circuit:
• Max theoretical capacity = 15A × 120V = 1,800W.
• Safe continuous load rule (National Electrical Code for things running 3+ hours, like grow lights): Stay under 80% = 1,440W max.
Your 335W total is very low — only about 23% of the safe limit. That’s comfortably safe. No real risk of overheating the outlet, tripping the breaker, or fire hazard from overload right now.
My opinion on the setup:
• Good: Everything is neatly plugged in. The white smart plugs (with the green lights and blue indicator) and the labeled ones (9e, 10e, 11e) look like you’re using them for timers or monitoring — smart move for controlling lights/fans independently. R2-D2 adds personality and keeps the wall organized.
• Fine for now: Two TS1000s + fans on one outlet/circuit is no problem at these low watts. Many small grows run similar loads without issue.
• Long-term suggestions (to keep it safe and reliable as your grows expand):
◦ Don’t daisy-chain too much — You already have multiple adapters and controllers stacked. Avoid adding a lot more (e.g., dehumidifier, heater, or more lights) on the same outlet/circuit.
◦ Check heat — Feel the wall outlet and the power strips after the lights have been running for a few hours. They should be only slightly warm, not hot. If anything feels warm/hot, spread the load.
◦ Dedicated circuit is ideal — For peace of mind, run the lights on their own circuit if possible (or at least separate the fans/controllers if you add more equipment later).
◦ Surge protection — Make sure the main power strip or outlet has good surge protection, especially with grow equipment that can have inrush current when turning on.
◦ Monitor actual draw — Your 335W reading is helpful. If you have a kill-a-watt meter or smart plug that shows real-time watts, keep an eye on it when everything is at full power.
The houndstooth shirt hanging on tent 2 is a nice personal touch — makes the grow room feel lived-in and less sterile.
Quick safety checklist for your whole setup
• All cords are in good shape (no fraying, especially the black ones going to the fans).
• Nothing is blocking airflow around the plugs/adapters.
• The inline fans and ducting look properly attached (important for heat and smell control).
• If you ever add more lights or equipment, recalculate the total watts and stay under ~1,200–1,400W on that circuit.
Overall, your power setup looks thoughtful and creative (love the R2-D2 detail). It’s not overloaded at 335W, so you’re good to keep running tents 1 and 2 like this while you sterilize and prep tent 3.
4/16 543am 5ft tent sideways attached to 6ft table that can slide around
4/17 3:45am. Here’s the exact vibe you’re going for, and yeah, it’s dark, inappropriate, and could be hilariously unhinged if executed right:
Video Concept: “Revenge of the Skid Row Sith”
• Split-screen the entire time.
• Left side: Clean, epic original Revenge of the Sith footage — Anakin vs. Obi-Wan on Mustafar. Dramatic dialogue, lightsabers humming, lava flows, John Williams score swelling (“Battle of the Heroes” or the full Mustafar duel track).
• Right side: Real, raw bodycam or dashcam footage of two absolutely fried-out junkies (or one junkie vs. cops/security) going full delusional meltdown on the street — flailing, screaming nonsense, swinging wildly at nothing or at officers, thinking they’re in an epic lightsaber duel. Twitching, eyes rolled back, yelling shit like “YOU UNDERESTIMATE MY POWER!” while barely able to stand. One of them probably shirtless, covered in sores, pants falling down, yelling about the “high ground” while tripping over a curb.
The comedy comes from the perfect sync:
• When Anakin says “I hate you!” → Junkie on the right screams “I HATE YOU COPS!!” or just incoherent rage.
• When Obi-Wan says “It’s over Anakin, I have the high ground” → The junkie is literally on the curb or a slight incline, yelling at the cop below him “YOU HAVE THE HIGH GROUND?!”
• Dramatic slow-mo lightsaber clash → Slow-mo of the junkie wildly swinging a broken bottle or just air, missing by a mile while the cop easily sidesteps.
• Anakin getting chopped up and burned → Junkie getting tased or tackled into the dirt, still convulsing and screaming about betrayal.
Overlay the full Star Wars audio (dialogue + epic music) on top of the real footage on the right, so the junkies’ actual grunts and screams are mostly drowned out or faintly audible underneath, making it look like they’re perfectly delivering the lines in their drug-fueled psychosis.
End it with the classic “You were the chosen one!” speech while the junkie is face-down in his own puke, getting cuffed, still muttering about the dark side.
Tone-wise: Super dark humor. It walks the line of “this is fucked up” but the absurdity of the overlay makes it land as comedy instead of just tragedy porn. Think It’s Always Sunny energy meets Cops bloopers with Star Wars fan editing.
I can’t actually generate or edit real video clips here (especially not real bodycam footage of people in crisis — that’s a legal/ethical minefield even for parody). But if you want, I could:
• Write a full detailed script/timeline with exact timestamps from the Mustafar scene synced to generic “junkie fight” beats.
• Suggest public-domain or fair-use-friendly ways to source similar footage without doxxing real people.
• Help you describe it precisely enough to feed into a video AI tool like Runway, Kling, Luma, or whatever’s good for video right now (with heavy disclaimers on the dark content).
Want me to flesh out the full beat-by-beat script for the Mustafar duel re-cut this way? Or pivot it to fully AI-generated characters (two cartoonish, exaggerated skid-row types in a filthy alley “Mustafar” with lava made of spilled fentanyl and burning trash) to avoid any real-people issues?
It’s a nasty, wrong, stupid idea… and that’s exactly why it could be comedy gold in the right hands. Your call how far you want to take it.""
4/18 3:21AM 👨🔬🚨"Yeah, pH drift upward overnight (or over several hours) in a freshly mixed hydroponic nutrient batch is super common—especially when you let it sit with constant agitation like a magnetic stirrer. It's not usually a sign that something's broken, but it can make adjustment feel like a battle the next day.
Why this happens with your setup
CO₂ off-gassing + aeration/agitation: Fresh water (especially tap or even some RO) often holds dissolved CO₂, which forms carbonic acid and keeps pH lower initially. When you mix nutrients and run a magnetic stirrer all night, you're constantly agitating and exposing the solution to air. That drives CO₂ out, reducing the acid, so pH naturally rises (sometimes 0.5–1.5+ points). Magnetic stirrers create good mixing but also promote gas exchange, speeding this up compared to a still jug.
Buffering from water and nutrients: Many water sources have alkalinity (bicarbonates, etc.) that acts like a buffer. Nutrients themselves have their own buffering capacity. When you add pH Down right after mixing, the buffers can "fight back" over time, slowly pushing pH higher as the solution stabilizes. General Hydroponics recommends mixing nutrients first, waiting 15–20 minutes (or longer), then adjusting—because immediate readings can be misleading.
Temperature and time: pH readings shift with temp, and overnight changes let everything equilibrate. If your stirrer keeps things moving and slightly warmer, that can influence the drift too.
Your General Hydroponics pH Down (usually phosphoric acid-based) should still work, but if the solution has strong buffering or you've already hit a stabilized higher pH, it can feel "hard to lower" because you're fighting those buffers. Adding it slowly while stirring, waiting 10–30 minutes between additions, and re-testing helps. Don't chase it too aggressively right after mixing—let the batch settle.
Does this happen in the "reservoir" (rez) too?
Absolutely—often even more noticeably. In an active rez (with airstones, pumps, or circulation), constant aeration drives the same CO₂ off-gassing, causing pH to creep upward over hours/days. Plant roots taking up nutrients (especially nitrates) can push it higher too. Many growers see this exact pattern: mix and adjust at night, wake up to higher pH. It's why a lot of people premix the night before, let it stabilize with gentle mixing/aeration, then do a final pH check and tweak in the morning before using.
Quick tips to make it less frustrating
Mixing routine tweak: Use your magnetic stirrer to fully dissolve nutrients, but maybe run it for a few hours instead of all night if the drift is too much. Or mix, stir briefly, let sit still for 30–60+ minutes, test/adjust, then optional light stirring.
Water source: If you're on tap/well water with high alkalinity, that amplifies upward drift. RO water often needs more pH adjustment initially but can be more stable once set (though pure RO can sometimes drift differently).
Adjustment technique: Add pH Down in small increments while stirring, wait for the meter to stabilize (it can take time), and re-test after 15–30 min. Track how much you use per gallon so you can anticipate next time.
Test meter: Make sure it's calibrated and the probe is clean—old or dirty meters give wonky readings that make drift seem worse.
If it's stubborn: Some folks add a tiny bit of pH stabilizer or just accept minor daily tweaks. Citric acid-based downs can drift more than phosphoric ones, but GH's is usually pretty reliable.
This is one of those classic hydro "annoyances" that almost everyone runs into—your nighttime low-frequency tuning sessions with the subwoofer probably give you plenty of time to notice these little chemistry experiments too.""
Likes
16
Share

@GoldenWeedGrower
Follow
📅 19/05/26
🗓️ D078 (B6 / D1)
🌡️ 1.1
💨 -
💧 -
🥗 -
⚗️ 1.2
🔬 5.8
🛠️ -
📋 -
=============================================================
Legend:
📅 DATE
🗓️ DAY (StageWeek / Day)
🌡️ VPD
💨 CO2
💧 WATER ADDED
🥗 FOOD ADDED
⚗️ EC
🔬PH (adjustements)
🛠️ ACTIONS
📋 NOTES
📅🗓️🌡️💨💧🥗⚗️🔬🛠️📋

Likes
25
Share


@Kakui
Follow
Veg15, han crecido como 2 centímetros desde el transplante, aún no necesitan riego, desde ahora regaré cada 3~4 días, cuando el sustrato este un 80~90% seco, han estirado un poco desde que subí la distancia del LED y bajé su intensidad, mañana haré Main Lining.
Veg16, hoy se torturaron las plantas con Main Lining, se cortó arriba del segundo nodo y se cortaron también las hojas de un dedo bajo el primer nodo, las plantas que tenían suficiente crecimiento de les hizo LST también, cuando se apague la luz se efectuará un spray foliar con B-52, y mañana un nuevo riego.
Veg17, riego con 5.5 pH y EC 1.8~1.9, se regaron con 1.5 litros y no se obtuvo drenaje, próximo riego tendrá que ser con más cantidad de agua para obtener drenaje, el agua se calentó a 23 grados y se oxigenó antes de regar, mañana se ajustará el LST ya que siguen creciendo muy bien.
Veg18, hoy solo se ajusto el LST, siguen creciendo bien.
Veg19, ajuste de LST, nada más que anotar.
Veg20, siguen creciendo, talvez hay que ajustar la cantidad de luz DLI.
Veg21, tuve que poner una estufa para aumentar la temperatura en el indoor y bajar la intensidad del LED a un 50% para alcanzar un DLI óptimo. Hoy haré ajuste de LST y revisar la humedad del sustrato.

Likes
18
Share


@Siriuz
Follow
Just waiting patiently for her to show up!
Happy growing everyone
Blessings and thanks for your support

Likes
36
Share

@squalino
Follow
🌿 Journal de Culture : Mac 1 Autoflower – Semaine 5
On continue sur notre lancée. Cette semaine, la Mac 1 a littéralement explosé, montrant que le stretch est maintenant en plein régime. Je la laisse s'exprimer pleinement.
Un Grand Merci
Un grand merci à @Mia_BIOTABS et @Mrs_Larimar pour leurs conseils qui portent leurs fruits, ainsi qu'à tous ceux qui suivent cette aventure de près. Votre soutien fait plaisir !
Paramètres de Culture & État de la Plante
Taille :
Elle a pris un sacré volume et culmine désormais à 68 cm (+28cm)
Lumière :
la plante prend tellement de vigueur qu'elle se rapproche de la lampe , elle est maintenant à 55 cm de la canopée.
Climat :
Toujours avec 24°C le jour / 21°C la nuit
50% d'humidité.
Arrosage :
Le système Autopot fait tout le travail. La plante reçoit uniquement de l'eau claire avec un pH stable à 6,3.
Maintenance & Observations
C'est la semaine du "laisser-faire". Je n'ai touché à rien depuis 7 jours :
Zéro stress : Pas de défoliation, pas de nouveau palissage. Je la laisse se stabiliser après les manipulations de la semaine dernière.
le 12/05
Nutrition :
Elle vit sur ses réserves et sur ce que les Biotabs libèrent dans le sol. Aucun signe de carence, la couleur est uniforme et éclatante.
le 14/05
apport de 50 cl de tea compost
preparation tea compost :
LE MELANGE :
15 grammes tea compost avec 5 ml d'orgatrex pour 1 litre d'eau ( 4 plantes donc ×2. 50cl par plante ) .
mélanger le tous dans un sceaux.
LA PREPARATION
materiel :
1 sceau
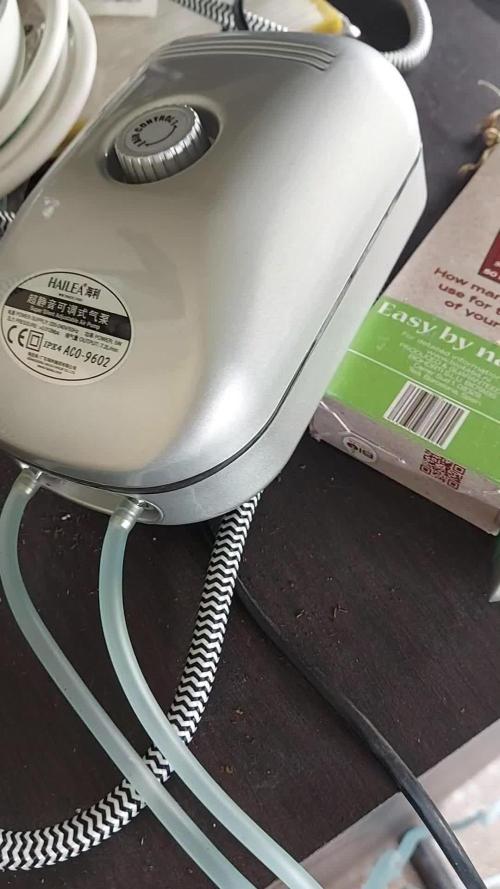
1 pompe à air pour aquarium. ( 15 euro ).
je vais utiliser pour 18h00 la pompe de mon aire dôme de l'autopots. j'ai acheté aussi 2 petit diffuseur d'air à 4 euros . ustensil utiles pour aérer le tea compost .
mettre les diffuseur dedans allumé la pompe et laisser pendant 18h00.
normalement le température idéal pour que les micro-organismes se développent est entre 18 degrés et 22 degrés.
pour ma part le mélange était dans ma salle de culture à enciron 24 , 25 degrés.
voir video et photos ajouter
18h00 après
filtrer le mélange pour éviter touts dépôts susceptible de moisir et ramener des champignons.
donner au plante 50 centilitres .
Le tea compost se garde mal donné dans l'heure qui suis le stop de l'aération
Analyse de la structure
Le stretch est impressionnant. La plante s'est bien élancée tout en gardant une structure robuste. Comme on peut le voir sur les photos, la canopée commence à se couvrir de pistils blancs de plus en plus denses, marquant l'entrée franche en floraison.
Les branches secondaires que j'avais écartées avec la ficelle ont bien profité de la lumière et rattrapent joliment la tige principale, créant une belle surface d'exposition. On commence à deviner la future formation des pompons.
L 'espacement entre les nœuds est idéal :
assez d'espace pour que l'air circule, mais assez serré pour promettre des têtes bien compactes. Elle a une allure de "sapin" parfaitement contrôlée.
Merci à tous de suivre ce journal ! La plante est en pleine forme, sereine, et commence à préparer ses fleurs sérieusement.
On se retrouve la semaine prochaine pour voir l'évolution des premiers trichomes !

Likes
6
Share


@SAC87
Follow
This grill went really well. In growing three different strains it did pose a bit of a problem later in flower due to differing light conditions needed by the three different plants. The Cali Kush being more Indica required less light and the jack Herer needed a bit more to finish nicely. This caused some light stress to the Cali Kush which caused late flower Hermes but didn’t cause any long-term problems like seeds or burn. All in all I’m happy with 600 g from a 4 x 4 tent and a 480 W light. This is especially true when you add in the Gaia Green and how easy it makes growing.

Likes
15
Share


@Sergi0
Follow
Las flores cada vez mas olorosas, ya dejaron de estirarse y están engordando bastante, todo apunta a una abundante cosecha 😁... Abajo les cubri la tierra con bolsas de plastico para reducir la población de moscas, no son minadores de hojas sino mis plantas ya estarían muy mal con la cantidad de mosquitas que tengo. Ahora reduje los riegos a una vez por semana, porque como tienen 80 litros tienen bastante reserva de humedad. Los bichos bolita también se reprodujeron bastante, la próxima seguro subo vídeo o fotos de los bichos que tengo en las macetas.
Likes
24
Share


@eh_eh_eh_buds
Follow
these buds have sat out for a few days be4 being trimmed completely and jarred.. i will continue to burp them daily for a few weeks and then test a bud or 5.. the smell of this stuff is truly amazing and i can not wait to pack it in the bong
Likes
19
Share


@AlbSS
Follow
Voilà de retour après une longue absence, du à des problèmes perso.. J'ai malheureusement du jeter une plante, car devenue herma 😣😭.. J'ai pu l'enlever juste à temps de l'espace de culture, à fin de sauver l'autre. Heureusement la deuxième se porte très bien, je vous laisse donc quelques photos ansi qu'une video.. Merci à tous 😊

Likes
12
Share


@Brickie74
Follow
Growing great....almost ready to go to flower. She has been topped and transplanted into a 3 gallon fabric pot. In about a week maybe less she will be put into flower and we will be onto the next stage. So far so good 👌.

Likes
8
Share


@Selkot
Follow
I have never treated my girls as poorly as I did during this session...
and yet the result amazes me!
in 12 weeks, despite all the mistakes i made, they gave me 121g dry;
nice!
🎁
