
Likes
Comments
Share


@OrganicNature420
Follow
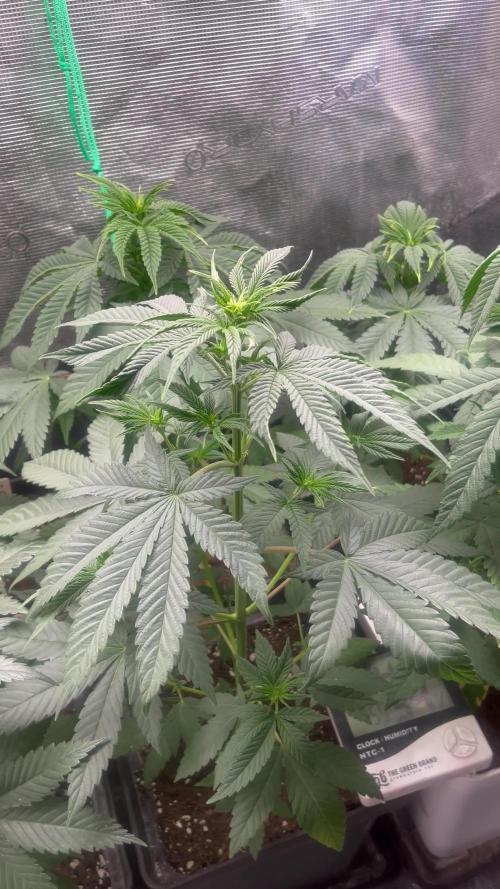
Germination date 🌱 28/11/2021
Day 78 16/02/2022
Strain 🍁 SinCity seeds Frosted Biscotti
(Biscotti Sundae x Whitenightmare)
THC% • Unknown
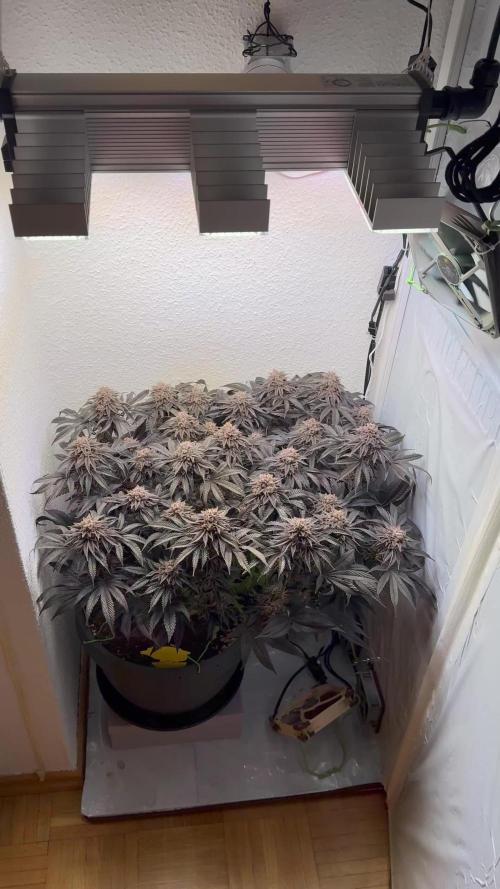
💡 Mars Hydro FC-E6500
• Power draw 650W + 5%
• Max coverage 5 x 5
• LED 3978 pcs high quality chips
• Max Yield 2.5g / watt
• Noise level 0 DB
• Removable Driver & Light bars
• Daisy chain
• Fast cool system
https://marshydroled.co.uk/ 🇬🇧
PROMO CODE • (organicnature420) DISCOUNT
https://www.mars-hydro.com/ 🇺🇲
PROMO CODE • (ORG420) DISCOUNT 👍🏻
⛺ Mars Hydro 150 x 150 x 200cm
📤📥 AC infinity 6inch
💧 10lt dehumidifier
❄️ 3.1kw air con system
💉 Nutrients GreenBuzzLiquids 🇩🇪
⭐⭐⭐⭐⭐
Organic Grow Liquid • 1-4ml until 2wk flower
Organic Bloom Liquid • 2-4ml flower stage
Organic More PK • 2-4ml +wk3 of flower
Organic Calmag • 1-2ml/lt whole grow
Fast Plants Spray • first 2wks at night lights off
More Roots • 2-5ml veg +2wks flower
Fast Buds • 5ml 12days before flower until wk1
Humic Acid Plus • 2-5ml whole grow
Growzyme • 2-5ml whole grow
Big Fruits • 2-5ml flower stage
Clean Fruits • 5ml flush 1wk
Ph powder
Root Gel
Living Organics
https://greenbuzzliquids.com/
PROMO CODE • organicnature420 15% off ✌️🏼
🥥 Growing Media • Coco Coir
Notes 📝
Loving life. Very happy with this grow. No complaints at all 🌱💚👊🏻
Go and give PharmaZ a follow and GreenBuzzLiquids and check out their grows and the future of nutrients.. Organic 💚
Discount codes in bio for Mars and GreenBuzzLiquids 👍🏻

Likes
6
Share


Processing
Likes
81
Share


@NugLife420
Follow
I received my Mars Hydro lights and they helped a lot. 2 TS-1000's. I supper cropped some of the 12/12 from seed and it looks like something trampled through the garden. Lol. The rest are really stretching now. I hope I the larger ones don't get rootbound. 🤞😁😁😁

Likes
132
Share


@rhodes68
Follow
11/17 Week 10
Ripley - Starting her on the Soul Peak very soon, low dose 5ml see how she takes it will reduce CocoTek on just her by 3ml/gal at that dose.
Keep defoliating her gently, dozen of so leaves every day or so just to keep buds open to light. No visible problems
Tara - The Beast - Ok now it officially the largest plant we have grown to date. With the pot its hitting 4 ft 8 in without 3 ft 2 in. The stretch has finally slowed to a stop and buds are beginning to quickly build... thank you God.
I was really wondering what I was going to do next.
Am going to have to bind her up a bit just for support tomorrow as those buds get heavy and she needs to give Ripley some room.
Also cleaning the heck out of the lower end tomorrow.
Keeping her CocoTek at current level with a Cal-Mag foliar every few days
1/19
Foliar Cal-Mag feed on Tara
Cleaned out the bottom of Tara, first pass at least see how it turns out.
Decided to put Tara on the same feed as Ripley see what happens as Ripley is building buds faster with the PK cant say that would hurt Tara,
No def so may as well
May be early but heck what do I know, on new ground here
1/20 So far so good, cleaned up Tara a bit and bound her up to give support and room for Ripley.
Buds building nicely crap load of them
Ripley doing well in the pK so will continue her protocol by slowly reducing CT and inc PK
1/21 Noticing some mag def on Tara and random Ca spots so getting a dose of Cal-Mag 3ml/gal as well as the foliar.
1/22 3ml/gal CalMag added to Tara feed
reduced CT 2ml/gal
Ripley on 5ml/gal CocoTek AB and 10ml/gal Peak getting her ready for flush
1/23 Going to try alternating between adding 3ml Cal-Mag to Tara's feed and foliar with same. Not a bad Mg problem but obviously one I cant ignore given its Ca as well.
Ripley on 6.1 Water and 15ml/gal Peak one more day then flushing to start week 11

Likes
4
Share


@dfgh95
Follow
Trying to get 70% RH but they are so small and don´t transpire so much, plus the indoor is quite large for this babies and I don´t have a humidifier. Just have to spray them a bit all the time to make them feel humid enough. RH is actually 60% but that´s OK, it will increase eventually when this babies grow.
Today May 16 I got a little humidifier and that mantains humidity around 60% without spraying water. I still spray a little water during the day to make them feel more comfy. I also decided to switch some light bulbs off because it was too much light for this babies. Just let 3 white bulbs and the 2 full spectrum bulbs on, 60 cm above the babies.
That was it for the first week of this 3 gums. Gum 3 has already a name if you noticed, I'll be thinking of the names for the other girls.

Likes
56
Share


@Prilyfe13
Follow
May 24, 2024 Day 99
This is the last week for these ladies. They have until the end of this week and then harvest no matter what. I'd much prefer to harvest them sooner, but I don't have space in my dry tent. It's only a 2x2 and the Tropicana Cookies just finished up and will be in there for about 7 days.
Banana Purple Punch A needs a half gallon of water today. She's not done yet and she's all dried up. So I'll give her that half gallon of plain water today PHed to 6.1 and that's it. She should be dry again in a week.
I'll be checking trichomes today as well. I'll update when I finish up.
Banana Purple Punch B is amazing. She smells wonderful and now with the Tropicana Cookies out of the tent, her aroma can shine. Wow.
I'll be checking trichomes as well today.
She also finished up her reservoir but she's still pretty moist. It must have emptied yesterday. This may last the week. I'll need a few days for her to dry out as well. So I might have to add a bit more water. Maybe a quarter gallon? Just enough for her to last the rest of the week. I'll see how she is tomorrow.
The environment is still a bit wonky. The humidity is still in the mid 50's% with the temp being around 73°. It's currently at 76° and 57% humidity.
Grow System Environment:
Temp: 73.2°
RH: 56.7%
VPD: 1.17 kPa
May 25, 2024
It's rainy today and naturally, the humidity in my room is stupid high. So in the tent the humidity is back to 60%. I'll be opening the tent door again every couple of hours today.
Banana Purple Punch A is starting to look like a hot mess. Tops are starting to flop over and there's a super weird fade going on. Leaves that just curled up and turned super dead yellow. Some of the leaves are showing purple, and the tops are getting purple hues. Still a bit of a mess.
Banana Purple Punch B is getting more and more purple. Her leaves are starting to lighten up as well. We can certainly see the start of the fade. The tops have nearly all purple sugar leaves. The buds are still pretty green. I wonder how it works with this one. We shall see over the next 6 days. I might have to add a half gallon of water to her reservoir. She's already a bit too dry to last the week. So I'll do that later today I think. Maybe first thing tomorrow.
Harvest time is 6 days away now. Both ladies are looking super close to being done. Hell, I may even go past the ideal time by a couple days. That's perfectly fine. I could use a good sedative.
The environment is back to being an absolute mess. The temp is at 75°, which is fine. But the humidity is back up to 60%. Hopefully I can get the humidity to drop a bit.
Grow System Environment:
Temp: 75.1°
RH: 55.1%
VPD: 1.30 kPa
May 26, 2024
These 2 are shaping up to be some heavy yielders. Both have massive buds and are on their way to being fully done. Another 5 days I think and they will be ready for harvest. However, I may have to keep them in there for a few extra days. The Tropicana Cookies in the dry tent are taking a bit longer to dry than I anticipated.
Banana Purple Punch A looks great. I ended up using a piece of a plant tie to prop up one of the most leaning tops. Looks great now. Much more light penetration to the lowers.
Banana Purple Punch B is absolutely amazing right now. MASSIVE buds that weigh a whole lot. She finally has a distinct purple look to her. And it's just getting more and more purple. When she is done, I believe she will have some beautiful foliage and lots of dark purple leaves.
She got about 1/3 of a gallon of water today to the reservoir. She was dry and she has much too long to go before she should be that dry.
The leaves are all starting to turn a bright green and fading into deep purples and yellows with orange. Fall foliage indeed.
I'll also be doing a full defoliation in 3 days I think. I want to clear as much foliage as I can before wet trimming. It doesn't seem as though wet trimming will be all that bad. There's sugar leaves, but they are big instead of plentiful. So it should be pretty quick. Drying may pose an issue. If the humidity keeps up like this, I'll have a lot of trouble keeping it below 62% in the dry tent. We have a few days left anyway, so maybe it will go back down by then.
The light is the same. I did take the DLI today and the average is about 40 mol/m²/d, so that's fine. I'd much rather it be closer to 36 mol/m²/d, but then it would interrupt the Sour Diesels in the tent that just started to flower.
The environment is really off today. It's super humid out and it's showing and killing my good vibes. The temp is a bit low at 73°. I would prefer it to be 75° during the day. It helps with all the plants in the tent. Oh well not won't stay low for long. It should start to creep up later today. The humidity is still super high at 63% today.
Grow System Environment:
Temp: 75.2°
RH: 60.9%
VPD: 1.15 kPa
May 27, 2024
Both ladies got a half gallon in their reservoirs today. Both were way too dry for now, sona half gallon should last them at least the night. Just 4 more days and we can harvest. Unless this humidity doesn't let up, then I have to wait even longer for the Tropicana Cookies to dry. AND risk mold! Damn it!
Banana Purple Punch A is starting to get floppy. I hooked some of the tops to each other so they will stand. A couple outer branches were starting to fall as well, so the were also tied up. Hopefully that solves the issue for the next 4 days. Maybe 5 or even 6 now. Too long in my opinion.
She doesn't have much in terms of fading but it's starting at least. Her leaves are all messed up. So I'm not bothering with the fade honestly. If she fades, she fades. I'll be defoliating in 2 days anyway. Then wet trimming, so the leaves aren't really a thing to bother with now.
She also has lowers with white pistils. They are developed, but the pistils are still white. Those are going to change in. Matter of days.
Banana Purple Punch B is shaping up to be the best plant of this run. She's actually the shortest, but has the best structure and the most solid buds and a lot of them. She's also doing quite well in her final days.
Her leaves are turning dark purple with the lowers turning bright green. She got a quarter gallon of water yesterday and drank it up almost immediately. I think I'll have to keep her watered for the next couple of days. She will certainly dry out quickly when I stop watering, so I think she will only need a couple days to fully dry out.
Currently, she is about 34% soil moisture content. Not bad at all. It might go up to 45% with the half gallon, but no higher.
I haven't done trichomes in a few days. I may get a video in today or tomorrow. Both plants could use a good viewing. Not that it matters, as I have to schedule my harvest, regardless of doneness. But we'll check them for science.
The environment is back to being the bane of my existence. Seriously, it's driving me insane. So the humidity is WAY up at 65% with the temp being around 74°. It's horrible. I really don't want to keep opening the tent. It just takes away precious light space.
The average night temp was also high at 70° with the humidity still being up at 64% I have no idea how these ladies haven't gotten bid rot or mold. Maybe it's because it's like a wind tunnel in there. Exhaust on full power, two 6 inch oscillating clip fans facing each other. There's no space untouched by some sort of airflow. It's not a heavy wind, but like a light breeze.
Update: I finally took some trichome videos and was a bit surprised at what I found. Both plants have tons of cloudy barely any clear and a good amount of amber. The extra 4 to 6 days may be a bit too long. We shall see. Some of the lowers still have white pistils and only have amber trichomes on the leaves. So there's time for them to finish up. We'll see how this works out.
Grow System Environment:
Temp: 74.3°
RH: 60.8%
VPD: 1.11 kPa
May 28, 2024
Very late entry today. I was quite busy wet trimming Banana Purple Punch A for the chop.
Yep, you heard it. The chop. One of the Tropicana Cookies finished drying today and I thought it was time to harvest her. So she got a full wet trim and is hanging in the dry tent.
She weighs in at a total of 22.26 oz wet hang. She has heavy buds, so the weight retention should be impressive. Maybe 5 oz? Maybe 4. Not bad.
Banana Purple Punch B will be harvested when the last Tropicana Cookies is done. That should be in about 4 to 5 days. Currently I have her moved to the back of the tent with the Sour Diesels taking over the rest. She looks great. More and more purple.
The environment is still crazy. Super high humidity and nothing I can do about it. I've tried AC, no AC and just started the heater. Something has to work.
Grow System Environment:
Temp: 72.5°
RH: 63.2%
VPD: 0.98 kPa
May 29, 2024
Nothing to do today.
Banana Purple Punch A is on her first day of drying and I expect it to take 10 to 14 days based on the current environment in the dry tent.
I did put a dehumidifier in there to help clear it out. It won't be permanent. Just until I can get the humidity back down to 60%. Then it will come out and go back in the 3x3. This will then help regulate the humidity for Banana Purple Punch B.
Banana Purple Punch B looks great! She will be harvested whenever the dry tent has a free spot. Should be in about 4 to 6 days, unless the humidity drops below 60% and then maybe 3, but I doubt it.
I also finally was able to take her off the risers and it worked a charm. The Sour Diesels in the tent aren't being overshadowed anymore and she is at a perfect light distance.
With the drop of the risers, the canopy DLI is now 38 mol/m²/d. Over the next few days, it should make the buds even more purple and dense.
The 3x3 environment is around 63% and at 73°. Still super high. The dehumidifier should start working soon. We will see a small drop in humidity. Maybe a jump in temp, but I need to get the humidity down somehow. The temp is nice and low for this lady, but not great for the other plants. I'd rather it be around 75° or even better 74.5°.
Because I was able to remove the risers from Banana Purple Punch B, I finally could lower the light for the Sour Diesels. The DLI is at 38 mol/m²/d with the power at 60%. Looking great!
Grow System Environment:
Temp: 73.3°
RH: 63.2%
VPD: 1.01 kPa
May 30, 2024
Lots to do today. Well, this afternoon. I finally pulled the final Tropicana Cookies out of the dry tent and now it's ready for Banana Purple Punch B. I may actually leave her in the dark for a day or 2 just under her sister plant that is currently drying.
Banana Purple Punch A is enjoying her second day of drying. It's actually a bit dry in the tent now. A good day out. But a bit too dry for a solid week. It should increase when I put her sister in the tent. She still has a good way to go. Maybe another 8 days if I can push it that far.
Banana Purple Punch B will be getting fully defoliated this afternoon. Then I think I'll put her in the dry tent for a day or 2. A nice dark period to stress her out a bit. Not to mention it will increase the humidity a bit in there as well.
I'll do a full wet trim in a day or 2 when she is done with the dark period. It should also give her time to fully dry out her container. And give a final push in trichome production.
I'm not going to bother with the environment today. It won't matter until tomorrow. Then I'll get dark tent data.
Grow System Environment:
Temp: 72.4°
RH: 57.1%
VPD: 1.13 kPa


Processing
Likes
1
Share


@marzochi_mirror
Follow
PS: I need to buy a dehumidifier to keep the humidity level lower.
Doubts:
I'm still not sure about the amount of water in the irrigation, however the technique I try to keep is 2l of water per plant every two days as it is the time it takes to dry and ask for more water.

Processing
Likes
15
Share


@LongJohn420
Follow
3rd veg week was done 6.9 and steady healthy grow. Later germinated The New seems to get along just fine. Meaning no big size difference 👌 Germinated in water glass 36h and nice tail then straight to soil and about 50h after putting that seed to water glass it broke soil. Nice 👌
Little sings of nutriens defs but I won't worry about that. It'll fix when they get in their final homes after couple days. Next weeks they in cleaned tent and in bigger pots 🙏
That's all folks!! Stay high, till next week!
Happy growing!''
"Fuck the humbe laws, I rather have a violent win""
-Ras Kass -

Likes
40
Share


@BLAZED
Follow
Week 12 (29-12 to 4-1)
29-12
Temperature: 26.4 degrees (lights on) 20.1 degrees (lights off)
Humidity: 72% (highest) 50% (lowest)
Watering: None.
30-12
Temperature: 24.6 degrees (lights on) 18.7 degrees (lights off)
Humidity: 71% (highest) 50% (lowest)
Watering: None.
31-12
Not at home.
1-1
Temperature: 25 degrees (lights on) 18 degrees (lights off)
Humidity: 68% (highest) 45% (lowest)
Watering: Both 2000 ml. PH: 5.8 EC: 1.8
As you can see the PH from the feeding water is a bit low, this is because someone suggested that i can try to lower the PH as my PH pen was a bit too high, aswell as my soil PH.
Lamp is at 80% and 40 cm distance.
Happy new year growmies!
2-1
Temperature: 25.5 degrees (lights on) 18.4 degrees (lights off)
Humidity: 64% (highest) 47% (lowest)
Watering: None.
3-1
Temperature: 25.2 degrees (lights on) 18.4 degrees (lights off)
Humidity: 56% (highest) 49% (lowest)
Watering: None.
4-1
Temperature: 26.4 degrees (lights on) 18.8 degrees (lights off)
Humidity: 64% (highest) 44% (lowest)
Watering: None.
I did a soil slurry test to check my soil PH and EC. I dont know how accurate this is, but these are the results:
Water used for the test: PH: 6.5/6.6 EC: 0.0
Biscotti #1: PH: 6.7 EC: 0.8
Biscotti #2: PH: 7 EC: 0.6
No pictures of the plants today.

Likes
10
Share

@eldruida_lamota
Follow
Que pasa familia, vamos con la primera semana de floración de estas Mental Rainbow F1 de Sweetseeds.
Vamos al lío, las plantas se trasplantaron a macetas de 7 litros.
El ph se controla en 6.5, la temperatura la tenemos entre 24/22 grados y la humedad ronda el 50%.
El ciclo de crecimiento puse 12h de luz, el foco está al 50% de potencia.
Me gustaría estar más encima este cultivo pero la salud me está impidiendo un poco este 100% con el proyecto. Con suerte la semana que viene andaré mejor.
- os dejo por aquí un CÓDIGO: Eldruida
Descuento para la tienda de MARS HYDRO.
https://www.mars-hydro.com
Hasta aquí todo, Buenos humos 💨💨💨

Likes
4
Share


@jahredi
Follow
Day 21
After an emergency bare root transplant from a biosolids medium to organic soil, there’s a glimmer of hope for my photoperoiod plants🙏
They got topped and pruned yesterday. a little earlier than I would have liked, but it made sense.
Day 23
Transplanted again down to 2 gallon pots to make room for another round I started. I decided to cut the fan leaves, too. These have been pruned and topped down to nothing but the emerging foilage from the 3rd and 4th nodes. My thinking is that the root system is so compromised that the less foliage they have to feed, the better. Fed some General Organics Bio Root 0-1-1 to promote root growth. Light mnist of pH’d water for foilar feeding.
Day 25
I think the Bio Root and the shade is doing them good 🤞Time will tell. If these come back strong, I’ll move them into 15 gallon living soil bags.

Likes
12
Share


@Sieben
Follow
I got at least 2 vids this time , in the next week a lil bit more , i use the whole hesi nutrient pack btw and are really impressed what LED and a noob scrog grow results to , don´t get me wrong but its a huge difference to hps and some untopped plants under it ;) , happy about all feedback btw.
The small growing Orange Lemon in mid seems to have a lot more haze DNA .
Left Gran Jefa, right back Fullgas , right Front and mid Lemon Orange.
Likes
12
Share


@Zer0xKira
Follow
Growing well . It is slightly bigger than the cinderella jack I am growing in soil in the same tent. It's definitley growing faster. I am seeing a calcium deficiency that I missed earlier on . I ordered some cal mag . I am expecting a full recovery. Also I had to add a bit of great white mycorhizzae to the mix because I was seeing alot of brown spots on my roots. It is starting to clear up. I also bought a better air stone to increase oxygen levels

Likes
2
Share


@Archimedes
Follow
Got a bottle of Biotonex from the nice folks @Cannaboom, the promised shorter internodial distance actualy shows, as far as i can tell at this point
Plants started smelling realy nice and sweet


Likes
12
Share


@Philippovic
Follow
Panikiller 3 ist nun endlich auch in der Blüte, die Lampe ist bis zum Maximum nach oben gezogen, hoffen wir mal das die Ladys nicht noch höher werden.
Dünger nach BioBizz Schema, licht auf 80%, Abluft auf 80 %, Ventilator Vollgas
Die Ladys hatten deutliche Anzeichen von Licht-Stress, daher wurde die Lampe auf 80% gedimmt.
11.07
Die Pflanzen sind alle sehr unterschiedlich entwickeln sich aber sehr g

Likes
Comments
Share

@Philipp420
Follow
Herstellerangaben: Ernte an BT 56-63
Ernte hier: BT 71
Lampe Leistungsverlauf in % (von 190W) über den Grow und dazugehörige PPFD Werte:
BW1-3: 40-60%, langsamer Anstieg von ca 400 auf 650 PPFD
BW 4: 60%, ca 650 PPFD
BW 5: 65% ca 700 PPFD
BW 6-8: 75%, ca 800 PPFD
BW 9: 70%, ca 750 PPFD
BW 10: 60%, ca 600 PPFD
Trichome:
Ernte bei circa 80% Milchig, 10% Klar und 10% Bernstein
Likes
58
Share


@GreenHouseLab
Follow
Leave are still droopy, oh well she says been like that since day 1 but is clear contender in front of the Cheese started same time. Nice bushy structure just like in the 1960-70s👍😂

Likes
5
Share


@Mattyice
Follow
Man. 12 hours trimming fuck man and I'm moving on to photos now lmao I don't even know what I'm getting myself into. My goal into this venture was to learn how to grow weed ,not only for myself, but just as good as dispensaries do too. And with the way this plant turned out I gotta say I'm really getting somewhere. The resin on the plant was incredible. I kept scraping off my pruning shears with a razor and making little hash balls I'm gonna throw in a blunt later. And the smell! Oh God it's so strong when I was trimming I swear I was getting a temporary buzz just inhaling it constantly I loved it and the smell. Almost like a fruity cat piss type of smell wonderful. Will be adding a pic of root ball in the morning after a well earned night's sleep lmao
Likes
48
Share


@TheCannaProphet
Follow
~ WEDDING CHEESECAKE FAST FLOWER by FastBuds ~
Well fam, here we go again with another epic strain from FastBuds Fast Flowering stable. After having such tremendous success growing their Gorilla Cookies Fast Flower outdoors last year, I've decided to run another of their fast flowering strains outdoors this year... Wedding Cheesecake Fast Flower!
The best description of this awesome cultivar comes directly from my friends at FastBuds which is as follows:
"A delight for the mind and body: Wedding Cheesecake FF (Fast-Flowering) is a delicious strain that offers XXL yields in a 7-8 weeks flowering cycle. This terpene powerhouse produces loads and loads of mouth-watering vanilla-creamy-cookie-scented terps with hints of citrus and cinnamon. In addition to its delicious aromas, this variety grows very well in both indoor and outdoor setups, yielding up to 650 g/m2 without extra maintenance, making it the ideal strain for beginners as it allows you to maximize yields while minimizing work. This super-fast feminized photoperiod version offers upbeat and energetic yet deeply relaxing effects that are perfect for consumers looking for a heavily focused, motivating, and creative high. It’s the ideal strain for those needing that extra energy boost to start a busy day on the right foot.
Wedding Cheesecake FF boasts chunky, large-sized buds with a thick layer of silvery-white resin and bright orange hairs scattered all over: that just screams ‘quality’. The lime-green flowers sparkle with an array of hues ranging from dark to light green, to magenta and purple, and reek of a delicious aroma that’ll remind you of fresh store-bought cheesecake.
This is an XXL hybrid that grows extremely tall in height, reaching up to 3m with one huge main cola and multiple long side branches that can withstand enormous yields of up to 650 g/m2 with ease. Wedding Cheesecake FF is extremely resilient to the elements and can be grown in almost every climate as long as you’ve got the space and basics covered, making her an excellent choice for those looking for large-scale harvests with a quick turnaround time without much effort."
________________________________________________________________________________________________________________________________________________________________________________________________________________________________________________________________________________________________________________________
The Setup:
This is going to be an outdoor grow, but I have started the Wedding Cheesecake FF indoors as our weather is still too cold to put her outside (nighttime temp's dipping regularly into the 30's℉).
The plan is simple... let her grow inside under a 19/5 light schedule until the nighttime temperatures stay above the mid 40's℉, at which point she'll be moved outside and transplanted into the soil which I have already setup and inoculated with beneficial microbes, and then let the fun begin!🤪💚
________________________________________________________________________________________________________________________________________________________________________________________________________________________________________________________________________________________________________________________
Weekly Updates:
9/6- Well, Week Five of flower is here and the Wedding Cheesecake FF by FastBuds is rockin-n-rollin! Well fam, the 'Beast From The East' is going strong, and so far has not encountered any issues with any bud rot but is showing signs of the beginnings of Septoria. Luckily, this far into flower it shouldn't be too much of a concern at this point. This late in our growing season I always worry about Boytris, especially with cultivars that have really dense and tightly grouped flowers as our weather is now turning cooler and wetter.
9/8- I'm continuing to water the Wedding Cheesecake FF in the mornings on days that we do not get any substantial rain with well water via the garden hose. Today I went through the plant and removed a bunch of old dead leaves, along with any shade leaves that were totally yellow. I did not water today as we had a good amount of rain yesterday and the soil is still really moist.
9/10- My daily routine of watering, removing dead foliage and checking over the flowers continues. The aroma coming off of the Wedding Cheesecake FF is really loud now and you can definitely pick up some subtle hints of her Cheese lineage in it!
9/12- With Five weeks of flowers now behind her, the FastBuds Wedding Cheesecake Fast Flower only has 2-3 more weeks to go (weather permitting) and she's on track to be an enormous yielding plant! I can't wait!!!
Thank you for checking out my diary, your positive comments and support make it all worthwhile! 💚Growers Love!💚😎🙏