


Likes
Comments
Share


@BB_UK
Follow
So let’s start by saying I was Mis sold original bloom with the hydro coco version and me being me expecting what I asked for and as I bought soil 2 bags with it you’d expect to have indefinitely what I asked for but sadly not, I can say it hasn’t caused a problem on my autos and I now have the correct nutrient but the first feed was with it! Results would apparently be not as good as the soil version but I imagine being the first feeds it’s not as important as if it was through 2-4th week of bloom, but again this is the start! Here we grow

Likes
1
Share


@420Cannaking
Follow
Vegetation cycle starts.
Light intensity 50% @ 16 inches
Nutrient program starts at 50% Green Planet Easy Feed and Week 2 begin Green Planet Pro Feed @ 50%.
Abit too much light for the plants finding the sweet spot on a 480watt LED,they recovered well.
Still battling high humidity and high temps. 28-31'C 65%-90%. Introducing a new dehumidifier as of next week.
Have turned AC on High between 11am-5pm (hottest part of the day) Summer only!

Likes
14
Share


@Dunk_Junk
Follow
She grew 10cm this week!
Next week I'm going to change the HID bulb I use in the tent. Currently it's quite a red spectrum. I'm going to swap it to a more blue/daylight 1000w item.

Likes
8
Share


@Skinnytalls420
Follow
Day 17-12/05/22 all looking good now giving biobizz grow and there flying!!!!
Day 20-15/05/22 all looking good!!!!
Likes
21
Share


@Rap_a_cap
Follow
Today is the harvest day of this wonderful girl. Plucked off all the main colas, the rest will mature for another week.
She's ripened very well, totally defoliated, in a sunny and hot end September. In a better position she would have yelded at least twice as much. These branches will turn into super premium buds, rich of colours. This strain is simply amazing.
See U ASAP for a great harvest
Good luck Growmigos

Likes
35
Share


@The_Bearded_Grower
Follow
Day 77 i turned off the lights at 10 pm Friday and started my ice water flush and 48 hrs of darkness. i have not done ice water flush before, the theory is that the harsh cold forces the plant to build more trichomes to better prepare for pollination its an easy thing to do and takes no extra time so why not try it the water ppm is 435 and the first round run off was 1139 ppm second round of flush 789 ppm. the reason for 2 rounds of flush is in the first flush round the nute's latch onto the water and the second washes them away. i wait 15-20 min between flushes. that's it for today's update keep your stick on the ice
Day 78 not much to say really water ppm is at 435 and runoff of round one for the day is 621 i will update with round 2 in an hr. UPDATE: ok so round 2 leaves it at 521 ppm
Day 79 ok ppl this is the last day before harvest no water just ice ( i know it melts but its not much water lol ) oddly after over 48 hrs in the dark i have seen no change in the color of the plant it does not matter but i was hoping lol i took some pics for your viewing pleasure

Likes
7
Share


@LittleBigTrees
Follow
I took 4 cuttings from my outdoor plant 3 weeks ago. They have just started showing signs of growth, I'll let them veg for 14-21 days and flower them.
Likes
21
Share


@BLAZED
Follow
W15 (9-5 to 15-5)
9-5
Temperature: 24.6 degrees (lights on) 20.3 degrees (lights off)
Humidity: 70% (highest) 46% (lowest)
Watering: None.
No pictures.
10-5
Temperature: 25.2 degrees (lights on) 20.8 degrees (lights off)
Humidity: 67% (highest) 44% (lowest)
Watering: 1000 ml.
11-5
Temperature: 25.4 degrees (lights on) 19.8 degrees (lights off)
Humidity: 67% (highest) 36% (lowest)
Watering: 1000 ml.
No pictures.
12-5
Temperature: 25.9 degrees (lights on) 20 degrees (lights off)
Humidity: 59% (highest) 42% (lowest)
Watering: 1500 ml.
Set the strength of the light to 95%
13-5
Temperature: 26.8 degrees (lights on) 20.9 degrees (lights off)
Humidity: 61% (highest) 47% (lowest)
Watering: 1500 ml.
No pictures.
14-5
Temperature: 27 degrees (lights on) 19.2 degrees (lights off)
Humidity: 68% (highest) 41% (lowest)
Watering: 1500 ml.
15-5
Temperature: 26.1 degrees (lights on) 19.8 degrees (lights off)
Humidity: 67% (highest) 43% (lowest)
Watering: None.

Likes
280
Share


@love_2_grow
Follow
D1
Both girls germinated, but the first has stretched more than the other, although they both look healthy and vibrant.
I moved them from the heat mat into the tent and a temporary SANSI light since the other light is still in my photo tent for another couple of days.
I will not bother with up-potting and instead transplant them into their final pots tomorrow.
------------------------------
D2.
Transplanted and watered each with 0.5 liters of water @ pH 6.4, with a half teaspoon of myco/kelp mixed in.
I switched the lights and set DLI to 12
------------------------------
D4.
The girls are happy little campers in their new homes.
The first is the taller one but only by a centimeter.
I bumped DLI to 14.
------------------------------
D7.
End of the first week, and the girls are loving life. Unfortunately, it seems that fungus gnats do as well. I knew this could happen by using fresh worm castings as a top dressing. It's not a huge deal, as I already have nematodes ready to go, but I want the soil to dry out before watering again. It's silly to risk over-watering just to get rid of a few gnats. It can wait a few days.
I increased DLI to 16.
------------------------------


Likes
17
Share


@OrganicChronic
Follow
GMO (Garlic mushroom onion) was slow to flower but came on strong weeks 8 and 9 to produce some dense heavy sticky buds. The dry weight of the plant material is unsure, but I’ll report the weight of various bubble microns when dry. Pictures of the dry bubble and maybe a melt shot impending! To dry, I decided to microplane into pizza boxes lined with parchment. It’s been fun growing along with everyone on grow diaries. Awesome
Likes
11
Share


@TechDCo
Follow
Week 1
27/01/2025
TF and MS
Feed HydroSol: Increased to 8ml/5L
28/01/2025
TF and MS
Light Increased: 313watts
DLi: 35
Rapid Growth has started again.
Feed Increased: HydroSol 10ml/5L
HP 12%: 1ml/5L
Uploaded today's pictures and yesterday's for comparison on how HydroSol is doing?
I topped MS. Hopefully by doing this now TF will catch up but that's not why I topped her. She's known for being bushy; so will be good to bring her up to her second level before branching. Giving the rate she is growing; we haven't to worry about stunting Growth.
H202 is also know to to cause mutations at high levels. I tried to start this diary with HP 12% from seed and it worked until micro-organisms in the air and water; what distillation has missed the "vocs" the cardon didn't catch. Caused them to later on because of free radicals and this is why high levels of HP can cause mutations and cancer when it steals atoms by ripping them apart. "Call the bomb swaddles" when mixed correctly or 'incorrectly 💣 lol
28th Today
Little VT of the 5L jerry can starter pots (DiY)
I think this process is allowing for optimization of Air/feed pks.
I'm at least 2-3weeks ahead from a normal grow because of this style growing.
I know, I know, I lost 3weeks from the first failed attempts. But it's okay 👍 I'm okay with that. Now I know and it's logged in the dairy for future reference I can quickly glance over before I start another one. Like hey 👋 "Time is valuable, read ya diaries" honestly, I don't have dementia i have human forgetfulness/error.
Its still in the experimentental phase.
Took tf out the propagator
31/01/2024
Nothing much to see
I've did everything for TF and still looking droopy. Exactly the same as MS.
I think she'll grow out of it!
01/02/2025
I know, I know what ya thinking, it looks like spider mites on MS only leaf but honestly I think its of the h202. I deffolled her only leaf. Sprayed it with h202 and no reactions happen. No mites.
The Future TF is looking much more lively.
Oh well. No speed-run this time round!
I shouldn't of took 4wks off from growing. Rhythmic nature of thing and getting in the swing off it. It's easy to do but I am always in two minds with everything I do. I can't help but cause "Self sabotage' every time I get to ahead of myself, by running my mouth 💯 blah blah blah; always beside myself.
Aye' they say "God is next to Cleanliness" if that's true it'll be impossible for me to be beside myself haha 😄
Its all fun and games 🎮 🙃
01/02/2025
Midday
Light Increased: 560watts (max) for this power supply. I disconnected the 1200watts one for each light is 600watts. It's currently half-power with 600watts max for two lights at 300watts each. Better than having mishaps with the full power supply 1200 being turned up accidently say in a not ventilated enough little tent. I'd rather pass on that anxiety 🙃
Plants: Under jerry cans with dli at 20.
This should by dinfintion let them gather themselves for 3days; while the sun is blazing outside the can. Even though I could lower the light. I think the high light intensity outside the cans the plants know.
Midday VT
MS looks likes shes a clone 😳 👀 but she ain't!
One day I will get these protocols right. But atm ; atlas, it's all in jest n fun!
MS defiantly looks like a clone but she's not; i have taken pictures since she hatched everyday
03/02/2025
Midday
Freaky Pablo and The future 2 germinated
Sprayed with weak solution of Hydroclonic Acid + h202 very mild.
Now the fun begins!

Likes
79
Share


@Belverde
Follow
(At the end of the photographs there is a video .. if you look at them enlarged it does not appear on smartphones and tablets)
All by handmade..
Welcome Ganja lovers 🌍🌎🌏
We are today at the conclusion of this exciting cultivation journal
I hope you have already enjoyed the photos of these beautiful flowers 🙂
In the end they speak better than me..
But anyway..
This was a very good experience
KALINI ASIA is an amazing Kush strain 👌👌
I have grown all five seeds that ZAMNESIA sent us, each with something different..some nutrients or the specific cultivation technique..
But in the end the story was the same
Vigorous
Resistant
Great aroma
Good trichome production
And heavy buds production
🔝🔝
I went far enough beyond the timing reported by the seed bank, it could probably have affected the heat wave in the last month 🌡️🌡️🌡️
Especially K # 5 performed more like a Sativa, even in the very fox-tailed shape of the buds.
Personally I love them 😍🔥
However, apart from K # 4, all the others showed flowers with that shape.
By researching, I discovered that genetics from Asia tend to show flowers with these characteristics..
The effect is still purely Kush, and so is the flavor.
But the inflorescence production is really powerful.
The buds have grown almost entirely on each branch.
Concerning the purple / dark pink colors..
K # 1 and K # 3 did not show these shades, but as terpenes they were the same
K # 2 was the only one grown in an 11l pot practicing lst, exactly like K # 1-3, but where I used my Living soil..
Its colors ranged from rosy to purple, and it was a sight to behold as it slowly depleted all nutrients.
To be honest it is the best and with the most delicious scents of all five 🙌
To its detriment, however, it has a much lower production than its two sisters in 11l..
[ For lovers of numbers I will report some data later ]
K# 4 also presented colors tending to pink / purple, less marked than K # 2-5..
On its side it had a greater resin production 🚀
But I think the (accidental) topping has slowed her down a bit 🤔✂️
K # 5 instead was the one with the darkest purple color of all..
But now it has turned more towards a brownish / purple color..
However, I repeat..
Slightly different look
But flowers with the same fragrances and effects.
As I reported above, this strain is very Kush, so it tends to be earthy and spicy with some citrus notes in the distance.
Kush effect, sweet calm of the senses.
Personally I find it a ganja to use regardless of the time of day or the various chores done ..
Also good for sleeping : 1:
Most users will find it more suitable for relaxing moments..
Anyway
I generally use vaporizers , because I find them the top from all points of view..
And I generally vape between 180 ° up to 200 ° using mighty or ghost mv1 and sometimes dynavap m.
Top flavor and effect 🤩
However, to better assess the quality of the flowers, he always carried out a smoke test
Organic papers and filters and only weed, no tobacco or blunt..
Four weeks after the cut, I carried out a first pre-test for each single plant..
The weed was already burning very well and the ash was, and is, a nice light gray color..
This test was done precisely to evaluate drying.
To properly evaluate the flavor, especially with varieties with Kush-style terpenes, I wait at least two months after cutting..
So I did another test for each one, and the taste was great 👌👌
In the video you saw I instead decided to roll a nice two-gram joint, with a mix of all five flowers 😎😁
Solo test 🛸
All excellent : 1:: 1:: 1:
I love Kush so I'm biased
A really good variety that I can only recommend !
.......... ......... ....... .....
About the nutrients
Leaving aside the one grown in the Living soil, all the others drew nutrients mainly from the fertilizer that ZAMNESIA sent us..
The MONSTER-MIX
What to say..
Really a great product
Extremely easy to use
With a cocoa scent that makes you want to eat it once opened
And plants really appreciate it
🔝👌💯🔥
I have never checked the pH, as I do with my Living soil, and everything went top ..
With one bag I managed to feed four of them almost entirely
In addition to the MONSTER-MIX and my Living soil, I have added all mycorrhiza plants during transplantation.
Also, from the fourth week of life onwards, I used some liquid organic stimulant.
Below I report the exact quantities I used for each product (total calculation)
For K # 1-2-3 I used, each for each one
_Rootjuice (Biobizz) 4ml
_Bioheaven (**) 7.5ml
_Topmax (**) 13ml
_Activera (**) 4ml
_Activator (Biomagno) 4ml
_Biomass (**) 0.5ml
_Voodojuice (Advanced Nutrients) 6,5ml
_Piranha (**) 6.5ml
_Tarantula (**) 6,5ml
_Rinhoskin (**) 15,5ml
_Sensizym (**) 13ml
_Molasses 23ml
For K # 4-5 something less (total sum values, each)
_Rootjuice (Biobizz) 3ml
_Bioheaven (**) 7.5ml
_Topmax (**) 6.25ml
_Activera (**) 3ml
_Activator (Biomagno) 2.25ml
_Voodojuice (Advanced Nutrients) 2.25ml
_Piranha (**) 2.25ml
_Tarantula (**) 2.25ml
_Rinhoskin (**) 6.75ml
_Sensizym (**) 6ml
_Molasses 10,5ml
Regarding mycorrhias, I have used an Italian patented product for many years which is called Micosat F 👌👌👌
I spread about 10g in contact with the roots
On top of that, I just washed it down with normal water
.......... ......... ....... .....
Always remaining in the field of numbers, for lovers of the sector I report below the various days of vegetative, flowering and respective quantities by weight of the flowers (weighed after drying, precise manicure and maturation of two months in a glass jar)
K # 1/2/3
_VEG STAGE: 6 weeks
_BLOOM STAGE: 10 weeks
K # 4
_VEG STAGE: 5 weeks
_BLOOM STAGE: 10 weeks
K # 5
_VEG STAGE: 4 weeks
_BLOOM STAGE: 11.5 weeks
Regarding the final production, I report the various weight systems below
_K #1 52g
_K #2 31g
_K #3 55g
_K #4 21g
_K #5 41g
As lighting I first used a 205w Optica2 led panel in the vegetative phase, but in addition to them there were also two other plants
During the flowering phase I switched to using two Black-dog LED panels, each of 200w
But even in this phase, the girls divided the light source together with another plant (CORAÇÃO BRASILEIRO diary...55g dry buds) and two more in the last week ..
So , 400w for six plants
💡💡💡💡 × 🌿🌿🌿🌿🌿🌳
Personally I am more than satisfied with the yield compared to the final quality.
.......... ......... ....... .....
What to say more
To be honest, this genetics literally surprised me
I can only recommend it to everyone and, even if you don't find the purple phenotype, don't worry too much ..
However, you will have a lady plant in your hands who will be able to give you many large and fragrant flowers ..
Thanks to Grow Diaries and especially Zamnesia for this opportunity 🙏
And thank you all for appreciating : 1:: 1:: 1:
I am looking forward to other similar competitions..
Because personally, every day of these weeks has been a victory.
Having the chance to grow cannabis is already the biggest reward 💚
Until next time..
Stay connected 😎
Ciao ✌️
🇮🇹
.
.
.
(The support sticks used, which were a little too long, were unfortunately the only ones I found during lockdown)😅

Likes
14
Share


@goeser
Follow
At least one if the ladies is ready to harvest. Just made a final check with the microscope and i think she is ready. I could wait a bit more for more amber heads but i think thats ok.

Likes
7
Share


@EaRtH
Follow
3.4. - Watered 💧
6.4. - Watered 💧 also flushed all Banana Purple Punch.
3.4. - 9.4.2025
Likes
79
Share

@RockoCalenberg
Follow
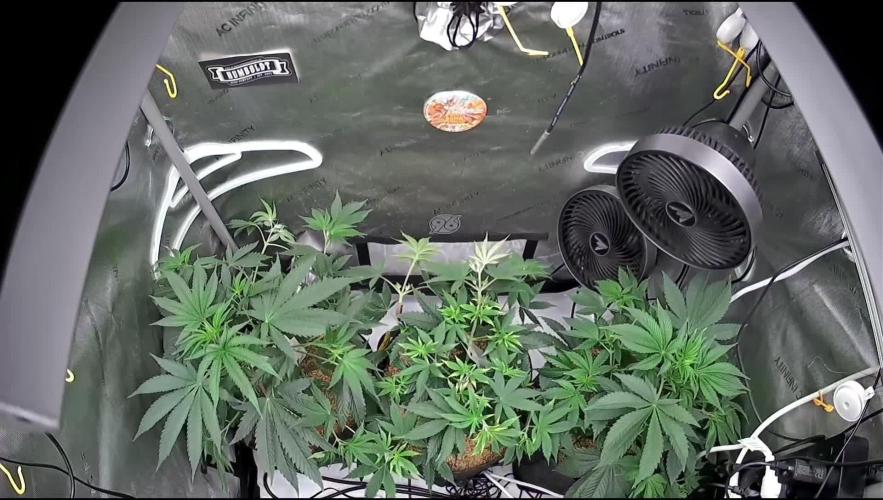
🌱 Tag 88 | 🌸 Blütetag 44
Drei Pflanzen, drei Persönlichkeiten
Während Strawberry AK und Chicken & Waffles zunehmend kompakte Blütenstrukturen ausbilden, bleibt die Fruit Bomb Punch ihrem sativalastigen Erscheinungsbild treu. Ihre Colas wachsen eher länglich und speerförmig heran und wirken deutlich unruhiger aufgebaut als die der beiden Konkurrentinnen.
Die Fruit Bomb Punch ist sozusagen der Struwwelpeter im Feld und zeigt am deutlichsten, dass sie ordentlich frühstückt. Als größte Verbraucherin im Grow hinterlassen die ständig wechselnden Bedingungen bei ihr auch die sichtbarsten Spuren. Trotzdem arbeitet sie unbeirrt weiter an ihren XXL-Buds und legt Woche für Woche an Blütenmasse zu.
Die Strawberry AK bleibt der ruhige Vermittler zwischen den Extremen und zieht ihr Programm ohne großes Drama durch. Sie entwickelt ihre Blüten kontinuierlich weiter und hält sich dabei angenehm aus jeder Diskussion heraus.
Die Chicken & Waffles hingegen steht weiterhin tiefgrün im Zelt und wirkt, als würde sie sich über das ganze Klima-Chaos der letzten Woche eher amüsieren. Frech grinst sie in die Kamera, als hätte sie von all den Schwankungen überhaupt nichts mitbekommen. Während die anderen beiden hier und da kleine Spuren der wechselnden Bedingungen zeigen, macht sie einfach stoisch ihr Ding und sieht dabei aus, als wäre alles exakt nach Plan gelaufen. 😄?🌱
Auch beim Klima gibt es Neuigkeiten: Der lange erwartete Luftentfeuchter ist endlich angekommen und wurde direkt ins Setup integriert. Nach den feuchten Wochen zuletzt war es höchste Zeit für Verstärkung. Ob er am Ende der erhoffte Gamechanger wird, muss sich allerdings erst noch zeigen. Für den Moment heißt es beobachten, Daten sammeln und schauen, was der neue Mitspieler im Team tatsächlich leisten kann.
Auch wenn die Bedingungen zuletzt nicht immer ideal waren, stehen die drei Damen insgesamt besser da, als man es nach einer Woche Wetter-Achterbahn erwarten würde. Die Buds stacken weiter, die Harzproduktion nimmt sichtbar zu und beim Öffnen des Zelts wird man inzwischen von einer ordentlichen Terpen-Wand begrüßt. 🍓💥?🌱
Day 88 | 🌸 Flower Day 44
Three Plants, Three Personalities
While Strawberry AK and Chicken & Waffles continue to develop increasingly compact flower structures, Fruit Bomb Punch remains true to her more sativa-leaning appearance. Her colas are growing longer and more spear-shaped, appearing noticeably less uniform than those of her two competitors.
Fruit Bomb Punch is somewhat the wild child of the field and makes it most obvious that she enjoys a hearty breakfast. As the hungriest plant in the grow, she also carries the most visible marks of the constantly changing conditions. Nevertheless, she keeps pushing forward, working relentlessly on her XXL buds and adding more flower mass week after week.
Strawberry AK remains the calm mediator between the extremes. She quietly goes about her business, steadily developing her flowers without creating much drama along the way.
Chicken & Waffles, on the other hand, is still standing deep green in the tent and looks as if she's rather amused by all the climate chaos of the past week. She keeps grinning cheekily at the camera as though she hasn't noticed any of the fluctuations at all. While the other two occasionally show small signs of the changing conditions, she simply carries on as if everything is going exactly according to plan. 😄?🌱
There is also some news on the environmental front: the long-awaited dehumidifier has finally arrived and has been integrated into the setup. After the persistently humid weeks, reinforcements were long overdue. Whether it will turn out to be the game changer I'm hoping for remains to be seen. For now, it's time to observe, collect data and see what the newest member of the team can actually bring to the table.
Even though conditions haven't always been ideal lately, all three ladies are looking better than one might expect after a week of weather-related ups and downs. The buds keep stacking, resin production is visibly increasing, and opening the tent now comes with a proper wall of terpenes. 🍓💥?🌱



Likes
6
Share


@Heybuddy
Follow
Wanted to learn to super crop this grow so went ahead and did the 4 main stems. I was blown away by how quickly she recovered. Such an amazing plant and the end result looks awesome!
Introduced nutrients to the autopot reservoir a week ago today.
In a couple days I’ll put up a net and start spreading things out. Maybe 2 weeks to start 12/12.

Likes
19
Share

@Flavors
Follow
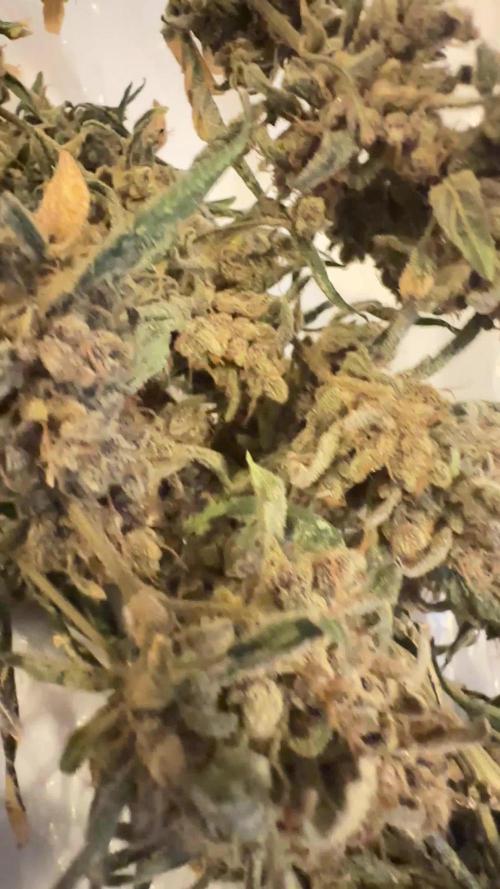
Harvest day finally came 🌿✂️🎉 — Mephisto’s Grape Wedding Force came down looking gorgeous 💜💎. The colas are dense and frosty ❄️🌸, with that signature grape-candy aroma filling the room 🍇🍬.
Trim went smooth ✂️👌 and buds are hanging to dry in perfect conditions 🌡️💨 (around 60°F / 60% RH). Trichomes are glistening ✨ and colors are rich — a perfect finish to the run 🌈🌿.
Now entering Week 1 of cure 🌱➡️🍯. Buds are in jars, burping daily

Likes
15
Share


@HollowSource
Follow
Roots started to show at the base of the pots so I've moved her into her penultimate pot now. Next stop the smart pot.
Her stem is firming up lovely and she's starting to show some lateral growth. Overall she looks really healthy. Once the other seedlings catch up a bit ill start to ramp up the light.
LST will start soon!
Likes
6
Share


@Bluemels
Follow
Tag 45: Ich beginne mit dem Scroggen der Pflanze, ich habe dafür das Netz eingebaut und etwas entlaubt. Doch die Cookie Gelato sieht nicht mehr so Vital aus , vermutlich war die Lampe etwas zu dicht, zur Stressbehandlung gebe ich jetzt noch Alg a mic in das Gießwasser. Ich hoffe sie erholt sich noch 😱