Likes
10
Share
@Smokwiri
Follow
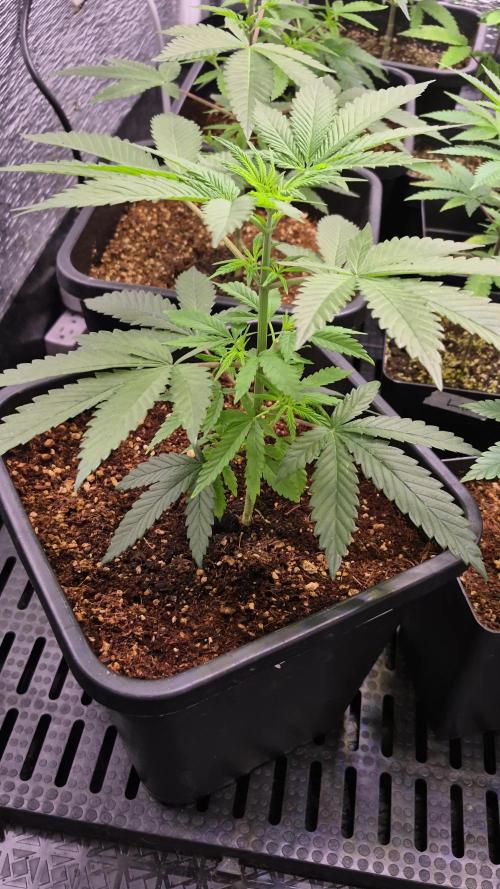
Welcome to week 4 of my Super Silver Haze diary (day22 from germination) Genetics by: Zamnesia seeds Looks great, nice and tall already. Going to flip to 12/12 schedule today, otherwise it will get bigger than 1meter. Last watering was last week, waiting for the soil to dry out a bit before next watering.
Likes
7
Share
@Bluemels
Follow
Tag 75: Die Pflanze sieht echt schlimm aus 😱 Ich hoffe das meine Rettungsmaßnahmen bald Wirkung zeigen 😕 Tag 80: Auf anraten habe ich mir eine ph pen usw. gekauft. Der Ph wert liegt bei 8 😱 ! Deshalb werde ich keinen Calmag Dünger mehr verwenden. Und den Ph wert einstellen müssen und abwarten...
Likes
13
Share
@Oyziphar
Follow
FLOWERING First week of flowering. The first flowering phenomena are visible in the tops of the plants.😜 -------------------------------- GROWTH The plants are still growing rapidly. To keep the size of the plants somewhat at the same height, I use the following techniques: 😷 1. Removal of the side branches (Defoliation) -Small plants: I remove almost all side branches. In this way the small plants do not have to spend energy in the growth of side branches. -Large Plants: I don't remove anything. The plants will put energy into the growth of side branches, so the plants will not grow too fast in height. -Other plants: I remove the side branches in proportion to the size of the plants. In the course of the following days, I gradually remove all low side branches! 2. Tying the branches (Low Stress Training) -The smallest plants grow straight upwards. -The largest plants are tempered in their growth, after I have tied them to the plant sticks with the help of plastic plant binders. On DAY 5 the plants vary in length between 23 and 41 cm -------------------------------- AIR HUMIDITY 😨 When the lights are on, it gets nice and warm in the growing room. To keep the humidity at the desired level, I have two 7.5 liter humidifiers working almost continuously. In less than 24 hours I have to refill them. As long as the plants do not have real buds, I like high humidity so the plants to keep a low VPD. -------------------------------- WATER and NUTRITION 😱 Due to the high humidity, I don't have to give that much water. Every 2-3 days I give 1.25 liters of water per pot. I add 3 tablets of Easy Grow Booster to 10 liters of water. I divide this mixture between the 8 pots. This week I gave 2 x water. !!! The WATERING VOLUME PER PLANT PER 24H above, is in fact PER POT (4 POTS) !!!
Likes
15
Share
Hallo zusammen 🤙. Sie wächst sehr schön und macht keine Umstände.
Likes
46
Share
Hey, cannabis enthusiasts and connoisseurs! 🌿🔥 The journey with our Runtz F1 has been nothing short of legendary, and now we’re at the stage that every grower eagerly awaits—the trim and smoke report. This Runtz F1 has delivered beyond expectations, and I can’t wait to share the details with you. Let’s dive in! The Trim Process 🌾✂️ The trimming process was an experience in itself, filled with care and attention to detail. Here’s how it all went down: • Breaking Down the Branches 🌿: • First, we carefully broke down the plant into manageable branches, making sure to preserve the integrity of each bud. The structure of the Runtz F1 made this easy, with its dense, compact colas ready for precision trimming. • Trim Bin Magic ✂️: • Using a Trim Bin, we meticulously trimmed away the sugar leaves, leaving behind only the most beautiful, resin-coated buds. The Trim Bin isn’t just a tool; it’s a game-changer, allowing us to catch every last bit of precious kief that falls during the process. This extra kief is like a bonus for those special moments when you want to add a little something extra to your smoke. • Preserving Terpenes with Grove Bags 🛍️: • Once trimmed, the buds were placed into Grove Bags for curing. These bags are revolutionary in the cannabis world, designed to lock in terpenes and keep your buds fresh for the long haul. Unlike traditional jars, Grove Bags use a special TerpLoc technology that creates a perfect microclimate within the bag, balancing out oxygen and moisture levels. This means your buds cure evenly without the need for burping, preserving that incredible citrus terpene profile we’ve come to love from the Runtz F1. The Legendary Smoke 🌬️🔥 Now, let’s talk about the smoke—because this is where the Runtz F1 truly shines. • Flavor Explosion 🍊🍋: • The moment you take your first inhale, you’re hit with a symphony of citrus flavors. It’s like walking through a citrus grove with the sun shining down—notes of oranges, tangerines, and lemons come through strong, each one distinct yet harmoniously blended. But the magic doesn’t stop there; an underlying hint of vanilla sneaks in on the exhale, rounding out the flavor with a creamy, smooth finish. It’s an experience that dances on your palate, leaving you craving more. • Aroma 🌿🌸: • The smell is just as captivating as the flavor. As soon as you open the Grove Bag, the room fills with that zesty citrus aroma, complemented by a subtle sweetness from the vanilla undertone. It’s the kind of smell that makes you pause and appreciate the craft that went into growing this plant. • The Effects 🌟: • The effects of the Runtz F1 are as balanced as its flavor profile. Expect an initial wave of uplifting energy—perfect for daytime use or when you need a creative boost. As the high settles in, it mellows into a relaxed, yet focused state. It’s the best of both worlds: energizing without being overwhelming, and calming without knocking you out. This makes it an ideal strain for those who want to stay productive while still enjoying a potent, flavorful smoke. Final Thoughts and Invitation 🎥✨ The Runtz F1 has proven itself to be a true connoisseur’s strain—a perfect blend of flavor, aroma, and effects that’s both complex and satisfying. This was a journey that showcased the importance of patience, precision, and care, from germination all the way to the final cure. If you want to dive deeper into the entire process, from the first week of veg to the final trim, I’ve documented it all on my YouTube channel. Join me there for a closer look at how this incredible strain came to life, and learn more about the tips and techniques I used to bring out the best in these plants. Thank you to everyone who’s been part of this journey, from the community to the amazing brands like Gro Diaries, TrolMaster, Aptus Holland, Kannabia, and more. Your support and tools have been invaluable. Remember, the magic is in the details—so never stop learning, growing, and enjoying the fruits of your labor. Stay positive, stay curious, and keep spreading the love! 🌿💚 #RuntzF1 #LegendarySmoke #CannabisConnoisseur #GroveBags #TrimMagic #StayPositive #GreenMagic #YouTubeJourney Germination method 🌱 @thecannakan Genetics Runtz F1 @zam.nesia Runtz auto @kannabiaglobal Nutrition @aptusholland 🌿 @aptus_world 🌎 @aptus_es 🌍 @aptusbrasil 🌱 @aptus_thailand 🌿 @aptus_portugal 🌳 @aptususa_official 🍀 @aptusplanttechnz 🌺 @aptusplanttechaus 🍃 Ambient controls🎮 @trolmaster.eu @trolmaster.eu.support @trolmaster.support @trolmaster.agro Soil @promix_growers_eur @promix_cannabis LED - @lumatekeu Watering- @autopot_usa @autopot_global Love and attention- @dogdoctorofficial #aptus #aptusplanttech #aptusgang #aptusfamily #aptustrueplantscience #inbalancewithnature #trolmaster #trolmastereurope #trolmastersecrets #Autopots #RuntzBattle #KannabiaVsZamnesia #GreenJoy As always thank you all for stopping by, for the love and for it all , this journey of mine wold just not be the same without you guys, the love and support is very much appreciated and i fell honored and so joyful with you all in my life 🙏 With true love comes happiness 💚🙏 Always believe in your self and always do things expecting nothing and with an open heart , be a giver and the universe will give back to you in ways you could not even imagine so 💚 More info and complete updates from all my adventures can be found ⬆️ link in the profile description ⬆️ Friendly reminder all you see here is pure research and for educational purposes only 💚Growers Love To you All 💚
Processing
Likes
15
Share
@vibealive
Follow
Finally moved into the new place... Can't wait to get the 4 x 8 setup then! This one has put on a TON of weight this past week... and is stinky and HARD man... REALLY stoked to chop it down!!!! :D Thank you SO MUCH Sweet Seeds! :D
Processing
Likes
62
Share
Week 6 - The Purple Power Is No Longer The Tallest In The Forest But It’s Still The Prettiest. The Purple Power Has Been Dethroned By 4 Of The Other Plants. Everyone Except For The Gorilla Glue Is On Bloom Nutrients. Height: Gorilla Glue: 19 Inches Purple Power: 28 1/2 inches Girls Scout Cookies(3gal): 30 inches Lemon OG: 34 1/2 inches Girls Scout Cookies(5gal): 34 1/2 inches Stardawg: 33 1/2 inches These Plants Are All Correct Measurements Size May Look Different In Picture Because Of Pot Size.
Processing
Likes
12
Share
Germinating looks good they were 1" long when I put them in super soil. Cover with cloche for a few days. Autoflower are supposed to go in the final pot. No transplanting. Got good seed from Crop King. We will see!!
Likes
7
Share
@UgoGrower
Follow
I was on hollidays for all the week, i was thinking that the survive of rhe pla t would be very hard, but it’s ok. She feels very well, and beggin the flowering.
Likes
70
Share
All feeds with nutes use either a whole ratio or combination of "Veg Mix" and "Bloom Mix"concentrates DILUTED in water until a total ppm of add in is reached using a (Total Dissolved Solids)TDS Meter measured in PPM (parts per million). The "Veg Mix" concentrate will eventually be added in smaller ratios and "Bloom Mix" concentrate what will eventually replace the "Veg Mix" concentrate entirely with the ppm and ratios listed when I feed. Veg mix recipe is on week 3. Bloom Mix recipe is on week 5. Day 56 Took some glamor pics with black background - not really for vanity (although there's a little) but for contrast. I see more of the lockout issue better in the pics this way. - on that note, the ph seems to be working as it's been two days since defoliation and knitting needle ph correction, and the progression is way slower than it was on the last leaves at 3rd day of identifying. So with that, room VPD of 1.07kpa seems stable enough with temps about 76F/65%RH/33%ILV I released the binds today to let her grow without them until they crowd each other too much and I need to restrain - so in a couple of days at max. Day 62 Transfer day. Although at first I didnt think I would be able to until Saturday, I got pots and plant saucers today, so I ended up going ahead and doing it. Started by calibrating/testing both meters. Double checked the soil mix from yesterday as the last time I used wood ash the ph rose the day after... however this time it was fully mixed to I wanted to know if there would be a higher ph - it was the same as yesterady - 5 reading avg of about 6.35 - the slurry of 1:1 soil and 7.7 ph water was tested at 6.3 also. Made about .75 gallon of 75/25 veg/bloom juice water at 500ppm feed water. Tried to ph read the soil in the pot and seen it go from 6.6 down to 6.35 (took video) in the dry soil, so I decided to use the 6.35 new soil reading and ph balanced the feed to that. Used the needles since it was 7 days since the last feed and I am using such a small amount. Poured over needles in 8 places and pulled each out to let water down. the vacuum pulls the water down when I lift the needles. Then I mixed 5tsp of Dynomyco to the 5 gallons of new soil and mixed really good. I placed a layer of perlite on the bottom of the 10 gallon pot and then layered in some soil. Then with the help of my wife we pulled the plant out of the pot and placed it in the 10 gallon. I place back in the tent and added about a quart of plain de-chlorinated water evenly over the new and older soil to help bind them. I reduced lights by 100ppfd to have about 505 and 500 at center colas and 430 lowest on outer ring with most at 450 and 470 highest. Soil to light is 35 inches and the plant is about 14 inches so about 21 inches from leaves to lights. I left the ring off today and will rebind as needed tomorrow after she rests. Today the leaves look wilted and limp. Also reduced humidity to 60% so 58 to 65% should be the range and the temps are 73F with the lights lower. PPFD was higher with the new growth - unbound and tucked in for better cola/light position, it reads 570 to 580 on outer colas and 590 at both center branches Day 57 Getting 1 more day out of free range growth before I tie her back against a ring. So in that time I decided to take a few vanity pics. Overall the ph block seems to have slowed or stopped and she's back to growing again. Will be thinking about flip at the end of this week or so. VPD same stats 76F/65%RH/33%ILV - ppfd right at max so I'll likely tie her off tomorrow. 605 600 in center and 580 to 590 at the outer ring. Day 58 VPD stats mostly steady again today - 76F/65%RH/33%ILV - ppfd was checked after LST, measured 600 at each center cola and the outer ring measured between 550 and 590 most at 580 So as I said, I did LST today to bind her more out while the 4 center 4 colas fill the middle. I had to bind to the pot base instead of the ring as the colas are still a little short to reach for binds at the ring just yet. There's a lot of space to fill and a few (about half) of the out colas are sideways for now. Had a break at the center cola when I tried to pull it back for bind. I knew to hold the branch at the node but forgot to do it here and heard a "snap" ... taped the crack and moved on - will monitor obviously Day 59 Did more light LST to ensure the branches are growing where I want. PPFD was mostly the same as yesterday only now there are more colas around 560 than 580 on the outer ring with the center colas at 610 and 590 (front cola was tied down to spread more away from the ring and fill center better. vpd same as past week or so 76F/65%RH/33%ILV Last feed was on day 54 and the soil still seems damp so I will check again tomorrow for the next day. (Day 61) The broken branch doesnt seem to have affected either side of the split as both sides seem to have grown a little with little to no wilt or drooping leaves. Im hoping it heals okay and doesnt delay flip to recover more; still monitoring. Day 60 Did some light LST today by releasing the lower binds to the pot and attached as couple to the outer ring now. So far I only have to bind a few as most are already holding where i want them to. Took the tape off the split and seen I didnt seel the gap closed when I taped it so now Im considering a drop of super glue to bind the branch back in hopes it grows onto the other side again. If not at least it would be more secure than it is now. And since it's a main split for 4 colas, I dont want too restrict it by binding at the split and potentially cutting off the nutrient pathways. ppfd after LST was 610 and 600 after more LST and the outer ring is still ranging 550 to 580 with more at 560 now. VPD same as I havent messing with any of the variables. 76F/65%RH/33%ILV Soil is a bit dry and it's been 5 days since the last feed flush, so I have about 3 gallons of tap burning of chlorine now for a feed tomorrow morning. Might still update again later if I find superglue... found some superglue - tried to take pictures but I cant hold, squeeze the applicator, and film with just two hands. So the idea gets through, I did both sides. On a side note I discovered a root popping out of the soil from the top. Covered it up but wasn't sure if I should be concerned. Day 61 VPD same as it's been for most of the last week - 74F/65%RH/33%ILV PPFD was recorded after I turn the plant a quarter turn for the smaller colas struggling to get over he ring's edge to have more light. Most colas at 580 with a couple at 600 and a couple more at 550 - center colas are hitting 615 and 620, but I have plancs to reduce in the next couple of days now On that note, the root growing out of the top tells me that she's hungry and needs more root space, even if that means growing through the top of the soil. So I plan to transplant to a 10 gallon and flip after the recovery. After reviewing more of NugBucket's journal I realized this is why he moves them when growing 16 colas. New pots should be here Friday so I should be able do it on Saturday. So I prepped soil (using more Happy frog with mycorrhizal fungi already growing in it for a few weeks) with de-chlorinated tap water Started by ph testing the soil and the water (4 readings on soil at 5.03 avg) - added about 1/2 cup total of wood ash to bring up the ph , mixed and tested again - added water at (about 7.7 ph) and tested again... last 5 readings in soil was 6.24,6.3,6.35,6.37,6.38 avg of 6.328 - covered and let rest until needed. Since I plan to transplant in a few days I felt it would be best to 'lightly' feed tomorrow, again on transplant day, and again 2 to 3 days later. Since my wife was taking pics at this time, I could only find this one to show the roots growing into the perlite then we planted it in the bigger pot. -------- (Day 62 root base picture from above) I have a hypothesis that says these are so short because I intentionally tried not to move the plant without the base stand to keep it from grinding these up and allowed them to grow in the last 2 weeks. This is that test picture/results. I like the idea of better/more drainage, but thinking I am doing more harm each time I hear those gravel pieces crunch as it cuts those and forces the plant to look somewhere else for root space. Notice how the small root lines have no finer pieces or laterals grow out from these - I believe that is because they are so new in growth and that the perlite chewed up the smaller laterals even with little to no movement over the last two weeks I would like to see a root ball experiment that exposed the roots throughout the grow but for now I can see these roots do grow into the base perlite and need to be handled carefully if you want them to grow more freely or with a standard pot size. As you can see Im not root bound but my plant thinks it is and is growing roots out the top.
Likes
Comments
Share
@PharmaZ
Follow
Saturday 25th July (day 28) 9pm This time I could be home at lights on so they will have a mixed feed with a little PK. EC still low and will be upping the base nutrients starting tomorrow. 0.5ml/L - Nirvana 0.5ml/L - Calmag 1ml/L - Canna A&B 0.5ml/L - Big Bud 0.5ml/L - Big Fruits 0.5ml/L - Growzyme PH5.8 EC1.1 Run off BBM PH6.5 EC0.9 Run off Cheese PH6.5 EC0.7 Sunday 26th July (day 29) 9pm 5L of nutrients made. It is nice to be able to feed when the lights come on makes a massive difference in my management of this grow. Hopefully fingers crossed and praying to God we can get to harvest. In a few weeks i have some time off so i can really try to dial it all in. 1ml/L - Nirvana 0.5ml/L - Calmag 1.5ml/L - Canna A&B 0.2ml/L - Big Bud 0.5ml/L - Big Fruits 1ml/L - Humic Acid Plus PH5.8 EC1.2 Run off BBM PH6.5 EC1.3 Run off Cheese PH6.5 EC0.9
Likes
151
Share
@CANNASIM
Follow
------GENERAL COMMENT------ This week was very flat and steady, girls are growing very well and leafs got sharper. They have got a new defoliation session, and a bit of supper cropping to make steams stronger. Nothing fancy, just training to an even or more even canopy. ------SM.BB COMMENT------ All good, growing very well and vigorously, accidentally snap off a hole stem supper-cropping, nothing to worry about, but was a pity...
Likes
9
Share
She getting old. Stinky and chunky. Seeds are developing on time. She was hand pollinated with mace widow fem pollen from sts.
Likes
10
Share
Smells are wonderful. Might get some seeds from one of them. The short one is nothing to write home about but i really love the grapefruit smell coming from the taller gal.
Likes
14
Share
The OG Kush made it through her final week of flower...56 days in total. Super sticky and smells like a mix of limonene and pinene and a hint of sweetness on the back end. I'm definitely happy I have a couple more of these beans. Super smooth run, chunky resinous buds. Thank you to everyone that visited to check my first Grow Diary out. You made it a really cool experience ✌️☺️. https://www.instagram.com/ao.grows?igsh=MXR1dWZxMWhlNnF6bA== Check out my Instagram for clips I made for this grow.
Processing
Likes
12
Share
Checkout my Instagram @smallbudz to see the Small budget grow setup for indoor use, low watt, low heat, low noise, step by step. 07/12/2019 - Fed her 2l of 6.5PH water with 0,5ml of each Grow, Bloom, Max and Alga-mic, and 1ml of each Heaven and Vera,noticed about 10% run off, also added a green filter to the camera lens. Adjusted the light distance to 55cm again it was toooo close about 32cm. 10/12/2019 - Decided to go back and check the basics, removed led strip to give a proper 'night' time, changing light cycle to 20/4h no more 'exotic' 22/2h, re-checked the light distance every 2 to 3 days to ensure 60-45cm and I can tell all ready she is loving it. Also added home made Co2 made with 1 tsp of yeast, 3/4 tsp of sugar 700ml of warm water in a 1l bottle with a tiny pin hole on the cap. 11/12/2019 - Fed her 1.5l of 6.5PH water with 0,5ml of each Grow, Bloom, Max and Alga-mic, and 1ml of each Heaven and Vera,noticed about 10% run off. 12/12/2019 - 8 weeks have passed and no flowers I guess I'm flipping to 1212h to see if she reacts.
Likes
54
Share
So in the last couple of weeks I tried to make the night time temperature go down enough for them to turn color and they did - the sugar leaves turned a deep bluish green, really nice coloring! I harvested over a 2-day period. Day 1 I hand-plucked the sugar leaves off plants # 1, 2, & 3. Day 2 I hand-plucked plants 4 & 5, trimmed all of them and cut them down whole. I hung them to dry in my closet/former grow room with a boot tray of water with a towel for evaporation. My last grow was a disappointment in the end due to me not realizing how dry it is in the house (here in the living room it's 19% RH due to it being January in Canada and the hot water heating radiators are going full time). When they were dry enough, I did the final trimming, removing all the waste and dividing the buds into 2 classes: Top tier which are the nice tops of the big colas, and 2nd tier, which are the rest. I think I'll learn to make hash with the 223 grams of wet sugar leaves. I'll be adding more to this final entry in the coming days - this has been really tiring! Final numbers for 5 ShishkaBerry plants: Top tier buds (dried not cured) 372g 2nd tier buds (dried not cured) 150g Hand plucked sugar leaves (wet) 223g Waste (Sticks, stems, burnt leaf tips) 128g I'm basing my comments on the taste by the glove-hash I smoked - wow it's really good! I'm looking forward to next month when these buds will be ready to enjoy 😁 I'd like to thank all my new friends here and the other growers that have helped me along the way 😚 Finally, I left you with an outtake video from one of the defoliation sessions 😺 Stay tuned for updates... UPDATE 1: Today I might have made some tincture or something, not sure. I slow-roasted the dried but not cured previously hand plucked sugar leaves and crumbled them up and put them in a mason jar (51 grams 100% dry weight) and added a little bottle of Absolut Vodka (375 ml). I shook the mixture vigorously for a couple of minutes then placed it in a cool area of the house to sit for a few weeks before a first test - not totally sure what I'm doing here). UPDATE 2: Possibly made Rick Simpson Oil (RSO) out of the Alsolut vodka - ShishkaBerry mixture: I strained it so that there was no plant material, reduced it in a double boiler style, not sure what to do with the gooey stuff that's left as a result.
Likes
7
Share
Week 3 and a repot is done and now in day 3. Finally it’s settling down after the repot, which was not pretty at all😂 Hope to get some massive plants this run 🌱 ________________________________________________________________________________________ Light from @MedicGrowLED 😎 NEO 780 LED🔥 780 Watt⚡️💥 PPF of 2184 μmol/s & 2.8 μmol/J🔥 Full Spectrum V1/F1 🌈 WiFi smart connection & Smart Aura Control 😱