
Likes
2
Share


@All_about_420
Follow
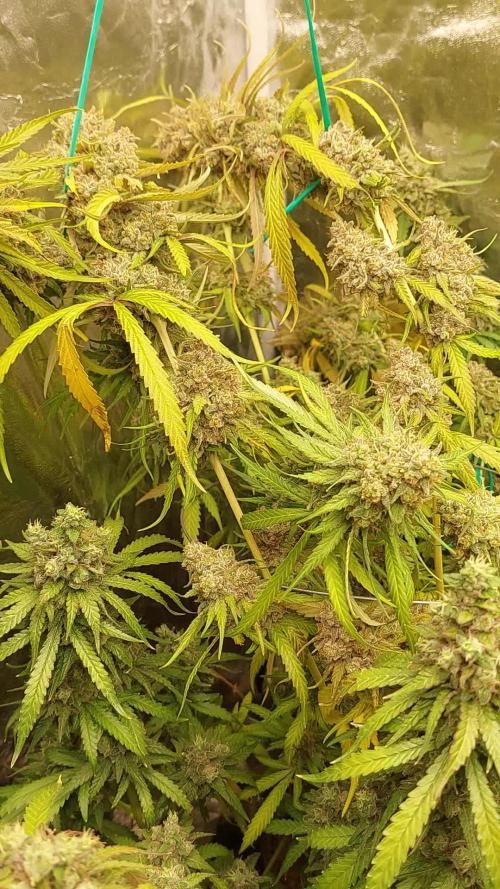
So langsam wachsen sie aus ihrem Töpfchen raus,
wird also bald Zeit für den Umzug ins neue, große Haus...
Das Blattwerk ist von unten leider etwas angeschlagen,
alles oberhalb und was neu wächst, sieht aber super aus.

Likes
37
Share


@RFarm21
Follow
11/9 - Flush 4L de água para cada. pH 6.5.
17/9 - começo das 48h de escuridão
19/9 - HARVEST DAY!

Likes
16
Share

@Z420Organics
Follow
🔥 Kannabia Grow Update 🔥
The plants are starting to show their beautiful colors! 🌈
They’re ripening perfectly — trichomes are now mostly milky, sparkling under the light ✨
We’re officially in the final stretch! ⏳
Can’t wait to see how these beauties finish — it’s harvest season vibes! 🌿💚


Likes
66
Share


@GODSGIFT_2005_JM
Follow
Powder: GREENHOUSE BIO FEEDING Line which are organic!
For LIQUIDS ******GREEN BUZZ LIQUIDS***** also organic.
Also i’m using their LIVING SOIL CULTURE in powder form!
MARSHYDRO ⛺️ has large openings on the sides which is useful for mid section groom room work. 🤩
☀️ MARSHYDRO FC 3000 LED 300W
☀️Also special thanks to VIPERSPECTRA P2000 (200W) & XS2000(240w) LED growlights
💨MARSHYDRO 6” in-line EXTRACTOR with speed-variation knob, comes complete with ducting and carbon filter.

Likes
7
Share


@balansa
Follow
I flushed my monster plant we are starting late flowering so i wanna make sure that there is no nutrient build up. And to make sure that shes gonna end up like a Bomb. Smell is good but not too strong. So the plant is perfect i have nothing to say
Likes
28
Share


@Budcrack
Follow
End off week 11, concluding week 7 off flowering:
Hi(gh) Guys! Thanks for viewing my weekly update (i hope again?)! The girls are doing great. I have to come back on a previous statement, i said that 3 girls are ahead of the rest and up for an early harvest, although that is both true, actually there straight on schedule, and i think the rest is behind. The manual on this strain says they need 9 weeks and flowering week 7 is now concluded. They start to gain weight all three and the stems are beginning to bend. This upcoming week they will get their last nutrients, but week 9 they will only get water, so i can flush properly for the upcoming week and a half. End of week 9 they will be terminated, because my vaporizer is idle for too long already!
As for the rest, they will need at least 2 or 3 weeks longer, because everywhere i look i see loads of white hairs, and i’m seeing forward to show you some off my biggest nugs ever! This is my first time on this website and i’m having a lot of fun. Earlier i'd grow my best round ever with 9 Gorilla Glue #4 ladieboys, what nice buds did they produce. But i guess the OG is going to be at least as close. That’s good for me because this is my favorite strain.
Please leave a comment, and like my post. My account needs a little more love!
Please come and see for another update next week.
(p.s. sorry for that shakie video, I was sitting on top of an little pebble with my knee, but I liked the video anyway…)

Likes
17
Share


@couplethatgrows420
Follow
did not get wet weight on this one but will update dry weight in a few days


Likes
16
Share


@Bigbankbossshit
Follow
“The Thrown” which is my tallest plant gave me some issues this week due to the fact that I had to suppress the plant because of the height.
Broke a few branches that I had to tape up which is not a problem. I break branches on the regular around here purposely for growth 😈.
Heavy rain this week, so I had to watch out for humidity issues, which I took care of. On top of that my basement flooded, had to break out the water pump.
This transition week i’m glad I was able to have more time at home to monitor my plants.
Hey guys sorry I’m not on here all the time if you like more pictures follow me on my Instagram a bigbankbossshit. I believe the link is at the top. They are about to be some really awesome pictures I’m hoping in the near future. With the six strains I’m sure to Jane some awesome pictures. So follow me on Instagram.


Likes
151
Share


@CANNASIM
Follow
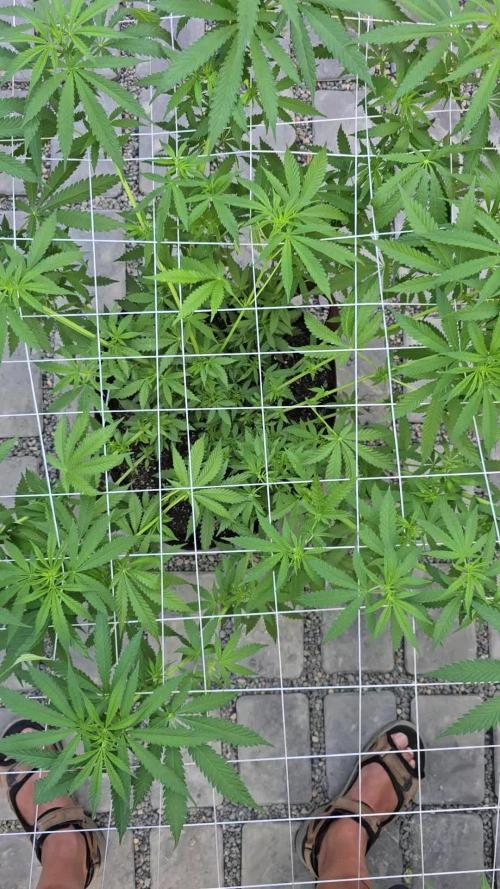
Training > topping, defoliation, and LST, using a cage for the first time, liked a lot to model a even canopy.
Girls wore grown in 15l fabric pots, I choose a higher pot so is not wide, my idea was to grow three, felt that 25l pots still ideal, the girls net bigger and have more room for the roots.
She was constant feed
> Watering 1 = Base Nutes + Recharge .
> Watering 2 = Boosters.
> Preventive Cal Mag every 15days +- .
Based on my feeling, and the leafs color I released some nutes or added so this is just an Idea on my schedule, no expressive or relevant burning.
— — —
My LED started to fail in mid cycle, so the light intensity started to vary, and i feel the matrix is not working and full potencial anymore.
At first was hard to control the RH but in a few weeks i have got a hang of it, and all went ok besides my LED.
Liked a lot this cycle, was flawless, simple and rewarding, only downfall was the weight, but everything was new, the tent, the pots size, the nutrient line, so on, so i’m satisfied.
Weight is compensated over quality, none the less she was not heavy flushed, without the cure she was already tasting amazing, butter smooth, and white ash.
When you open the jar a very pungent sweet, berry like smell comes out mixed with a pleasant cheese cake sour end.
Potency is above average, 3 hits are what I can take, a bit more and the fun is over and the experience becomes too strong for me.
The effect is just perfect for a night smoke, to me is instant, I feel mainly on the body, just want to lay and relax. Just perfect for our needs home.
Smoke is clean and easy to smoke, you feel the joy of the usual insense smell around, very strong, stealth smoking is not a option, taste is sweet and fruity, easy to overdo.
——
UPDATE 1
Vaping is a joy, the effects are more controlled as you have the temps to do that. The terpenes profile is very pronunced with the Volcano and the Davinci IQ, Pine berryes is what i taste.
At this point buds are curing woth boveda 62 for 1 1/2 weeks, then I will change the humidity pack to a dryer one.

Likes
36
Share


@MadeInGermany
Follow
Hey everyone 😊
This week they were put in the flower chamber :-).
I am curious how both phenotypes develop 😊.
I will now wait about 7-10 days until the actual flowering begins, then I will add 2 g of GHSC Powder Bio Bloom per liter of substrate.
Otherwise everything is going as it should and I'm looking forward to next week new update.
Until then, I wish you all the best, stay healthy 🙏🏻 and let ea grow 🍀👋
You can buy this Strain at :
https://sweetseeds.es/de/sweet-skunk-f1-fast-version/
Type:
Sweet Skunk F1 Fast Version
☝️🏼
Genetics:
Sweet Skunk Auto (SWS34)
X
Early Skunk
👍
Vega lamp:
2 x Todogrow Led
Quantum Board 100 W
💡
Bloom Lamp :
2 x Todogrow Led
Cxb 3590 COB 3500 K 205W
💡💡☝️🏼
Soil :
Canna Coco Professional +
☝️🏼
Fertilizer:
Green House Powder Feeding
☝️🏼🌱
Water:
Osmosis water mixed with normal water (24 hours stale that the chlorine evaporates) to 0.2 EC. Add Cal / Mag to 0.4 Ec Ph with Organic Ph - to 5.5 - 5.8 .
Likes
2
Share


@Keep_it_Cleannabis
Follow
Super excited for these to finish. The gassyness is just unreal, in flush, next week should see a ton of colors coming out
Likes
15
Share


@SweetheartOG
Follow
Girls are doing well with the LST. Kosher cake was topped last week and now has what looks like 8 heads.
3rd of June have given the girls living soil veg.
Likes
19
Share


@Chunkmasta1
Follow
These auto berry bombs are taking off quick will be throwing them in 3 gal buckets this weekend will update with week four by Monday with the growth I am getting off these my weeks will run 5 days this is the second time I have grown these autos I feel like I have The nutes where I want them and they are showing their love of the nutes


Likes
14
Share


@HanfConnoisseur
Follow
Week 3: Mid-Flowering Stage
Welcome to the seventh weekly update of our cannabis cultivation journey in Germany! As we progress into the third week of flowering, our strains—Pulp Friction, Cookies Haze, Eleven Roses, Poddy Mouth, Critical Lemon Kush, and OG Kush—are flourishing with vibrant buds and continued growth.
Key Developments:
1. Bud Development:
- The buds have significantly increased in size and density, filling out along the branches.
- Trichome production is becoming more pronounced, indicating the onset of resin production.
2. Environmental Management:
- Maintained stable environmental conditions with temperatures ranging between 20-26 degrees Celsius and humidity levels around 40-50%.
- Ensured adequate ventilation to prevent humidity buildup and maintain airflow around the plants.
3. Nutrient and Watering Regimen:
- Continued to provide a balanced nutrient solution through the AutoPot system, adjusting as needed based on the plants’ flowering stage.
- Monitored soil moisture levels closely to prevent overwatering or underwatering, ensuring the roots receive optimal hydration.
4. Support and Maintenance:
- Supported the plants’ structure with additional ties and stakes to prevent bending or breaking under the weight of developing buds.
- Continued to prune away any yellowing or dead leaves to maintain plant health and focus energy on bud production.
Growing Medium and Setup:
- The plants thrive in a blend of living soil, coco coir, perlite, and clay pebbles, enriched with mycorrhizal fungi cultures for enhanced nutrient uptake.
Next Steps:
- Monitor the development of buds and trichomes daily to determine optimal harvest time.
- Adjust feeding and watering schedules based on plant responses and environmental conditions.
- Prepare for the final stages of flowering, focusing on maximizing bud growth and resin production.
Stay tuned for next week’s update, where we’ll discuss the late flowering stage and preparations for harvest. Feel free to ask any questions or share your experiences in the comments below!


Likes
14
Share


@danwho
Follow
8/14/2024
Topped plant A due to the node spacing and side branching. Hopefully, this will cause this pheno to bush out a bit more.
Intentionally FIMed plant B due to the short internodal spacing and difficulties getting a clean cut for a topping. This plant is already quite bushy and condensed - hoping that it will respond nicely to FIM.
Water was not changed over entirely, only added one fresh gallon of nutrient water with additional nutrients added to step up entire system to close to 575-600ppm. Both plants are looking great, root zone needs some improvement with water temperatures. I have ordered a larger water cooler and hope that will help reduce the water temperature inside the tent. Although water temps are a bit high in the buckets, the roots are flourishing and are pearly white!
8/16/2024
Noticed Plant A is showing signs of potassium issues. Added one fresh gallon of non-nutrified water as I was unable to complete a water change.
8/17/2024
Pumped out 5 gallons of nutrient water and refreshed with 5 new gallons. Both plants look to be responding well to the water change. The resulting PPM was 650 after allowing time for the system to reach equilibrium. Extra insulation on the buckets is helping to maintain lower water temperatures throughout the day with lights on in the tent. The environment is pretty well dialed in at an average 1.2-1.6 VPD.
8/19/2024
Replaced water cooler with one that is twice the size and rated for 15-gallon systems. Running reservoir temp target at 18.5 C. Conducted some minor LST on the bushy plant (Plant B) to get the middle opened up a bit more. Did some leaf tucking on plant A to get the lower branches some more direct light.
8/20/2024
Both plants are looking phenomenal. There is a very slight cannabis smell in the tent at all times.
Likes
10
Share


@Aekarath
Follow
สัปดาห์นี้ผมได้ทำการเทรนต้นโดยใช้วิธี Lst ต้น ดัดยังไงก็ได้ครับให้ทุกยอดโดนแสงให้มากที่สุด พืชของเราได้จะได้เพิ่มผลผลิตได้มากที่สุด ปุ๋ยน้ำก็ปกติ ปุ๋ยผมให้ สัปดาห์ละ 2 ครั้ง ส่วนน้ำจะให้ตอนหน้าดินแห้งนะครับ อย่าลืม ปรับค่า ph ก่อนรดน้ำนะครับ
Likes
3
Share

@leithsffs
Follow
I'm not sure if this will work well or not. But, I decided to scrog this plant out to help keep the height down and to give the inner and lower growth more chance to get some sunlight. I had an extra 5 foot long piece of pvc that I use to water it. Thank goodness for extra pieces!
Yes, of course that's a homemade scrog net. It's not easy making a 5x6 net and keep it all tight. It's a bitch, it really is.
It'll be about time to reammend the soil next weekend. That should be fun to reach in there. Super happy for long arms for that chore.