
Processing
Likes
Comments
Share


@TheWeedPimp
Follow
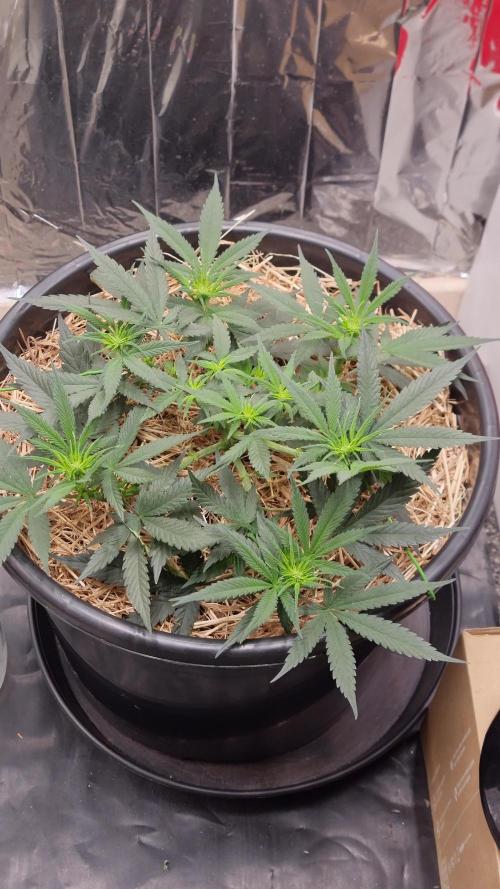
Doing a little training LST
Defoliation and toppping

Likes
9
Share


@BusyBeeFarmer
Follow
Environmental Adjustments:
Due to cool temperatures, a root heater was installed this week.
The heater also helps maintain higher nighttime temperatures, improving overall conditions.
Final Selection:
The last selection was made, removing a smaller plant with slight leaf deformities. Although the differences were minor, only one plant was retained.
Growth Observations:
The selected plant shows symmetrical and robust growth.
No abnormalities or issues have been observed, and it continues to thrive under the improved conditions.
Summary:
Week 2 marks steady progress with optimized conditions, setting the stage for continued strong development.
dein-onlineheadshop.de/
Use my referral code 420Shop at checkout to get a discount on your purchase. By using this code, you also support me, as I receive a small reward for each use. Thank you for your support!

Likes
226
Share


@JUNGLE_B4RNS
Follow
Hey folks ! Back with some Royal Queen Seeds genetics, lets blow out all their potential and make some monsters plants 😉
The plan is 12 plants of 1 square meter all in personal ScrOG to harvest 12 squares meter.
Light:
2 x Adjust-A-Wings Avenger
1 x 600w SuperPlant Super Red 85000 Lumens 2000K 1498nm
1 x 600w HPS Philips Son-t Green Power 95000 Lumens
Soil:
Platinium Royal Mix Premium Quality Oxygen+
with NPK 8-9-12
Nutrients:
-SensistarBloom, 4 in 1 concentrated gel made under nanotechnology,
NPK (5-12-15) + Cal Mag (2-2.5) + Oligos.
-Superboost PK, P-K (5-20) S (14) perfect combination of concentrated phosphorous and potassium, which contains molasses, carbohydrates, and amino acids from the sugar cane extraction. + growth regulators, vitamins and natural plant hormones.
- Diamond Sugar (3%K, 1%Mg, 4%S), active photosynthesis and promotes the formation of carbohydrates, proteins and their translocation to the fruit.
-Canna Mono Mag, essential for photosynthesis.
-Cellmax SuperEnzyme, improves the absorption of nutrients.
- Cellmax BioLush, P-K (10-12)
[Day 113]
- Water pH 6.5 (Cellmax pH- Bloom) + SuperEnzyme 1ml/1l + Diamond Sugar 1ml/1l + Super Boost PK 1ml/1l + SensistarBloom 1ml/1l Total ppm: 1000ppm
Bubblegum 1 , 2
[Day 115]
- Water pH 6.5 (Cellmax pH- Bloom)
Royal Gorilla 1 , 2
Fruit Spirit 1 , 2
Bubble Kush 2
Drain :
Fruit Spirit 1: 980ppm
Gorilla 1: 970ppm
Gorilla 2: 1050ppm
Fruit Spirit 2: 800ppm
Bubble Kush 2: 960ppm
[Day 117]
- Water pH 6.5 (Cellmax pH- Bloom)
Bubble Kush 1
Candy Kush 1 , 2
Drain :
BBK 1: 880ppm
Candy Kush 1: 1020ppm
Candy Kush 2: 900ppm
[Day 118]
- Water pH 6.5 (Cellmax pH- Bloom)
Bubblegum 1 , 2
Drain :
BBG 1: 970ppm
BBG 2: 930ppm
[Day 119]
Checking the buds looking for signs of mold by pulling on the sugar leaves to see if they hold tight or if they plug off because of rotted stem. No signs of bud rot on this first inspection 👍

Likes
42
Share


@Gabarram
Follow
155 days from seed and still harvesting the last big colas, and flushing for the parts still receiving light during 12 hours and processing more residual materials intracellularly, while hopefully ripening a little bit more. Like I told before, there are three or four colas like that in the video that were not completely exposed to light and they might not as ripe as they should be. I'll check that while smoking later after these colas are properly dried and cured.

Likes
14
Share


@Swiftgrow
Follow
Started LST on 3/6 of the plants.
Having no issues at all so far👌
Gave her some nutes twice so far at a very low dose. Currently feeding once a week. Soil holds enough nutes as is already.
Low dose Cal-Mag in every watering
- missed week 2 so I just started week 3

Likes
7
Share


@GrowGuy97
Follow
Clones off a friends plant, they where in my 2nd run diary but I didn’t have room for them in flower so I’m just gonna let them keep going till next flower run! Doing a lot of LST & topping just to try & keep her from getting out of control!
Likes
Comments
Share


@GreeneScene
Follow
Day 15 Update : Decided to grab a tape measure to check canopy heights on a whim and discovered that my light was hanging 35 inches from “Cellie” Cereal and Milk . Wowzers 👀! So I raised the plant to be 26 inches from the light that I also dimmed down to about 40% . It works out that I can try to get the most out of the end of flower stretch for the older gal who shall no more than be mentioned for reference to accentuate the great glorious glamorous “Cellie”.
The humidity plummeted after I did a major defoliation of the older gals so I adjusted the airflow rate of the lower in-line fan and the upper inline exhaust fan with the carbon filter .
I lowered them both to the lowest setting & the humidity returned to “normal”
Let me explain my reasonings/thinking behind my adjustments which are experimental at BEST.
It’s worth also mentioning without having to preset a single thing on my 70pint Dehumidifier located inside this tent it is legitimately only plugged into my PRESET humidistat controller which is set to 50%-46% RH WITH an alarm on highs of 55% and lows of 43% . In real life what this translates to is when this humidity controller triggers the dehumidifier ON @50%RH immediately the fan of the Dehumidifier begins running. However this does not help the rising humidity that is occurring (it will reach 55%-60.2%RH ). Given a fixed amount of time , the condenser(atleast what it sounds like . .again, it could be anything) turns on . It is when this “condenser” “sounding” component begins working that the humidity IMMEDIATELY plummets down to my low point of 46%
So to make a long story short the humidity gets vacuumed to 46%RH & the dehumidifier turns off, bc of the PURPOSEFUL EXPERIMENTAL TWEAKING making all air exchange fans low leveled the humidity slowly but steadily rises to 50%RH then the dehumidifier is triggered on but only the fans initially and the humidity eventually reaches 55%RH-60.2%RH & then the humidity gets all its hair snatched out by the dehumidifier and drops back down to 46%RH.
😮💨😮💨😮💨😮💨 with all that said of anybody was even interested per my tents leaf canopy height temperature average good to great OR LITE GREEN TO DARK GREEN VPD for my temperature begins @ 60 & ends @ 52 which is kind of a perfect storm for OUR GIRL “CELLIE” oooooooorrrrrrrrrrr sssssssoooooo I think/hope .
She still hasn’t needed watering since being transplanted, she should now ready and willing to stretch those toes and we need the opportunities to top water that soil a few times to make those dry amendments available to her .
More pics of later the week coming as we go . . Hopefully . Diligence is a practice
Day #17: giving her some water today, no specific amount just until she feels the right amount of “heavy”. She was given 3 different batches of water once ph’d to 6.3 once ph’d to 6.7 one ph’d to 6.5. She’s grown an inch in 2 days.
Also swapped out the smart hygrometer system to a different brand . So far it has all the capability I was looking for but I need to run 2 more experiments to know for certain it lives up to my needs and its price tag 😁
Day 18 Update: she grew an inch taller nice 👍
The smart hygrometer system has reported/experience Bluetooth failures twice already(although I don’t know exactly what that means considering I purchased this for it’s Wifi capabilities )
I didn’t think to check it whilst I was away so I cannot yet say If it meets my final expectation/need
I bought a soil ph meter & it indicates “my mix” is at 3.1 ph 👀 hmm 🤔 I’m wondering if this is a must fix or can I get by .eventually she will be transplanted and at that time I can use my new digital soil ph probe to construct her new blend moving forward but I am curious is I mixed another batch at 3 something ph would it matter ?
In the beginning I wasn’t ph’ing any of my watering just because I assumed my soil mixture was highly acidic because of the 70ish pecernr peat moss base . I also assumed that it would be acid fixing for the water I put in it and therefore wouldn’t need to ph it and I did just fine just giving plain old tap water when thirsty until I experience VPD issues & in an effort to pinpoint what my exact issue was and how to fix it I of course eliminated all the variables and dialed in on my ph of my feed water and now my soil so it leaves me wondering does the soil need to be relatively 6.1 ph or is the 3.1 I’m flying at alright also . I checked the other 3 currently in here getting through flower & two of them are in the 3’s for ph & one of them is 6.2(the largest of them all) how ever she was the largest of them all always and oddly enough I mixed one big batch for them and transplanted them at the same time so I get two of them having the same ph as “Cellie” but the other that is in ph heaven is an oddball
Should I top her here or supercrop later hmm I need to decide my vision for this thing
Day 19 Update: ponytailed her youngest internode for about 16hrs she aggressively popped out of it twice ! It didn’t even work for 24hrs when I try it again it’ll be before the internode is so strong . Also rigged up a 16in oscillating wall-fan that currently being held with 2 zip ties , 2 rubber bands , & a smidget of duct tape and MAJORITY OF FAITH keeping it in place . The biggest plus to my added circulation is that I got the 16in fan for ! A win is a win . Pics uploads will be held for the next 3 days until the end of week 3 upload .
Drop a thumbs up
Day 20 Update : THE FAN FELL! But no one was damaged or injured . I re-rigged it . This time with duct tape , 3 popsicle sticks , 2 heavy duty zip ties & 1 regular strength zip tie . SHES SOLID NOW 😂 I did some solid rigging this time & have videoed my handy work .
Also I forgot to turn my A/C back on before leaving the house so temps and humidity skyrocketed and swung for 9 hours until I got home . The temp in the tent was 84.4 and the humidity went from 42.4 to 57.5 to 42 every three mins.
Day 21 Update : SHES A PRETTY GIRL. RQS says Cereal Milk is a slightly sativa dominant hybrid but the pheno of this particular seed seems to lean more towards indica I’m not mad at it ! I’m getting more stoked to see what she can do. She still hasn’t received any additional water since day #18.
Likes
13
Share


@Alpha_Green
Follow
Some of you may have wondered:
Why do I use CO2 at average 950 ppfd μmol/m2/s (moral flow)?
The answer is quite simple. Because of lack of space in some regions of my cultivation area, I simply cannot keep the ideal distance to my Sanlight high-performance lamp, due to some height growth of various strains. And so some of the main colas have ppfd values of 1250 μmol/m2/s and even more...
So this is how I manage to achieve and compensate for such high radiation levels even with a CO 2 balance. And I have to say, my strategy to avoid various light stress symptoms works just fabulously. In combination with CO 2 implementation, my babies are simply unbeatably insensitive to light. Thats it!
Beginning of 3rd week flowering:
Again feeding my babies by 36 hours fermented potions of Bio Tabs Kompost Tea PK-Booster (15 g pro Liter) and added:
5ml Orgatrex/Liter
1 Spoon of Bactrex
1 Spoon of Mycotrex
1 Spoon of Mycco-Vital
1 Spoon of Dynomyco
A little tip for those who are interested in small modifications that have a big difference or influence - on the result - effect - beauty - health - taste! Before adding microorganisms or beneficial bacteria or Mycorrizae and Trichodermas, please use oxygen-saturated water. On the one hand, unwanted chlorine gases evaporate and the small world of the microbiome becomes even faster and more rewarding in compost tea to sprout.
Last but not least for this week, I would like to introduce my reasons, why I prefer growing biologically and sustainably.
First of all, it’s something which suits very well in these times/days we are living now. Sustainability is a big need and task for our planet. 🌎 Nature means life. Our home, the air we breathe and everything that surrounds us. Not just today. Hopefully tomorrow as well.
Maybe I'm starting to protect our environment on a small scale, but maybe I can also make a big difference at all.
If you change the way you look at things, the things you look at change...
I thought about what’s the difference, between Mineral Feeding and Super Soil Feeding.
It’s very easy. Biologically Growing is a similar process than the natural soil activities out there in the lap of nature’s. So plants has to work and interact with the microorganisms and microbiomic communities in the soil. So the plants will never get lazy like the lazy ones of mineral feeding growers.
If you grow biologically, you will feed the soil first and the microorganisms will support every parameter next to your plant conditions. And that will generate an unbelievable spectrum of Terpenes and Trichomes you will never forget.
It’s the same comparison, when you daily visit McDonalds and you eat only fast food. How does your body and mind react on this shit for money?!?!
May I invite you to think about it…
See you next week dear Growmies! Have a nice Weekend and take care…
Peace out!
Addendum for Day 53:
At the moment we unfortunately have another winter onset here in Germany. This means that I am forced to take additional heating measures due to structural facts in order to be able to keep the temperatures constant. After all, just tonight the thermometer climbs again to -1 degree Celsius.
In addition, my exhaust air system runs out of my bedroom terrace and I therefore grow winter and summer with the patio door open. Well, sometimes I experience real weather-related challenges. But all in all, no problem...
"Where there's a will, there's a way."
Addendum to pouring out the fermented PK tea: I always administer half a liter of lukewarm aerated water with 3.5 ml of cannazyme per liter to each plant. This means that the "root machine" is not supplied with supplies unprepared and the nutrient solution can thus also be better distributed in the soil. Since I also work with cloth shoes, I spray them evenly moistened everywhere with water that is also warm before pouring them out from the outside. This has the advantage that the moisture stays where it should: in the pot!
... I did the math today ;-) We are still in week 7 until this Friday. And week 8 starts on Friday! OMG... still so much time yeahh!
Today my Fast Buds Sour Jealousy and Sweet Seeds Big Devil and Dark Devil Automatics arrived. I'm looking forward to it.
This time Fast Buds next Time Sweet Seeds. Love them too. Very beautiful genetics.
Today a review video of the beginning of week 3.
At the time of the pictures, I had minor signs of nitrogen excess. (Light peaks first at the crown of the roof and then slightly continuing to the middle section.) I then painstakingly racked my brains as to why this could be. I found that very slight dry spots had formed and therefore the root found small accumulations of nitrogen that caused its problems. But then, when I carefully homogeneously checked the moisture content in the substrate, the problem evaporated again. However, they had not shown any loss of growth rate during this time. Nevertheless, they developed as expected.
They Strawnanas had no problem with that.
In the end, I always have a hard time killing them. But I guess that's the way things go.
We live and die.
We come and go.
But it's not there yet. ;-)
Tomorrow is day 56.
Tomorrow’s updating day!
Can't wait to see their progress.
Have a good time and see you tomorrow… 🏽🕊️
🏽 ☮️🕊️


Likes
77
Share


@Puffdamagikchillum
Follow
Day 77) 12/9 End of another week. Phone is fixed and pics are back. Day 74,75,76 there were no pics due to f'ked up phone but day 77 now has pics. This girl is doing well and still growing taller but I can tell she's at the end of her stretch. Flowers are smelling very sweet like berry and a hint of pine and candy and just sticky as hell. Buds are elongating up and down the stem with a nice 12-15 inch length but buds are forming and fattening slowly, could be the sativa side of her. Still drinking a gallon a water 💦 a day with nutes. Daily temps and humidity fluctuations may be a cause of slow bud growth and it may be my fault for trying too hard to keep environment inside tent and outside tent to the exact same but in reality according to natural science and popular findings it's evident that a swing in these conditions of not much more than 10 degrees/percent is expected between light and dark (silly me!) So I will let nature take its course but will be very watchful. Hope u all are still watching and taking a peek now and again.
Happy Growing and
Happy Harvesting


Likes
16
Share


@NMGDOC
Follow
Semana del 1 al 7 de marzo.
Lo apunto aquí porque sino luego no sé ni en que semana vamos jaja 😂
Las primeras fotos y vídeo son del inicio de la semana. Hemos retrasado el cambio de una semana a otra, ya que por el lavado de raíces no las pudimos alimentar antes.
Luego cambiaremos el PH a 5,8-9 y el EC también lo aumentaremos.
Edito: al final no lo hemos aumentado porque respondían bien y estaban recuperándose.
Respecto a la semana anterior, se ven mucho mejor después del lavado de raíces. Algunas plantas están muy bajitas, así que la luz para las más bajas está a 65 cm.
Mañana o pasado aplicaré jabón potásico con aceite de neem a modo de prevención. La vez pasada, que era mi primera vez plantando, llegaron trips y al final resultó todo bien, pero si no llegan los bichos, mejor todavía

Likes
14
Share


@BLAZED
Follow
Week 2 (7-2 to 13-2)
7-2
Watering: None.
No pictures.
8-2
Watering: 70 ml.
9-2
Watering: 20 ml.
No pictures.
10-2
Watering: Kush#1: 62 ml. Kush#2: 65
No pictures.
11-2
Watering: None.
12-2
Watering: Kush#1: 70 ml. Kush#2: 68
13-2
Watering: Kush#1: 68 ml. Kush#2: 68


Likes
Comments
Share
@SpliffDoc
Follow
She got flipped on day 36. Saw pistils a couple of days later. She isn't big, but she's a beauty. I think this strain would be better left to grow naturally rather than pissing around LST'ing. The response hasn't been what i expected. The proof is in the end product though so let's see😁🏻
Likes
Comments
Share

@HOME_GROWBOOK
Follow
Wir starten in die BW 5 Pflanzen sehen sehr gesund aus. LST ein wenig nachjustiert.
Richtiger gesamt Bericht Ende der Woche
Likes
27
Share


@Lady_NugWitch
Follow
I took a ton of fan leaves off and you can't even tell! 😃 they are beast❗

Likes
23
Share


@M_J_KllrAutoSystems
Follow
These girls I’m sure are going to be my new #1 and possibly #2 for harvest’s
(DAY4) fill water
Processing
Likes
6
Share


@eldruida_lamota
Follow
Esta semana quitamos productos, que termine bien de chupar todo el alimento, y que hinchen ya estás últimas semanas.
.tambien lavaremos la raíces esta semana para quitar el alimento sobrante y las sales acumuladas.
Empezaremos con el ESTRÉS HÍDRICO:el cual cada vez que regamos, regamos menos cantidad , así La Niña resina estas últimas semanas. Os incluyo vídeos.
Likes
29
Share


@Smokwiri
Follow
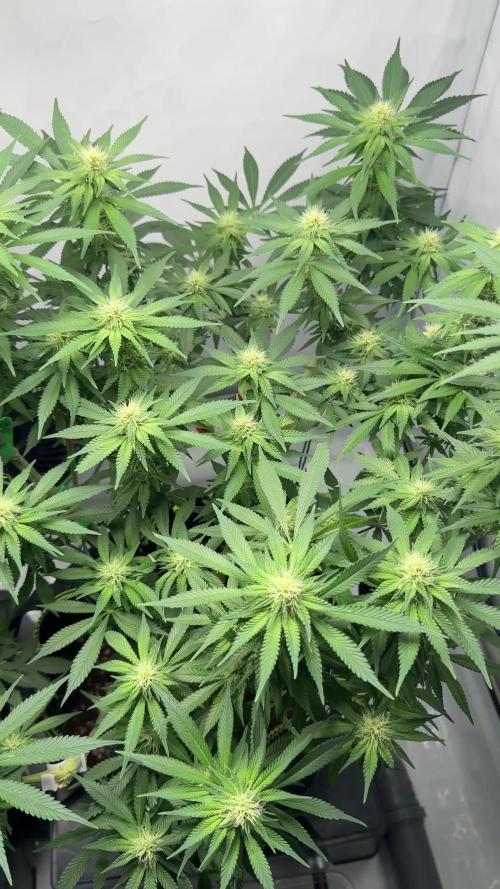
Welcome to week 10 of my Runtz gum by original sensible seeds.
Plant looks great, i love it, just a couple weeks before harvest, planning some minor defoliation and adding some ghe terra aquatica pro bloom booster to the menu this week.
Viparspectra discount:
Amazon: http://url-9.cn/0y9i
Amazon US: https://amzn.to/3e0P2bk
Amazon CA: https://amzn.to/3bTnEJC
Amazon discount Code:
it10smokwiri XS1000 10%
XSsmokwiri XS1500 8%
it20smokwiri XS2000 5%
it40smokwiri XS4000 5%
