Check the winners The Grow Awards 2026 🏆
Likes
Comments
Share
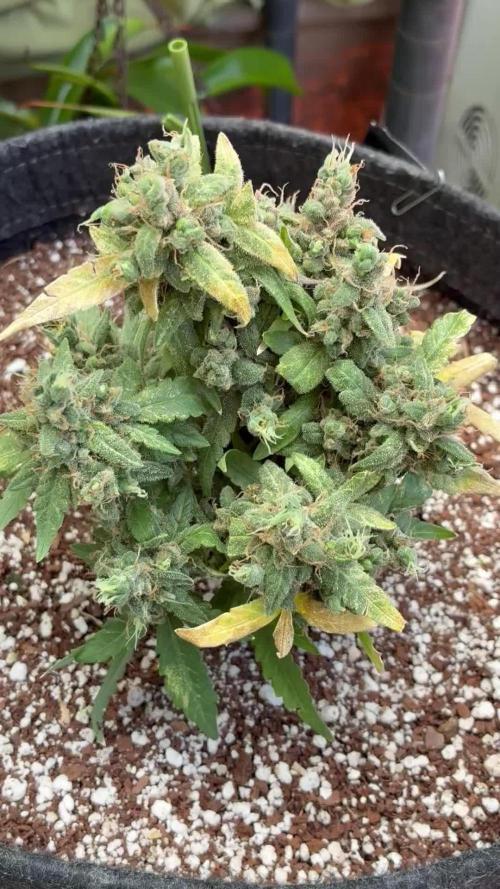
Hi all! So I started adding PK 13/14 this week , only 0.5ml/lt, I haven't notice such crazy growth or more sugary flowers so far, anyway they look nice. One of them is showing some light brown spots which I think it's a K overfeeding due to the 13/14, what do you think? I'm watering every 2 days but humidity levels went higher so I need to use a de-humidifier and I'm obtaining 7lt water every 2 days from the tank. They look very well, I'm waiting now for my magnifier to arrive so I can check em cuz I think 2 of them are almost ready to cut. I think I gonna start adding only ph'ed water from now on, soil has bat guano as well so I think they will have enough nutrients to keep growing so far. Thanks a lot everyone ,this community is amazing, cyA next week!
Likes
24
Share
@Seedler
Follow
i used a low dose because for my plants even half strength is often too much, this saves nutrients tho. Around 825ppm, 18 DLI, Ph 6-6,25 thanks to FastBuds and Terra Power!
Likes
36
Share
@m0use
Follow
The time is finally here to post the harvest. I waited till it was all done and dry before updating the dairy so will add in the dry weights next on the 2nd half of the harvest entry. Had some ups and downs with this plant. mainly the extreme yellowing that was happening. I should have treated this faster with a flush but was super reluctant and I feel this has suffered in the end. The top best looking buds could have been larger and the lower ones could have been thicker. There is some smells with this plant but they are not pronounced. Just smells like mild basic weed, this would be one reason not to grow it, however, the crystals on this plant have been the most I've ever grown before. When trimming them every time the scissors snipped or the brush stroked I saw some falling down onto the tray. This plant would be great for making hash. had a good little ball of finger hash at the end of it and will be giving that to my friends to smoke or make a strong edible with. I don't plan on growing this strain out again, the lack of smells and the fact I'm only trying to grow cbd dominate plants is the main reason. If my friends really like this I have some clones so can always give them some. Speaking of clones they are doing well outside, greened up a lot and showing signs of revegging. Took some photos of the weed hang drying on day 1 in the tent and a week later to show how much they shrink. most of the lower growth is quite larfy but will make good edibles or hash, that will be a fun project to do and may include that in my projects diary. That's about all I can think of if you have any questions just ask. m0use Disclaimers: 1. I have divided the total watts of light in half, 300w(150w) for this diary. It will accurately reflect the g/w ratio as the two plants growing in this tent are listed in two separate diaries. 2. I include any shake/trim in my gross totals as I use them to make edibles. 3. I did not follow any proper ways of listing my nutrients. Some are ml/l of total solution watered, others ml/l of total medium and some are just the total amounts I added, not as a ratio. If you have any questions let me know! +++++++++++++++++++++++++++++++++++++++++++++++++++++++++++++ Cost + Time Analysis Of Growing Cannabis. m0use’s Breakdown +++++++++++++++++++++++++++++++++++++++++++++++++++++++++++++ Light Schedule === Veg [Dec 18th 2021 - Mar 11th 2022] 18h on 6h off - 6am-12pm Flower [Mar 12th 2022 - May 10th 2022] 12h on 12h off - 9am-9pm This is extra tricky this harvest as I went through 2 different hydro rates in three different periods, plus a veg and bloom switch between them. Mon-Fri are TOU rates, all weekends are off-peak pricing all day. Off Peak = 7pm-7am + all weekend Mid peak = 11am-5pm On peak = 7am-11am + 5pm-7pm TOU rates: Dec 18th 2021-Jan 17th 2022 Cost of kwh with on-peak "17.0c", mid-peak "11.3c" and off-peak "8.2c". Jan 18th 2022 - Feb 7th 2022 Cost of kwh with on-peak "8.2c", mid-peak "8.2c" and off-peak "8.2c". Feb 8th 2022 - Current Cost of kwh with on-peak "17.0c", mid-peak "11.3c" and off-peak "8.2c". — Dec 18th 2021-Jan 17th 2022 Weekdays “21 days” 6am - 7am -- 1hr @8.2c/kwh off-peak 7am - 11am -- 4hr @17.0c/kwh on-peak 11am - 5pm --6hr @11.3c/kwh mid-peak 5pm - 7pm -- 2hr @17.0c/kwh on-peak 7pm - 12am -- 5hr @8.2c/Kwh off-peak Weekends “10 days” 6am - 12am – 18hr @8.2c/kwh off-peak 6h @17.0c/kwh 6h @11.3c/kwh 6h @8.2c/kwh + 18h@8.2c/kwh weekdays/weekends — Jan 18th 2022 - Feb 7th 2022 Weekdays “15 days” 6am - 7am -- 1hr @8.2c/kwh off-peak 7am - 11am -- 4hr @8.2c/kwh on-peak 11am - 5pm --6hr @8.2c/kwh mid-peak 5pm - 7pm -- 2hr @8.2c/kwh on-peak 7pm - 12am -- 5hr @8.2c/Kwh off-peak Weekends “6 days” 6am - 12am – 18hr @8.2c/kwh off-peak 18h @8.2c/kwh + 18h@8.2c/kwh weekdays/weekends — Feb 8th 2022 - Harvest Veg Feb 8th - March 11th 2022 weekdays “24 days” 6am - 7am -- 1hr @8.2c/kwh off-peak 7am - 11am -- 4hr @17.0c/kwh on-peak 11am - 5pm --6hr @11.3c/kwh mid-peak 5pm - 7pm -- 2hr @17.0c/kwh on-peak 7pm - 12am -- 5hr @8.2c/Kwh off-peak weekends “8 days” 6am - 12am – 18hr @8.2c/kwh off-peak 6h @17.0c/kwh 6h @11.3c/kwh 6h @8.2c/kwh + 18h@8.2c/kwh weekdays/weekends — Flower March 12 - May 10th 2022 weekdays “42 days” 9am - 11am -- 2hr @17.0c/kwh on-peak 11am - 5pm --6hr @11.3c/kwh mid-peak 5pm - 7pm -- 2hr @17.0c/kwh on-peak 7pm - 9am -- 2hr @8.2c/Kwh off-peak weekends “18 days” 9am - 9pm – 18hr @8.2c/kwh off-peak 4h @17.0c/kwh 6h @811.3c/kwh 2h @8.2c/kwh + 12h@8.2c/kwh weekdays/weekends — Total hours in each peak period 126+144+168 = 438h @17.0c/kwh 126+144+252 = 522h @11.3c/kwh 306+378+288+300 = 1,272h @8.2c/kwh Lights === LED’s I use are 48w and 18w, per stick, they are arranged on an array totaling 300w. 6400k 18w*6 = 108w + 3000k 48w*4 = 192 108w+192w=300w | 300w/1000 = 0.3Kw * note I am using 150w as stated in my disclaimers to account for the missing plant in a separate diary.* Using the previous c/kwh numbers above I can find out the total cost of the lamps in the 3 peak periods. I converted the cents into dollar amounts beforehand to avoid dividing by 100. 8.2c/h = 0.082$/h 438h * 0.17c/kwh = $74.46kw * 0.15kw = $11.17 on peak 522h * 0.113c/kwh = $58.99kw *0.15kw = $8.85 mid peak 1,272h * 0.082c/kwh = $104.30kw *0.15kw = $15.65 off peak The "h" hours and "kw" kilowatts cancel out and we are left with a value of $ dollars per peak period, add all the peak periods up and you get your total cost of running the lights in dollars. $11.17 + $8.85 + $15.65 = $35.67 for the grow light only. My light grew for 20 weeks and 4 days, or 144 days. almost 21 weeks total. $35.67 / 144d = 0.2477$/d average of about 25c a day in electricity 337.2kw for the entire grow. Using the regular calculation of grams harvested divided by watts used is not accurate to me, it does not account for all the time the lamps are on, the length of grow to the over all cost. The calculation that makes sense to me is this, harvested dry weight of usable cannabis buds/trim/keif/whatever in grams divided by total kw used. Could also combine it with grams per total single use costs “anything you used only for this grow and wont reuse in the next, or fractions of multi use items like fertilizers if they ½ full” and see how much you’re investing per gram. "kw" ÷ "g" = kw/g "$" ÷ "g" = $/g I have harvested 5.34oz or 151.6g on 337.2kw. 337.2kw ÷151.6g = 2.22 kw/g of usable cannabis. This is not an ideal ratio for me and looks like a lot of energy waste happened from the extended veg period. $35.67 ÷ 151.6g = 0.24c/g It cost 24c/g when comparing total electricity cost to gross yield, almost identical to the comparison of total electrical cost to the number of days in the grow 25c/day. Neat! legend, kwh = kilowatt per hour kw = kilowatt w = watt h = hour c = cents $ = dollars d = day LED= Light Emitting Diode
Likes
18
Share
@JO_GROW
Follow
So It's been a great week! Apologies to anyone following as I'm a couple days late updating the diary this week due to work. Anyway, bud growth is really coming on! They're starting to fatten up nicely and the smell is just fantastic. Lots of trichomes as you can see from the pics and her parentage is really starting to show with those lovely bright orange pistils. The addition of PK warrior has certainly given them a boost but I have a feeling she is going to need longer than the advertised "8 weeks" to fully mature. We will see. Have a good week. 😁👍🌴
Likes
29
Share
@nonick123
Follow
Día 41 (03/06) Riego 750 ml sólo H2O pH 6.2 Empieza a engordar sus cogollos 😍 Día 42 (04/06) Riego con 750 ml H2O + Regulator 0,15 ml/l + P-Boost 0,5 ml/l + K-Boost 0,5 ml/l + CaMg-Boost 0,25 ml/I +TopBooster 0,2 ml/l - pH 6.2 Está apilando y engordando sus cogollos, y empieza a mostrar senescencia en la hojas inferiores. La veo capaz de acabar en 8-9 semanas! El tiempo lo dirá Día 43 (05/06) Riego 750 ml sólo H2O pH 6.2 Día 44 (06/06) Riego con 750 ml H2O + Regulator 0,15 ml/l + P-Boost 0,5 ml/l + K-Boost 0,5 ml/l +TopBooster 0,2 ml/l - pH 6.2 Día 45 (07/06) Riego 750 ml sólo H2O pH 6.2 Está empezando a mostrar tonos morados en los cogollos! 😍 Día 46 (08/06) Riego con 750 ml H2O + Regulator 0,15 ml/l + P-Boost 0,5 ml/l + K-Boost 0,5 ml/l + CaMg-Boost 0,25 ml/I +TopBooster 0,2 ml/l - pH 6.2 El tamaño del cogollo central es impresionante 💥😁 Día 47 (09/06) Riego con 1 Litro H2O + Regulator 0,15 ml/l + P-Boost 0,5 ml/l + K-Boost 0,5 ml/l + CaMg-Boost 0,25 ml/I +TopBooster 0,2 ml/l - pH 6.2 💦Nutrients by Aptus Holland - www.aptus-holland.com 🌱Substrate PRO-MIX HP BACILLUS + MYCORRHIZAE - www.pthorticulture.com/en/products/pro-mix-hp-biostimulant-plus-mycorrhizae
Likes
10
Share
Likes
2
Share
Поливал по схеме вода, удобрение. Раз в 3 дня по 4л. Листья все ещё чуть желтеют но терпимо. Думаю начать давать 4.5-5л обычной воды, удобрения все также 4л уставить. Очень много оранжевых пестиков, конечно не пурпурный но тоже приятно. Вообще жаль что нету calmag, очень полезная добавка, думаю с ней все было бы стабильнее и лучше но и так не плохо. Жду не дождусь харвеста, купил микроскоп так что следующая неделя может трихомы сфоткаю
Likes
18
Share
@emanresU
Follow
Edit from 16th May. Ok, so... I got Fungus Gnats... I vacuum cleaned my plant my accident... Overwatered first 2 plants... This is not like riding bicycle, I had to re-learn few things. But we going strong! The biggest plant (Fat Banana week #4) growing big and strong, every 2 hours I can notice some changes, she seems to like the environment (32C and ~40% Humidity), soil stays wet for weeks literally. I have to buy bottom feeders and keep the top soil dry bone to prevent Fungus Gnats having sex in wet soil. I have switched to 600W now and I put my lamp around 30cm higher then before. I have a net for Sea Of Green hanging and waiting but Im not sure If Im gonna use it or If I'm gonna "lollipop" these plants just because there is so many of them now there. I didn't "top" because I believe that main cola produce some banger THC content and terps, so I want to focus on all main colas and just tackle the side ones. Edit from 17th May. It looks like Fungus Gnats don't like 24h light. I can see larvas trying to eat the roots (fuck you you fucking.... FuckYouGnat). But I don't see adults flying around. 4x yellow tape helps as well for sure. I ordered some Nematodes, they should be here next week. Until then I'm fighting manually. I placed a decoy on most of the pots. I'm hoping to attract larvas to the decoy instead of baby roots of my plants. They already eat one of my seedling before it even fully open the shell, so I think there are not so many of them to attack all plants at once. I feel like I'm having more and more control over them everyday. Moving the dry soil to the sides also helps a bit with killing larvas. Just uncover the wet parts with larvas and blast them with all the watts you have. So far 2 big plants looks good and healthy, some praying leafs every now and then. I think I'm gonna leave the lights for 24/7 until I'm gonna be sure these FuckYouGnats are gone. Edit form 18th May. Nematodes arrived, I mixed 1 pack in 2L and watered all 8 pots. I have 1 pack left that I'm planning to use next week or after 2 weeks. Lady Banana is showing her sex. I was worried that it looks like hermie but I think it's just Calyx in very early stage. She also looks "wilt", I guess from all that dry period, she got some water today with nematodes, I'll check on her tomorrow. Vacuum Cleaner Surviver going strong! I believe she would even survive a house fire!
Likes
68
Share
@simps
Follow
Well i no it's budding but it's still growing tall and wide 56in wide 46in tall the grow has really been a good experience the the the Fox Farm nutrients is really making it take off the big giant bush in this oven I really enjoy and it's been one of the funnest most learning experiences I've had growing this is my 8th grow outside 3 grows inside I really enjoyed growing outside the plants get huge outside and really have huge yields so I hope you enjoy my diary and I know of I've enjoyed putting it on there so thank you for the likes and comments I really appreciate it thank you
Likes
28
Share
Due premature sono state tagliate a 48f giorni Appiccicosissima puzza di limone
Likes
24
Share
Many of the buds starting showing seeds 😞. There must have been more pollen released from the nanners than I had originally thought. The only stress I can think of is light stress. Either light leaks, light intensity, or perhaps a combination of both. All other conditions have been damn near optimal. I guess it could be genetics as well but I'm giving Crop King the benefit of the doubt. Its a shame too because they were just starting to show their fall colors and it seems like another 2 weeks is all I needed. I will start the flush and as soon as I can get the runoff EC below .2 I'll unplug the light and let them dry in the dark for 48 hours before I chop them down. Thanks for stopping by!
Processing
Likes
3
Share
Stopped the organics as this could be causing the leaf claw. Won't defoliate for the foreseeable future as i think this is enough. Feed is 2.15k ppm. Had to use TaNLiN as had a fungus gnat problem. One drop into the water and a stir done the job after about a week or 2. Seem to be watering this every day. Always empty the runoff after 20 mins of watering. 18-24 hours later the soil will be practically dry.
Likes
38
Share
Utopia Haze is a rare heavily sativa dominant hybrid (90% sativa/10% indica) strain created through back crossing Brazilian Sativa strains. This tasty little bud took home 1st Place for Best Sativa in the 2008 High Times’ Cannabis Cup and for good reason – with its potent 18-22% average THC level and long lasting cerebral effects, Utopia Haze is one powerhouse smoke. The Utopia Haze high comes on soon after you finish your first toke, hitting you with a strong cerebral lift that infuses you with a sense of hazy relaxation. Type: Feminised/Photoperiod Cultivation: Indoor/Outdoor Flowering Time (days): 70-75 Indoor Yield (g): Up to 650 Feminised Outdoor Harvest Month: October Feminised Outdoor Harvest Month Week: 3rd-4th week Aroma: Citrus, Woody, Pungent, Mint Effect: Cerebral Lift, Hazy Relaxation, Sleepy Welcome Everyone to the Final Entry of my Utopia Haze Grow ! There is so much to discuss ! I have been extremely busy as of late trying to get this Harvest together, but i am happy to have it here for you now ! I Seriously under estimated the amount of time, help from others, and my own necessary skills to pull this off.. and i still kind of screwed it up lol ! But its worth noting i have never actually done this before and trying to document it during....was extremely hard. It is next to impossible to work an iPhone with rubber gloves on ! First I want to discuss everything step by step so before you jump straight into the comments on how the end product is so small in "quantity" Rest assured i am happy with its"quality"...and thats all that matters to me because Life is a journey not a destination! and i have learned so much from this grow that I couldn't be any happy even if i messed some things up :) But at the very least I hope you read through this entry in its entirety with an open mind and focus more on the process, rather than just the outcome! I ran out of Ice & i was only able to wash three times..(normally I've heard you should go sometimes 5-6 washes) Preparation is Key & things will be much better next round :) Photos 1-22 These are pretty self explanatory but for those of you just tuning in now.. this is what happens to a very happy plant when you don't have the necessary tools to monitor key components of growing cannabis.. Ph, as well as EC levels play a very key role in the outcome of your grow lol that being said I was just able to save this plant by purchasing both tools but that doesn't mean the plant didn't suffer because of the prior events.. This was a Huge reason behind me choosing to turn this harvest into what i would consider "Solventless Hash Rosin" from "Ice water extracted Bubble hash". Pictures 23 The idea here is the process of using "fresh Frozen Cannabis" this has been discussed many a time online on such sites as instagram and here on grow diaries as well.. I personally have Never tried the process so i decided to try it out and make a judgement for myself.. Video 24 The Cannabis has now been in the freezer for 72 hours making it very well frozen.. as you can tell i struggled getting it all into the 25u Screen Wash Bag. One thing of note i would do differently is i will de-stem my next batch as i also believe this played a part in the amount of plant matter that escaped through the sieves. Photo/Video's 25-28 The idea here is "ice water Seiving" & especially with the bags that I am using here that are only have screen material on the bottom portion of the bag it is very important to have spaces in-between the screens to allow the water to pass directly through the screens into the bottom bucket with the least amount of resistance.. because the hash is so extremely temperature dependant if it gets warm on the side of the bag.. it will stick there and not make it to the bottom to become use able product.. 29 You do not need to use as much Ice as i used here lol... the idea is to keep everything very cold..i certainly achieved that but at the sacrifice of using so much that i ended up grinding product and producing "contaminants" but in the end they are just plant matter that i would be smoking when i rolled up my joint either way so.. I'm not super disappointed.. But it should be noted that what you want to achieve here is a Layering effect where you have the wash bag between two small layers of ice while the "water current" washes the Trichomes away allowing them to be separated by the screens setup below :) Before Starting the machine you should allow some time (i.e.;10-12minutes pre soak to allow the product to become saturated) before the first cycle. By video 32 I have just ran out of ice lol.. Video 33-34 Here I have a tip for you.. to separate the screens that you sieve through.. cut 5 gallon buckets to stretch them across nice and tight.. it'll make scooping your Bubble that much easier ! i learned this from the many "Frenchy" videos I have watched :) Picture 35 Here in lays the problem for most people.. drying your hash without loosing vast amounts of "Terpenes" whilst also stay ever vigilant against mold ! Thanks to all those videos I've watched on youtube.. id like to think this was one of my most successful parts of this process.. Things to Note; Terpenes start to seriously evaporate at temperatures 68F or 20C you need to stay as cold as possible whilst bringing the Relative Humidity in the space down into the 40-30% to stay away from that nasty mold ! I used my cold storage room in the basement.. with a dehumidifier running to keep the space at 45% RH & staying at a constant 15c. All while spreading the hash as thin as possible across parchment paper, on top of the white screens with a fan moving air across both sides of the paper. Pictures 36-38 These are some macros i took in the middle of my drying session I fell in love with the colour. Yes i know the black spots are plant material but they will get caught when i bag the hash & squish the oil out. Thing to Note; at this stage it is important to ensure you 'micro plane" the hash down as fine as you can whilst staying weary of the temperature... any "chunks" will hold pockets of moisture.. that lead to potential problems..ie; mold ... Picture/Video 39-41 Successfully planed bubble hash ready to be bagged and Squished ! Picture 42 Ive decided to follow Pedro.. from Pedros Grow Room and double bag to be on the safe side so i don't have any blow outs. So thats One 25u bag inside one 160u bag ! :) Pictures 43 This is almost 3 grams of the bubble hash from above, already melting in the bag.. this is where i ran into trouble again lol things started getting to warm in the house and i was only able to get one of the three squish's i did on video :( things started getting sticky. Picture 44 This is basically just a photo of the equipment I'm using; 3x5 LowTemp Cage in the frame I built myself, with a 20Ton bottle jack. Something to note here is this is an older Lowtemp model with only a single heating zone which is which i have it closed here heating Both sides of the press :) As well as the importance of having adequate pressure on your plates.. my rig is very overkill for the size of hash bags..lol Video 45 Here is the lovely press video.. its didn't quite work the way i wanted either lol my directional folding wasn't quite tight enough for a big "drip" :) &the Press was set to 65°c Photo's 46-50 are pretty self explanatory :) I had a blow out.. but still managed to pull an 80% return from the hash once squished...& yes it tasted amazing :) Was it worth it in the end... that could be debated.. for some..i understand..its not your thing, but for those of us that are interested in making our own concentrates.. free from Solvents... I wouldn't make it any other way :) If even ONE of you reading this diary finds it helpful to reference for ANYTHING.....even if its "what not to do" ill consider it a success ! Thanks again for tagging along on this garden adventure.. its been one heck of a journey ! Much Love from B.C. Canada, Until Next time, Cariboo
Likes
3
Share
Semana 5: Consolidación de Biomasa y Transición Metabólica Fase: Pico de Expresión de Tricomas / Cese de Elongación Internodal Esta semana marca el fin definitivo de la fase de estiramiento, redirigiendo el 100% de la energía metabólica hacia la compactación y engorde de los cálices. La estructura floral ha dejado de expandirse longitudinalmente para enfocarse en la ganancia de densidad volumétrica. Puntos clave de la semana: * Maduración Estructural: Los cúmulos florales están cerrando brechas, formando colas sólidas y pesadas. Se observa una hinchazón progresiva en los cálices inferiores, señal de una distribución eficiente de fotosintatos. * Densidad de Resina: Tras la suspensión de los tratamientos foliares de la semana 4, la producción de resina se muestra más pura y pegajosa. La cobertura de tricomas es ahora visible a simple vista incluso en las hojas de azúcar más externas, con un perfil de terpenos que comienza a definirse de forma agresiva. * Estrategia Nutricional: El enfoque se desplaza hacia un ratio de P-K (Fósforo y Potasio) más elevado. Se mantiene la vigilancia extrema en la electroconductividad (EC) y el pH del lixiviado para asegurar que no existan bloqueos nutricionales en este momento de máxima demanda. * Gestión Ambiental: Con la densidad actual de los cogollos, la ventilación se ha vuelto el factor crítico de seguridad. Se ha optimizado el flujo de aire abriendo las ventanas al invernadero para mantener una humedad relativa estable y prevenir bolsas de aire estancado, mitigando cualquier riesgo de botrytis o patógenos fúngicos ahora que el follaje es denso. Estado actual: La planta se encuentra en su punto de mayor actividad bioquímica. Los estigmas se mantienen blancos y turgentes, indicando que el potencial de engorde aún tiene margen de crecimiento antes de entrar en la fase de oxidación final..
Likes
21
Share
What a great strain...definitely surprised me positively. Thank you Exotic Seeds for the opportunity to work with you trying this awsome plant. It has a steady growth, kinda short and bushy like a lot of plants with strong indica traits Very dense buds, big ones, fat and resinous. With a LOT of productions all-over the plant. So much thricome production it sparkles white. Cutes it yesterday (17/12/2023) altough on my opinion it could have 1 more week. Altough because of the huge problem I had to do it. This grow tent (specially the other plant growing side by side) had a mold issue, bud rot spreading fast. I must have lost about 5 65 grams of wet flower total on the Fat Banana. When I cuted it 🍓 Strawberry Cola weighted 829 grams it has a lot of defoliation done alredy but I'll trim it 100% when dry. This is it, thank you all of you growmies for watching this grow. See u guys on the next one.
Likes
7
Share
@Mrg7667
Follow
Amazing week! Starting to smell absolutely Devine! Some cherry funk to cherry funk with a hash back and some with just lighter hashy lind of smell all looking great except one oheno growing funky finger nugs (one of the better smelling phenos tho) Need to clone 4,6,3!
Likes
18
Share
5' semaine de floraison, tous ces bien passés . Gêne sativa et bien la elles ont pris 3 cm encore . Les bourgeons commencent à grossir. Niveaux réglage culture rien de changé.. Merci les gens qui me suivent ,bonne culture à vous 🌱🌞🌱
Likes
224
Share
@Ju_Bps
Follow
Hello growmies 👩‍🌾👨‍🌾🌲🌲, 👋 The end is here, Final lap to the harvest, No water this week, Harvest tonight ✂️ 💡Mars Hydro - SP 3000 80% 41 cm. 🔥 Thanks community for follow, likes, comments, always a pleasure 👩‍🌾👨‍🌾💚🌲. Mars Hydro - SP 3000 💡💡 https://www.mars-hydro.com/sp-3000-samsung-lm301b-greenhouse-led-grow-light NUTRI NPK 💥🔥 https://www.nutrinpk.com/product/npk-mix-pak-for-4-to-5-plants-cannabis-fertilizer/ Pure Instinto - Strawberry Shortcake Auto🌲🌲 https://pureinstinto.com/product/strawberry-shortcake-autoflower/
Likes
8
Share
@Zdenda
Follow
Tento týden už začínají palice prorůstat.. Protože jsem po prolití zjistil, že se v půdě trochu hromadí Ec tak jsem je to nechal vyžrat a tento týden ec 0.8 pH 6.4.. . Jinak se zdá, že i pijí méně a musím nechat častěji vysychat.. bude to chtít zase probrat listy, ale holky vypadají dobře a zatím žádný problém.. tvoří se pryskyřice a vypadá to hezky 😄..
Likes
17
Share
@Agrocann
Follow
After ~ 30 hours the small root emerged from the seed. After 48 hours the small root become big and I managed to brake the tip of the root. After 48 hours from seedling the new baby has emerged :)
Likes
22
Share
@Slobasian
Follow
Love every plant each one is growing differently stacking different even the visual difference of one strain growin two different ways combined smells of diesel, pez candy and lemons