


Likes
Comments
Share

@DogDoctorOfficial
Follow
🥒 Project Blue Tent – Week 7
Pickle Lemon Haze F1 – Pheno A (Folder 14A)
Hello everyone, and welcome back to another chapter of Project Blue Tent! 💙🌱
If you're discovering this diary for the first time, welcome aboard!
Project Blue Tent follows four individual plants, each documented in its own dedicated diary from seed to harvest.
All four plants share the same environment, lighting, irrigation system, nutrition and training strategy. By keeping as many variables identical as possible, we can observe something particularly interesting:
How much personality can an individual phenotype still show when everything around it remains the same?
Every plant has the same opportunity.
Every plant receives the same care.
Yet somehow...
They still manage to tell their own story.
Today we're checking in with Pickle Lemon Haze F1 – Plant A.
And this week marks a pretty important moment in her story.
The canopy is full.
The structure is ready.
And we're preparing for the final step before flowering.
────────────────────────
🌱 Week Seven – From Building to Preparing
For the last several weeks, the entire focus has been on building the canopy.
We topped.
We trained.
We installed the SCROG.
We guided branches through the screen.
And slowly, square by square, the empty spaces disappeared.
Now the Blue Tent has reached the point where the plants have essentially done their job.
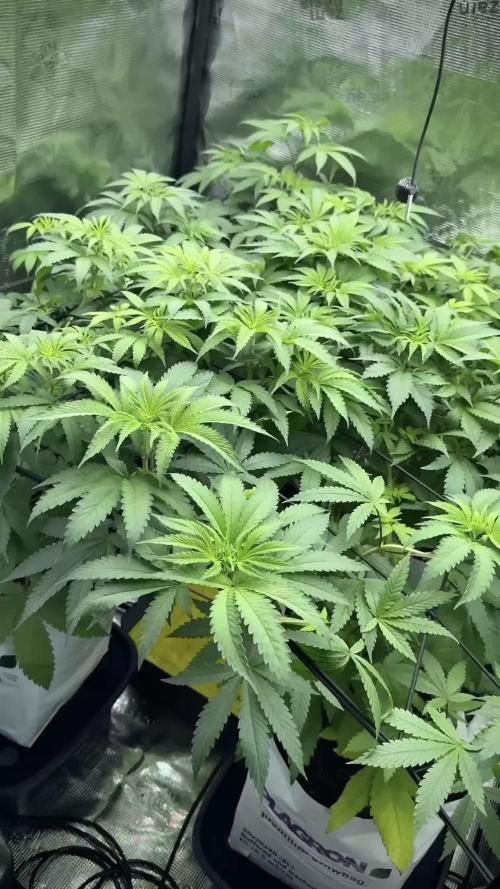
Looking from above, the canopy is remarkably even.
All four sisters are sitting at approximately 60 cm, and because the SCROG net was lowered and tightened earlier in the grow, the majority of the new growth has been directed horizontally rather than vertically.
That was the objective.
Not taller plants.
More usable canopy.
And Plant A has done an exceptional job filling her allocated space.
Her foliage is rich green, her branches are strong, and the amount of healthy growth packed into that screen is impressive.
But there comes a point where adding more foliage isn't necessarily the goal anymore.
Now we need to prepare what we've built.
────────────────────────
🕸️ The SCROG – Mission Accomplished
The SCROG has been one of the most important techniques we've used during this vegetative cycle.
For anyone unfamiliar with it, SCROG means Screen of Green.
Instead of allowing the plant to develop a few dominant vertical branches, we repeatedly guide the growing shoots underneath a horizontal screen.
As each branch moves through the screen, we can distribute the future flowering sites across a much larger area.
The result we're looking for is a relatively even canopy rather than several tall branches competing with one another.
And this isn't something that happens in one afternoon.
It's a process.
A little tuck here.
Another branch redirected there.
A few minutes of observation every day.
Eventually, the plant does most of the work itself.
This week, looking across the Blue Tent, that process has reached its goal.
The screen is effectively filled.
And that means it's time for the next stage.
────────────────────────
✂️ Defoliation – Cleaning the Canopy Before Flower
This week's main event is defoliation.
And because this technique is sometimes misunderstood, I want to explain exactly what we're doing and, perhaps more importantly, what we're not doing.
Defoliation is not simply removing leaves because we don't like seeing them.
Leaves are essential to the plant.
They're responsible for capturing light and supporting photosynthesis, so removing them unnecessarily doesn't automatically make a plant healthier.
The objective here is different.
After weeks of vigorous vegetative growth and SCROG training, the interior of the canopy has become extremely dense.
Leaves overlap.
Branches cross through one another.
Lower sections become increasingly shaded.
Air movement through the middle of the plant becomes more difficult.
And some foliage is simply contributing less to the productive upper canopy.
So we're performing a deliberate cleanup.
Removing selected leaves.
Opening congested areas.
Improving visibility.
Creating more space between branches.
And preparing the structure for the very different demands of flowering.
The goal isn't:
"Remove as many leaves as possible."
The goal is:
"Remove what isn't helping the structure we're trying to build."
────────────────────────
🌬️ Why Defoliate Now?
The timing is just as important as the technique.
A significant defoliation is a form of stress.
Even a perfectly healthy plant needs time to respond after losing a meaningful amount of foliage.
That's why we're doing this while the plants are still in vegetative growth rather than waiting until we're well into flowering.
Right now they're running 18/6.
They're actively growing.
They're not yet trying to produce flowers.
So if the plants need a little time to rebuild their balance after the cleanup, we have that time.
The sequence we're following is very intentional:
Build the plant.
Fill the screen.
Clean the canopy.
Allow recovery.
Then flip.
I would much rather have the plants enter flowering already recovered from this work than perform a major cleanup while they're simultaneously dealing with the transition into flower.
Once the lights are flipped, the priorities change.
The plant will begin redirecting its energy toward reproductive growth, and I want that transition to happen with a clean, well-organised canopy rather than asking her to recover from major training at the same time.
────────────────────────
🧠 Defoliation Isn't a Magic Trick
Another thing worth mentioning is that defoliation isn't some magical technique that automatically produces bigger flowers.
It's a canopy-management tool.
We're trying to improve the relationship between:
🌱 Growing sites
💡 Light distribution
🌬️ Air movement
🍃 Leaf density
? Plant structure
The upper canopy is already receiving strong light.
The problem we're addressing is congestion.
When four vigorous plants share a 100 × 100 × 200 cm space, the interior can become incredibly dense.
By selectively removing some unnecessary foliage, we're opening pathways through that structure.
Better airflow.
Better visibility.
Less congestion.
And a cleaner starting point for flowering.
It's about managing the environment that exists inside the canopy, not simply making the plants look prettier.
Although...
I have to admit...
They do look pretty spectacular after the cleanup. 😂💙
────────────────────────
🌿 Pickle Lemon Haze F1 – Plant A
And now, back to our girl.
Plant A continues to be exactly the phenotype I thought she might become when she first started showing her personality.
Vigorous.
Responsive.
Confident.
She has consistently been one of the most energetic plants in the Blue Tent.
Every time we've given her something to work with, she's responded with more growth.
Topping?
She recovered beautifully.
SCROG?
She filled it.
Daily training?
She simply kept producing new shoots.
Her internodal spacing remains nicely compact, her stems have thickened substantially, and the foliage has developed that rich green colour we've been looking for.
The most impressive part is probably how much growth she's managed to produce while still maintaining a very manageable structure.
She's not simply growing wildly.
She's growing usefully.
And that's exactly what we want at this stage.
────────────────────────
🥥 Feeding – No Changes Yet
The nutrition remains completely unchanged.
And honestly...
Why change something that is working?
Current feeding:
• Plagron Hydro A — 1.9 ml/L
• Plagron Hydro B — 1.9 ml/L
• Plagron Hydro Roots — 1 ml/L
Current EC:
1.92 mS/cm
pH:
5.8
The plants are showing excellent colour and vigorous growth, so I'm not interested in increasing the nutrient strength simply because we're approaching flowering.
Instead, we'll watch their response to this week's defoliation.
If they continue consuming aggressively and maintaining that healthy green colour, we may increase the nutrition next week as flowering begins.
But for now...
The plants are happy.
And happy plants don't need unnecessary changes.
────────────────────────
💧 The Drip Irrigation Continues to Impress
The Mars Hydro automatic drip irrigation and drainage system has also become one of those pieces of equipment that quietly proves its value every day.
Each plant is receiving approximately 1.2 litres of nutrient solution per 24 hours, delivered through the individual drip system.
The solution passes through the coco and the resulting runoff is automatically collected and removed.
That consistency is particularly useful in a project like this.
We're trying to keep four plants under almost identical conditions.
Manual watering can certainly work, but maintaining exactly the same routine every day becomes increasingly difficult as plants get larger and more demanding.
The automated system removes much of that variation.
The roots receive a consistent supply.
The plants receive the same routine.
And I get to spend less time carrying water...
And more time observing the plants.
That's a pretty good exchange in my book. 😄
────────────────────────
🌡️ Blue Tent Environment
The environment has remained very stable as we approach the transition into flowering.
This week's average conditions were:
• 🌡️ Day Temperature: 28°C
• 🌙 Night Temperature: 25°C
• 💧 Relative Humidity: 65%
• 🥥 Substrate Temperature: 24°C
• 💦 Nutrient Solution: 18°C
• ⚗️ pH: 5.8
• ⚡ EC: 1.92 mS/cm
• 💨 CO₂: approximately 450 ppm
• 💡 Light Schedule: 18/6
• 💧 Irrigation: approximately 1.2 L/plant/24h
• ? Pot Size: 8 L
• 📏 Plant Height: approximately 60 cm
At this point, maintaining consistency is more important than constantly chasing numbers.
The plants are growing beautifully.
The canopy is healthy.
The irrigation is performing reliably.
And the nutrition is producing exactly the response we're looking for.
So for now...
We observe.
────────────────────────
🌿 Four Plants Starting to Look Like One
One of my favourite things about this stage of Project Blue Tent is looking at the tent from above.
It's becoming genuinely difficult to tell the four plants apart.
The canopy is so even that the individual plants almost disappear into one continuous sea of green.
And that's actually a fantastic result from the SCROG.
We started with four individual plants.
Different branches.
Different growth patterns.
Different personalities.
Now we've shaped them into one remarkably uniform canopy.
But underneath that uniformity, the individual characteristics are still there.
And that's what makes documenting them separately so interesting.
Plant A still has her particular way of growing.
She's still one of the most vigorous.
She's still incredibly responsive to training.
And she's still quietly trying to occupy every available centimetre of space.
────────────────────────
🌬️ Cleaning for the Next Chapter
Once the defoliation is complete, the room should immediately feel different.
More open.
More breathable.
Less congested.
And that is exactly what we're looking for before the flip.
We're not trying to make the plants small.
We're not trying to weaken them.
We're simply creating a cleaner structure from which the flowering cycle can begin.
The canopy has been built.
Now we're refining it.
Then comes recovery.
And after that...
Flower. 🌸
────────────────────────
👀 Looking Ahead
This is one of those weeks where the best thing we can do after the work is simply give the plants some peace.
We've spent weeks manipulating their structure.
Now they need time to respond.
I'll be watching the new growth closely, keeping the environment stable and monitoring how quickly they recover.
The nutrient recipe may increase next week depending on what the plants tell us.
The irrigation will continue doing its job.
And if everything looks as good as it does now...
We'll be ready to flip the Blue Tent into flowering.
The SCROG is full.
The canopy is organised.
The plants are healthy.
The cleanup is done.
Now we let them recover.
Then...
we turn the page.
────────────────────────
💙 Thank You
A huge thank you to Zamnesia for making Project Blue Tent possible and for providing these fantastic Pickle Lemon Haze F1 genetics.
A heartfelt thank you to Plagron for the Premium Growbags and Hydro nutrient line that continue supporting this beautiful vegetative growth.
A special thank you to Phytonaut for the LED lighting helping us maintain such a consistent and beautifully structured canopy throughout the tent.
And a massive thank you to Mars Hydro for the automatic drip irrigation and drainage system, which continues making consistent irrigation so much easier.
Thank you to GrowDiaries for providing a place where growers from all over the world can document their journeys, share knowledge and learn from one another.
And finally...
Thank you to everyone following Project Blue Tent.
Whether you've been here since the beginning, just discovered this diary, leave comments every week or simply enjoy watching these plants develop...
I genuinely appreciate you being here. 💙
Four sisters.
One environment.
One experiment.
And four very different little personalities hiding underneath an increasingly uniform canopy.
For Plant A, this week is about finishing what we started.
The canopy is built.
The cleanup is complete.
Now she gets to recover.
And very soon...
🌸 Flowering begins.
Until next time...
Growers Love, happy growing, and take care everyone! 🌱💙

Likes
3
Share


@Hexahydrat666
Follow
Ich hätte den beiden gerne noch etwas mehr Zeit geben aber die Raubmilben haben das Problem mit den Thripslarven nicht in den Griff bekommen. Die Biester haben im Zelt ordentlich Party gefeiert und sich kräftig vermehrt so das ich mich entschlossen habe zu ernten damit ich genug Zeit habe zu trocknen und das Zelt zu desinfizieren bevor die nächsten Pflanzen einziehen. Beim nächsten Grow werde ich stärker auf die ersten Anzeichen für einen Schädlingsbefall achten. Das war das erste Mal dass ich Thripslarven im Zelt hatte weshalb ich sie nicht gleich entdeckt habe. Ich hätte nicht gedacht dass die Mistviecher so klein sind das ich sie mit dem bloßen Auge kaum sehen kann und ich auf die Fraßspuren hätte achten müssen .Man lernt halt ständig dazu😃

Likes
255
Share


@Terp1
Follow
05.10.2023
Tag 74 - Woche 11 / Tag 4
Licht: 40cm – 50%
Lichtzyklus: 18/6
Luftfeuchte: 50%
Temperatur: 26°C
VPD: 1.6 kPa
Höhe Apricot: 46cm
Bemerkungen:
- Licht runter auf 50% @ 40cm reguliert - das entspricht bei 18/6 einem DLI von 32,4
- Ich habe leider auch die 2 dicksten Äste der Apricot an Blütenfäule verloren 😐
- diese wurde jedoch sehr, sehr, sehr früh erkannt und großflächig in Form des ganzen Triebes entfernt 👌
- ich bin da echt mit meinem USB-Mikroskop ran. nicht ganz so nah 😅 aber so, dass man sich großflächig in einer hervorragenden Auflösung die Buds anschauen und sehr gut Trichome von Myzel unterscheiden konnte
- ich hoffe die Apricot hält bei 45-50% RH die letzten beiden Wochen noch durch
- bin da aber auch sehr positiv gestimmt… die sieht verdammt gut aus 👊
ich will kein unreifes Weed haben
Terp 💪😎


Likes
8
Share

@RakonGrow
Follow
+
Day 43:
2.25L bottle water EC 0.35 + 0.3ml/L CalMag + Terra Flores 4.5ml/L Final PH 6.13
Day 42:
0.625L bottle water EC 0.35 + 0.3ml/L CalMag + Terra Flores 4.5ml/L Final PH 6.13
Day 41:
2.25L bottle water EC 0.35 + 0.3ml/L CalMag + Terra Flores 4.5ml/L Final PH 6.13
Day 39:
2.25L bottle water EC 0.35 + 0.3ml/L CalMag + Terra Flores 4.0ml/L Final PH 6.13
+
Likes
92
Share


@gottagrowsometime
Follow
Week 12 D86 Flowering 35-40 days since stigma started showing. She is growing really well, for now what ever all the little rust spots were are gone. Still not solid explanations as to what it was or to as why it came up. Made a hard choice. And snipped the roots that were drinking from the plate, as this could of been the cause as to why this was happening on otherwise a healthy looking plant. Lowered the PPM from 1550 down to 1250 and will bring her down another 3-600 over the course of the next week and then another 2-300 the following week and keep her on regular 700ppm feeds of just bloom, but candy overdrive and B-52. All other nutes will be pulled over the next 2 weeks, gradually and not all at once neither, don't want to shock her into a def, just want to make sure all this crap is flushed from her. Big bud, she got her last feed of that today and that's her done on that now. She was started on her normal mix - 300ppm. RH is holding at a steady 65 temp is 26, 21c with lights off.
14/3/22 Added my 2nd intake fan was able to bring down the RH down as low as 53% with the 2 on full blast. Rooms RH is at 46% dehumidifier has been running 24/7 since I got it. Not good enough though. It works but looks like I'm going to get a 370watt 25l (meaning, it takes 25l out of the air every 24hrs, the 1 im using now is a 60watt that gets rid of 2l every 8hrs). It'll do in an hour what this machine takes 8hours to do. So it'll actually use
less energy overall.
18/3/22 Plant is coming on nicely, putting on lots of bud mass, hopefully it'll keep packing on bud as there is not much in the way of sugar leafs it'll just be nice dense bud. For the last 24 hrs I've thrown her into a hard flush, 6l of water with 2 flushes one last night 1 tonight after each flush 50ml with sensi cal mag extra 1ml/50ml was given so the plant wouldn't go into full flush and the nutes left behind will break down helping nute uptake. Very important to introduce some cal as if you flush for too long and have a high build up of salts you'll cause a form of nute lock and throw plant into the flushing phase. So always use some cal mag on top to break down the nutes you are trying to flush.
Thanks for reading
gottagrowsometime

Likes
1
Share


@Urunascar
Follow
Segunda semana, conociendo la luz solar así no sufren tanto estrés cuando las pase hacia afuera definitivamente y el led quedará como suplementario para días nublados (también será instalado afuera más adelante)
Likes
11
Share


@TheMadHasher
Follow
Whats up everybody! Since last week the ladies have been switched to a flowering light cycle. I eased them into the schedule over like three days just to give them a more natural transition. They all got most of their mature fan leaves removed from the bottom sections to open yo the bud sites to a little more light and airflow. After about the first day you could already see the new growth coming in and more bud sites starting to form. I also bent the dominant colas on all three plants to give them all more of an even canopy. Cant wait to see these babies start budding! I hope everyone has a Merry Christmas! 🎁🎄


Likes
7
Share


@eldruida_lamota
Follow
Que pasa familia, vamos con la cosecha de estas Black Muffin F1 de Sweetseeds.
Esta variedad me resultó bastante sencilla de cultivary es bastante resistente, si no la maltratáis crece mucho y bien sana, la flor se ve increíble, tiene una cantidad de resina considerable y unos tonos rojos oscuros muy peculiares, se ven genial.
El olor que desprende es bastante frutal con toques cítricos, no pinta nada mal, las flores están prietas.
No da mayores problemas, el ciclo no es largo, cuiden con la altura ya que se desmadran un poco.
IMPORTANTE destacar: En las fotos comprobaréis que ya no hay botes de cristal con sobres de bóveda, ahora hay Grovebags.
Que son una especie de sobres o bolsas que retienen el peso, previene la aparición de moho y mantiene intacto el terpeno, para que el curado sea más óptimo.
Hasta aquí todo, Buenos humos 💨💨💨

Likes
7
Share

@GREENPHOENIX6262
Follow
01/31 - HST SOG completed - rebounding accordingly - increased feeds to every other day between clean water and nute feeds - Lights have been picked up to make soon for SOG - looking to pluck clones in about 2/3 weeks

Likes
2
Share


@m1ndofAC
Follow
Started off week 2 of flowering on 11/19. All of the ladies look good with the Tangerine Dream being the only set of clones to start showing bud sights and not just pre-flowering. Did a significant amount of clipping and clipped most of the fan leaves on the main colas of my ladies and side branches too. I also began playing classical music for them!
True to it’s genetics my Tangerine Dreams are putting off numerous side branches with side branches coming off those branches! Since flowering my Cotton Candy has grown the most. Before flowering it was just barely half the height of my TDs and now they’re taller! As for the Chronic Thunder it’s always been the tallest but in flowering it’s focus has all been on the side branches without me even topping it.

Likes
1
Share


@mauigrown
Follow
Week 9 is here and we are looking at harvesting! After checking the trichomes of just the top colas, I decided this week I was going to harvest. I am updating this post after I have dried and harvested the plant so do not have much more details. I flushed the plant this week with Flora Kleen along with terpinator and microbes.
I cut down the plants and hung them up in the tent to dry using a clothes hanger with clips I got off of Amazon. It took 10 days to dry the bud and my temps and humidity would fluctuate throughout the day and night. I stayed in the mid to low 70s for temperature and humidity was at 50% at first. Then I added a humidifier and had it dry in 60% humidity.
Will update the rest in the harvest update.


Likes
6
Share


@AutoCrazy
Follow
Week 4 of flower.
5.8-6.0 pH
450ppm
65-68 F water temp.
72 F tent temp
So… the back two plants aren’t stacking like I had hoped. They may end up being popcorn queens. But they are nice and frosty so a long as they produce decent compact and frosty buds I’ll be happy.
The front two are finally bursting into flower. The Mimosa X Orange Punch (front right) is looking good and it smells really unique already. I hope she stacks up some nice buds.
Likes
16
Share


@Symbiosis_420
Follow
Ok, so it's slowly getting thicker and frostier. At week seven my girl could be ready in anywhere from two weeks to four weeks more.
The light was dropped closer to the top of the canopy. I decided to try 15 cm of distance, as well four 50W LEDs are not as powerful as the 600W HID or LED panels that are usually used in grow tents. I will of course keep an eye for signs of light and heat stress, but I suspect that won't be a problem.
Update Day 89.
Today I decided to turn the plant around to see the back colas and their growth. Then I found some mites under the leaves after examining weird spots in a couple of leaves. It seems to me that there was not enough airflow to deter the mites from making home in the back leaves, when compared to the front leaves of my plant. Lesson learnt, rotate plant often, ensure good and even airflow.
I didn't find any webs beside a really small one seen on the video (most affected leaf). So, I think I found them mites early. I only found this kind of damage on very few leaves, and each leave contained less than 8 mites (at least that I could see) and a couple of eggs. So it seems that paying close attention to my leaves saved me from an out of control infestation.
Anyhow... I removed all of the leaves that had even a single mite, or a single mark of discoloration.
Also, I disinfected the grow tent, top of soil and lower part of the branches by spraying them with a 1/4 tbsp of bleach per liter of water.
After that was completely dry, I mixed one part rubbing alcohol with 9 parts water and misted both sides of the leaves and even the buds directly (ethanol evaporates easily, so there shouldn't be residues left after it dries completely).
I got these remedies from https://www.growweedeasy.com/cannabis-plant-problems/how-to-get-rid-of-spider-mites
I will apply them every 3-4 days and keep a good eye on the leaves.
Prevention is key, and some aspects I could've considered before are:
1. not grow any other plant next to my cannabis
2. Don't come into my indoor growtent after tending my outdoor plants.
3. Ensure even and plenty airflow.
So, I attacked back strongly. I cut more leaves than those that showed damage, to increase airflow. I will be on the watch for pests and will rotate my plant often, as well as spraying a few times every week, just to make sure they don't come back.
I also am going to build a kind of metal wire cage to separate the colas further and make it harder for any pest to spread.
Its only my second grow, but from what I've read online about mites, it's way more costly (time and money) to deal with an infestation than to strike them hard early. I guess that specially now that I noticed them before they even made webs.
Look closely at your girls growbros !
Update day 90.
So this morning I. Becker the trichomes and they seem to have gotten more cloudy. I am not an expert at that, but they are starting to be fewer clear and more milky. I will keep an eye on them, but it think harvest might be here very soon, probably closer to the 9 week mark than to the 12 week one (I'm about to finish the 7th week)...
Likes
11
Share


Likes
5
Share

@Harry_Pothead
Follow
Die Keimung ist gelungenen und erstmal ist alles okay.
Nachdem die Keimwurzel ca 1 cm lang war kam er in einen 10cm breiten und durchwurzelbaren Torftopf.
Mit dieser Größe hoffe ich, dass sie eine Weile im Keimzelt bleiben können…
Likes
54
Share


@ASCBOOGS
Follow
Day 30 noticed some white/yellow small looking maggots when i was defoliating which i believe to be thrips i have cleaned the grow area and gave all the plants a foliar spray of dr schimmel mite killer which seems to be doing its job and it says it can be used throughout the flowering stage going to give the 3rd application tomorrow hopefully then should be back on track but things are looking much better after thr first couple applications i am still going to continue big bud for another week due to the thrips interupting then will pk after for a week and finish with overdrive then flush please fee free to leave your input


