Likes
Comments
Share

@TrickzCutz
Follow
Servus Moin!
Die Permanent Melons entwickelt such sehr schöne große Buds. Bin gespannt, ob das Big Bud Pulver von Advanced Nutrients die Knospen diesmal richtig fest machen.
Likes
46
Share


@Mrs_Larimar
Follow
February, 6th
The Plants are entering the second Week of Flower.
All Plants looking very Good.
Nice and green.
Its o much fun to grow in that small vessels....
I measured and its only 10g of Soil in the Sheeps
Only the candleholders got more Volume
Iam watering the Sheeps 2-3 Times daily , in letting them "dive" into the Feedingsolution
Iam very happy to be challengend by this, Ima feeling prepped to Grow
Soilless or Hydro
Have Fun with my " EGGHUNT"-Grows

Likes
88
Share


@ILoVeThiSpLaNt
Follow
Avevo staccato due cime per pianta delle kmintz. Mantengono quello che sentivo mentre le toccavo. La prima pianta sa di caramelle zkittlez con un fumo che nell aria non è il classico odore di erba ma qualcosa di incensato e mi fa impazzire.La seconda è decisamente più complessa. Zkittlez/frutti di bosco/nocciola/gas. Ho scritto oggi a Ripper Seeds facendo vedere un po di foto e mi hanno detto di tagliarle pure anche se manca qualche giorno rispetto ai 63 dichiarati dalla casa.Ho già ricomprato 5 semi perché le rifarò sicuramente se non il prossimo ciclo quello dopo. Le due Watermelon Zkittlez proseguono la fioritura. A settimana prossima coltivatori 💪🤞

Likes
31
Share


@MxGrow
Follow
Siguen muy bien las plantas, sigo encontrando hojas manchadas por araña roja pero decidí no aplicar nada de químicos, dejaré que las plantas sigan su proceso y trataré de controlar la plaga solo eliminando las hojas donde encuentre arañas o huevos, la plaga no pone en peligro la producción.
Sigo aplicando Advance Nutrients 2 veces por semana con 3 litros de agua por planta los martes y viernes, los domingos riego con 1 litro de solo agua a cada planta.


Likes
2
Share


@OrganicWeedOnly
Follow
She's really starting to take off now I've corrected the lights height and strength, you'll see in the next week that I'll start having some pH issues, I'm usually an outdoor grower. This is my first indoor grow so I don't have all the stuff you need yet, I should be getting a pH pen and PPM metre soon.
Likes
35
Share

@Mrs_Larimar
Follow
May, 8th
I tried to do different Trainings on the Cookie-Plants
the one on the Pictures is growing quite Wild with alot of laterals
but atm i let her do the Thing
The others have a more strict Growingregime✊
All Girls sit in amended Soilmix, ( EASY BOOST ORGANIC NUTRITION)
so only Water and Beneficals for them
waiting little before I start Floweringnutes
Likes
2
Share

@IceGenetics
Follow
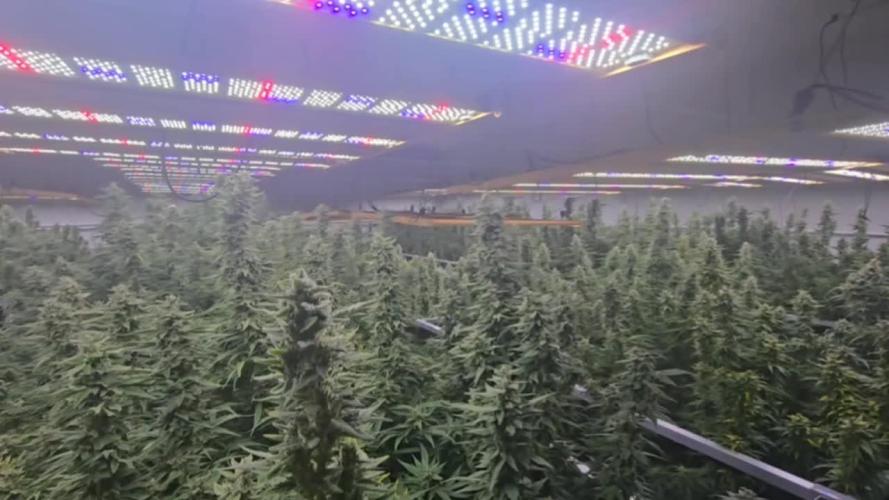
Today, day 80. Plant height 120–155 cm. Over just over 2 weeks, the bushes have gained a decent amount of mass.
Nutrient concentration — 1050 ppm, room temperature daytime up to 26 °C, nighttime up to 22 °C, CO2 concentration about 1000 ppm, and humidity 40%. The light schedule is 18 hours of light and 6 hours of darkness. PPFD — 950. Visually, over two weeks the bushes have gained mass excellently, the inflorescences continue to swell very vigorously. The fertilizers at 1050 ppm were already mixed for full flowering with an emphasis on PK. Increased the duration of shots (irrigations).
We remind you, friends, of the goals of our grow report:
- To check the autoflowering genetics and strains that we've been working on for over 5 years.
- To test the new fertilizer composition.
- To study the final yield indicators per m² in "classic" mode, using a minimum of training.
- To check this cultivation economic model with the ratio of labor costs (man-hours), spent resources and funds.
P.S. For reasons of privacy, intellectual property, and commercial secrecy, some additional goals are not disclosed.
We are confidently and steadily moving toward the set goal, friends-rastamans! 🧐
Likes
37
Share


@Mr_Juice
Follow
I haven't grown for 15 years. First time indoor. I did not know what I can expect. I am very surprised. It's unbelievable. Thanks for the ghrow diary. I learned a lot and the second time it will be perfect.thx boys and girls 😊


Likes
2
Share


@Gardens_of_Of
Follow
3rd week of Flowering is over and the stretching stopped. She received a big defoliation and bottom half is lollipoped. She just enjoys life and keeps growing her buds. Frosting slightly started.

Likes
32
Share


@AsNoriu
Follow
Day 1. Ohh , what a long and painful attempt it was.
First seed - failed root
Second seed - I was impatient and dig her out, needed like 24 hours more, never made it, had root
Third seed - made it, but I started working and in the morning made a football of her ... died.
Forth seed - maybe will make it, brown start, could be Growing root up, covered with extra soil ... Will wait....
Have 5th seed soaked too ;)))
Later Day 1. She is out !!!! November 24 is first day.
Happy Growing !!!

Likes
2
Share


@Manchu
Follow
Mi experiencia con esta variedad, fue realmente buena. una semilla con mucho vigor, muy resistente a plagas, y con sabores y olores exquisitos
Likes
30
Share


@TragicTerps
Follow
Plant A (left side) started pushing through the medium first after 48 hours. Plant B germinated successfully at 96hrs but due to cold climate and moisture in the seed the seed got too cold and turned to mush. At 96hrs Plant A had reached 1.25" and had started to spread the first set of leaves. It is now approximately 2" tall and the first fan leaves are about 1/3" long. Growth is steady and effortless for this girl.
So far the self watering set up, grow light, and medium have been treating plant A great. After 60hrs she became fully exposed. Plant B germinated as stated before and died, Plant C was planted 5 days into the germination week of Plant A. No pre-soak, just dry seeds dropped directly into the medium. Miracle Grow myth has so far been proven wrong (performance organics, not regular potting soil).
In addition to the set up, I found a water bottle diffuser I have on a 6hr rotation (6 on and 6 off) that I found for $9USD at a grocery outlet. Humidity now steady at 31% on the gauge and about 65% Relative Humidity. Temps sit steady around 68-71°F.
Shooting for 360g or 180g from each plant utilizing LST. We are seeing if organic miracle grow has enough nutes for an autoflower, with 3 months of nutrients as stated from the bag it should end up timing out perfectly for harvest time with no flushing needed as nutrients will already be used up.

Processing
Likes
103
Share


@MG2009
Follow
08/30/2008
Day 1 week 4
Seedling leaves turning pale, started nutrients today Advanced Nutrients Grow,Micro,Bloom at .25% quarter strength 💪 of recommendation. I will ease her into the nutes. First res. Change today also.
Ps.
I noticed under day light she has burgundy coloured stems,like her mom but we will see if adding nutes changes this... I believe it's genetic ! 😎
Also changed lights to 16-8 and red spectrum turned to 50%, prepare her for the flip!.....
09/05/2018
Noticed i noticed in the last pic a little fert burn 🔥 but that's why I increase it slow 🐌 but got decent amount of growth so onto 1/2strength for next reservoir change in week 5 .😎
Likes
40
Share


@Mr_und_Ms_Lue_Roots
Follow
Das Blütenwachstum schreitet gut voran. Die Blüten werden jetzt fülliger und der Geruch hat stark zu genommen. Trichome bilden sich langsam.
Seit dieser Woche geben wir auch PK 14/15 ,05-,075 ml/ l pro Tag in die Nährstofflösung.
Wiegehabt gießen wir jeden Tag ca. 3 Liter inkl. Co2 Zugabe.

Likes
4
Share


@Mr_nugs_lover_David
Follow
This lady looks absolutely gorgeous, she's got big beautiful leaves, I cannot wait to transplant this lady and make her become a beautiful fat bush! Let's do this! I'm very glad to be working with this strain this 2021 outdoor season, this lady has been Transplanted after 34 days since planted to her definitive 30L texpot, let's see how this lady performs!!

Likes
24
Share


@Newbiegrower420
Follow
Day one of week five! 19th September!
Small amount of defoliation today as some leaves had been laying on the soil and were turning yellow. Other than that the girls look good I think. A little more LST but think Ive got a good even spread so far.. 🤞🏼
Nutes gone in today Biobizz: Grow/Bloom/TopMax all at 1ml per litre..
Day 3 of week 5! Update 21st September:
Nutes gone in again today BioBizz Grow/bloom/Top Max all at 1ml per litre...
Starting to see signs of filtered water deficiencies so CalMag going in on next feed @ 1ml/l. Wasn’t sure if my water filter was much cop but looks like it’s better than I thought. Wish I’d gone with my gut and started the CalMag earlier! Other than that I’m giving them a couple more weeks of veg and then we’re going to flower 🌷 all being well 🤞🏼❤️
Day 4 UPDATE: 22nd Sept.
More LST to keep things all the same height and encourage more new growth sites..
Day 5 UPDATE - 23rd Sept:
Last lot of Nutes for the week - BioBizz Grow/Bloom/Top Max @ 1ml/l and now that CalMag has gone in @ 1ml/l I’m hoping to not see anymore brown spots on my leaves 🤞🏼🍁
Happy growing everyone!! 🍃 🍁

Likes
6
Share


@DogDoctorOfficial
Follow
💙 Project Blue Tent – Week 7
Blue Waffle F1 – Pheno B (Folder 13B)
Hello everyone, and welcome back to another chapter of Project Blue Tent! 💙🌱
If you're joining us for the first time, welcome aboard.
Project Blue Tent follows four individual Blue Waffle F1 plants from Zamnesia, each documented separately from seed all the way through harvest.
All four sisters share the same environment, lighting, nutrition, irrigation and training techniques.
The idea is simple:
Keep the environment as consistent as possible and let the genetics tell the story.
And despite all those similarities, each plant still manages to develop her own little personality.
Today we're checking in with Blue Waffle F1 – Plant B.
And if you've been following her journey...
You might remember that this is the girl who had a rather unexpected visitor last week. 🐛
Don't worry.
She's absolutely fine.
In fact, judging by the way she's growing...
She seems to have completely forgotten it ever happened.
────────────────────────
🌿 Week Seven – The Canopy Is Ready
This week feels like the end of one chapter and the beginning of another.
For several weeks we've been building the canopy.
Topping.
Training.
Guiding branches.
Installing the SCROG.
Tucking shoots underneath the net.
Slowly filling every available space.
And now...
We've done it.
The canopy is essentially where I want it.
Plant B is sitting at approximately 60 cm, just like her sisters, with the SCROG keeping the plants at a remarkably even height.
Looking from above, it's becoming increasingly difficult to distinguish one phenotype from another.
That's actually one of the most fascinating things about this project.
Four individual plants.
Four individual diaries.
And yet, under identical conditions, they're producing an incredibly uniform overall canopy.
Plant B has once again filled her section beautifully.
She's healthy, vigorous and absolutely covered in potential flowering sites.
So now it's time for the final preparation before we flip.
────────────────────────
🕸️ The SCROG Mission – Completed
The SCROG has been one of the most important pieces of the puzzle during this vegetative cycle.
Instead of allowing the plants to develop a few dominant vertical tops, we've spent weeks encouraging the branches to grow horizontally across the screen.
Every time a shoot tried to escape upward, we'd gently guide it underneath the net and into the next available square.
Slowly...
The empty spaces disappeared.
And eventually, the screen became one continuous canopy.
That's exactly what we wanted.
The purpose isn't simply to keep the plants at 60 cm.
It's to distribute the growing tips across the available light and create a more uniform structure for flowering.
And Plant B has handled the entire process beautifully.
Now that the screen is full, however, our priorities are changing.
We're no longer trying to add more foliage.
We're preparing the foliage we already have.
────────────────────────
✂️ Defoliation – The Final Vegetative Cleanup
This week's main event is defoliation.
And this is an important distinction:
Defoliation isn't about removing leaves because they look ugly.
It's not about trying to make the plant look "clean."
And it's certainly not about stripping every leaf from the plant.
Leaves are the plant's solar panels.
They're valuable.
So the objective is selective removal, not destruction.
After several weeks of vigorous vegetative growth and SCROG training, the interior of the canopy has become extremely dense.
There are leaves overlapping one another.
Branches crossing through crowded areas.
And sections of the plant where airflow and light penetration can be improved simply by removing some unnecessary foliage.
That's what we're addressing now.
We're opening the plant.
Creating breathing room.
Improving visibility.
And preparing the structure for the much denser environment that flowering will bring.
────────────────────────
🌬️ Why Do This Before Flower?
This timing is very deliberate.
Defoliation is a form of stress.
Even when performed correctly, removing a substantial amount of foliage temporarily forces the plant to adjust to a new balance between its leaves, roots and active growing points.
So I want that recovery to happen before flowering begins.
We're still running an 18/6 vegetative schedule.
The plants are actively growing.
They have time to recover.
And we're not simultaneously asking them to transition into a completely different developmental phase.
Once flowering begins, I want the plant's attention moving toward flower development rather than recovering from major structural work.
So we're following a very simple sequence:
Build the canopy.
Fill the screen.
Defoliate.
Recover.
Flip.
One step at a time.
────────────────────────
🧠 What Defoliation Actually Achieves
There's a common misconception that removing leaves automatically means more light equals more growth.
It's not quite that simple.
The reason we're doing this is to improve the overall efficiency of the canopy.
We're trying to create a better relationship between:
🌱 Growing sites
💡 Light penetration
🌬️ Air movement
🍃 Leaf density
? Plant structure
The upper canopy is already receiving plenty of light.
What concerns me more is what happens underneath it.
A dense interior can become a maze of overlapping leaves and branches.
By selectively removing some of that congestion now, we're creating a more open structure before the flowers begin developing.
And that's particularly valuable inside a compact tent where four vigorous plants are sharing the same space.
────────────────────────
🌿 Plant B – The Girl Who Bounced Back
And then there's Plant B.
The survivor of the infamous caterpillar incident. 😂🐛
Last week she had a tiny visitor arrive from the outside vegetable garden and apparently decided that one of her leaves would make an excellent snack.
Fortunately, the entire event was almost comically uneventful.
The caterpillar was found.
It was removed.
The affected area was cleaned up.
The entire tent was inspected.
And Plant B simply continued growing.
No meaningful setback.
No visible stress.
No drama.
If anything...
She seems to have responded by growing even harder.
Her foliage is now rich, healthy green from top to bottom.
The new growth is vigorous.
The branches remain strong and flexible.
And the canopy has continued expanding exactly as planned.
So I think it's safe to say:
Plant B won that battle.
The caterpillar got one meal.
Plant B got another week of growth.
I'd call that a draw. 😂
────────────────────────
💧 Drip Irrigation – Doing Its Job
The Mars Hydro drip irrigation and automatic drainage system continues to impress me.
Each plant is currently receiving approximately 1.2 litres of nutrient solution per 24 hours, delivered consistently through the individual drippers.
The runoff is then collected and removed through the automatic drainage system.
That consistency has become particularly valuable now that the plants are getting larger and the root systems are becoming increasingly demanding.
Instead of manually trying to reproduce the same watering pattern every day, the system gives the plants a predictable routine.
And the plants are clearly responding well to it.
Healthy foliage.
Strong growth.
Stable development.
It's one of those pieces of equipment that quietly does its job in the background...
Which is exactly what I want from an irrigation system.
────────────────────────
🥥 Feeding Program
The nutrient recipe remains completely unchanged this week.
There is simply no reason to interfere with something that's working.
Current feeding:
• Plagron Hydro A — 1.9 ml/L
• Plagron Hydro B — 1.9 ml/L
• Plagron Hydro Roots — 1 ml/L
Current EC:
1.92 mS/cm
pH:
5.8
For now, I'm keeping the nutrition exactly where it is.
The plants are showing excellent colour, vigorous growth and healthy structure.
We may increase the nutritional strength next week depending on how they respond after this defoliation and as we move into flowering.
But I prefer to make that decision based on the plants rather than simply increasing numbers because the calendar says we should.
They'll tell me when they're hungry.
────────────────────────
🌡️ Blue Tent Environment
The environmental conditions remain wonderfully stable.
This week's average conditions were:
• 🌡️ Day Temperature: 28°C
• 🌙 Night Temperature: 25°C
• 💧 Relative Humidity: 65%
• 🥥 Substrate Temperature: 24°C
• 💦 Nutrient Solution: 18°C
• ⚗️ pH: 5.8
• ⚡ EC: 1.92 mS/cm
• 💨 CO₂: approximately 450 ppm
• 💡 Light Schedule: 18/6
• 💧 Irrigation: approximately 1.2 L/plant/24h
• ? Pot Size: 8 L
• 📏 Plant Height: approximately 60 cm
The consistency between the four plants is one of the things I appreciate most about this project.
We're trying to remove as many environmental variables as possible so that when differences appear, we can look much more closely at the plants themselves.
And right now...
The similarities are remarkable.
────────────────────────
🌱 Four Sisters, One Canopy
This is perhaps the strangest part of the project at the moment.
When I look across the Blue Tent from above, the four plants almost look like one giant organism.
The canopy is extremely uniform.
The colour is consistent.
The height is consistent.
The growth rate is remarkably similar.
And the SCROG has done an excellent job of bringing everything together.
Of course, if you look closely, you can still see the individual personalities.
That's why these separate diaries exist.
But from a distance?
It's becoming increasingly difficult to tell who is who.
And honestly...
That's a beautiful result.
It means the environment is doing exactly what we wanted it to do.
────────────────────────
🌿 Plant B's Personality
Plant B continues to be one of the more naturally cooperative plants in the tent.
She's responsive to training.
She's vigorous without becoming unruly.
And she has developed an incredibly usable structure beneath the screen.
Her branches have thickened nicely, her internodal spacing remains compact, and the new growth continues appearing with that healthy, vibrant colour I've been looking for.
And perhaps most importantly...
She doesn't seem to hold grudges.
We topped her.
We bent her.
We tucked her.
A caterpillar ate her.
And now we're defoliating her.
And she's still standing there saying:
"Is that all you've got?" 😂🌱
That's Plant B.
────────────────────────
👀 Looking Ahead – Flower Is Coming
After today's cleanup, the most important thing we can do is...
Nothing.
Let her recover.
Let the new growth settle.
Keep the environment stable.
Keep the roots happy.
And observe.
This is where patience becomes just as important as technique.
We've spent weeks building this plant.
Now we need to give her the time to respond.
If everything continues looking this good, the next major milestone will be the transition into flowering.
The screen is full.
The excess foliage has been cleaned up.
The structure is ready.
And the plants are healthy.
We're almost there.
Vegetative growth is coming to an end.
The next chapter is going to be very different.
🌸 Flowering is next.
────────────────────────
💙 Thank You
A huge thank you to Zamnesia for making Project Blue Tent possible and for providing these fantastic Blue Waffle F1 genetics.
A heartfelt thank you to Plagron for the Premium Growbags and Hydro nutrient line, which continue providing the plants with everything they need to maintain this beautiful growth.
A special thank you to Mars Hydro for the drip irrigation and automatic drainage system. It has been performing wonderfully throughout this project and has made maintaining consistency inside the tent considerably easier.
Thank you as well to Future of Grow for the UVC LED bar, which remains another tool within my preventative IPM routine.
And of course, thank you to GrowDiaries for giving growers around the world a place to document, learn, exchange ideas and share these journeys.
And finally...
Thank you.
For following.
For commenting.
For asking questions.
For sharing your own experiences.
And for simply being here.
Plant B has already survived topping, SCROG training and a tiny caterpillar invasion.
Now she's clean, healthy and ready for the next chapter.
The canopy is full.
The room is ready.
The plants are ready.
And soon...
we flip the Blue Tent. 🌸💙
Until next week...
Growers Love, happy growing, and take care everyone! 🌱💙
Processing
Likes
3
Share


@Jamminbear
Follow
10/16/18- water Tap-left out to release the chlorine. 1 gallon with Yucca/Fresh Aloe/thriveNAmminos/UrbNatural
Processing
Likes
17
Share


@Silverback_Guerilla
Follow
12/31:
The first two are both coming along nicely, and the reserve/alternate seedling is catching up. 👍
Today was the first day in which I fed them some Big Bloom and Boomerang along with humic acid, pH'd to 6.1.
1/3:
I've been letting them dry out a bit for the last two days. They've got roots coming out the bottoms now...I'll probably transplant them into 5 gallon fabric pots tomorrow or the next day.
I ordered a 4' 180w tube light with 578 LEDs..it has a 360 degree beam with 3000k and a bunch of 660nm. It's waterproof, so no worries about keeping it beneath my canopy to illuminate the lower branches and hopefully increase the density of those buds that never get much top-lighting.
Today, I mounted my two new 24w UVA LED lights (395-405nm) to my frame. I'll run them 6 hours a day from the time I put the plants into my closet, until harvest. It is my understanding that exposure to UVA, particularly during the vegetative stage, triggers many different plant defense hormones, which speed growth and can increase heartiness to withstand constant exposure to UVB without suffering as much cellular damage as usual.
I'm also ordering a 2' Solacure FlowerPower UVB (285nm-310nm) next week to use during flowering to stress the plants and increase trichome production.
1/4:
I did a few foliar feedings with big bloom and fulvic acid today.
1/5:
Transplanting day. I dusted their roots with magic dust and transplant them into 5 gallon pots today. I had some excellent compost with biochar and myco that I mixed into their soil, too. I watered them in with about 2 quarts of their first taste of full strength veg nutes, plus mycorrhizal fungi, trichoderma, beneficial bacteria, and humic acid, then I sprayed them with biotabs boomboom spray when finished. The were moved into the closet under the quantum boards, UVA's, and a pair of MiracleLED blue bulbs. I'll start adding far-red spectra to the equation in the next few days.

Likes
8
Share