




Likes
2
Share


@CalGonJim
Follow
5/5 MONDAY Took out the AC Infinity lights and just went with the 2 cheap blue and red lights. Samsung 301B.. H?....great lights but so powerful and no blue red combo. I noticed the plant grow towards the red spectrum LED than the whiter ones on the AC system. There are 2 on each bar. I use the AC lights as auxiliary when I get need it for taller plants with lots of vegetation. 2pm looking great.
'"Sir, I have seen nae deerskin treaty, nor have I seen fairies or water sprites. But what I do have are Malay coins, enough to bury you. Prayer beads, not enough to get you to heaven. And hashish, enough to ease my grieving when the East India Company slit your throat, which, of course, they will."
― Brace in a conversation with James.
5/5 11pm Monday night, MORNING for me.....WHAT IS THIS?????
CONKEY IS ALIVE!!!!!!
CONKEY IS ALIVE!!!!!!
CONKEY IS ALIVE!!!!!!
CONKEY IS ALIVE!!!!!!
CONKEY IS ALIVE!!!!!! HOLDY SHILT I CANT BELIVE IT, NOW WHAT THE FUCK DO I DO???? I GOT OUTSMARTED BY A SEED!!!!!! A-FUCKING-GAIN!!!! HOW CAN I NOT BE SMARTER THAN A SEED....??????🚨
5/6 1230am..... ALL OF THIS IS SOMEONE ELSE FAULT....... Now I have a freakshow Siamese twin plant, PERFECT.
When Im not flying off in a rage about things I break....it's a fucking comet of disaster.... I typed comedy you stupid ficler.... Maybe I keep them in the same pot and call them Cory & Trevor!!!
2am They are getting a little humid so I have to open the top for a while. The cheaper lights work better. and are less than 15w
5/7👍🚨Looks like Cory & Trevor are fighting 😂😂
5/8 looks good. 8am getting great photos on small iPhone by pulling back a little bit so it doesn’t focus too far behind.
5/10 2am. I was able to empty my disgusting body of toxic shit...these plants are rebuilding by digestive tract and systems. A multi-year painful endeavor I have achieved through weed. so fuck you if you dont like it. I will defend my rights with overwhelming force. if you try and take it. you know exactly what I mean and yes this means you badgey mc fafo.
5/11 12 pm
Likes
190
Share


@Sparkles
Follow
April 8 - added a few more pics of lights ;)
Brought to u by Mars Hydro. Grow on Earth. Grow with Mars.
All pics and video flower day 56.
Lights are running at ~60%. 18” away from canopy.
Can’t wait for her to finish. Hope u enjoy the pics
Likes
7
Share


@HardNuggGrow
Follow
Just started my flush. My first time using a flushing agent . ran 2 gallons of water Through with 1 tsp of sledge hammer in each. manufacturer recommends 2 teaspoons I’ll move up Depending on how it acts to this dose. Runoff was at 568 ppm and 5.8 ph. I don’t know if I should have kept running water through Or if this stuff eats up the PPM’s Without overwatering I don’t know we’ll see. Open to advice . Overall she is doing well

Processing
Likes
54
Share


@Mimi420
Follow
Hi growers!
The kushes are buding nice!Bubba kush started to coloring a litle.Dutch kush have such a nice smell.Loove the smell that is coming from the tent!
Stay green!🌱


Likes
2
Share


@CharlieilBrown
Follow
- DAY 71 (13/08)
I have defoliated most of the burnt leaves.
In the evening I sprayed the mix of neem oil (neem oil, water, potassium soap and citric acid).
So, I am continuing with the washing of the roots. The plant visibly needs nitrogen, for the next irrigation I will go back to feeding. This time hoping to be able to feed without problems and that the burns on the leaves will not return.
The girl is growing out of all proportion. Within the next 2 weeks the hormones that will send her into bloom should be triggered.
Everything that I will do relevant in the days of this week I will update it here in Week Comment. I am open to advice, I would be happy if you comment with what you would do in my place.
- DAY 75 (17/08) FEEDING
So, from now on I will feed with half tap water and half distilled. I removed the lemon juice by replacing it with BioBizz PH Down. The starting water should be less loaded with calcium and potassium now.
I irrigated 3 liter of water with:
- 1.2 ml Micro
- 0.6 ml Grow
- 0.6 ml Bloom
- DAY 76 (18/08)
I sprayed the mix of neem oil (neem oil, water, potassium soap and citric acid).
Day/night air temperature on average for this week:
Day 28-36 °C.
Night 18-24 °C.

Likes
1
Share

@Ninjabuds
Follow
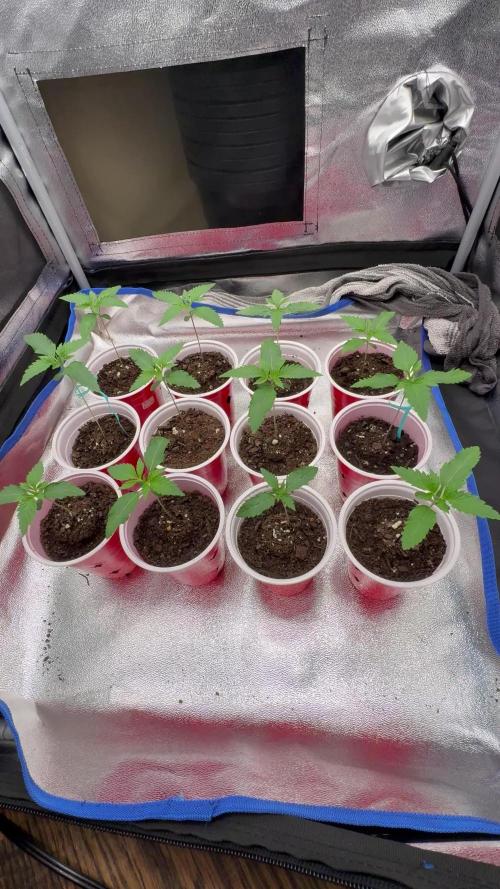
It's been a great week for the seedlings! They've really taken off and are looking strong. I'm planning to transplant them into larger pots in the next few days, so next week's photos should show some impressive growth. I'm so excited to see how they thrive in their new homes! I've been giving them distilled water from the start, and I'm still doing that, but I just started adding 10 milliliters of Fox Farm Big Bloom and 1 milliliter of Fox Farm Grow Big. All of the seedlings are doing really well, and there's not really any visible difference between all the ten strains. I started all ten packs of each strain and kept all the best seedlings, so that's why they're all doing so well.
Likes
10
Share


@CHILLING_RACOONS
Follow
Hi Dear Friends, 👨🌾 👩🌾
Plants showed some deficiencies, but we are recovering it. I prefer to have deficiencies instead excesses..
Maybe It was better if I started a week ago to give Top Veg.
It is the biggest of the cycle and it is really fast.
I notice a HUGE difference compared to other plants growed under the 480w quantum board.
The Kush mintz Fast is under the the XS2000 by ViparSpectra and it is bigger and stronger compared to other plants. Small distance between internodes and stems hard like rocks.
This lamp is really a beast, can't wait to try the new models!!
✅ VEGETATIVE week #7 (LAST WEEK)
30/12 SWITCH 12/12H
📅this week goes from 26/12 to 01/01.📅
💡💡💡Viparspectra XS2000 is working at 50% power.
💉🔍Fertilization schedule:🔍💉
26/12 3ml/lt TOP VEG
30/12 TOP MASS 0.2ml/L + 2.2 ml/L TOP VEG
31/12 SENSI CAL MAG EXTRA 2ml/L foliar spray
WE ARE BACK!!!
We are back after a little pause.
We take a break because we were too busy to post high quality diaries. In the last diaries we tried to post as good as possible and we have to publish about 6 or 8 diaries (in addition to these that we will publish shortly). We opened also an educational Instagram page, we growed a lot in a short amount of time BUT, Instagram suspended our account and we lost all our posts, I was so sad and disappointed... a lot of work lost in a night....
In this diary you will see our journey with Kush Mintz Fast by Original Sensible 🤩, sit down and enjoy the show!
We are growing in a 15L Smart Pot with Light Mix soil by BioBizz under the AWESOME XS2000 by Viparspectra 🤩
DATA SHEET:
Bubba Kush , Animal Mints, Secret Hybrid
Genetics: mostly Indica
Yield: 650g/m² indoor
flowering time: 50/55 days
THC: 25%
Aroma: cookie mint
Effect: happy relaxed
💸💸💸💸💸 Here you can buy seeds of this top shelf strain: https://originalsensible.com/original-sensible-seeds-kush-mintz-fast~21711
_______________________________________________________________________
🔧💡OUR SET UP💡🔧
✔️ 💲💲💲VIPARSPECTRA 🚀🚀🚀🌕🌕
ViparSpectra®️ XS2000 240W Infrared Full Spectrum LED Grow Light:
Excellent ratio between wattage and ppfd, excellent light penetraton, perfect light spectrum (it also has IR 🤩) and it has the best build quality on the market. Until now, built quality is really awesome. You can touch that quality. Materials are really strong, excellent driver and the best leds on the market. Heat dissipation is perfect, the lamp is never too hot and it has a passive dissipator so you will have zero noise. It also has IP65 certification. I like that this lamp is bigger than others, so the 240w of power are well distribuited on the space. Viparspectra has an awesome customer service, and shipping was creazy fast!
This awesome brand also offers 3 years warranty.
This lamp has no rivals.
A special thanks to Emily of Viparspectra ❤️❤️❤️❤️
HERE YOU CAN BUY THIS PROFESSIONAL LIGHT: https://www.viparspectra.com/products/xs-series-xs2000 or https://amzn.to/3dyUoJl
and here you can buy other awesome stuff: https://www.viparspectra.com
✔️ 💲💲💲MARSHYDRO 🚀🚀🚀🌕🌕
📦120X120 GROW TENT: an awesome box, easy and fast to assembly. Made by strong materials, solid zips and it is totally lightproof. The position of holes is optimal and the two lateral windows will make easier the work inside the box. There is also a double end, so you are 100% sure that dirt or liquids will not spill out. You can find it here: https://www.mars-hydro.com/grow-tent/buy-mars-hydro-grow-tent-48x48x80-1680d-4-x-4-size-keeps-all-light-in-top-quality-1680d-canvas-is-tear-proof-and-double-stitched-light-blocking-fast-installation-for-sale
💡TS 600 FULL SPECTRUM 100W LED GROW LIGHT : with this light you will achieve excellent buds, you will not need anything more. This lamp replace a 150w HPS lamp, but, with this Led Light you will smoke bigger, harder and tastier buds because Led have a complete spectrum and a powerful light penetration, so your plants will work as much as possible to make you happy. Psssssss it it extremely cheap and it is only 100w, your bills will never be too high, YOU HAVE NO EXCUSES!! Here if you want this little beast: https://www.mars-hydro.com/led-grow-light/mars-ts-series-led-grow-light/mars-tsw-600-led-full-spectrum-hydroponic-led-grow-light
Thank you Eleen of Marshydro❤️❤️❤️❤️
💣Quantum board - 480w - 4x120w Boards by Zhoangshan Koray Opto-Electronic Ltd.
Samsung LM301B 288 led/board 3000K 0dB noise
+24led/board led Osram 660nm
Efficiency 2.6 umol/J 220 lm/w
Driver: Meanwell HLG-480H-36B
💣Quantum board - 240w - 2x120w Boards by Shenzen Yuanhui Led Ltd.
Samsung LM301H 504 led 3500K 0dB noise
+24led/board led Osram 660nm
Efficiency 2.7 umol/J 220 lm/w
Driver: Meanwell HLG-240H-48B
-ESTRACTION FAN:
Blauberg 125 Turbo Pro Series
Maximum air flow: 430-560 m³ / h 50W 32-44 dBA
-FANS:
A)OSCILLATING FAN D.15cm 2 speeds 20w
B) COMPUTER FAN Sunon DP200A – 230V 20w (Strong, reliable and quiet)
C)Cornawall Electronics Multifan Turbo, three speeds, can be used both on support surfaces and mounted on the wall. High capacity, about 740 m3 / h. High silence and reliability.
💊💉💊FEEDINGS:
We used BioBizz light Mix
TOP CROP:
-DEEPER UNDERGROUND: to stimulate roots system
-TOP VEG: for a excellent growth in the vegetative phase
-GREEN EXPLOSION: to promote creation of bud sites and to allow a faster growth
-MICRO VITA: bacterias for equilibrate the soil and to make the plant healty
-BIG ONE: to stimulate bud sites and to stimulate resin production
-TOP BLOOM: to achieve excellent big and hard buds
-TOP CANDY: to feed the buds with molasses for a tastier smoke and to gain weight
-TOP BUD: to enlarge buds and to gain weight
PLAGRON: PK 13-14 to have big and hard buds and to feed plants with lower effort
ADVANCED NUTRIENTS: Sensi Cal-Mag Extra-> for cal mag deficiency
GROTEK: CAL MAG for cal mag deficiency
HESI: PowerZyme to clean and balance the soil. It feeds the plant cleaning the soil.
GHE: - Final Part (ex Ripen) accelerate the final flowering phase, dissolves minerals in excess
- Flash Clean to flush the plant and to be sure that all excesses are out from plant and pot
These two products improve A LOT the smoke of our babies
-PURPINATOR to stimulate flavonoids and to have a better taste and smell.
____________________________________________________________________________________________
🙏❤️ THANK YOU FOR BEING HERE ❤️🙏
Please leave a comment with your opinions, it is very important to us to have a comparison.
If you like our job, tap the weed button and follow us. It will be really appreciated.🙏
We want to thank again everyone that help us in our project. You support us to support our dream. ❤️
SPREAD THE LOVE OF THIS PLANT ALL AROUND THE WORLD
🌿Thank you again🌿
❤️Sweet hugs❤️
👨🌾CHILLING_RACOONS👩🌾

Likes
29
Share


@Edenganj
Follow
Today is their first day out, they aren’t loving it. Hopefully they’ll adjust. Has any one used King Crab before?


Likes
4
Share

@Ninjabuds
Follow
My LIT Marker plant is thriving, and it's interesting to see the similar leaf structure to the Black Valentine I grew from LIT Farms. I gave it a dose of calcium this week, hoping it will help green up the leaves and keep it healthy.
It's been a challenging week with the constant rain and ridiculously high humidity. Keeping things dry indoors has been a real struggle. Despite the weather, I managed to flip all my feminized photoperiod plants to flower this week. I'm hoping the switch will go smoothly, but with this humidity, it's going to be tough.

Likes
32
Share


@GODSGIFT_2005_JM
Follow
🍼Greenhouse Feeding BioGrow & BioBloom
⛺️MARSHYDRO
The ⛺️ has a small door 🚪 on the sides which is useful for mid section groom room work. 🤩
☀️ by VIPARSPECTRA (models: P2000 & XS 2000)
🌱 DUTCH HEADSHOP SEEDS:
www.dutch-headshop.eu
www.dutch-headshop.nl
ONE STOP SHOP
. 100% germination success on first try! with HUGE seed selection!
. Very friendly customer service
. Best bio-seed packaging
. Sells other products @ best prices:
. Nutrients
. Vaporizers
. Smoking accessories (grinders, cones)
. CBD Tinctures
. Resin Extracts
. Boveda humidity packs
. Ziplock bags
. Other health supplements such as:
. Lion’s Mane Organic Capsules
. Hemp Seed coffee

Likes
46
Share


@RedBeardGreen
Follow
This week I transplanted the clones of the first plants in flower.( 1 gallon container ) I also finished the final defoliation of the six bigger plants in veg before they get moved into a 11/13 light cycle (about 2 weeks). Pheno #2 at the moment is my favorite. All though it’s the smallest plant it has an amazing pheno that smells like blueberry gummy bears. The rest are showing strong cheese tones with hints of berries.

Likes
32
Share

@GODSGIFT_2005_JM
Follow
🍼Greenhouse Feeding BioGrow & BioBloom
⛺️MARSHYDRO
The ⛺️ has a small door 🚪 on the sides which is useful for mid section groom room work. 🤩
☀️ by VIPARSPECTRA (models: P2000 & XS 2000)
🌱 DUTCH HEADSHOP SEEDS:
www.dutch-headshop.eu
www.dutch-headshop.nl
ONE STOP SHOP
. 100% germination success on first try! with HUGE seed selection!
. Very friendly customer service
. Best bio-seed packaging
. Sells other products @ best prices:
. Nutrients
. Vaporizers
. Smoking accessories (grinders, cones)
. CBD Tinctures
. Resin Extracts
. Boveda humidity packs
. Ziplock bags
. Other health supplements such as:
. Lion’s Mane Organic Capsules
. Hemp Seed coffee
Likes
12
Share


@Chamed33
Follow
Second time flushing it.. I’m also running out of time before harvest I should’ve been flushing it a week earlier.. she’ll be ready in 2 days for chop


Likes
27
Share


@OldDabKing
Follow
Watered in 2ml of ChitoSal this week, also introduced TNB Naturals Co2 "The Enhancer" into the tent to help raise the Co2 levels in the 2X4 tent. Adjusting LST ties as the plant grows, and removing drying/dying fan leaves from first and second node.

Likes
35
Share


@Pietcandwcbucket
Follow
2x Plants with liqui cannabiz doing very - ghe tri 2x coming along (adjusted their nutes) lets hope for the ge best..ill be doing some fimming through out he week.. Hopefully side branches eill catchup during stretch period.. Looks like 2 showing signs of flowering.. Hectic week ahead @ work - will try my best not 2 f&#k things up..sofar so good.. Had some issues with LC buckets - looks like ektra NSol solving the issue.. Lets see changing all nutes 2morrow
Likes
2
Share


@TheBudWhisperer
Follow
Week 4’s in the box and these plants are lightning quick outta veg. We’ve confirmed the presence of at least 3 males and 1 guaranteed female so far. They’ve all started to hit vegetative maturity in full stride so it won’t be long until we look to flip. A couple have been topped once more for the sake of additional colas and if we get lucky, the remaining females may be suitable for a scrog. Either way, can’t be much happier about how well they’re growing at this stage. Here’s hoping it remains so through flower🤞.
***Notes: strongest plant to this week is first confirmed female. Prob a prime candidate for cuts and back pollination with the F1 pollen dump.***
Likes
21
Share


@RussianGrower
Follow
Greetings from Russia to my comrades! I was busy with work for a long time and could not deal with my diaries. Now I'm free and ready to devote every day to my plants. I have a lot of plans. My mom is coming to the end of 6 weeks. She feels great and cheerful, develops well, visible progress. While I do not train him, and give him free growth. I gave my plants the enzymes, together with the chief stimulator and the main force, Then I fed the plant folic acids under the root and on the leaves. Soon I will make my girl an intimate haircut. And in a few weeks, I'll be making the third tier of the pot.

Likes
16
Share


@DTHEREID
Follow
Chopped the big tooth since she was flushed earlier due to issues. Also have the purple gorilla auto chopped and drying.
Still flushing strawberry eclair and critical jack to come down next.


