


Likes
Comments
Share

@MaxWax
Follow
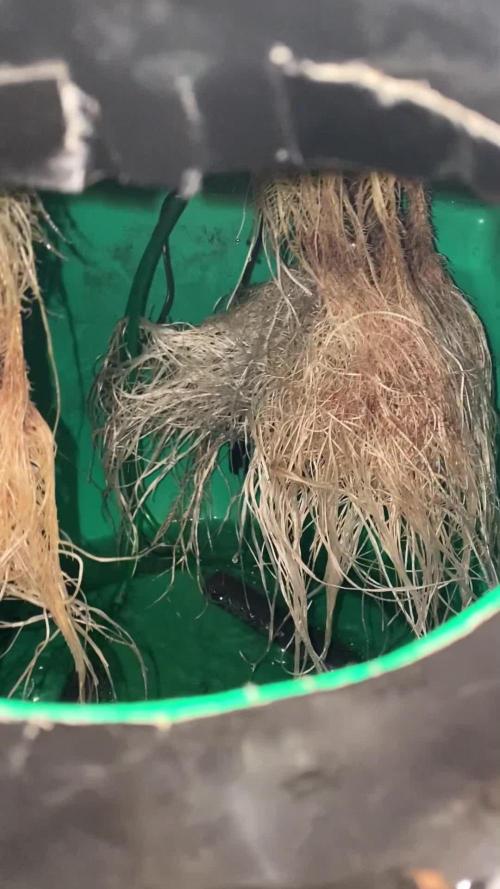
The plants are doing quite well so far, but one is much bigger than the other. At first, I thought it was due to genetics. However, I'm starting to suspect that it might be my fault—specifically the frozen water bottle I use to regulate the reservoir temperature. If I don't use the ice bottles, the temperature rises above 22°C, but I think the roots of the smaller plant might be getting a cold shock.
I’ve already learned a lot from this project that I will do right from the start in my next DWC grow 🙂

Likes
Comments
Share


@Budking420
Follow
This nug is getting huge on top hole mackerel! I'm super excited for this idk what's I'm doing that it likes so much I just fed it grow dots and that's it just been keeping it wet with the self watering ac infinity bases! Check back in a week to see how far it has progressed!


Processing
Likes
24
Share


Likes
199
Share


@Teamdirtbag2
Follow
Ok things are moving.... they must... time doesn't stop. I have a lot of new stuff. And I am cloning everything. (This diary will only end when it wont accept any more info or seeds) so I have labeled pics. And I will place my newts correctly soon. But for those who know I only really use General Hydroponics. If anybody has questions don't be hesitant to ask... I know there is info that I am not so upfront about. But all and all I think everyone is growing good. Well except for my bitch (slurricane). One week she is good and then sh*t .... wtf... I think she will like the California Sun. ( its really different here!!!! ) I will start introducing Dutch Buckets ( 3 gallon ... DIY ) some plants are telling me they need it ( Gorilla Zkittles ). And let's not forget about DVG she is still playing lock out games. But I have a feeling about it. Fuck it let's play. 😎

Blue Gelato 41 · Barney's Farm
Gorilla Zkittlez · Barney's Farm
ShiskaBerry · Barney's Farm
CBD Lemon Potion Auto · Barney's Farm
Pineapple Express Auto · Barney's Farm

Cream Mandarine Auto® · Sweet Seeds

Foul Mouth · Dungeons Vault Genetics

Fire OG · Custom Breeder & Strain

Slurricane · In House Genetics

Moon Walker Kush · Spliff Seeds
Strawberry Lemonade · Barney's Farm
Purple Berry Kush · Spliff Seeds

Diesel Fire OG · Relentless Genetics
Spliffs Strawberry · Spliff Seeds
CBD Spliff Berry · Spliff Seeds
Citrus Farmer · Dungeons Vault Genetics
Tahoe Kush · In House Genetics
Likes
10
Share

@OnlyBuds
Follow
Week 6 – Fat Lemon Energy 🍋🔥
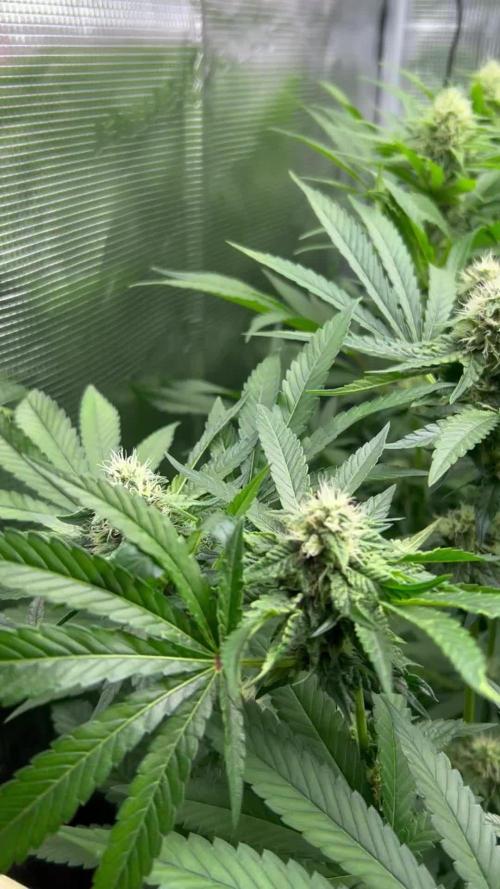
Week 6 is here and the Lamin-O-Gs are doing their thing – stacking, swelling, and smelling like straight-up citrus bombs.
Buds are thickening up, pistils are firing everywhere, and the canopy looks like it’s ready for takeoff. 🚀
💧 Feed for the week (15L):
• 20ml Topmax
• 70ml Bloom
• 50ml molasses
• 30ml EM (Effective Microorganisms)
• 30ml CalMag
The nitrogen fade is on point – older leaves are gently fading, feeding the flowers, while the tops stay lush and green. No drama, just bloom power.
These girls are soaking up every watt of light without a single complaint.
Full throttle. Lemon OG jungle vibes. 🌴
Next week? Expect even more frost and bulk – these ladies are just getting started.
Stay tuned, amigos. Only buds, no stress. 💚

Likes
26
Share


@Gunnen
Follow
Week 2 plans are to water when dry between 6.2-6.6 PH, as nutrients are organic slow release. Plan is to also keep light height around 36" to allow some plant stretching. Environment 50-55 RH, temps around 23C. Making sure to water bottom of fabric pots to encourage lower soil to be moist for root development. Update pictures as week goes along, ladies seem happy so far.

Likes
13
Share


@leithsffs
Follow
I started harvesting 6 days ago. I'll finish it tomorrow.
I was in trim jail Aaaaalllllll day today. I started at 5:30am and finish putting the last label on the jars at 6:30pm. I did, however, take a 1 hour break for lunch.
The results for Sept 21:
Orange Sherbet FF - 188.43 grams, 6.73oz (2 plants)
Gorilla Cookies FF - 86.97 grams, 3.1oz
The results for Sept 27:
Orange Sherbert FF - 104.5 grams, 3.73 oz (2 plants)
One more quick trim day to go.
The results for Oct. 3:
Gorilla Cookies FF - 36.28 grams, 1.3 oz
Not including all of the little popcorn buds I chopped up and threw into the trim, it's 14.86 oz.
That's it for this run.
Take care, gromies!!


Likes
10
Share


@Jbcultivates
Follow
Great grow, dealt with some pests that took a few plants from me . But overall my best grow quality so far and I’m very happy with the grow!

Likes
307
Share


@Ju_Bps
Follow
Hello growmies 👩🌾👨🌾🌲🌲,
👋 The babies keep growing well.
The burned has been recovery,
Still the mutation on the #1, since the 3rd nodes, she's doing 1 leaves instead of 2 per nodes, really strange, maybe I could recover with toping and hoping the secondary stems will develop 2 leaves per nodes.
Starting nutes and give more and more water.
💪 No Training for the moment, just let Grow.
💧 Give water each 2/3 day
And vaporise plant with water + Plagron Roots (1ml/l)
0.25 l Water + Roots + Grow (1 + 2 ml/l)
0.25 l Water + Roots + Grow (1 + 2,5 ml/l)
0.4 l Water + Roots + Grow (1 + 3 ml/l)
PH @6
💡Mars Hydro - FC 3000
50% 77 cm.
Mars Hydro Fan kit
Setting 8
Have a good week and see you next week 👋
Thanks community for follow, likes, comments, always a pleasure 👩🌾👨🌾❤️🌲
Mars Hydro - Smart FC3000 300W Samsung LM301B LED Grow Light💡💡
https://www.mars-hydro.com/fc-3000-samsung-lm301b-led-grow-light
Mars Hydro - 6 Inch Inline Fan And Carbon Filter Combo With Thermostat Controller 💨💨
https://www.mars-hydro.com/6-inch-inline-duct-fan-and-carbon-filter-combo-with-thermostat-controller
Anesia Seeds - High Mars 36% THC🌲🌲
https://anesiaseeds.com/product/high-mars/

Likes
6
Share


@Magical_Surgeon
Follow
After you found some good sector and clone it you let the mycelium grow and fill almost all the petri dish like I did last week.
So now you're ready to move forward.
Making grain spawn!🍄🍄
For grain you can use Organic Rye Berries, but you can also get away with wheat berries, or brown rice or even corn kernels(which I used myself) !
And you'll need some mason jars or honestly I used some jars that I had home just clean them very well and sterilise before using
Making a grain spawn can be broken down into 6 easy steps.
🍄Hydrate Grain By Soaking
🍄Make Specialized Lids
🍄Simmer, Drain and Dry The Grain
🍄Sterilize
🍄Put your agar in the jar
🍄Colonize
🍄Soak the grain by placing it in a bucket, covering in water, and leaving it for 12 -24 hours. Easy.
🍄Drill 1 hole on top of the lid. Right in the center and cover with a small dab of high temperature silicone sealant, and leave it overnight to dry. And your jars are done. There other diff types for different methods like liquid culture etc. But I'm just going roughly through what Ive done.
🍄The next step is to simmer the grains on the stove. This will thoroughly hydrate the grains, and will soften them to make them easier for the mushroom mycelium to consume.
Cook soaked grain on the stove for about 15 minutes. You don’t want to cook it too long, because eventually all the grain will crack and you’ll get some mushy grain spawn. We don't want that. 🧐After the grains have simmered on a low boil, you’ll need to drain them off. What I did is I drop them in the sink with the drain cover on. The grains will drain over an hour or so, after which you can go ahead and fill your jars.
🍄Once your jars are filled, they need to be sterilised.This kills off all the other nasty contaminants in the grain cover the lids in tinfoil (to prevent water dripping into the lid) and then just pressure sterilise them for about 90 minutes at 15 psi.
🍄After that let them cool down. Get your SAB, wipe down the walls with some alcohol wipes and place the jars inside. And wait untill they will be warm to the touch... not hot and painful 😤patience is key. Bring in your plates that had been stored by you in a dark place. And what u have to do is sterilise your scalpel and just accurately and efficiently decide your mycelium into about 10 pieces and quickly place them in your jar. And complete for every jar u make. You have to be very quick. The more you keep you're jar and your agar plates lids open the more cans they will get contaminated. There certain technics you can see online..
🍄Ones you're done close all your jars lids tight and Jake your jar so the mycelium pieces will mix around the jar and place them in the dark place to colonize. And just keep waiting... 😅 Untill the mycelium will conquer your grain. Keep your eyes on the jars, any weird smells or colour during the waiting time.. because that would mean you got a contamination going on. Oh yeah and when about 55% of your jar is filled with mycilium shake the sh*t out of it so it will break the mycilium inside and make spread more faster.
Likes
2
Share


@Viccrazyweed
Follow
Shit got serious, my biggest fear has come true, the XXL pheno is here
She has grew even more than the roof so i had to perform the LST in order to provide her some regular light instead of the madness she was being
This is going crazy as hell wtf this auto is growing even more than the photoperiodic ones


Likes
16
Share


@Canadian
Follow
I did not now the weight of how much dry or wet flower I have because I decided to freeze right away all of the flower and after 24 hours in the fridge I created bubble hash unfortunately I only took pictures of the first batch total amount 58.6 grams of bubble hash of excellent quality despite treating this plant really badly it give me a very abundant flower With incredible density

Likes
12
Share


@SnarkyGoat
Follow
Day one of the 14th week was October 24th. The trichomes on the small bud leafs are still clear resin. The hairs are about 70% dark and many are receding back toward the bud. Harvest time is getting close.


Likes
27
Share


@babyboo
Follow
The looks on this one are sexy! It also burns even.
Effects wise, first 15 mins you perceive a high cerebral rush that peaks at 30 mins. Makes you feel creative and with energy. Later on, the cerebral effect dissipates and leaves you feeling all giggly and relaxed in da body.
The smell is all about sweetness and gas with a funky grapey smell hugging and keeping those close.
Colors didn't showed much cause of the 24/0 light cycle but it ended up showing some purple hues during late bloom.
Overall this girl was so fn grateful with the treatment she received.
Likes
20
Share


@MrWolfe
Follow
Upgraded day 21 to luxx 645 pros, absolutely love these, amazing coverage and way less heat output.


