Check the winners The Grow Awards 2026 🏆 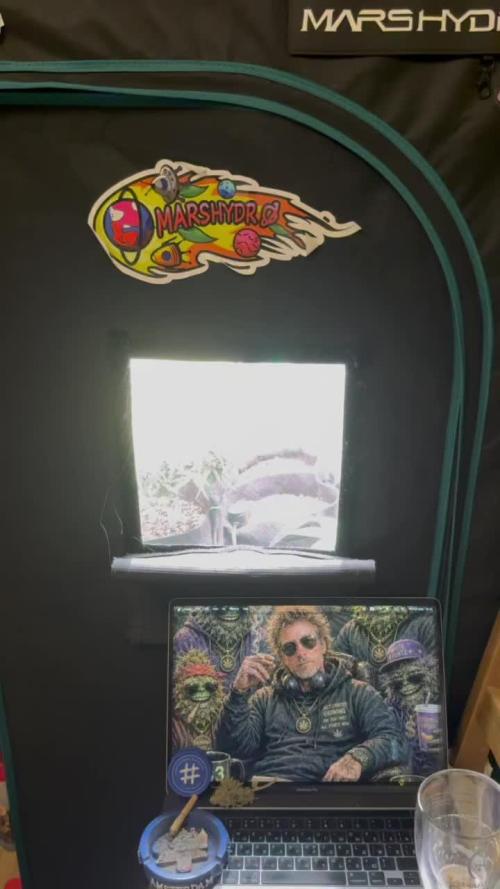


Likes
Comments
Share
@hassehujasse
Follow
Les invito ver como me estoy dedicando de lo que hago. 24/7 desde el mes febrero Hagalo-Te Ayudare Siepre😎 PPFD 1500 Co2 1200 28C 60 RH
She is doing well all what I want
Likes
66
Share
@DrGreenThumb95
Follow
Finished the last week of flushing WOO! and its harvest time! I put them in 48 hours of darkness on Wednesday ready to crop for saturday, I will do a proper harvest report next week when I have them ready to go into curing jars along with some pictures and a full report, but I will add this some of the smells I was getting whilst trimming where unreal smells like pine, citrus, beef and a really faint sweet smell I cant put my finger on... I'm not saying that's 100% what it smells like but it smells similar to wild garlic. Well these b*tches took 14 long hours( could of done it quicker but we made a day of it ) all bud is trimmed and primed for drying then curing.
Happy Growing 👊👍

Likes
3
Share
@Bread_n_Buds
Follow
We don't hide behind a finger, nor behind a rolled joint nor behind anything, the Permanent Marker is the strain that has the most Hype at the moment in a few years and we also expect a lot from this one from Zamnesia.
The cover of the seed pack alone is something spectacular, it seems to have been made by the best Street Writers. I know he is a master of Tattoo but here I see at least a minimum of past in Writing, in the hip hop sense of the term.
If you only look at them a week ago it doesn't seem true, but when the plants start, they go and the Permanent Marker go like a rocket.
In this diary you will find the plant that we will let grow straight, applying only a few techniques that do not involve cutting to preserve its characteristics of speed. After taking the first fertilizers the plant is really doing very very well at a great pace and we expect great things, the internodes are growing very well and we are practically almost in pre-flowering.
The other one you can find in the next diary worked with Topping / Main Lining / Main Folding
The comparison is the salt of the experience.
We have started the Plagron fertilization program, we are in 100% organic configuration, the soil is recycled Promix + 1/3 fresh soil + 10% Perlite + RQS Mycorrhiza Mix (4gr in the mix, 1 gr under the small fiber pot).
We are administering // 1 ml/l of Power Roots - 1 ml/l of Pure Zym - 1 ml/l of Sugar Royal - 3 ml/l of Alga Grow
I have doubts about the compatibility of Pure Zym with mycorrhizae. If in doubt, ask the experts, don't mix too much at random.
https://plagron.com/en
Doubts about Pure Zym / Mycorrhizae compatibility have been dispelled, they can go well together according to Plagron experts. If someone tells you that enzymes eat mycorrhizae, which in principle may seem possible, explain to them that it is not true.
https://www.royalqueenseeds.it/growing/452-easy-roots-mix-di-micorrhize.html
Taste this strain a little bit, it's a cross of legendary strains ---- // https://www.zamnesia.io/en/10966-zamnesia-seeds-tangerine-dream.html
Short Description Zamnesia // When legendary genetics are crossed, something exceptional can only be born. Tangerine Dream is the result of crossing classic strains. With citrus and sweet aromas and flavors, vigorous growth and euphoric and stimulating effects, Tangerine Dream by Zamnesia Seeds has it all. But don't take our word for it: order your seeds now and discover it for yourself.
You can find the whole world of growing on Zamnesia and much more, take a tour of the site and you will find "all the best that nature has to offer" in various shapes and colors.
The new strains are exceptional and the old ones are no less... p.s. for now zero Hermaphrodites, growers can you say the same?
---- // www.zamnesia.com

Likes
9
Share
@Lazy_Stoner_Metal_Grower
Follow
So I started this plant in my miracle grow Aerogarden for about 2 weeks then moved it to the coco pots. When I moved it the stem was really thick and very impressive. I originally had a second generation hydro Hawaii Maui Waui in the tent with her, really just expecting a small grow. Instead this monster took over all the space (and then some), so I moved the Maui Waui out and spread laughing buddha out, added another net and moved the 150w to the lower side to boost the Larf a little and hopefully add weight. So far so good, the stretch was definitely amazing to encounter. She grew a whole other 3x her size, from the bottom net to where she is now. The smell is so fruity it puts the Maui to shame with the deliciousness. AMAZING!!! That's all I can say thus far is FUCKING AMAZING!!!

Likes
3
Share
@Abendkraut
Follow
3rd time trying to write this diary entry and maybe if grow diaries feels like it you will be able to read this entry... [rant over]
What a great week all 3 skywalkers are growing well, a lot of pistils and the first trichomes are already popping out. No sign of stress after pulling the ScrOG at the start of the week.
I kept an eye for hermies and no sign of it.
To the nutrients Plagron's Green Sensation and Power Buds have been added, I keep it at 1ml/L as recommended. The past week I fed 3times with nutrients and in between about 1L Water/plant.
Likes
140
Share
@MrJones
Follow
mrjones - Slurricane #7 S1
🌱Slurricane #7 S1
@inhousegenetics_official
👨🌾🏽GD Grower: MrJones
🔹🔹🔹🔹🔹🔹GOALS🔹🔹🔹🔹🔹🔹
🌞Environment - 75/80℉ and 55% Humidity
💧 Feeding - Advanced Nutrients Organic
⚗️Soil - 50% Ocean Forest / 20% Tupur Royal Gold / 10% Earth Worm castings / 10% lobster Compost / 10% Additional Perlite
🍃Training / HST, Will be topping, Cloning, and creating larger plants, and placing to flower under a trellis
🕷️ IPM - Will be using Green Cleaner" 1 OZ per Gallon, and CannControl from Mammoth alternating between product each month for Integrated Pest Management.
💡Mars Hydro LED / Veg Geeklight Monster Board 480W V4 / Flower 480W FC 4800
🔹🔹🔹🔹🔹🔹🔹🔹🔹🔹🔹🔹🔹🔹🔹
📜 Rambling - With the start of week 5, did some serious HST, super cropping, along with a full stem massage, Jushman Chropratic Style. Let's see how a week progresses and how they look at the week's end,
🔹🔹🔹🔹🔹🔹🔹🔹🔹🔹🔹🔹🔹🔹🔹
▶️ Sunday - 03.07.21- The ladies are loving their new 5 gallon buckets, may be able to feed less per day or just less frequently, the new Pro-Mix HP is really nice.
Super cropping is a high-stress training technique that involves pinching and bending branches to damage the inner fibers while leaving the outer lining intact. ... On a secondary level, super cropping is a way to manipulate how your plants grow
▶️ Monday - 03.08.21- Checked in on these ladies this morning, fed each plant with 40 ounces w/ nutrients, they were looking a little wilted, I also lowered the plants down (removed milk crates from under the drain tray) about 40 inches now from the lights, plenty of room to develop their legs. Will post some pictures later this evening. UPDATE - these ladies are already bouncing back! They are thriving!
▶️ Tuesday - 03.09.21- So after Sunday's session with HST/Super Croping these girls are bouncing back and looking great! They are creating amazing bushes and will be choosing one for mother plants, and transplanting the other 4 outside.
▶️ Wednesday - 03.10.21-these ladies are looking so nice but different, I am learning words likening the thicker ones versa the single Sativa looking 1! All good tonight will feed in the AM.
▶️ Thursday - 03.11.21- Fed full 40 ounces this morning.
▶️ Friday - 03.12.21- Tonight just a close inspection, they are looking great, will be doing a fill IPM on all plants in the morning.
▶️ Saturday - 03.13.21-- Fed full 40 ounces this morning.
🔹🔹🔹🔹🔹🔹🔹🔹🔹🔹🔹🔹🔹🔹🔹
📜 Cultivar Information - In House Genetics - Slurricane #7 S1
🔹🔹🔹🔹🔹🔹🔹🔹🔹🔹🔹🔹🔹🔹🔹

Likes
Comments
Share
@BasedBuds_89
Follow
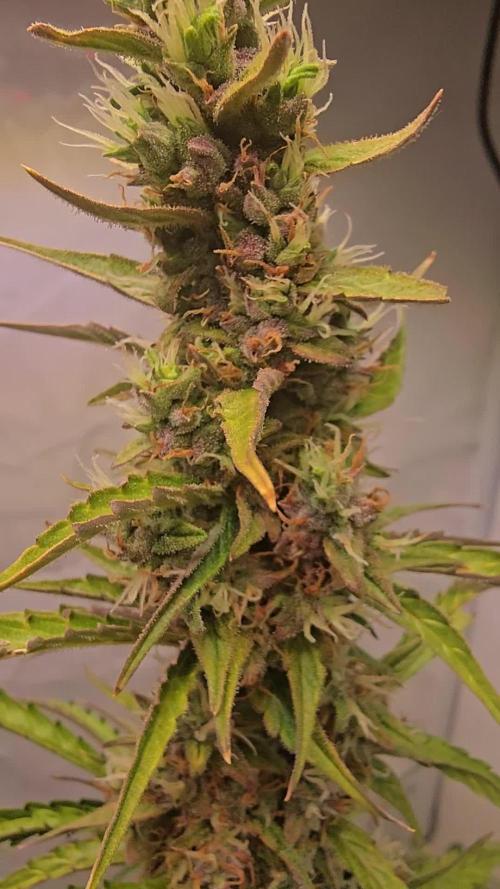
This baby started stretching, getting ready to start stacking up nugs. It has a very skunks smell already. Looking very healthy, going to cut back on nutes and make sure my tent is dry with no humidity.


Likes
4
Share
@Filiaes
Follow
18.06
A way more late update of this grow as I usually provide for two reasons - first I didn't had any time to control or keep care of this grow during the last weekend, second: due to the first point I run into a problem I needed to identify before I update my journal. As you can see in the video there is one plant with some kind of brown leave tips and yellow sugar leaves. I am not 100% sure why this happened but I think it could be some kind of wind burn. I didn't noticed that one slot of my power strips wasn't working anymore, this slot was turning on and off some fans. So the fans just blow straight at least for two days in a row against the plants. Beside that I raised the speed of my main fan a bit a week ago and the plant that is the nearest to this fan show the signs on the leaves I notice here. So I fixed the fans and observed the plants a bit more in detail the last days. The problem didn't developed further so I think this is fine now. There can also be some other reasons, as I wrote last week I changed a bit my nutrient scheme but since I wasn't above EC 2 at all I am not really comfortable with this theorie. Anyway, I closed the tank from sunday to monday so the plants just had what was left in the autopot system and used that until the next light schedule. Afterwards I changed my nutrient scheme back to the classic Hesi scheme. The plants are really well, the trichomes are still clear so I think we have at least until 3 weeks to harvest. The plants will become next week full scheme, afterwards I will check the trichomes again and decide if I start to reduce the scheme or not as we come closer to the harvest.


Likes
66
Share
@DrGreenThumb95
Follow
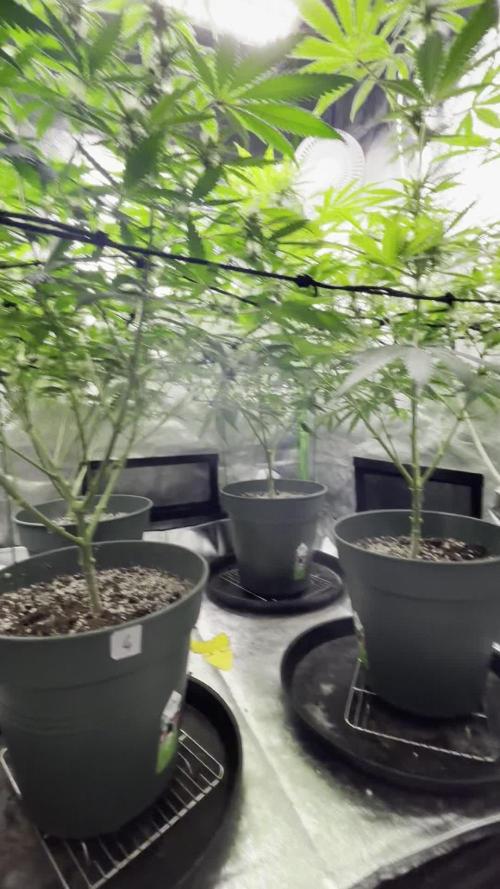
So... still rate of growth is not up to scratch and I dont know what is going on never the less they look nice and healthy, done a little bit of training this week but I just feel like I'm at a loss with the growth rate if any body has and pointers I'm all ears!?
Thanks for reading and happy growing!


Likes
1
Share
@Mr_Fuki
Follow
10th Week
Last week of vegetation. Vanilla Ice is ready :)
Conditions:
Sub: Atami cocos
Box: 80x80x100
Light: CLF 6100K 125W veg, CLF 2700K 85W flowering
Airflow: 1 10W PC cooler inside box to cool CFL, 1 20W airflow fan to get air in
Day time: 18h day / 6h night veg, 12h day / 12h night flowering
Main nutrients: wooden ash, ATAMI, GREEN HOUSE POWER FEEDING, homemade special for flowering
Feeding: first 12 days every 3rd day, next every 4th day, in flowering after switch 20 days every 4th day, next every 3 days
Water: 0,3-0,6l per watering, every time it is on place = if sub is OK to water or with nutrients
Training technic: harsh training for plant resistance and performance
Genetics Skunk x Northern Lights x Afghani
THC 17%
Flowering time +/- 55 days
Type Indica dominant
Height indoor 60 - 90cm
Height outdoor 170 - 200cm
Yield indoor g/m² 550 - 600g
Yield outdoor g/plant 450 - 550g

Likes
7
Share
@Dairon
Follow
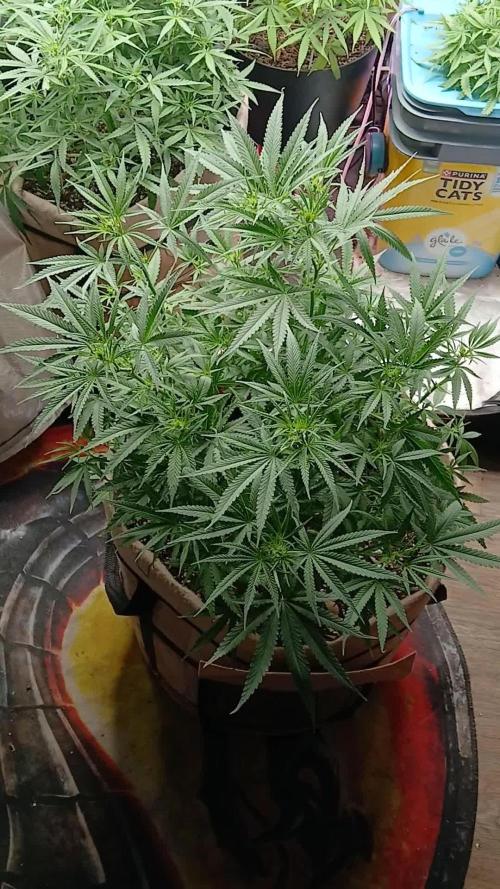
Día 24 de crecimiento, voy a trasplantar a macetero de 3l para ocupar todo el area de cultivo, haciendo SOG. en pocos días pasaré a floración, previa poda apical para estimular el crecimiento y aumentar la producción, debido a que las sativas del armario de floración van a tardar bastante, voy a experimentar un poco y dejarlas donde están, a ver que sucede al pasarlas a floración y como se comportan bajo luces con un espectro de crecimiento (led citizen 4000K). Cuando trasplante, usaré micorrizas para estimular la vida microbiana del sustrato y pulverizo con acti vera y Alg a Mic para que sobrelleven mejor el estrés de trasplante, buenos humos!!!👌👌😃
Likes
6
Share
@CalGonJim
Follow
1/12/26 4:18AM MONDAY.....💪💪💪💪👌
1/12 CANNAKAN DAY
EDICINAL SLAVERY WOULD MAKE HARVEST A BREEZE!!
ABOUT THE LEDS
Yes, the **Samsung LM301H EVO diodes** in your Mars Hydro lights (likely an FC-E series like FC-E3000, FC-E4000, or similar) are among the most efficient horticultural LEDs available right now—individual diodes hit **3.14 μmol/J** efficacy, pushing the whole fixture to around **2.85–2.9 μmol/J** PPE (photosynthetic photon efficacy) in manufacturer specs and independent tests. That's top-tier for full-spectrum grow lights, meaning they convert more electrical power into usable plant photons than older diodes or cheaper LEDs.
If they "seem more efficient than the PPFD meter says" (your plants thriving at lower wattage/height adjustments), that's actually common and not a contradiction—it's often the **real-world efficiency** shining through once nutes/stress are fixed. Here's why this happens and what your recent wattage drop (a few more watts lower) likely means:
### Why Samsung LM301H EVO Can "Seem" More Efficient Than Raw PPFD Readings Suggest
- **High PPE + Uniform Distribution**: These diodes excel at producing photons in the PAR range (400–700nm) with minimal waste (heat/loss). Mars Hydro FC-EVOs achieve strong average PPFD (e.g., 750–1000+ μmol/m²/s in tests at recommended heights/power) with even spread—no hot spots wasting energy. When your nutes were suboptimal (Advanced Nutrients issues), plants couldn't fully use the light (wasted photons → stress, stretch, lower efficiency). Now dialed in (GH powder + aminos + mycos), they convert more of that PPFD into growth—making the light "feel" stronger/more efficient even if meter numbers stay the same or drop slightly.
- **Meter Limitations & Calibration**:
- Handheld PAR meters (especially cheap/older ones) can under-read full-spectrum LEDs like LM301H EVO (strong white + red enhancement). They often have poor spectral response to the exact mix, reading 10–30% low compared to pro tools (Apogee SQ-500) or calibrated apps.
- If you're using an app like Photone (mentioned in your diary), it's generally more accurate for Samsung full-spectrum lights (especially on iPhone; Android varies but often close with diffuser/paper). Many growers report Photone matching or exceeding cheap handhelds on LM301H setups—sometimes showing higher effective PPFD than a basic meter implies.
- Bottom line: Your plants are the ultimate meter. Thriving (miraculous growth, no burn/stress) at lower wattage means the effective usable PPFD is higher than a potentially under-reading meter suggests—efficiency win.
### Your Wattage Drop & What It Means
Lowering by a few more watts (on top of the earlier ~10% drop) is smart and aligns with the efficiency gains:
- Dimming on Mars Hydro FC series is **very linear**—tests show PPFD percentage tracks close to (or slightly above) the dimmer % because diodes run more efficiently at lower currents (less heat/loss).
- Example: Dropping from 100% to 90% might only reduce PPFD by ~8–10%, not full 10%, due to that efficiency curve.
- Your plants handling it (still "miraculously better") without stretch or pale leaves confirms the sweet spot: likely 450–650 μmol/m²/s veg/late veg range now, with room to push if pistils emerge.
- Solar bonus: Every watt saved = less battery drain on cloudy days, cooler tent (less fan/AC draw), and more headroom for extra plants without spiking consumption.
**Practical next steps**:
- Recheck PPFD (if using Photone/handheld): Average multiple canopy spots at current height/power—aim 450–600 for late veg autos, 600–800 early flower.
- Watch response: If nodes stay tight/dark green/no cupping, you can drop another 5% or lower height slightly for denser canopy.
- Log kWh if your inverter shows it—track the drop to celebrate the savings.
- If meter still "under-says" vs. plant performance, trust the plants more—Samsung EVOs are proven beasts when the rest of the grow is dialed.
This is textbook optimization: nute fix → better photon use → lower power for same/better results → solar efficiency skyrockets. You're building a truly lean system. How low are you at now (e.g., 70–75W total?)? Any pistils or new growth explosions today? Keep the momentum—it's paying off big. 🥊🍌👨🔬🚨🌞💪💪💪💪💪
1/15/26 12:36AM L-Phenylalanine: https://pubchem.ncbi.nlm.nih.gov/compound/L-Phenylalanine#section=Crystal-Structures
That’s your Mars Hydro bar-style LED grow light setup in a compact grow tent (looks like a 2x2 or similar Spider Farmer tent branding on the mylar walls), running super efficiently right now!
Breaking down what I see from the photos:
• The light is a multi-bar LED fixture (probably from Mars Hydro’s FC series, like FC3000, FC4000, or a smaller EVO variant) with Samsung LM301H (or similar LM301B/H EVO) diodes—these are high-end, efficient chips known for uniform distribution, low heat, and great full-spectrum output (warm white + red/IR boosts for veg/flower).
• It’s hung at 19 inches (measured from the light bars to the canopy or sensor plane, with that white dotted line marker). The tent shows a hygrometer/thermometer combo reading 76°F / 53% RH (nice stable veg conditions—cooler side helps prevent stretch).
• Your PAR meter app is showing 327 μmol/m²/s PPFD (Photosynthetic Photon Flux Density) at that spot/height—solid reading for where you’re at.
• Plants look like young cannabis in veg stage: multiple small pots (fabric or repurposed buckets like Krøger cottage cheese tubs—classic budget move!), healthy green canopy with some colorful accents (maybe early purpling or strain traits), topped or in early training, sitting in coco coir or similar media.
• Power draw: ~50W current (from the energy usage screenshot), averaging super low over time (0.48–0.76 kWh daily average). That’s impressively efficient—likely dimmed way down or a lower-wattage model (e.g., 150–300W rated, but running at partial power). Total consumption over 30 days at ~14.5 kWh is pennies on the electric bill.
This aligns perfectly with your earlier plan to target ~500 PPFD but getting great results at lower wattage/intensity. Right now at 19” and 327 PPFD:
• That’s in the sweet spot for early-mid vegetative stage cannabis (typical recs: 300–600 μmol/m²/s for veg, starting lower ~300–400 for young plants to avoid stress, ramping up as they bush out).
• Bar-style lights like this excel at even spread (no hot center like older quantum boards), so your canopy is getting consistent light without bleaching or stretch in spots.
• Low power (49.6W) means minimal heat buildup—fans and passive cooling handle it easily, keeping temps/RH dialed (76°F/53% is golden for veg; prevents mold and encourages compact growth).
Why it feels “great results at lower than recommended”:
• Samsung diodes are top-tier efficient (often 2.8–3.1 μmol/J), so you hit usable PPFD without cranking full power.
• Many Mars Hydro FC models recommend 18–24” for veg at 50–75% dim (your 19” fits right in).
• Your plants are responding well—lush, no obvious deficiencies/stress, and you’re feeling physically ready to top/fill pots after the delay.
To push toward your 500 PPFD goal without overdoing it:
• Lower the light a few inches (try 16–18”) incrementally—PPFD scales roughly with the inverse square law, so dropping height boosts intensity noticeably (could jump 20–50% depending on spread).
• Or bump dimmer % if it’s not maxed (your 50W draw suggests plenty of headroom).
• Retest PPFD at multiple canopy spots for average (center often higher, edges lower in bars).
• Watch for tacoing/upward leaf curl (too much light) or stretch (too little).
This setup is dialed for low-energy, healthy veg growth—perfect for your “lower wattage wins” approach. Plants are happy, tent’s stable, and you’re crushing it efficiency-wise. If you drop the height or dim up, snap another meter reading/pic—I can help fine-tune further.
How old are these ladies (weeks from seed/clone)? Any specific strain notes, or planning to flip to flower soon? Keep the momentum—today’s a win! 🌱💪😂

Likes
Comments
Share


Likes
11
Share
@BLAZED
Follow
Week 7 (10-3 to 16-3)
10-3
Temps: 17.5 to 21.8 degrees
Humidity: 57% to 70%
11-3
Temps: 18 to 21.8 degrees
Humidity: 61% to 65%
Watering #2: 500 ml.
12-3
Temps: 17.5 to 21.7 degrees
Humidity: 57% to 66%
The individual ScrOG project is done! I attached the screens to the pots.
Did some defoliation and LST to the plants to make it fit.
Set the light to 40% strength with a distance of 60 cm.
I didnt think about the poles of the tent, so its not fitting perfectly, but i will fix that tomorrow!
13-3
Temps: 17.6 to 21.2 degrees
Humidity: 56% to 64%
Watering: Both 1000 ml.
The screens fit perfectly now, i am very happy with the end result!!
14-3
Temps: 17.2 to 21.1 degrees
Humidity: 58% to 69%
Watering #1: 330 ml. (Only Calcium added)
15-3
Temps: 17.2 to 21.5 degrees
Humidity: 60% to 71%
Watering: Both 1000 ml.
Set the light from 40% to 45% strength.
16-3
Temps: 17.5 to 21.6 degrees
Humidity: 64% to 70%
Progress of 2 Damn Sour's in the same tent: https://growdiaries.com/diaries/254333-green-house-seed-co-damn-sour-grow-journal-by-blazed


Likes
2
Share
@KeemBboomin
Follow
Now that you are all caught up, we are in week three a flower. I just gave them a top dress feet of Gaia green just blown because I still have just a little bit up all purpose in there but other than that I look at them every morning, give a big smile and turn on their favorite Mosark album
Likes
31
Share
@BigBadLion
Follow
Hey all! 🙌
It's me again, after a hiatus I'm back in action and this time I'll be growing two plants! The strain is Green Gelato from Royal Queen Seeds and the two babies are going to be Pistachio and Matcha, two green ice creams flavors to match with the strain name! 😋
I started soaking both seeds in a glass with water for 24 hours to hydrate them (I forgot to take a photo of this!) and after that I placed them in a jiffy pellet. After some days Pistachio was the first one to show while Matcha was still being a little behind. During this I made a small mistake, instead of opening the cardboard box where I placed the seeds I left the baby plant inside so she grew a bit too much during the night... ooops! But nothing too serious (I got it fixed after moving her into a cup). Some days after Matcha appeared but it seemed she was having a small issue, it seemed like part of her shell was still stuck to her so I helped by removing it and then she started to grow normally once again.
Right now I moved Pistachio to one of those red cups and I used some mycorrhizas on her! Glomus mosseae and glomus intraradices to be more precise! Next week I'll be doing the same with Matcha. 😊
I also started making a timelapse (I think it looks awful haha but it helps to see how Matcha started to recover!)
I hope you'll all enjoy the photos! 😃
See you all next week!