


Likes
Comments
Share

@DogDoctorOfficial
Follow
Before starting this harvest chapter, I want to apologize once again for not uploading everything directly into the official harvest and smoke review tabs.
GrowDiaries has been struggling a little with very large uploads lately, and with the amount of photos, videos and information involved in this Ghost Train Haze harvest, I decided to split everything into multiple parts to make sure nothing gets lost or broken during upload.
And honestly… this plant deserves the full story.
So welcome to Part 1 of the Ghost Train Haze harvest. 🌱✨
Before talking about harvest itself, let’s do a quick recap of how we even arrived here.
This was another 12/12-from-seed run.
No traditional vegging.
Very little manipulation.
Minimal training.
Mostly just letting the plants naturally express themselves while guiding environment, airflow, watering and light intensity carefully around them.
Instead of forcing the plants into a shape, the goal here was to let them grow naturally into the PPFD and into the environment themselves.
And wow…
Ghost Train Haze really showed personality during this run.
Most of the attention naturally went toward the massive main plant everybody keeps seeing in the photos — the giant colorful spear covered in fading reds, dark purples and swollen flowers — but there were multiple plants in this room, and in this harvest report we’ll finally start talking about all of them and the different directions they took after harvest.
By Week 14, the room looked absolutely incredible.
The fading on these plants became something special.
Deep reds.
Dark purples.
Almost black tones in some areas.
Golden fading leaves.
Heavy trichome coverage.
Color spreading through the sugar leaves and surrounding flower tissue.
One of those harvests where the plants almost stop looking real.
And underneath all those colors:
extremely heavy flowers.
Dense.
Massive.
Sharp aromas.
Long spears everywhere.
The branches became so heavy during late flower that support was absolutely necessary. Yo-yos were holding branches constantly, helping prevent collapse under the weight of the flowers.
And the moment the supports came out during harvest…
everything opened and leaned downward immediately under its own weight.
That alone says a lot about the size and density of these flowers.
There are photos in this report where I’m holding entire plants, and honestly, seeing them outside the tent really puts scale into perspective. It’s one of those plants that instantly makes you imagine how unbelievably huge she could become outdoors in native soil with unrestricted root space.
Harvest day finally arrived, and from there the project split into two different paths.
Some plants were harvested whole and hung for traditional drying.
Others were fully broken down, every single flower removed from the branches, vacuum sealed into bags and immediately frozen for ice-water extraction work.
And this is where things start becoming really interesting.
Because this report is not only about harvesting flower.
It’s also about exploring different post-harvest directions and understanding why growers process material differently depending on their goals.
The flowers selected for traditional drying will continue their journey in Part 2, where we’ll focus much more deeply on drying conditions, moisture management, branch snapping, trimming and curing.
But for now…
let’s talk about the frozen material and ice-water extraction. ❄️
After harvesting, the flowers destined for washing were separated carefully and placed into vacuum bags before going into the freezer.
Freezing fresh material helps preserve volatile compounds, terpene expression and trichome integrity while preparing the flowers for ice-water extraction.
And no — this is not simply “throwing weed into ice.”
There’s actual science and technique behind this process.
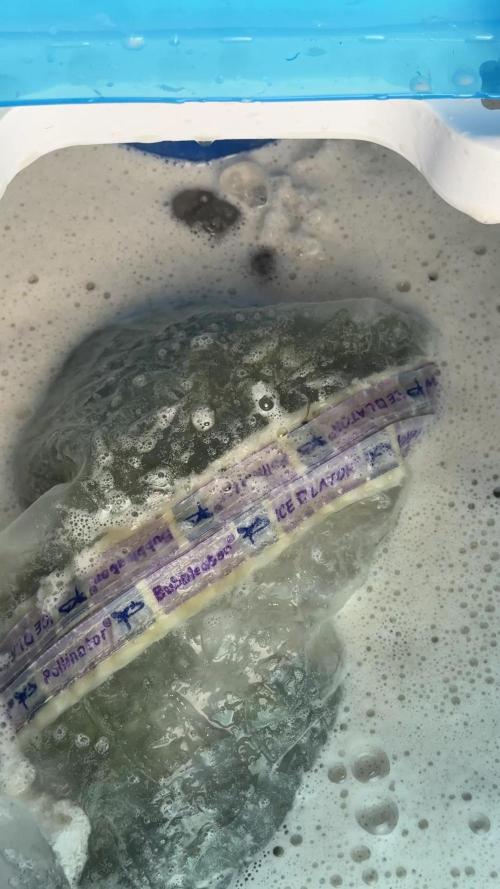
Before washing, the frozen material is combined with ice and extremely cold water, ideally close to 0°C. The goal is to make the trichome heads brittle enough to detach cleanly while keeping unwanted plant contamination as low as possible.
At the same time, the flowers need time to fully soak and rehydrate slightly before agitation starts. This helps reduce excessive breakage of plant material during washing.
And then comes the wash itself.
The bubble washer machine agitates the mixture gently, allowing trichome heads to separate naturally from the plant material and suspend inside the cold water.
From there, the water passes through a series of filtration bags with different micron sizes.
25 micron.
45 micron.
73 micron.
90 micron.
120 micron.
160 micron.
220 micron.
Each size captures different grades and sizes of resin heads and contaminants.
We are not using every single bag configuration during this run, and we’ll go much deeper into grading, collection quality, drying and final results later in the series. But since this report already includes videos and photos of the process itself, I thought this was the perfect moment to explain what ice-water extraction actually is — and what it is not.
This process is not about adding anything.
It’s about separating what the plant already naturally created.
Water.
Ice.
Agitation.
Filtration.
Patience.
That’s it.
And honestly…
watching these resin-covered flowers moving inside ice water almost feels hypnotic.
The harvest itself may be finished…
but the real post-harvest journey is only beginning now.
This report will continue in the next update very soon because there is simply too much material, too many photos and too much information to fit properly into a single upload without risking GrowDiaries crashing or losing content again.
Part 2 will continue deeper into:
the drying process,
environmental control,
trimming,
flower handling,
and the continuation of both post-harvest paths.
And eventually, Part 3 will close the circle with curing, smoke review, flavors, extraction reflections, effects and final thoughts.
As always, thank you to everybody following this journey.
To Zamnesia for the genetics.
To Plagron for the nutrition.
To all the gear keeping this room alive day after day.
To GrowDiaries itself.
To the community.
To the longtime followers and OGs.
To the new people arriving every day.
To the curious ones.
To the silent supporters.
To the lovers.
To the skeptics.
To the haters.
To everyone who stopped by, even for a moment.
Thank you for being here. 🌱
Part 2 coming very soon. ✨
📡 DELETED @ 1K Please stay tuned.we never quit https://www.youtube.com/@TheDogDoctorOfficial NEW 🙏 Thank you for your patience and continued support.
FOR DISCOUNT CODES AND MORE JUST FOLLOW THE LINK https://website.beacons.ai/dogdoctorofficial
📲 Don’t forget to Subscribe and follow me on Instagram and YouTube @DogDoctorOfficial for exclusive content, real-time updates, and behind-the-scenes magic. We’ve got so much more coming, including transplanting and all the amazing techniques that go along with it. You won’t want to miss it.
GrowDiaries Journal: https://growdiaries.com/grower/dogdoctorofficial
Instagram: https://www.instagram.com/dogdoctorofficial/
YouTube: https://www.youtube.com/@dogdoctorofficial Deleted by Youtube - https://www.youtube.com/@TheDogDoctorOfficial NEW
Vimeo : https://vimeo.com/dogdoctorofficial Under construction stay tuned ⸻
Explore the Gear that Powers My Grow
If you’re curious about the tech I’m using, check out these links:
🔆 Lighting & Environmental Control
• Future of Grow — Advanced LED lighting technology
https://www.futureofgrow.com/
DISCOUNT CODE: DOG20
• Lumiflora — Under-canopy LED lighting
https://lumiflorade.com/
• TrollMaster — Environmental controllers and automation gear (past collaboration)
⸻
Genetics
• Zamnesia Seeds — Genetics used in this project
https://www.zamnesia.com/
⸻
🌱 Soil, Substrates, Boosters & Root Support
• Plagron — Substrates, bio mixes, and supportive products
https://plagron.com/en/
⸻
🎒 Storage, Curing & Preservation
• Grove Bags — Curing and storage solutions
https://grovebags.com/
⸻
📸 Photography Equipment & Tools
(Not sponsors, but part of my creative toolkit)
• Sony A6700
• Sony full-frame macro lens + few more
• Stacking photography workflow - learning
• iPhone (for behind-the-scenes shots)
We’ve got much more coming as we move through the grow cycles. Trust me, you won’t want to miss the next steps, let’s push the boundaries of indoor horticulture together!
As always, this is shared for educational purposes, aiming to spread understanding and appreciation for this plant. Let’s celebrate it responsibly and continue to learn and grow together.
With true love comes happiness. Always believe in yourself, and always do things expecting nothing and with an open heart. Be a giver, and the universe will give back in ways you could never imagine.
💚 Growers love to all 💚
📸 P.S. – The Eye Behind the Lens
All photos in this diary (for now — except for the ones showing the camera, which I took with an iPhone) are taken with a Sony A6700 paired with a Sony full-frame macro lens and a few more.
Photography is part of the story — it’s how we share the fine textures, the glow, and the quiet details that words can’t always capture.
I’ve also started experimenting with photo stacking — a technique where multiple images, each taken at a slightly different focus point, are layered together to create one perfectly sharp image from front to back.
It’s not digital enhancement or AI; it’s pure photography — a way to reveal the plant’s beauty in microscopic depth, from trichome to petal.
You’ll even see a few shots of "ghost me" capturing the shots — camera, lens, setup — because every grow deserves not just to be cultivated, but documented like art.
FOR DISCOUNT CODES AND MORE JUST FOLLOW THE LINK https://website.beacons.ai/dogdoctorofficial
NEW DISCORD - Official Server Invite Link : https://discord.gg/ksjAkA5T74

Likes
18
Share


@VI_Cannabis
Follow
June 7 - We ordered some new lights last week, they are 240w kingbrite samsung lm310h with uv/ir, 3000k, and meanwell drivers.
We setup the new room and moved the girls into there. After a bit of LST and a watering (with nutrients) at roughly 7ph, they were ready to go under the 2 new lights and the same SF-1000 we have been using in this grow.
The new room is a 12 ft enclosed trailer. I moved everything from the small tent into this. I put clear poly on the walls, floor and ceiling. I put poly on the shelf I am going to be keeping in there as well. I bought 50ft of 6mm mylar and lined the floors, roof and sides with it. I plan to get some reflective tape to seal everything and to cover the wood. I did not get much of a chance to watch temp's today as they it was later in the evening after all was said and done. The inline fan blowing in air from outside.
June 8 -
9 AM i checked the plants, they were at 25.2 and 50% RH. Late through the day I had checked and we had gotten up to around 32 degrees. So I moved the inline fan to the closer vent, hooked up to that, and had the air blowing out of the trailer with the inline fan sucking it from above the lights.
I then added oscillating fan and had it blowing air on the left side of the room so it would somewhat circulate once I closed the doors. I then checked at about 9pm and we were at 22 degrees. Definitely noticed a decent amount of growth already. I have the lights on a 22/2 cycle as I was worried about the heat at night time.
June 9 -
Some great growth from the girls, still having problems controlling the temps in the afternoon. I decided to prop the door open a bit to have a constant breeze throughout the day while I am at work. Decided to do some more LST and also a bit of defoliation. I took about 25% of the leaf's that were blocking the new growth as it was getting a bit bunched up. I was then told the leaf's are almost solar panels for them. So from now on I will be trying to just do some tucking unless needed. The leaf's I removed were most of the damaged leaf's, I am not to sure if that makes much of a difference. I gave them a watering with only water as there is a potential I am getting a bit of a nutrient buildup along with the PH problem. Or potentially the reason for the ph problem is nutrient buildup. After watering with A PH of 7 I got some run off and tested it. The smaller plant gave me a PH of about 5.5 where the bigger one is around 5.0.
June 10 -
Plants are looking happy and showing tons of growth. Seems to be trying to stretch outwards. Not a ton of sign of PH issues showing so potentially getting it under control. Still a bit of damage to previous leaf's but it is what it is! The last few days I have been leaving the door open a bit in order to keep the temps down. I decided to test something and turn the lights off (automatically) at 11AM and back on at 5PM so light schedule has now changed to 18/6 and it seems I may have figured out the issue. We haven't had lots of sun the last couple days so it hasn't been to hard and I have yet to know if it truly fixed the heat issue for now. (I will be looking into a ac unit as well since it typically gets to around 30-35 around here.
June 11 - Pulled some of the branches back down and added a few more LST spots. Seems we have a good amount of growth from the smaller plant out of the 2 topped spots. Unfortunately it looks like I fucked up on the bigger plant and only one of the nodes seems to have new growth. I will continue to monitor that but I think I cut the node to low and also to soon. Other then that, the girls are doing great. They seem to be absolutely loving these new lights. I gave them some nutrient water today as well. roughly 3L each. They seem to be A hell of A lot more thirsty under these new lights.
June 12 - The girls are doing great , they are still just doing growing away. Lots of progress everyday. I am going to be getting a go-pro so I can set-up a time-lapse for the rest of this grow. I received my new inline fan, I got A ac infinity CLOUDLINE T4 with the temperature humidity controller. I am going to be having one fan pushing fresh air in and one fan pulling out the hot air. I will be doing that tomorrow since I have to work today.
June 13 - I ordered another 50ft of mylar and that showed up today. I have decided to remove the shelf and add another 3+ feet to the grow space. So today I installed more poly, mylar, the ac infinity fan. I have it set-up to pump in air if it gets to warm. I am thinking of switching it to the output that way if it gets to hot or to humid I can have that air pulled out of the trailer. Right now my other inline fan is the outtake and I just have it set on full. Overall I think everything is set-up a bit better and more accessible. I will be putting my 2x2 tent in there at the left of the doors so I can have a veg room when these 2 are in flower. I plan to have 4 in veg and 4 in flower for the next grow. Still waiting on JOTI seeds, ordered 3 weeks ago and still have not been shipped. I will be getting those going the moment they arrive.
The girls seem to be happy still, did a bit more LST to try to keep everything even, mainly I'm just pulling down on the spots I already have tie wire on.
Likes
4
Share


@adam_pawloski87
Follow
@twenty20mendocino A-Team R&D Update ~ Let’s Go day 24 of flower 🌸 an we are looking amazing! Ladies are starting to stack an oh my we getting a lot of frost going on! starting to get some gassy stanky notes of em too😍 ! We are only into week 4 ladies an gents we still got a few weeks to go of stacking! Keep your eyes peeled for next week’s update yall , peace love a positive to all y’all , an have an amazing productive day ! Cheers an blaze on !!

Likes
10
Share


Likes
44
Share


@Buffynuffy
Follow
It’s amazing watching these plants grow, it’s been an experience already and so much to go with this grow and with all the learning to come I hope it looks okay to you guys anyone who would like to comment please do I’d love to hear other’s thoughts!


Likes
6
Share


@Lordviper28
Follow
These lady's have real good except error on my part with one that ended up herming out but got it out tent before it could do anything but rest have since to gotten way better and are filling out nicely and my mania she still the best looking ggxww I got initially got about a week left before the ready to be chopped down have been flushing for almost two weeks ph has been at 6.5

Likes
15
Share


@moritz
Follow
Day 15 / 15.04. For the start of week 3 of Veg I decided to transplant the plants into their final 15l autopots. Because I only have space for 3 plants I threw out the runty Super Lemon Haze plant. I transplanted all of them into BioBizz Biomix and sprinkeled mycorrhizae on the roots. I watered them in with 300ml of nutrient solution at 6.5 Ph and 1.1 mS/cm TDS. The VPD has now reached 0.8 kPa. With the transplant I also switched the small light the plants were under to the Mars Hydro TS-3000 on 20% brightness. This means plants' DLI has been bumped up to about 20 mol/m2/d.
Day 17 / 17.04. The big light has blown the third relay of the smart system in a row. This means lights turned on about half a hour late today.
Day 19 / 19.04. Today I topped all of the plants at the fourth node. I initially planned to top on day 21 but they did not experience any shock from transplant so I got to do it today.
Day 21 / 21.04. For the end of week 3 veg I filled up the autopot reservoir and turned it on. I'm expecting some even greater growth now.

Likes
22
Share


@Chumpkilla
Follow
7/24/23 - Day 42 - Ok, so where to start? I'm going to go over the last couple days of issues/troubleshooting. We had an issue with the lights not coming on for a whole day/night cycle. That was a couple of days ago, and everything seems okay since then. I had some Canoeing/tacoing on the leaves once the lights were back on. I think I had the PH too low, 5.8. In flower, I should start moving it up the scale. Once I corrected the PH to 6.2, the canoeing/tacoing in the leaves seemed to be gone/almost gone.
I'm REALLY worried about the height of the plant. She is only 12 in. from the light that I cannot move. I added a second scrogg net???? I don't know if that's done a lot, but I'm going to try and stop if from growing straight up. I think the best I can do is give it a lean. So Ill call this the ScoggGL (GangstaLean). You'll see some pictures up top as I start the ScoggGL
I did the first big trim and pulled a 3-gallon bucket of fan leaves out. I cut off a few side branches I didn't want the plant to waste energy on. I trimmed so many leaves off it was crazy. The smells have been awesome! You all know the smell of the fresh plant stems and leaves as you trim and rub across them. It's one of my favorite smells, which is in full effect.
I noticed that I have some pistils growing. I know what that means, shes going to have some flowers here in the next week. I couldn't be more excited!!!!!
The roots are just downright ruthless; they have been growing out of control. I have a great picture of them in there with no water.
I should note that I did two things that might have solved the Tacoing in the leaves. It could have been one or the other, but it also could be a combo of both things. I did the trimming to get some airflow between the leaves and changed the target for my PH from 5.8 to 6.2. When moving into flowering, I should have already done that. But I did both things while the leaves were Tacoing, and now they are not. I wanted to make sure I noted that.
7/26/23 - Day 44 - Things are looking great. No more tacoing, she's growing and still drinking about 2+ gallons a day of water. I hope the vertical growth stops soon, I want to remove a ton more fan leaves, and I'm hoping that it spends more time growing around than up, I'm keeping some leaves on just to slow some vertical growth.
7/27/23 - Day 45 - She's sleeping right now, but I will chop some more fan leaves when she wakes up. She's growing too tall, and I need to find a way to stop her. I think shocking her system will help stunt her growth. How crazy is this, what a conundrum I'm in. Normally I stress out trying to find the right time to trim to avoid stunting growth. I always keep my plants busy and do one or two chops. I think they need to grow as mother nature intended. Let them grow and do one, maybe two fan leave chops. That's always been my motto and its always worked out great for me. This is now the exact opposite. Feels weird even thinking about it, doing a leave chop two weeks into flower..... ARE YOU INSANE!!!!!! Lol
The 2nd chop has happened. I took a ton of fan leaves off. It's time for the plant to slow down heal and start working on the buds! Let's see how this goes over the next couple of days. I added a timelapse of me chopping her up.
7/28/23 - Day 46 - After adding more water last night, I was checking PH, and I did a quick check on the ppm from the nutes. If it went from 600ppm down to 130ppm in a couple of days. So we decided to give her another dose of nutes so she has something to eat. I'll update you after she wakes up for the day.
If you are looking for this experience, check out https://www.getleaf.co/


Likes
114
Share


@Coco4CocoPuffs
Follow
Well we are now at DAY 84 from seed and 53 Days of Flowering 🍉 🍉 🍉
So shes been doing reall well ☺️ And this week could be the week she gets the chop 😁
I have moved the feeding to accommodate the final step in flower 😀 by straight up giving her fresh water till its time 👈
So there now we play the waiting game 😋 yet again
🍉 🍉 🍉 🍉 🍉 🍉 🍉 🍉 🍉 🍉 🍉 🍉 🍉 🍉 🍉 🍉 🍉 🍉 🍉 🍉
Thanks 😊 my friends for the support 🙏👊

Likes
16
Share


@AestheticGenetics
Follow
4/23/25
Beautiful plant. The fade is coming in nicely with purples and oranges. Not doing too much just keeping her happy while we get to the finish line.
Top dressed with 1 tsp microbe charge and 2 tsp of bloom

Likes
39
Share


@valiotoro
Follow
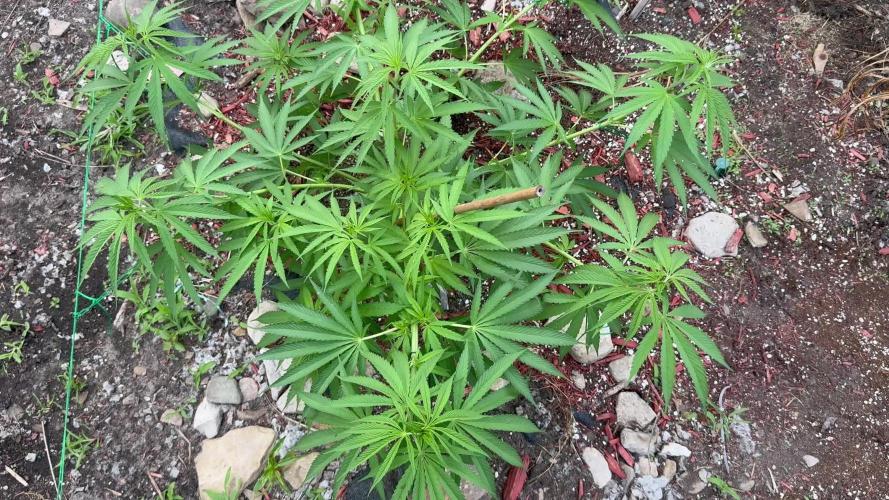
Hello everyone week 6 of flower has passed for this Cinderella Jack auto 👸🏼
For the feeding schedule i stopped feeding Power Roots and Pure Zym and started feeding Green Sensation 0,7ml/l
Mars hydro FC-E6500 power 100%🔥
have a great day and wish you all happy growing 😎



Processing
Likes
15
Share


@MG2009
Follow
07/08/2020
Powdery mildew has cleared up got bird poop on leaves now will clean, and defoliate as needed🙏
Red Sky clones do not take light stress well be on top of that shit with a timer! The first clone I took I put under 24 hour light (on purpose)sent out male flower at several nodes (collecting for Feminized project)
So no light stress, unless you need to!
Processing
Likes
3
Share


@Kushizlez
Follow
Day 42-49
(Day 43) I was at the dollar store today and I found the best little plant risers. And they all link together in perfect 12” squares. Fits in my tent perfectly and only spent 15 bucks. That should help the dry downs quite a bit.
I’m going to transplant the euro genetics into 1.7g pots with amended sunshine mix #4 for their final containers.
I moved all of the non-marijuana seedlings into a small greenhouse out of my tent so I have some more space and light per plant.
I also set up an exhaust fan to keep the humidity at a perfect 65-70% night and day.
(Day 44) Everything is looking a little nute burned and droopy. The garlics are showing signs of overwatering and nitrogen toxicity. They look like they want to flower so badly. Node spacing is weirdly short too. I picked up the American genetics to look for roots and they were busting out of the bottom. They’re definitely not rootbound as they’re not even a foot tall yet. This is likely from having soil that is too compact (from using too much rock dust and not enough drainage) causing my waterings to not even reach the bottom of the pot. This was also happening to my other grow. I will make sure to very lightly pack soil into pots for now on because you can always add more later. I’m going to fluff up the pots and see if I can loosen the soil a bit. If that doesn’t work I’m going to look at transplanting into 3g fabric pots and lightly shaking off most of the old soil. Luckily I added a shit ton of drainage for the euro genetics when I amended the sunshine mix so they won’t need a transplant.
(Day 46) The fluffing didn’t do much. In fact it might have made it worse lol. I just went to the store and bought some Destiny Organics soil and have decided to transplant.
I dusted off 90% of the old soil down to root ball which will cause an insane amount of stress to the plants. The plants started in the aero garden were being choked out by the shitty sponge plug it was germinated in. I took a razor blade and carefully cut them down the middle so the stem can expand. I might have cut a few major roots one or two plants. Other than that everything is transplanted. I cut all my amendments in half and I packed the soil very loosely this time.
The situation is not ideal by any means but I’m hoping they will bounce back in the next week. This should at least set them up for a more successful flower. I can’t really expect much quality from botched run but who knows. I might come out with some fire. Since this is my last grow here I don’t even have to pay the power bill for the next few months! (I have a very generous landlord as he’s letting me finish my grow until mid September now 😂)
(Day 47) I’m going to give them their first good watering and test my fluffy soil. I watered in approximately 700mls each making sure it soaks to the bottom of the pot.
(Day 49) All the plants have bounced back except for the ones with root damage. They are still looking droopy and sad. The black garlic #1 has recovered really nicely and is looking happier than ever. The apical growth tip is so tight it has like 4 nodes within an inch somehow. I recently learned that hormones contained in kelp and seaweed extracts can act as plant growth inhibitors and shorten node spacing drastically. I only added a very small amount of kelp meal to the soil so it must be leftover from the previous foliar sprays Velokelp. I’m going to pinch the top off bg1 and see if the lowers can catch up. Sucks to do that so close to flip but oh well.
The euros are looking fully recovered from their burn a little while ago. The sunshine mix is quite thick and water retentive as well but at least it has some extra drainage. They’re all looking quite healthy.


Likes
170
Share


@Tropicannibis_Todd
Follow
👉Alrighty Then👈
70 days in flipped at 28 days
👉we are now around 3 to 4 weeks left and I'm super happy thus far 👈
It's been a great week all plants are killing it ......... 👉we are now in full flowering 👈
There all gonna get a slight defolation over the next few days to let air and light get in there which seems like I'm doing just about every feeding 👈
👉So I topped all but Babba Kush and Slurricane they didn't require it ... 👌 Got some nice level tops 👌
I've now started lowering there full flowering nutrients program , so we are set to go ...... up to the flush 😳
Persian Pie from Greenhouseseeds
Full Gas from Greenhouseseeds
Babba Kush from Greenhouseseeds
Rainbow Melon from Fastbuds
Papaya Sherbet from Fastbuds
Weddingcheesecake FF From Fastbuds
Purple Oreoz F1 From Seedsman
Slurricane From Premium Cultivars
Soil by Promix
Nutrients by Cronks
Well this should be fun 🙃
Thanks to all my growmies out there for stopping by its much appreciated 👈
👉Happy Growing👈

Likes
11
Share


@LSnake
Follow
In this second week of veg I started adding some nutrients to the plant water. (below the recommended doses) 🔥
Since they are growing well next week I will try to apply the manifold , hoping to be able to increase the final yield of this genetics that I love. ✂️🌱


Likes
11
Share


@Marianolst
Follow
Deje las plantas al cuidado de mí Hermano por las vacaciones.
Crecieron mucho en dos semanas un cambio increíble.
Voy a tener que hacer un último LST.
Ya mañana subo buenas fotos.
