


Likes
Comments
Share

@centralflpheno
Follow
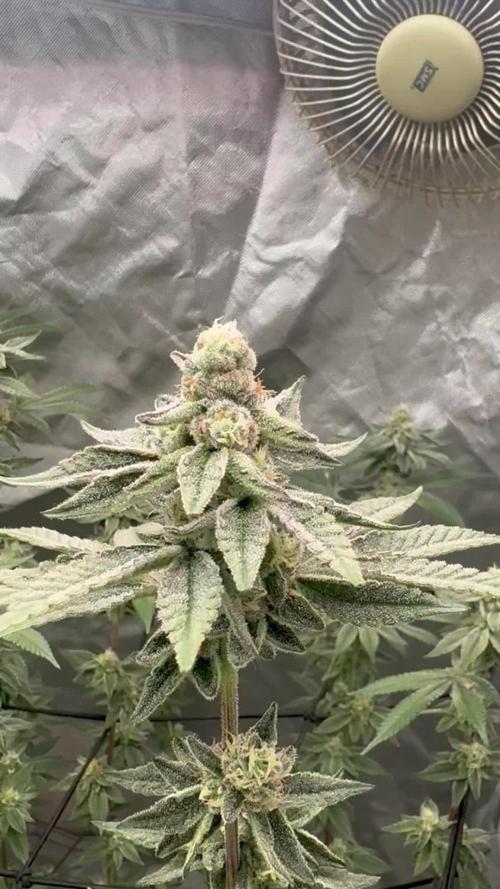
Cleaned her up a bit, she looks and smells great , gonna cut down PK after this week

Processing
Likes
1
Share


@Luv2Grow
Follow
Day 71 - Starting week 11 and she’s really starting to fill in quite nicely. Did a little bit more of leaf tucking and will be giving her a feed of nutes in the next day or two. She’s got a really sweet smell to her right now.
Day 72 - All looking good and not much new today. I did give her a feeding of nutes today and checked the runoff again and a tiny bit higher than I’d like, sitting at 7.1. Other than that, just removed a few leaves and tucked the rest.
Day 73 - Noticed a couple leaves that have a couple “rust” spots on them so gonna try and get that fixed. Other than that she’s progressing nicely and will probably end op giving her some more water in 2 days.
Day 74 - Nothing new happening right now. I’m just letting her do her thing and feeding her when she calls for it. I did rearrange her in the tent a little bit but that’s about it for today.
Day 75 - The girl is still fattening up nicely but other than that, there’s not much else happening today. She’ll be ready for some water tomorrow.
Day 76 - Gave the girl a heavy watering of plain water today and the PPM is at 223 right now so next watering will definitely be a feeding of nutes. She’s has quite some time left before harvest so not wanting to cut the nutrients yet.
Likes
22
Share


@BigDaddyK
Follow
Short plant , dense , would suit people with reduced height rooms , flavoursome

Likes
5
Share

@World_Breeders
Follow
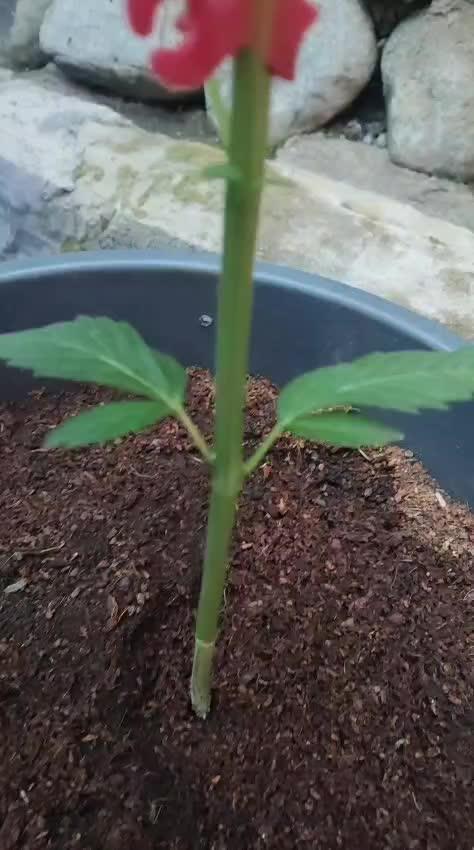
Pink Honey — Week 2
Pink Honey keeps moving forward into her second week of vegetation. She has gained noticeable height and is developing a more open structure, with good internodal spacing and fresh growth coming through at the top.
The leaves are showing a healthy green color and the plant is starting to establish her structure nicely. Still early in the journey, but she's already showing good vigor and steady development.
Seeds by World Breeders
Cultivated by Piperoots 🇲🇦 🌱🔥
Likes
155
Share


@deFharo
Follow
Bienvenidos cultivadores de marihuana clandestinos y también a los que tienen la fortuna de no serlo!🖐️👨🌾👍
Este es un diario donde semanalmente explico algunas de mis técnicas de cultivo y preparados orgánicos, los cuales llevo experimentando dos años en cultivos de marihuana interior.
• Hay dos componentes absolutamente necesarios para cualquier cultivo y de los que no se puede prescindir: La luz y el agua... hoy toca hablar de agua, homenajear al agua que la montaña y el cielo me regalan para mis plantas de marihuana!! 💧💧💧
Tengo que decir, que hasta el momento, nunca he usado agua con cloro en mis cultivos, mi interés por el agua pura de manantial ya venía de antes, pues yo mismo la consumo habitualmente, el cloro es añadido al agua corriente para hacerla potable y acabar con posibles bacterias o patógenos, pero no distingue entre buenos y malos. Siempre he creído que el consumo de agua pura, ayuda a mantener la micro biota de nuestro sistema digestivo, os podría hablar de las ventajas palpables, pero voy a obviar comentarios escatológicos.
En el caso de mi modo de cultivo, donde baso toda mi técnica en el mantenimiento e inoculación masiva de Microorganismos de Montaña (MM) en el sustrato, el uso de agua pura sin cloro es obligado.
El 03 de julio de 2020, publiqué lo siguiente:
GROWING TIP: Agua!! Mineralizada, viva y estructurada.
La importancia de la calidad del agua para el cultivo es vital para mi, he recorrido los manantiales, ríos y arroyos de mi zona con el medidor de EC y el de PH para conocer las aguas que me rodean, recojo siempre que hay oportunidad agua de lluvia de la terraza de un vecino, nunca me falta agua pura, desecho regar con agua del grifo. Para mi, y actualmente, la mejor mezcla de agua que puedo ofrecer a mis plantas es agua de lluvia 75% con otra de un manantial de montaña de agua alcalina (Carbonato cálcico PH: 9.2) y muy mineralizada (EC: 0.85), esta agua yo mismo la consumo regularmente, consigo una mezcla de agua pura con un EC alrededor de 0.19, me garantizo así el aporte de calcio y otros minerales. En épocas donde no llueve uso agua pura de manantiales y arroyos con EC de 0.3.
Estas aguas las filtro y almaceno a obscuras en mi casa, la cuestión es que el agua parada pierde oxígeno y también desordena su estructura molecular haciéndola caótica. Para poder recuperar esta estructura y oxigenación, el agua debe estar en movimiento como en la naturaleza, yo me ayudo de un agitador magnético para volver a tener agua viva, el agitador crea un vórtice implosivo que en 10 minutos pone las cosas en su sitio y carga de oxígeno nuestra agua, una vez hecho este proceso voy añadiendo los nutrientes uno a uno y sigo agitando hasta el final.
El agua tratada con esta técnica, mejora la asimilación de nutrientes porque favorece el intercambio catiónico e inunda de oxígeno nuestro sustrato y raíces, también con esta técnica se pueden bajar las concentraciones normales de EC en un 30% y conseguir los mismos resultados, prueba y verás!!
------
Hoy tengo algunos comentarios nuevos sobre los diferentes tipos de agua que uso y usé.
- Agua de río: Comencé recogiendo agua de los dos ríos caudalosos que cruzan mi pueblo, buena agua, no hay industrias en su cauce, pero sin embargo las aguas fecales de los pueblos acaban en él. Por lo que, ante la duda, deseche el uso de este tipo de agua.
- Agua de lluvia: Como comenté antes, recogía agua de lluvia desde el desagüe de la terraza de un vecino (PH: 7, EC: 0.07), mucho trabajo, exposición vecinal y explicaciones surrealistas a los transeúntes que me preguntaban, como decir que recogía el agua para mi perro que no podía tomar agua con minerales por tener tendencia a la formación de piedras en la vejiga, en otras ocasiones, respondía con entusiasmo que era la mejor agua para cocinar alubias!! 🤷♂️😎 Definitivamente dejé de recoger agua de lluvia de ese lugar, pues el agua que explico a continuación ya viene con los niveles de EC que yo busco...
- Agua de montaña: Manantial permanente a 700m de altitud, el PH varía según la época del año, cuando en otoño, invierno y primavera hay más lluvia, el PH está en 7, y el EC en 0.25, en verano el PH sube a 8 y el EC a 0,5, esto es debido a que la carga de minerales es mayor cuando no hay lluvias. Según la geología de la zona, rocas cálcicas, arcillas y basalto principalmente, este agua mineral contiene suficiente mineral (Ca, Mg, Si, Al, Fe, K...) para no tener necesidad de usar aditivos como CalMag. Esta, es el agua que más uso para riegos.
- Agua de manantial alcalino: Casi a nivel del mar, muy mineralizada, con menos variación de PH y EC en épocas de lluvia: PH entre 8 y 9.2, EC entre 0.5 y 0.9.
Esta agua la uso de varias maneras:
a) Es el agua que yo bebo.
b) El café y la comida la hago con esta agua.
c) Por su nivel de alcalinidad la uso para los diferentes fermentados anaeróbicos, compensa la extrema acidez de estos preparados y aporta minerales ya solubilizados.
d) Este invierno la he usado para riegos mezclada con agua de des-humificador al 50%, obteniendo agua con un EC de 0,25.
e) Las raras ocasiones en que riego sólo con agua, uso ésta si el cultivo va bien, y si necesitara hacer un lavado de sustrato por sobre fertilización, uso el agua de des humificador: PH: 7, EC: 0.09, que al no contener minerales el poder de disolución es mayor.
- Agua de des humificador: Este invierno debido a las bajas temperaturas, alta humedad relativa y aparición de oídio, me vi obligado a tener funcionando permanentemente un des humificador, y para hacer de la necesidad virtud, he estado recogiendo esta agua exenta de minerales, mezclándola al 50% con las aguas del manantial alcalino, de esta manera me he he ahorrado algunos viajes al manantial de montaña.
Recientemente medí el consumo de este aparato, y casi me caigo de espaldas al comprobar un consumo de 140w, lo he tenido encendido más de 3 meses las 24h del día y en ocasiones he tenido funcionando dos des humificadores! y yo, engañosamente, pensé que no consumían más de 50w... bueno, después del disgusto de saber el despilfarro de vatios, yo, que me he esforzado mucho en los últimos cultivos, acarreando macetas del interior al exterior, por consumir el mínimo de luz eléctrica y que me ha supuesto obtener unas cosechas medio bajas para lo que estaba costumbrado, ahora, en mis nuevos 4 cultivos la luz no va a ser el obstáculo, ya que ahora los des humificadores están guardados, y voy a alumbrar estas plantas con todo lo que me quepa en la carpa, la media de vatios por planta de mi última temporada de cultivos fue de 40w/planta, esta temporada voy a llegar a los 100w por planta... más luz es igual a más masa floral!!🌲🌲🌲🌲
- Agua de mar (for nerds): Yo no me he atrevido a usarla para riegos, pero con el agua de mar preparo Ormus casero con agua del mar Cantábrico, donde separo el sodio y hago precipitar los minerales:
Publicado el 10 de julio de 2020
a) Fuente principalmente de Magnesio, Azufre y calcio para todo el cultivo. El Ormus contiene de un 30 al 60% de magnesio. Yo lo uso sistemáticamente en todos mis riegos, las dosis van desde el 1% al 2%.
b) Contiene más de 70 minerales, la mayoría en modo monoatómico que mejora el intercambio catiónico y la asimilación de nutrientes.
c) Al ser un producto alcalino se puede usar para subir el PH del riego cuando se necesite. Aumenta muy poco la carga de EC.
d) Forma parte de mis componentes en la solución acuosa que preparo para germinación y establecimiento de semillas.
e) Almacenado a obscuras el producto no tiene caducidad conocida.
• Agua de coco (for nerds).
Producto natural rico en azúcares, vitaminas, proteínas y aminoácidos, enzimas citocininas (División celular, crecimiento), ácido giberélico (Estimulación de raíces) y minerales (Ca, Fe, P, Mg).
- Los momentos clave de más demanda de enzimas citocininas comienzan en la mitad de la primera etapa de germinación y establecimiento de la plántula, y al comienzo de la etapa de floración/reproducción. En la última etapa de los cultivos es innecesaria.
- Los momentos clave del ácido Giberélico comienzan también en la primera mitad de la primera etapa de cultivo y las últimas semanas de crecimiento vegetativo, después de estas etapas la necesidad del ácido decae hasta hacerlo innecesario en las últimas semanas del cultivo.
- Yo uso el agua de coco, alternándola con otros nutrientes, sólo en las primeras etapas de la planta y hasta la preflora.
- Las dosis dependen de la carga de EC que se prefiera. Como mínimo aconsejo una carga en disolución de EC de 0,4 o PPM 200.
- El agua de coco natural se debe guardar en el refrigerador, como máximo 4 días, pues fermenta con mucha facilidad.
y esto es todo por hoy... tengo sed! 😁
Hasta la próxima semana...
SALUDOS CULTIVADORES!!🖐️👨🌾💧💦🌞💡
=================================
Likes
3
Share


@xipo86
Follow
now is that time of the harvest that you can see change day by day on buds... love it this phase.. 😀


Likes
14
Share


@Do_it_Dan
Follow
This girls coming along so nicely and the smell is impeccable 👌 sweet and a little gassy, can't wait 😊 happy growing and stay green ✌️ 💚 👌
Likes
4
Share


@AmsterdamAutos
Follow
Got a TDS meter at the end of this week. This lady is also in full on flower!!! I just love seeing the pistols, I am also catching a small bit of smell during a small period when the lights come on!
She is starting to spread out and even out well. I dont think she is to great for LST, or at least she should be started a bit towards the end middle of week 3 or the end even. She grows short and bushy.

Likes
4
Share


@Mr_nugs_lover_David
Follow
Strong strong smell, what an amazing smell, I'm enjoying an amazing strong amnesia haze clasic smell right now, cannot believe this lady is gonna be ready in around 65 days, let's see how she keeps developing in the further days of this 4th week of flower 😋😍👨🌾


Processing
Likes
2
Share


@Cannatech
Follow
First week of flower not much to do, defoliate few leaves and leave the plant to do its thing. As far as training most of it is already done now so just letting plant stretch up and get some decent height.

Likes
17
Share


@Geili_Seili_fireinfireout
Follow
Zweiter tag in erde. Wurzeln schnell an und suchen sofort das licht.
Bin gespannt auf den wuchs dieser ladys.
Der cut is wie immer von der saubersten und vitalsten stecklingsfirma österreichs und vllt sogar europa. ROOTS-FARMS ÖSTERREICH 👌🌱🔥

Processing
Likes
37
Share


@The_Bearded_Grower
Follow
welcome to Day 29 15/1/21 she has grown so much in 1 week and that makes me happy as she was quite small. I have done light trimming of the lower leaves and toped up the res with the addition of flower nutes.
that's all for this week happy growing and as always keep your stick on the ice
Likes
55
Share


@Xpie77
Follow
Red Wine was a joy to grow. Very easy plant that not need a lot of nutrition to eat. Smell is out of this world, cant pinpoint because Ive never done Red Wine ever... But its fruity and a hint of berries. From Seed to flower it took 11 weeks. Thats a fast growing plant


Likes
11
Share


@UrbanBoer
Follow
I have finally realised that this experiment is horribly going side ways at the moment, however I wonder if it is due to the Winter season, growing outside or in my makeshift greenhouse, (when I say makeshift I mean, recycled plastic sheets, pallets, etc, I think all that aside, my forth cycle is going to memorable… currently I lack grow lights and fans, luckily I made my greenhouse self ventilate, though I am waiting for August(AwwDust) the windiest time in South Africa, if it remains standing and still self ventilating, I would consider it a victor.) growth would be slower than the warm seasons. To make conditions even harder, I do not have grow lights currently however an obstacle that I’ll correct, going for solar lights and solar fans, electricity tariffs are booming, luckily I use rain water stored in a 1000lt tank, no one is complaining water consumption, I feel like people don’t stress the cost of growing, if you don’t pay the bills and you want to become a grower, look for cheaper methods of growing, like for now… I am going to use the sun as my main light source, will get fans to induce positive stress.
Processing
Likes
47
Share


@rhodes68
Follow
11/17 Week 8
Man I will be glad when this grow is over, if making mistakes promotes learning well... Im a fricking PHD ...
Ok progress on Maggie the yellow is limited to the very top as buds are building in particular those a couple inches from the top.
Thinking another root drench is in order, cant hurt and letting her dry a bit as a prep.
Looks like tomorrow
Layla doing ok she exhibits far fewer problems but the same issue are present she is just a hell of plant along with the Runtz which she shares the tent.
Thinking about the feeding tomorrow will decide what to do then.
They have plenty of time to finish up, had some issues on germination on the grow following so looks like it may be delayed a week from the scheduled 2 weeks.
Maggie may need it.
11/19
Have stumbled onto to something it seems. The further I move the lights out, they are now at twice the "ideal" placement of 14" at 28" and the yellowing is disappearing to a great extent.
Problem with this of course is not enough light at bud sites not on the canopy which lets face it is most of your bud.
It is absolutely something that makes the plants insanely susceptible to light burn. New one for me but maybe some of yall know so making a question of it. Pics at lights out only and I missed today so new pics later if I get back in time.
Update :
Defoliated and tightened training on all three to spread things out from the center and open up the light and air paths. Raising the lights is working just wish I knew why as lights are higher than crap with little room for more than a few more inches. Would drop the watts to 450 but need the heat to keep the grow room level as our temps here swing 40 degrees all the time. Something I learned with the help of a carbon filter. If things normalize will begin dropping lights to see what happens.
11/20
Setting the lights at 24" as I am not risking yield any further than that on Layla and the Runtz, Have the canopy as level as it can be with Brandy getting the least light being on a coco coir block (heh) for height, which she is responding well to since I opened up the plant and no longer worried over mold issues in that main bud.
Have Layla on a milk crate to bring her into decent light as well as the Runtz. She is just a lovely thing building those white crystalline buds.
Maggie has turned into a beast at least I know her root ball is huge from the growth above. Seriously defoliated her removing several small lower branches and leaves blocking light and air paths. Next feed will be continuing what seems to be working, Epsom salt and bloom nuets (no calmag with epsom salt) with a foliar feed after lights out which may well be with calmag.
Foliar feeding today at lights out, one quart sprayer with 1ml CaliMagic and 0.5ml wetting agent un-PH warmed to 75 F before spraying (our tap water comes out at @50F so...), just trying to hit hard and effective
* New Pics after foliar
Update
Folks its taken 8 weeks and a final piece of the puzzle provided by Grey_wolf resulted in a near full strength cal-mag foliar feeding and the last def bites the dust.
See what happens from here but its the first time I have felt good about this grow since the bad time germing at week one. *big sigh of relief*
Have a whole list of things I will never do again in soil more about that at harvest.
Right now I need to work on why calcium is blocked at the roots but thats another day right now I just wanna look at em. 😁
11/22 Another foliar feed same as before just diluted 30% and all three got it today JIC
Cannot find a pale leaf or top and hairs are standing up on the top buds for once and buds building nice on the lower ares the defs were cleared up first.
Going to stop the foliars for a few days see what happens but will resume at first sign of need.
Maggie has potential even after all this and we going to help her be all she can :D
11/22 Feeding day -
Bio-Bloom 7ml - calmag 4ml - Recharge .5tsp / gal at 6.5PH to all three. No foliar today
11/23
The thickness of the hair growth on Layla is amazing! Will try and get pics at lights out of it if my crappy camera will catch it.
Never seen anything like it, once again THIS this is what we intended by growing Stardawg :)
Update:
Pics and vid hope it comes through well enough as for the green in that tent and the dense hairs on Layla
Likes
6
Share


@Magical_Surgeon
Follow
After you found some good sector and clone it you let the mycelium grow and fill almost all the petri dish like I did last week.
So now you're ready to move forward.
Making grain spawn!🍄🍄
For grain you can use Organic Rye Berries, but you can also get away with wheat berries, or brown rice or even corn kernels(which I used myself) !
And you'll need some mason jars or honestly I used some jars that I had home just clean them very well and sterilise before using
Making a grain spawn can be broken down into 6 easy steps.
🍄Hydrate Grain By Soaking
🍄Make Specialized Lids
🍄Simmer, Drain and Dry The Grain
🍄Sterilize
🍄Put your agar in the jar
🍄Colonize
🍄Soak the grain by placing it in a bucket, covering in water, and leaving it for 12 -24 hours. Easy.
🍄Drill 1 hole on top of the lid. Right in the center and cover with a small dab of high temperature silicone sealant, and leave it overnight to dry. And your jars are done. There other diff types for different methods like liquid culture etc. But I'm just going roughly through what Ive done.
🍄The next step is to simmer the grains on the stove. This will thoroughly hydrate the grains, and will soften them to make them easier for the mushroom mycelium to consume.
Cook soaked grain on the stove for about 15 minutes. You don’t want to cook it too long, because eventually all the grain will crack and you’ll get some mushy grain spawn. We don't want that. 🧐After the grains have simmered on a low boil, you’ll need to drain them off. What I did is I drop them in the sink with the drain cover on. The grains will drain over an hour or so, after which you can go ahead and fill your jars.
🍄Once your jars are filled, they need to be sterilised.This kills off all the other nasty contaminants in the grain cover the lids in tinfoil (to prevent water dripping into the lid) and then just pressure sterilise them for about 90 minutes at 15 psi.
🍄After that let them cool down. Get your SAB, wipe down the walls with some alcohol wipes and place the jars inside. And wait untill they will be warm to the touch... not hot and painful 😤patience is key. Bring in your plates that had been stored by you in a dark place. And what u have to do is sterilise your scalpel and just accurately and efficiently decide your mycelium into about 10 pieces and quickly place them in your jar. And complete for every jar u make. You have to be very quick. The more you keep you're jar and your agar plates lids open the more cans they will get contaminated. There certain technics you can see online..
🍄Ones you're done close all your jars lids tight and Jake your jar so the mycelium pieces will mix around the jar and place them in the dark place to colonize. And just keep waiting... 😅 Untill the mycelium will conquer your grain. Keep your eyes on the jars, any weird smells or colour during the waiting time.. because that would mean you got a contamination going on. Oh yeah and when about 55% of your jar is filled with mycilium shake the sh*t out of it so it will break the mycilium inside and make spread more faster.
Likes
7
Share


@CreatureCreator
Follow
4/8 - They are doing great. PPFD at 800. Debating if I want to do CO2 this grow, because I could easily get 1000 PPFD out of this light. That means adding a dehumidifier to keep a sealed environment, but don't think there's enough of a cost benefit. Might just add more far red at lights on and lights off to try and get a little more vegetative stretch before I switch over to 12/12. Clock is ticking. Mother-in-law shows up 6/15, and I'll want it chopped by then.
4/8 - on further calculation, I'm switching to flower today. Never switched this early before, but we'll see how it goes, eh?
4/9 - prepping for vacation.
Bought new 10 gal Roughneck storage container, mixed new nute mix 2:1:2. EC 1.40 with 0.3 tap water. 11ml of pH down to get PH from 6.4 to 5.8. Ditching the auto fill. Too high risk for flooding without flare fittings. Don't trust cheap-ass quick connect push fittings.
4/10 - turned off "seedling vpd mode" which kept humidity artificially high.
Turned on 2nd bank of LED lights, so system is pulling about 370W with lights on, still significantly dimmed down. Turned on light cooling circ fan, which is a sealed aluminum labyrinth tied to two 4"vents. Although, almost all the heat this lamp generates is from radiation, not thermal loss of the LEDs, so the heat sink is barely warm. Lights up to 16" over canopy to allow growth while on vacation. Ppfd at canopy 800. Room temp 81, humidity 73. Auto water time is 30 sec per pot.
Likes
12
Share

@GERGrowDesigns
Follow
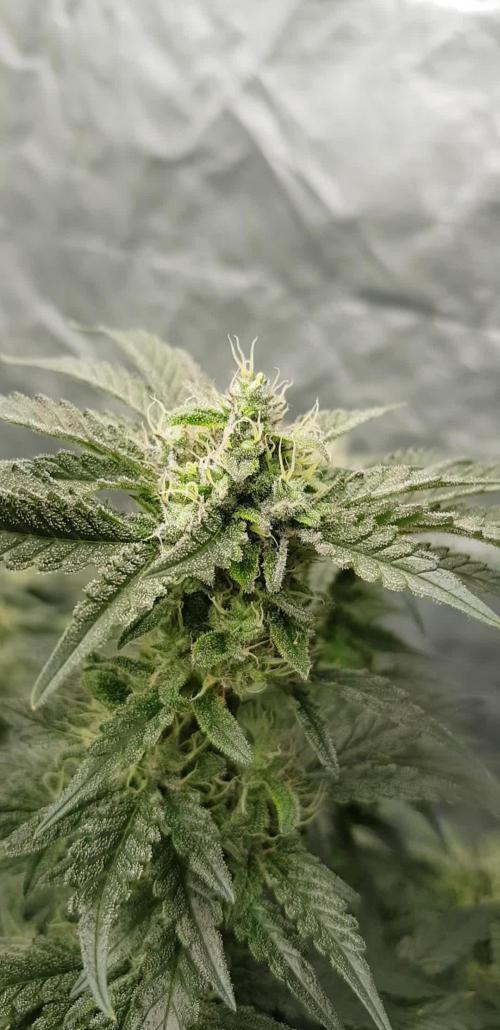
Welcome to Flower Week 7 of Sensi Seeds Mandarine Jam
I'm excited to share my grow journey with you from my
Sensi Seeds Project . It's going to be an incredible ride, full of learning, growing, and connecting with fellow growers from all around the world!
For this Project , I’ve chosen the Feminized Photo Strain Mandarine Jam:
Here’s what I’m working with:
• 🌱 Tent: 120x60x80
• 🧑🌾 Breeder Company: Sensi Seeds
• 💧Strain Info : 20-23%
• ⏳ Flowering Time: 7-8weeks
