


Likes
Comments
Share

@poloq
Follow
_Environment + Pests + Setup
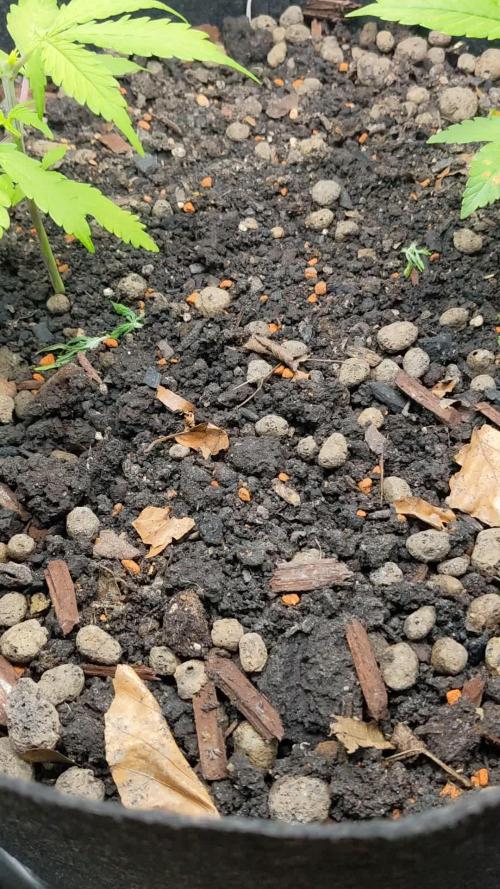
This week (at day 31) I decided to end the battle against fungus gnats. Even after almost three weeks of dried-out soil, dozens of adult insects could be seen, which told me that there were pockets of moisture that I couldn't influence. Accordingly, I went back to the original plan I had outlined earlier: bring the system into balance and use sand and nematodes. Since I should no longer have any problems with low RH, I have also reactivated the exhaust fan, which lead to the values you can see above.
_Living Soil
From the outset, the plants showed a slight nitrogen deficiency, which was evident in their rather pale, light green color. This is probably due to the fact that the substrate (until now) did not contain enough moisture to allow metabolic and decomposition processes to proceed efficiently. Directly after watering I got reassured that my choice was right and the soil still alive, healthy, and ready to 'get back to work': Look at the amount of springtails and how fast new growth appeared!
_Plants
On day 30, I topped the plants. Both had already formed three nodes and started to develop healthy side branches at all of these nodes. So, according to my plan, I removed the main shoot, leaving enough space for the stump to encapsulate without damaging the healthy plant. I also removed one shoot from each of the middle nodes, as I don't want branches that already grow towards the center (the branches will grow towards the light anyway, and this way I can ensure that there is enough air circulation and room for expansion).
Besides that, I sadly feel like the variegation - and genetic really - ain't stable. By the end of week 5, you could see that the offshoots differed a lot in their 'quality' (asymmetrical, some very weak, etc.), and the variegation didn't appear again.
*Gorilla Z Auto was 14 cm tall, Mimosa Cake Auto 7 cm (both after topping).

Likes
40
Share


@Coopmc
Follow
Looking like 2 more weeks to Glory!!
Oh yes this looks good!
Looks like a bit over a week left maybe 2
Likes
24
Share


@Hawkbo
Follow
This is probably the final week of the full tent shots, these were taken a few days ago and at this point there is only 8 plants that have not yet been harvested. I learned a lot this run, tried some new shit, grew out my own crosses, dialed things in by getting rid of the light leaks and adding the heater so it was a success. The new lights out performed my expectation and the leaf strip might become a staple in my garden. The leaf strip made me nervous I wasn't sure how it would turn out but all of my buds are noticeably larger, the lowers are filled out and as dense as the tops and it saved space, water and nutrients. The lights could have contriuted to the larger buds but the other things made it well worth it. I have been vegging out the next run for a while trying to keep them from growing too much in 1/2 gal bags so there should be some interesting plants there stay tuned.
* My 2 MC1 X;s have been harvested and are in the dry tent now, one came out pretty ugly but smells unbelievablely strong of citrus. The black leafed one is a looker but doesn't have the yield factor. I thought I took cuts of these but turns out I did not so these 2 will be one and done, maybe down the road I will dip back into them but going forward I will be hitting any cuts that stand out to me with my reversed MC2 pollen and maybe give some away. But that won't be for a while.
REMEMBER , IF YOUR SHOPPING FOR GEAR YOU CAN USE THE CODE “BANGDANG” FOR 10% OFF YOUR ENTIRE PURCHASE FROM ANY OF THE FOLLOWING COMPANIES.
@greenbuzzliquids
@rainscience_growbags
@gorilla_grow_tent
@growlightscience.led
NEW* @Rocbudinc Seeds on his website *
*****Gorilla grow tent discounts extend to all companies affiliated with grow strong industries which include..*****
@super.closet
Lotus Nutrients
Kind LED grow lights
Likes
15
Share


@Chubbs
Follow
420Fastbuds
FBT2313/Week8
What up what up grow fam. Weekly update on these two frosty girls. They both are maturing nicely at the flower sites. Starting to smell super pungent. Still keeping up the same routine for the next week or two before I'll start checking trichs.
All in all Happy Growing
Processing
Likes
4
Share


@Ferenc
Follow
Week 10: 20/4 light schedule, 150 mp water per plant 2x, no fertilization anymore. Day 65: Next week Tueasday/beggining week 11/ we need to harvest because they will come from the council to check the house😂 Well, the previous one finished in 69 days, but I think they won't be properly ready by next week. I tried it and made me high anyways. I would give at least 2 weeks more to be done. Tomorrow I will check the trichomes with magnifying glass. They are beautiful stinky girls. Flowers are getting thicker and pistils are getting brownish. Day 66: I checked the trichomes with magnifying glass and it will be ready by next Tuesday. 7 days left with this day. They are beautiful just check in the video (Day 66).
Day 67: It is crazy the last 3 days was so hot here in London. Today was 38 degrees!!!!!! Poor plants even with ventilation it goes up to 30-31 degrees. Well, it is alright because direct ventilation goes on so they won't be cooked. 😓😛 Day 70: It is the last day when they receive water and they just get once and half of the daily intake. 2 days before harvest I will not water them. Harvest day is on Tuesday 30th of July when they are 72 days old. I have checked the trichomes all good they are matured nicely cloudy so now it is very strong. They are very stinky girls 😋 Day 71: No more water for them..... Tomorrow is harvest day!!!!!😋

Likes
6
Share


@Hommero75
Follow
End of week 5 for this lady. Awesome week for GG4 Sherbet FF she is bouncing back really good from the issues she had in earlier weeks. She still developing slow but thats ok. The leaves looks really good and healthy. I did a good defoliation to the botton so she can receive more light. For week 6 she only is going to receive water and cal-mag so she can continue with the recovering.
Processing
Likes
7
Share

@Hawkbo
Follow
They all doin pretty good, leaves are a little too yellow for my liking at this point I should have added some grow to the mix but they will be fine I think. This one is a one of the shorter ones with fat buds.
REMEMBER , IF YOUR SHOPPING FOR GEAR YOU CAN USE THE CODE “BANGDANG” FOR 10% OFF YOUR ENTIRE PURCHASE FROM ANY OF THE FOLLOWING COMPANIES.
@greenbuzzliquids
@rainscience_growbags
@gorilla_grow_tent
@growlightscience.led
NEW* @Rocbudinc Seeds on his website *
*****Gorilla grow tent discounts extend to all companies affiliated with grow strong industries which include..*****
@super.closet
Lotus Nutrients
Kind LED grow lights

Likes
22
Share


@Gorey
Follow
they grow fast and are very strong, the branches are thick. a good smell is already emerging. I think the 5 will largely fill the tent. I added led bars on the uprights


Likes
46
Share


@The_Bearded_Grower
Follow
welcome to 📅 Day 31 8/4/2021 sorry this is a very late update back to the next week's update is tomorrow things have been just chaotic I keep thinking it's going to be better and it's not

Likes
49
Share


@masterofsmeagol
Follow
8/29 Knowing I was going to have to yo to the hospital er again this morning with my wife I got up early and watered. We are supposed to get an inch of rain tomorrow but the bags were totally light. If I was going to be around I might've held off watering. Instead I watered everything one gallon and figured the rain will make up for the other 10 percent hopfully that will do it.
8/30 Rained overnight. Plants were soaked. Flowers are swelling. I defoliated a shit ton of yellow leaves the other day. I still don't think I have anything fungal but I'm keeping an eye u e out and am considering doing an application of plant doctor. We are suppised to get an inch of rain tonight and tomorrow I guess. My biddy said i shouod cover my plants because next week is going to be "great growing weather" but with the rain and then the sun it could be a recipe for disaster since I have some large flowers. I got my father's leaf blower running but it was leaking gas. Brought it to the repair shop and a buddy let me borrow his for thus storm. I and hit the plants with it this morning. It is super strong though. I need to be careful not to blow it right out of the bag!!! Or break branches. Of course after u left it started raining lightly. A nice rain that plants like but it's stopped. I'm wondering if I should go over and blast them again to keep them dry but I know it's going to rain off and on and it'd going to rain tonight. I'll check the weather and decide from there. So far things are going good. Still have some yellowing leaves and a few normal pests but that is to be expected.
UPDATE: Stopped raining so I went over
and shook off the plants then put the leaf blower to them. I made sure to get the interiors before I went and had shook things again by hand. Storage us low bur i took a video. Cant upload toll tomorrow. Buds are growing at an insane rate but im losing some fan leaves that just yellow and die. Im sure its senescence but its still wortisome. We are supposed to have a real good week of growing weather coming so I hope that doesn't change. I'll update tomorrow. That leafblower works awesome though.
8/31 Went over to an extremely sunny windy morning. I didn't even need to shake plants or use the leaf blower since I did it after it Rained last night. I'm worried the wind night dry my bags out today so I'll be sure to keep an eye on them. I defoliated a shit ton of leaves but apparently it's just senescence. I need to check the last time I fed. Trich development is going good. The smell was incredible this morning! Each strain has its own unique smell to it. We are supposed to have a real good week for growing so I'm looking forward to it. May do a preventative plant doctor app but I think it will be alright. I'll keep this updated.
UPDATE: Went over around one and plants were bone dry. The wind was RIDICULOUS! I added a few individual stakes and tied a couple loose branches. I got my tarp out and considered covering the cagecto protect from the wind. However I didn't have time to sanitize if and they had already been through it all night and day alwuth no breakages. Plants are strong and supported well. At least I hope. Plus the tarp would block the rest of the direct sun the plants are getting right now. The wind looked like it dud its worst and the trellis and supports held. I did add extra supports higher up the plant to prevent breakages. Found a moth larvae (yellow) and squished him. Also found some aphids but a few lady bugs and three lady bugs larvae so I think I'll be OK. I am really excited for this year. Flowers are really exploding! FORGOT TO PUT THE MOST IMPORTANT THING. WATERED EVERYTHING TWO GALLONS EXCEPT THE 10. WHICH GOT ONE.
9/1 Forgot my phone on the daY I really needed it. It rained last night. The wind was the strongest i've seen in years. I would've tarped the cage but i couldn't find any of the bungee cords or zip ties. Probably good I didn't. No breaks. One plant had dark brown splotches ALL over the leaves! I picked them all off and took pictures and will consult my commercial buddy. I researched and asked a question on here. If it's septoria or something that could ruin my gorgeous garden I'd rather just junk the plant. It's big but it's the furthest behind flowering and I would not be heart broken if I had to get rid of that for the others. This week is supposed to be the best week we've had all summer so I'm expecting major growth. I'll update after conferring with other growers and making a decision. Looking online it seems like it could just be lack of nutes with the co dictionary we've been having. It IS time to feed and I haven't been feeding much. We'll see what he says.
UPDATE: AFTER RESEARCH AND CONSULTING WITH OTHER CONMERCIAL GROWERS I BELIEVE THAT THIS IS A NUTRIENT DEFICIENCY. I READ THAT RAPID TEMP FLUCTUATIONS AND HIGH WINDS CAN EFFECT THINGS LIKE THIS. IT DOES NOT APPEAR TO BE SEPTORIA (WHICH I'M EXPERIENCED WITH). I WAS THINKING ABOUT DOING AN APPLICATION OF PLANT DOCTOR BUT SINCE IT WAS SO FEW DAYS DURING THESE CONDITIONS IM GOING TO WAIT AND MONITOR THE PLANT. I DEFOLIATED ANY LEAF THAT WAS SUSPECT. FOUND AND KILLED A BUD WORM. I THINK THEY ARE STILL DIEING FROM THE BT. IT WAS LIKE STRETCHING UP FROM THE TOG OF A BIG NUG LIKE, "HERE I AM COME OUT ME OUT OF MY AGONY." ALSO FOUND LADY BUGS AND BEETLES AND THEIR LARVAE. IVE SEEN TGE VERY LOWER SECONDARY BRANCHES GET STRIPPED ON A COUPLE PLANTS BUT THATS WHY I LEFT THEM THERE. IF THEIR ARE EARWIGS THEY CAN HAVECTHE SHIT THAT I WAS GOING TO LOLLIPOP ANYWAY BECAUSE THATS WHAT THEY USUALLY GO FOR. THEY ARE DEFINATELY STRAIB DEPENDANT TOO. THEY LOVE ANYTHING BLUEBERRY BUT DONT TOUCH THE REST. MAYBE THERE IS JUST A COUPLE IN "THAT BAG". ILL HAVE TO GO AT NIGHT AND CHECK. IM EXCITED. MY FLOWERS ARE EXPLODING IN SIZE AND TRICHOME PRODUCTION. SEEIMG THAT I THINK THIS IS A NUTRIENT ISSUE AND MY FEEDING DAY WAS TODAY I FED EVERYTHING 1.75 PINTS OF NUTRIENT MIX TO EVERYTHING BUT THE 10 GALLON WHICH GOT LIKE 3/4 OF THE POWERADE BOTTLE. PLANTS SEEM HAPPY AFTER I FEED SO MAYBE I SHOULD UP THE FEEDING SCHEDULE. SINCE THE SOIL WAS ALREADY MOIST AND IT RAINED YESTERDAY I FED WITHOUT WATERING. HOPFULLY THAT WILL BE OKAY. I'VE DONE IT BEFORE.
Went back over at six and WOW! After this nice sunny day buds have swollen. Plants seemed to love the nutes. I think the nutes in my soil are fairly depleted so I just needed to adjust my feeding schedule. I didn't notice anymore calcium deficiency looking spots and I had defoliated a lot of leaves. Super excited moving forward. Pistols are changing color on one 10th p phenome and retracting into buds. This is is the fun time. As long as I can avoid the rot.
9/2 Says it didn't rain last night but my plants are dripping wet. If course the leafblower kept dying so I had to shake everything by hand. Hope that's good enough. Gonna be real sunny. Bags still had some heft to them. I'll check them later. Found a few leaves with what looks like the calcium deficiency on the sane plant and I just removed them. I really don't think it's anything to worry about. I'll update later.
UPDATE: Went back around 10 and everything looked good and was dry. Brought the leaf blower to be fixed. Should have it by the end of the day. Found and killed another pillar and some ants. Took a picture of a lady bug/beetle. This sunshine is making my buds explode!! I was thinking about checking again tonight but I think I can wait and water tomorrow. Bags are still fairly heavy. I did take another couple leaves off the plant that lopks like it might have a deficiency or something. The stalks are bigger than the bottom of a baseball bat. A couple almost like the fat end. Some 9f the best plants I've grown. I also took three short videos of a plant of each strain. Maybe if it's short it will upload quicker. Happy growing! UPDATE: I was back and forth today. I did some pruning and defoliation and then I noticed that my canary was light as hell. I waited until night and went back and had a couple starting to droop so i watered everything 2 gallons except the 10 and tub got 1. Everytime I see them it seems like they are bigger
9/3 Used the leaf blower this morning to get the dew off the buds. I shook them by hand before that. I'm noticing like a little army of lady bug larvae so any aphids I have are not going to be a problem. I have adults as well but is the babies that eat 10x what the adults do. I'm hoping they'll wipe put any bud worms. The weather is great this week all sunny. Making the buds explode in size and increasing terp production. This is the strongest smelling cannabis I've grown. Each strain. Has its own unique "funk" to it. Purple punch is really sweet and floral smelling. 10th planet is more gassy. I need to get some yellow sticky traps. I saw a couple fungus gnats on my canary. A late blooming blueberrycheese. It's the one that dries out the fastest but is more sativa leaning and drinks TONS of water. I have two that are that phenome. Losing yellow leaves but exploding with flowers. Noticed a couple more leaves with that calcium deficiency looking leaf. I just defoliated it. I'm really happy where I'm at right now.
9/4 Plants were covered in water this morning and the leaf blower wouldn't start. I shook everything off by hand. Each strain hasits own STRONG unique scent. One tenth planet phenome smells like bubble gum. I think I've got like two weeks and some of the flowers on ONE plant should be done. I'm planning to take the top half and then letting the bottom mature longer of its not whete I want it to be. The weather has been gorgeous. Sunny today. I'll need to water tonight I'm sure. UPDATE: WENT OVER AT 3PM AND PLANTS WERE DRY. WATERED EVERYTHING 2 GALLONS BIT THE 10 AND THE TUB. THEY GOT ONE. FLOWER DEVELOPMENT IS VISIBLE FROM MORNING TO NIGHT. I HAVE A TENTH PLANET THAT I BELIEVE WILL BE READY FOR HARVEST (AT LEAST THE TOPS) WITHIN A COUPLE WEEKS. PISTOLS ARE RETRACTING AND TURNING ORANGE ON THIS PHENOME AND RED ON THE OTHERS. I AM LOVING HOW THIS STRAIN LOOKS GROWING. I HAVE REAL HIGH HOPES FOR IT. I FAILED TOO MANY TIMES UPLOADING THE VIDEO AND PICTURES I TOOK SO ILL DO THAT TOMORROW. I CANT BELIEVE THE SWELKING GOING ON AND THE AROMA! THIS IS SUCH A WONDETFUL YLTIME OF YEAR. STILL FIND8NY SMALL SPOTS OF WHAT LOOKS LIKE CAL DEFICIENCY IN THAT ONE PLANT. IM STILL UNCERYAIN WHWT TO DO WITH THAT ONE.


Likes
15
Share


@The_Stonedbaker
Follow
Hello Everyone and welcome back!
Its been another tough week so I hope you are all hanging in there safe.
So in this week at the start I did a pretty good defoliation to allow more light penetration and to clean up the lowers on the plant. By the time I took these
pics it is hardly noticeable.
During this week I also did two waterings.
The first was 20L of water with 3tsp freeze dried coconut and 3 tbsp of microbial mass.
The 2nd was 20L of water with 1/8 tsp of sulphate of potash, 3 tsp coconut, 50ml liquid kelp and 4 grams of TM7 Ful-Humix.
After this most likely I will only use the freeze dried coconut for the remainder of flower.
Its really cool to see the flowers develop and watch them start to swell.
While they were younger I had added a few bamboo poles but I added 2 to each pot trying to stick to the outsides of the pot
as I did it to not damage the roots too much. I think they will get heavy enough to need support so I am trying to be proactive
to protect them.
The flowers have a pretty great smell happening when I open up the tent.
Strain: Moon Boots bred by Archive Seed Bank
Tent: 2' X 4' @highdrogro
Light: Scyence Dragon S Turbo 450 Watt LED
Light Cycle: 12/12
Soil: Black Swallow Living Soil, KIS organic mix
Top Dress: Insect Frass and MYGOODGREEN Bokashi pro
Air Circulation: AC Infinity Cloudline T6 Inline Duct Fan + two Air King clip fans.
7 Gallon Living Soil Bags: Grass Roots Fabric Pots
Top Dress: MYGOODGREEN Bokashi pro and 3-1-3 Insect frass

Likes
7
Share

@Skynets_Growing
Follow
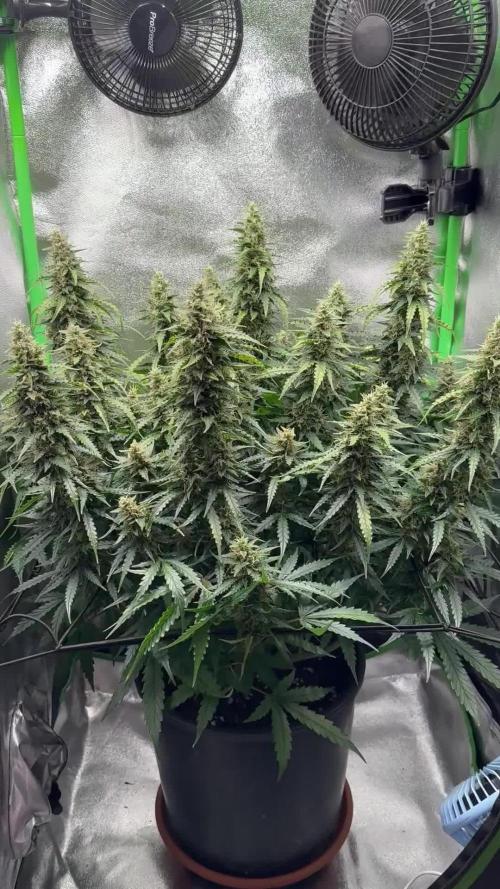
Tamara her week 11 is full with looking in many Little Parts of Tamara. Every „corner“ I have my eyes on I am more and more impressed of her Beautyness… really. I have never thought about that, that a plant can take me so much. I am looking for week 12 what she will do with me ^^. I am sure, I will love the next week.
Likes
Comments
Share


@grower0007
Follow
Great strain! I was to get such plan with tree leaves instead of two.


Likes
104
Share

@Growbody
Follow
Meine lieben Freunde und Freundinnen, Brüder und Schwestern im Geistigen und Tatkräftigen, herzlich Willkommen zum Greenhouse Summer Outdoor Grow 2026.
Der erste Strain des Outdoor Grows den ich Euch vorstellen werde ist die Purple Lemonade FF von 2Fast4Buds, eine 60% Sativa die laut FastBuds etwas nebulös als eine Kreuzung aus purple und citrus Cali Genetik beschrieben wird. Egal, sie soll sehr fruchtig und zitronig schmecken und könnte schöne Farben bekommen. Außerdem soll Sie eine kurze Blütezeit haben. Hier ist die URL:
https://2fast4buds.com/de/seeds/purple-lemonade-fast-flowering#description
Der zweite Strain der im Set mit dabei ist, ist die Mimosa x Orange Punch fem. von Barney's Farm, die ihre Genetik und den Taste bereits im Namen trägt, eine 65% Indica, die laut Barney's "ein wirklich sensationelles, zitrusähnliches und mandarinenartig-süßes Aroma" haben soll. Auch sie könnte interessante Farben bekommen. Hier die URL:
https://www.barneysfarm.de/mimosa-x-orange-punch-552
Last but not least, der dritte Strain ist die Chocolate Sherbet fem. von Grower's Choice, eine 70% Sativa, deren Eltern Chocolope x Sunset Sherbet sind. Auf den Geschmack bin ich schon jetzt gespannt, cremiges Haschisch. Mit bis zu 240cm könnte sie die größte im Greenhouse werden und würde dann bis zur Decke wachsen. Hier ist die URL:
https://www.growerschoice.nl/de/chocolate-sherbet.html#description
EDIT:
Nachdem die oben aufgeführten Pflänzchen nicht so recht loslegen wollten, habe ich mich entschlossen, fertige Stecklinge von Hanfgarten aus Österreich dazuzubestellen. Die Stecklinge kommen in die Mörtelwannen, die selbst gezogenen kommen in die bereits bewährten 15 und 20 Liter ROOTiES. So kann ich die auch mal direkt in die Sonne stellen.
Der erste Steckling ist die Blueberry von Hanfgarten, eine 80% Indica, einer Kreuzung aus Afghan Indica x (Thai Sativa x Mexican Oaxacan Sativa), die nach 8 Wochen Blüte Mitte Oktober fertig sein soll. Außerdem soll sie fruchtig, beerig und süß schmecken. Auch hier gibt es eine URL:
https://www.hanfgartenshop.de/blueberry.html
Der zweite Steckling ist die Runtz, ebenfalls von Hanfgarten, ein Hybrid aus Zkittlez × Gelato, die auch nur 8-9 Wochen Blüte hat, mal sehen. Wenn sie ein ähnliches Aroma hat wie die Wurlz bin ich happy. Die URL:
https://www.hanfgartenshop.de/runtz.html
Der dritte Steckling ist die Super Lemon Haze, eine 80% Sativa von Greenhouse Seeds, deren Genetik von Lemon Skunk x Super Silver Haze stammt. Mit 9-10 Wochen Blüte steht sie wohl mit am längsten im Greenhouse. I💖Haze und hier sind die URL's:
https://www.hanfgartenshop.de/super-lemon-haze.html
https://shop.greenhouseseeds.nl/feminised-cannabis-seeds/1-seed-pack/super-lemon-haze/?variation_id=604
Auch dieses Jahr gibt es wieder etwas Neues:
Mir ist vor einigen Wochen im Baumarkt ein Foliengewächshäuschen begegnet. Die Aussicht, meine Schätzchen immer im Trockenen zu Wissen, lies mich sofort (also sofort nach einem Recall mit meiner Liebsten) zuschlagen. Danach war nur noch ein teilweiser Umbau unseres Gartens nötig, einen kleinen Weg anders verlegen, ein Fundament ausheben, Bordsteine zersägen, 2 Zentner Beton verbuddeln, Löcher bohren, verdübeln und verschrauben ohne das der Beton ausplatzt, einen haufen Astwerk vom Wein opfern und viel Rasen neu anlegen, das war's schon fast.
Neu:
Sind auch die zwei 90 Liter Maurerbottiche, in denen sich meine Pflanzen wohlfühlen dürfen, 4x soviel Platz wie im letzten Summer Outdoor Grow. Zur Drainage habe ich Rheinkiesel 9-18 verwendet. Da drauf kam mein altes Erdmischungsrezept mit frischem Kompost von Piluweris, Lehm, den die Wühlmäuse ständig in unserem Rasen aufwerfen und Sand aus'm Kieswerk mit gaaanz viel Staub drinne, praktisch Gesteinsmehl. Auch hier gab's was Neues: Hornmehl zusätzlich, hatich früher schon verwendet und ganz vergessen. Der erste Sack Sonnenerde Hanferde wurde mit der oberen Schicht meiner Mischung vermischt. Der zweite Sack kam dann blank obendrauf.
Neu:
Für mich ist auch die angewendete Keimmethode noch neu, die Samen zuerst in einem Marmeladenglas mit temperiertem Wasser mit Zusatz von Wasserstoffperoxyd keimen zu lassen.
Neu:
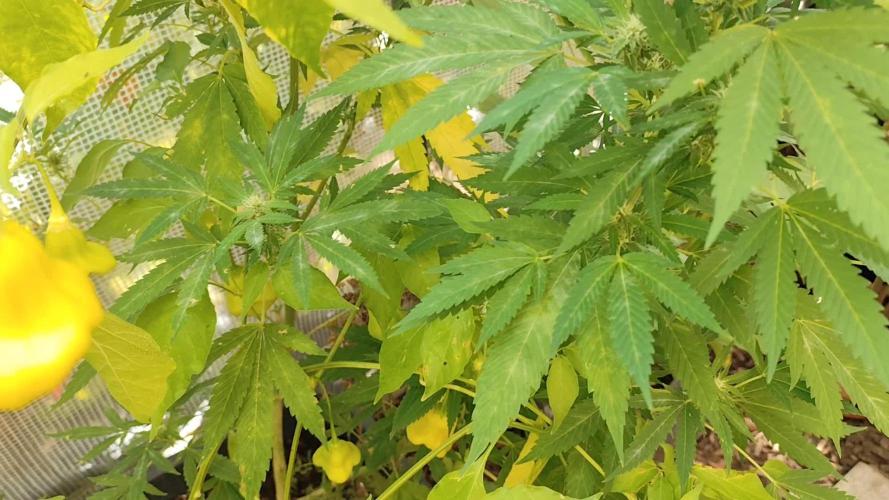
In die Wannen kommen zusätzlich Gäste als da wären erprobte und neue sowie überwinterte Chilisorten, verschiedene Basiliken oder -kums, Weiße Melisse, Roter Klee, paar Blumen und so.
Tag 142: Heute ist es mal wieder zeitweise stark bewölkt mit weniger Sonne und 22°C, im Greenhouse sind es 28°C bei 41%. Nachts kalte 8°C bei 97% RLF. Die Mimosa x Orange Punch fem. von Barney's Farm bekommt dickere Blüten und ein schönes Herbstlaub, dessen Farbe allerdings weit entfernt ist, von dem Pheno, das auf deren Homepage zu sehen ist. Dafür riecht sie appetitlich nach Orange. In ihrer 4. Blütewoche ist sie nochmal 5 cm gewachsen auf jetzt 189 cm. Der Stofftopf steht schon einige Wochen am gleichen Platz und ist mirrlerweile am Boden festgewachsen, wie auch die Chocolat Sherbet. Die Blüten der Purple Lemonade FF von 2Fast4Buds werden in der 6. Blütewoche richtig hart, riechen nicht so kräftig wie die der Mimosa und bekommen trockene Pistillen. Die Blätter der Astspitzen purpeln wunderschön. Die Chocolat Sherbet fem. von Grower's Choice ist mit jetzt 251 cm eine Riesin geworden an deren Spitze mein Arm bei weitem nicht hinreicht. Obwohl sie mit der Blüte erst begonnen hat, füllen sich die Buds ziemlich rasch. Die Blueberry von Hanfgarten blüht jetzt die 4. Woche, bekommt wunderschöne Herbstfarben und ist diese Woche noch auf 176 cm gewachsen. Die Runtz von Hanfgarten blüht knapp 4 Wochen, hat immer noch den größten Blütezuwachs von allen und bleibt auf 145 cm. Die Blätter zeigen deutliche Anzeichen für den echten Mehltau, deshalb bekommt die Runtz eine Dusche mit Natriumhydrogencarbonat, das billigste und wirksamste Mittel in diesem Fall, das für ungünstige Wachstumsbedingungen für den Mehltau sorgt. Die EU hat übrigens den Bauern verboten, dieses Mittel einzusetzen, die Pharma hat dafür kostspieligen Ersatz in ihrem Chemiebaukasten. Da braucht man sich nicht wundern, wenn das Vertrauen in diese wichtige Institution sinkt. Die Super Lemon Haze Hanfgarten/Greenhousseeds ist nochmal um 2 cm auf 202 cm gewachsen, hat weiterhin diese seltsamen Vertrocknungen an den untersten Zweigen. Ich schneide die befallenen Triebe immer noch komplett weg, es kommt aber trotzdem immer wieder zu neuem Befall.
Tag 144: Die Ausbreitung von Mehltau ist gestoppt. Ging schnell. Heute Nacht gab es 2 Liter Regen. Die drei Grazien bekommen nur noch 1x am Tag ~3 Liter, ebenso die Stecklinge drinnen 1x 10 Liter Brunnenwasser. Die Temperaturen sind trotzdem bei 26°C, im Greenhouse sind es 31°C bei 41%, nachts 6°C bei 97%.
Tag 146: Heute hat es 26°C, im Greenhouse sind es 30°C bei 37%, nachts kalte 6°C bei 96%, heute vormittag war es stark bewölkt es gab aber keinen Regen.
Eins kann ich versprechen: It will take a very, very long time 😃 Schön das du es bist, der mich begleitet 👍😎


Likes
18
Share


@CRK00
Follow
9th Week Report 12/12/19 - 19/12/19
In photos CMXL is on the left and LSD on the right
12/12/19
Unfortunately humidity at 80% and since is too high from next week I will try to give them more aeration. Hope there won't be mold.
Changed solution and raised its strength to 90% and unlikely the last change I didn't added a small quantity (0.5/L) of "grow" nutrient as both are in full flowering
13/12/19
CMXL got a bigger defoliation and now you can see even more bud sites! 😁 Just waiting for her ;)
Looking to LSD I guess next week we probably will be ready to harvest. As you can see she almost has no more space, CMXL is giant (and beautiful) and she is starting to cover LSD, but hopefully LSD will be harvested soon and consequently CMXL will have all the space she needs.
CMXL was defoliated every couple of days, the quantity of leaves that were removed during every defoliation session is more or less like in the photo uploaded.
However it looks like CMXL is not anymore stretching and just fattening up, so from the next week will get light defoliation just when needed (if she will cover everything again like last week probably will get one more last stronger defoliation).
Any comment or suggestions is appreciated, especially if you have tips about LSD time to harvest! Thanks in advance dudes 😁👊
Last Update 19/12/19
See you guys ;)
Likes
4
Share


@Oyziphar
Follow
18 plants, 5 strains. Each plant has 3 main buds. By means of LST I tried to make them all the same height. Because the plants have now stopped growing, leading is no longer necessary. The plants are still attached to the plant sticks with tie strips to support the buds when they get heavy later on.
Lots and large leaves, and therefore a weekly large defoliation every week. The trichomes begin to appear.
I have 4 Marilla Fruit plants and they are all very different. The scent of each plant is very strong and very special.
MF # 2 - 79cm - has a very compact Indica growth pattern with wide and large leaves. I had to defoliate a lot. Trichomes production is well underway.
MF # 3 - 99cm - is more of the sativa type. Very slender leaves with purple stem. Trichomes production is also well underway at this plant.
MF # 4 - 81cm - Indica plant with thick clusters of leaves that are packed very close together. Lots of defoliation work.
MF # 6 - 96cm - rather sativa type. Open structure, relatively few large leaves, many side branches, buds spread over the entire plant. Less positive are the many small leaves between the flowers.
Likes
9
Share


@Justrite
Follow
Second week of overdrive , and getting ready to flush for next next week res has been topped up and diluted down the mixture to ensure no over feeding or blockages happening and also to encourage the purple n black colours to come through .
More comments said on the video as well
Likes
20
Share


@420DeepGrow
Follow
Blue Zushi entra en su recta final con una presencia imponente. Cada rincón del cuarto de cultivo refleja el esfuerzo de estas semanas, y las plantas están en su punto más vistoso hasta ahora.
Los cogollos han alcanzado un nivel de compactación sobresaliente. Se sienten duros al tacto, pesados y llenos de resina. La capa de tricomas es densa y opaca, como una escarcha blanca que lo cubre todo. El característico tono azul se ha intensificado al máximo, sobre todo en las hojas cercanas a las puntas, creando un contraste visual que parece sacado de una postal.
La nutrición sigue igual: XpertNutrients como base y Sticky Fingers como potenciador de resina, que no ha dejado de sorprender. En esta fase, la acumulación de terpenos se hace evidente: los aromas son más penetrantes, complejos y embriagadores. El perfil se define con notas cítricas más dulces, casi caramelizadas, sobre un fondo kush cremoso y ligeramente especiado.
La iluminación con Adlite sigue marcando la diferencia. La densidad de cogollos incluso en zonas menos expuestas lo confirma. La distribución de la luz ha permitido un desarrollo muy equilibrado de toda la planta.
Las condiciones ambientales se han mantenido estables, lo que ha permitido evitar cualquier estrés: temperaturas entre 22 y 24 °C y una humedad que ya se empieza a bajar ligeramente, en torno al 45-50%, para prepararnos de cara al final.
El ambiente está cargado de aroma, intenso y agradable, pero también indica que se acerca el momento decisivo. La mayoría de los tricomas están ya lechosos y muchos comienzan a teñirse de ámbar. La planta pide calma, pero ya deja entrever que la cosecha está muy cerca.
Una joya que está casi lista para brillar al máximo.
¡Últimos pasos antes del gran final! ✨
Seguimos creciendo fuerte! 💪
