Check the winners The Grow Awards 2026 🏆 


Likes
Comments
Share
@BettyFlores
Follow
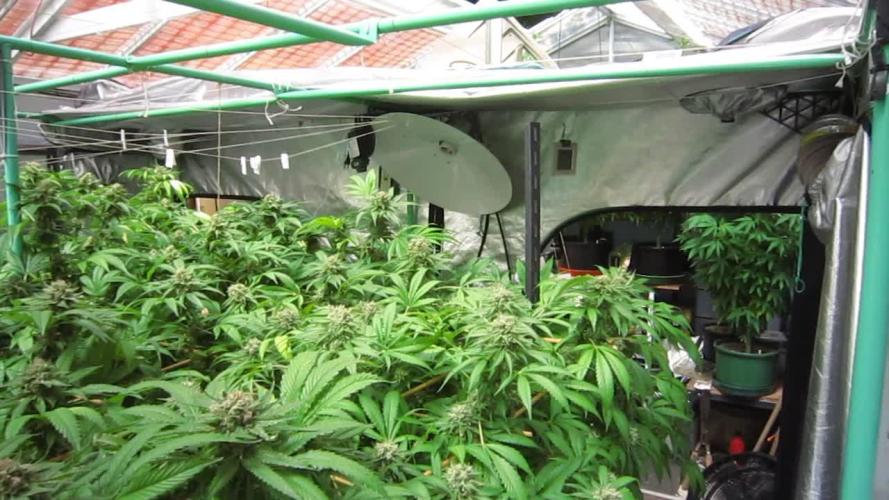
27.11.2025 She got really tall and nearly reaches the light. Maybe I'll supercrop her, in case she will stretch a little more. She is a giant and if she will provide a good harvest I'm the happiest person ever. I'm already dreaming about smoking her on christmas eve. That would be a perfect occassion. And hopefully some seeds come around, too .
Likes
188
Share
@DeepWaterGrower
Follow
Hi guys, just a quick info for whoever read this diary:
I started this run with two plants but during Week 9 (57 days: 49 vegetative + 8 flowering) I had to remove the one on the right due slow growth (issue started after I topped her).
Enjoy the reading.
🌱🌱🌱🌱🌱🌱🌱🌱🌱🌱🌱🌱🌱🌱🌱🌱🌱
Third run begins.
🍪🍦Cookies Gelato by RQS, my first time with photoperiods.
I created this diary at the end of January but due some problem with the new drip system (too ph oscillations), I decided to go back to my first love: the DWC.
This time, however, I decided to build my own DWC, taking into account the negative aspects that I find in the expensive DWC of various brands.
This tank has about 50 liters capacity and on the bottom I have inserted a metal tap that will help me with the solution changes.
The lid is made up of two parts, the upper one on which I made a hole in which I inserted a 2 liter planter full of expanded clay and the two root riot;
the front part of the lid is magnificent because it opens and allows me to do a quick check of PH and EC.
This time I'm going to count the days from the germination date. I'm going to VEG for about 40 days, then switch to 12/12 for about 70 days.
I plan on topping the plants during week 4, then defoliation + SCROG during week 5, switch 12/12 during week 6. Then lollipopping at the end of the stretch.
In this run I will use my new MARS HYDRO TS1000 2022 (already have one with 2021 MOSO driver), bought a few days ago to test the latest model with the proprietary Mars Hydro driver. I'm sure there will be further improvement in my performance 💪.
No sponsor for me yet, what I have is what I bought but I hope someone can help me to bring my crops to the next level. I'm planning to buy a new 90x90 tent and a nice 300/480 watt lamp would be very nice. Crossed fingers! 🤞
🌱🌱🌱🌱🌱GERMINATION STAGE🌱🌱🌱🌱🌱
- 20/2/23: seeds in a glass of demineralized water, 2 drops of rootbastic and 3 drops of hydrogen peroxide for 24 hours, then in root riot;
- 21/2/23: seeds under TS1000: 100 cm distance / 33% dimmer = 50 watt;
- 22/2/23: first Cookies Gelato sprouted;
- 23/2/23: second Cookies Gelato sprouted. - Got some gift from RQS, really appreciated.
I'll consider tomorrow as 1° day of veg for all 2 seedlings. I'll switch 'em to 12/12 after 40/45 days of veg.

Likes
13
Share
@Chucky324
Follow
Hello. This is the end of week 8 and the beginning of week 9 of flowering.
The plants look great. Little bit of thrips damage, but other wise, they look great.
Started flushing on Sun. They'll get ph adjusted tap water twice a week... with the run off, draining back into the reservoir.
Plant #1 smells like lemon with some mango hints. plants #2 and #3 smell fruity with citrus hints.
Will start the harvest on Aug 11th and it should take about 5 days to harvest or maybe 6.
It depends on how tired I am and if I need a nap on one of those days to keep my energy up.
I also put the buds into curing bags after 3 days hanging, which takes up more time.
I've got some other plants to put in their places. and that will take us up to Oct. for that harvest. It's the Mac and Crack Diary.
This is the last of Weirdo #8 and I will put more weird comics in my next diary. Check out my other diaries for more weird comics.
OK. Have Fun.
Chuck.

Likes
25
Share
@420DeepGrow
Follow
🍁💐 Runtz:
La Runtz de Zamnesia 🌱🔥 es una variedad de cannabis de alta calidad, resultado del cruce entre las legendarias Zkittlez 🍬 y Gelato 🍦. Este híbrido perfectamente equilibrado, con un 50% índica 🛋️ y un 50% sativa 🌞, combina lo mejor de ambas genéticas para ofrecer una experiencia intensa 💥, sabrosa 😋 y completa. Su nivel de THC puede alcanzar el 27%.
El TS1000 de Mars Hydro es una lámpara LED increíble para el cultivo interior 🌱💡. Ofrece una excelente combinación de potencia y eficiencia, perfecta para espacios pequeños y medianos. Su espectro completo simula la luz solar 🌞, ideal para todas las etapas del cultivo, desde la germinación hasta la floración. Además, el consumo energético es súper bajo ⚡, pero la producción es impresionante 🌿🔥. La distribución uniforme de la luz asegura plantas sanas y cosechas abundantes. Definitivamente es una gran inversión.
Para este Concurso usaré la gama de fertilizantes de Plagron tal como mandan las reglas.
📆 Semana 1:
He cambiado el horario 12/12 para seguir la tabla de fertilizantes, también he aplicado tierra de diatomeas para evitar plagas indeseadas.
Ha sido una semana explosiva, las hojas son grandes, anchas y ya empieza a desprender olor.

Likes
18
Share
@NewMan
Follow
Zdar a sílu. Vypadá to že se blížíme ke zdárnému konci.Brocolice krásně voní a ještě víc lepí, palice zmohutněly a celkově to parádně zaplnilo stan, sundal jsem síťku, prostříhal a "TOP z pátého týdne" už šel pod kosu aby nepřekážel. Ta menší jde na řadu za dva dny a zbytek nechám ještě týden. Ph 6.2 , Ec 2 , zálivka pořad stejný dokola, 4.5l každý třetí den . Ať to roste a za týden 🖖
Likes
23
Share
@canongun
Follow
Day 22 - 28
She is really eager. The growth rate is noticeable every morning when I have look into the growing tent...
I am keeping the same nutrient rates because, as you can see from the pictures, there are signs of nutrient toxicity. I am giving CalMag and Rhizo as mentioned above, but I have decreased all the TriPart nutrients to half. I will continue watering her this way for the next 2-3 sessions.
I am also confused regarding defoliation. Every session I am cutting some leaves if they are blocking too much light and if I cannot manage to push them down. However, I will wait for the real defoliation session until the early flowering phase. What do you guys think?


Likes
4
Share
@Cr0mEtheus
Follow
The buds fattened up to about the size of my fist. Sticky resin coated everything and the tent smelled fantastic.

Likes
9
Share
@AgentOrange
Follow
Think I’m going to have to harvest maybe a little early as I will not be around to water the plant.🤷♂️🤷♂️ bit to sure if it’s ready or not.
What do you think is it to early and how early ?


Likes
27
Share
@RDWCGrowing
Follow
1/20/2023- So much to do pre grow and over the next 16 days, absolute first order of business is that I have to take down my current Grow---TIMBER-- Then I have a list of things I have to get done in order to be ready to start this grow 1 Feb.
With that said
T - 2 days until start 48 hour Flush
T - 2 days until Start 48 hours of Light
T - 4 days until TIMBER!!!
Items that need to be done before 1 Feb 2023
1. I need to clean the tent out
2. I need to clean the equipment- Proper Sanitization between grows in Hydro is a must!!!
3. I need to get the hole in the ceiling above my tent repaired- For my last grow I had a deep sink installed in my grow room, to make Hydroponics a little bit easier and have a water source in the same room. The seals on the pipes they were installing broke and leaked through the ceiling causing some damage all the way across my grow room, I was already weeks into my grow and couldn't risk them working above my tent and it would have been very awkward positon for them to be working in as well, so have to get this done quickly between chop and germination.
4. I have to install my new light- I was using a Vivosun 4000 and for this grow I am switching up to a Spider-farmer SF 7000.
1/20/23- For this upcoming grow I am working with M/F photo seeds so I ordered 4 Sex determination kits. I recieved my my 4 Sex determination testing kits from Rimrock Analytics today. I will be using these to test my plants at week 2 of Veg so that when/if I take clones I know I am taking them off females. As well as I don't want to accidently pollinate my tent during this grow I am looking for big beautiful buds not seeded buds. :-)
1/24/2023- Harvest of current grow- Started at 2:00pm and finshed wet trim and firt batch into the freeze dryer.
1/25/2023- Next batch into the freeze dryer and cleaning all my equipment for this Grow.
T-1 Day until the workers are supposed to be here to fix the hole in the Grow Room.
T-3 days until I instll my new Gorilla Grow Tent and my New Light Spider Farmer SE-7000 for this grow.
T-7 Days until Start of Germination
1/26/2023- Harvest is done ran through the Freeze dryer and dry tim completed.
1/27/2023- Grow Room repairs completed. Hole is gone Letting the paint dry before I install the new tent.
T-2 days until Install the New Gorilla Grow tent and the new Light
T-3 days until I put the hydro equipment in the new tent
T-5 days until Germination
1/29/2023- Day 0- Final Pre Germination activities
Germination Start T-3 days
The paint on the ceiling was dry and it was time to finish prepping for Germination. I got the following items knocked off my list.
New 4X4 Gorilla Grow Tent is up and ready
New Spider Farmer SE-7000 Light is installed- Thanks Moony Grows for the suggestion and for the Code that got me some money off and free shipping (Moonygrows)!! I turned the lights all the way up to max and set the timer to 18/6 0600-0000. I will keep an eye on the temperature and humidity without my plants and see how hot it gets with the new light.
I put my Hydro system back together and put in 40 gallons of water into it, time to monitor for leaks the next few days.
I Setup my cloning machine for Germination Days 3-11
1/30/2023
let me break down the situation, ROOM in the TENT.. Enough said.. No really I tried putting my exhaust system up in the new tent with my new light, The light is so big corner to corner that it really didn't give me enough room for the lights be be raised, with the exahust hanging the buckets my plants are Starting in are 2 and 1/2 feet off the ground, great for plenty of room for roots but not so great for upwards space for the plant to grow. In a 6' 11 tent with the exauhst in side and hanging that only gave me a little over 4 feet of grow room to play with. My last grow if you saw my diary, anyone could tell I was struggling to keep the buds off the lights. No good, Since space was such an issue I was running my carbon filter inside on the ground but It really needed to be up sucking the heat out not shooting the cool out. With that setup I was sucking air through the filter and pushing it out the tent at a bottom exhaust hole cold out. Wasn't doing me any good for my heat. I was hitting temps of up to 85 degrees. I bought a portable AC unit and have been running it in the grow room to try and keep temps below 85 and I have had to lower the power on my lights during grow also not ideal.. With that said a friend of mine MoonyGrows (Check out his diary) took the time to look at my issue send me a picture of my grow tent setup with detailed instructions on how to suck the air out from the top but putting my filter and fan on top of my tent so no room issue and I am sucking the air out from the top where the heat is instead of pushing the air out from the bottom where the cool is... THANK YOU MoonyGrows For taking the time to help me get this straightened out.. Now I have room and I have the exhausts working right and now my temps with everything at 100% are topping out at 80 this dropped the temp by 5 + degrees at 100% max.
T-2 days until Start of Germination
Prepped my seed tray with humidity dome
Prepped my Rapid Rooter plugs. I Used RO water, and I added a few drops of Hydrogen peroxide to Oxygenate the water. I then PH balanced between 5.7-6.0 the same that they will be getting in the Cloning Machine and when they get to thier final grow pod. I perfere the 5.8x range and I hit 5.84 for these rapid rooters. If you want to see a complete video on the process HowWeedGrow has an amzing video that shows step by step how to do it and explains it better than I ever could including how to plant the seeds. Which I will cover when I get to that step on Wed. https://www.howweedgrow.com/how-germinate-weed-seeds-cannabis-rapid-rooters/
1/31/2023
T-1 day until Germination Start
All set and ready have my Rapid Rooter plugs ready to go have my seeds out.. Have my seed tray warming up tonight. Tomorrow morning right into the Rapid Rooter then strait into the tray. I will spray the dome to start the humidity in there.
2/1/2023
Germination Day!!
Let the games begin!
0600am Put the seeds into the Root Riots. And then put the seeded Root Riots into their first home the Seed tray. I have them under the light 24/7. Sprayed the dome
7:30pm Sprayed the Dome to keep humidity going on the dome.
2/2/2023
Day 1 of Germination
Sprayed the Dome in the morning
Sprayed the Dome in the evening
2/3/2023
Day 2 of Germination
Roots are starting to come out the bottom of the root riot plugs and the heads are slowly popping out of Number 4 just below the surface.
Afternoon- Number 4 has popped up
Evening- Number 3 has popped up as well. Happy Dance!!
2/4/2023
Day 3 - Germination
Surprise Surprise Surprise- all 4 have now poked their heads up.. Happy day!! 100% Germination succeeded.
Now major milestone to track is how many are female and how many are male.
I will take look at the roots this afternoon/evening and see if they have enough root to go into the cloning machine for the next 7 days before they go into their Hydro Pods.
Day 3 - Germination - Evening..
Roots looked good and they were tall enough to make it into the cloning machine.
Now that they are all in the cloning machine I have switched the lighting to veg state 18 on 6 off.
2/5/2023
Day 4 - Germination - Morning
All the Ladies (fingers crossed) looking great stretching nicely and look nice and green, Photo synthesis underway....
UPDATE!! After a very interesting POD cast on FSTS by Dr. Bruce Bugsbee from Utah University, I have shifted my lighting to 24 hours on through seedling and then I am going to shift to 20 hours on the rest of Veg.
2/6/2023
Day 5 - Germination
While Checking on my conditions inside the new tent last night, I found that the Humidity was down to 39 Percent. I added an AquaOasis Cool Mist Humidifier, the reason I selected this humidifier is that I needed one that could be turned on and off utilizing my Inkbird Humidity Controller IHC200 that I have my Pro Breeze Dehumidifier currently running with.
Root structures are starting to get there about 1/4 of an inch.
2/7/2023
Day 6 - Germination
Everything seems on track more roots poking out of each today. They are each getting a little taller as well.
Checked in the evening and number 3 was drooping the Root riot plug on the bottome was dry and the roots were not in the water yet. I raised the water just enough that the longest root that was sticking out is now hitting the water.
2/8/2023
Day 7 - Germination
Everything looked good while checking in on them this morning number 3 is now full up and no droop again.
2/9/2023
Day 8 - Germination
T-2 days until Plant into Forever Pods and we start week 1 of Veg .. :-)
Surprising thing to me is that number 1 and 2 were later in popping then 3 and 4 but the roots are growing longer in 1 and 2.
2/10/2023
Day 9 - Germination
Number 1 and Number 2 are definitely ready for transplant today.. Based on how they were yesterday and where they are today I am hoping by tomorrow 3 and 4 are ready. Today they look to me where 1 and 2 did yesterday.. I really hope 3 and 4 catch up by tomorrow since..
T-1 day until transplant to new/ final home for grow.
Need the roots long enough to have some clay down in the basket to keep the root riot out of the water and only roots in the water..
2/11/2023
Day 10 - Germination
Today they got placed in thier forever Home, 7 days from Sprout and 7 days until Week 1 Start.
PPM- 180 this is water out of the Tap
Temp Water: 70.7
Temp Tent: 77
Humidity: 40% I have a humidifier going 24/7 to try and bring this up.. I also have Humidity Domes on each plant.
2/12/2023
Day 11 - Germination
Sprayed the domes, all are looking good.. Nothing much to do at this phase but Keep monitoring the PH level in the system and making sure they have a comfortable home.
T-6 days until Week 1 start
2/13/2023
Day 12 - Germination
Sprayed the domes, They were looking a little yellow today so I moved the light down to assist. Nothing much to do at this phase but Keep monitoring the PH level in the system and making sure they have a comfortable home.
T-5 days until Week 1 start
2/14/2023
Day 13 - Germination
Sprayed the domes, They were looking a little Florissant yellow today, with what looks like slight burn on the tips, I talked with a fellow grower and we agreed that It was probably that I was drowning them, Yes you can drown you plants even in Hydro, but only early on.. :-) It usually happens with the water being too high, which soaks not only the roots but the medium (root Riot plug in this case). I lowered the water from touching the bottom of the pot to about 1" away. This will probably take 3-4 days to resolve. I will continue my daily monitoring.
T-4 days until Week 1 start
2/15/2023
Day 14 - Germination
Sprayed the domes, continue my daily monitoring they look a little darker green instead of lime green now that I lowered the water levels in the system, so I think that I might have resolved the issue but it will take a few days for recovery to happen.
T-3 days until Week 1 start
2/16/2023
Day 15 - Germination
I looked in on them this morning, 3 and 4 look like they are doing well and recovering nicely. Number 1 not so much it has brown spots on the leaves, this very well can still be a side effect of the overwatering but I decide to go ahead and add Nutes earlier than I was planning just incase. I was going to wait until Saturday but I think intervention is necessary now especially after drowning them early on.
I added 1/2 what I am planning on adding for week 1 start. I also think I am going to adjust my chart to add 1/2 2 days after plant from now on. I don't think it would hurt it to have some Nutes to pull from.
.25ml/Gal Calmag = 12.5ml
1ml/gal GH FloraMicro= 50ml
1ml/gal GH FloraGro = 50ml
1ml/gal GH FloraBloom = 50ml
T-2 days until Week 1 start = I will drain the system and start it over on Saturday with Week 1 Nutes.
2/17/2023
Day 16- Germination
I didn't even want to post today after looking in on them this morning, 3 of the 4 are now showing signs of dronwing.. Brown spots on the leaves, the water levels were still too high.. I drained about another inch out of the tanks.. Will see how quick they recover.. I start week 1 tomorrow and will have to ensure my water levels are at least 1" away from the basket on this round.

Likes
7
Share
@Giovi
Follow
Hi guys! here is how my beautiful girls proceed! they had a nitrogen boost in the first few weeks of flowering, but are now stable, feeding well and having a beautiful streccing (x2 / x3). The pre-flower seems to be forming well and on day 22 from the change to 12/12 the first trichomes appeared! I'm curious about how it will go and very excited 💪🏻 good 4:20 and good cokttivation everyone !!


Likes
5
Share
@LeedsCityFarmz
Follow
Plants exploded this week once put into the Scrog. All tops topped once this week to help promote all tops below the main canopy to catch up with the rest.
Likes
3
Share
@Snuffys_garden
Follow
Week 8 is going great, started flush
toward the end of week 7 on Zkittlez and OG Kush. Also started flushing Pink Kush CBD and Purple Punch at start of week 8. All are packing weight still and smelling very fragrant. Trichomes are starting to cloud out and I am planning on harvesting when trichomes are starting to amber.


Likes
10
Share
@BodyByVio
Follow
This week I Supercrop all the plants and spred them out over both lights. One more week of Veg and they are ready to explode
Check me out on Instagram @growmorestressless

Processing
Likes
12
Share
@ELPIRATA
Follow
Todo parece ir bien por estos lados, Lo importante es que las raices estan haciendo una fiesta en el sustrato!!! 😎
Hoy comienza la 4ta SEMANA! Dia 22 de cultivo, y 100% motivado por este mundo maravilloso!
- Se realiza una pequeña poda en las partes bajas de las 4 plantas, por motivos de precaucion a la aparicion de algun agente perverso que pueda estropear lo avanzado.
(Se aplica folear Knactive X3 ML)
*El día de hoy 28/05/2020 se han regado 3 plantas en macetas de 11 litros:
X2 Semillas Auto Lemon Kix= 500 ml [3mlKnactive+3ml/L ATAGrowth-C+2mLTopCrop-TopAuto] PH 6.0 / EC= X Tº=22
X1 Semilla Auto Tutankhamon= 500 ml [3mlKnactive+3ml/L ATAGrowth-C+2mLTopCrop-TopAuto] PH 6.0 / EC= X Tº=22
(Proximo riego se incorporara al parecer Flower-C de ATAMI)
*El día de hoy se han regado 1 planta en macetas de 7 litros:
X1 Semillas Auto Lemon Kix#3 = 350ml [3mlKnactive+3ml/L ATAGrowth-C+2mLTopCrop-TopAuto] PH 6.0 / EC= X Tº=22
*El dia de hoy 29/05/20 se realiza de manera experimental, LST nivel novato, Me gustaría sus consejos. próximamente incorporare Red SCROG de 49 espacios.
*El día de hoy 01/06/2020 se han regado 3 plantas en macetas de 11 litros:
X2 Semillas Auto Lemon Kix= 500 ml [1mlKnactive+3ml/L ATAGrowth-C+3mL ATAFlower-C] PH 6.2 / EC= X Tº=23
X1 Semilla Auto Tutankhamon= 500 ml [1mlKnactive+3ml/L ATAGrowth-C+3mL ATAFlower-C] PH 6.2 / EC= X Tº=23
*El día de hoy se han regado 1 planta en macetas de 7 litros:
X1 Semillas Auto Lemon Kix#3 = 350 ml [1mlKnactive+3ml/L ATAGrowth-C+3mL ATAFlower-C] PH 6.2 / EC= X Tº=23
CONSEJOS ?
BUENOS HUMOS!!!


Likes
16
Share
@KushManF
Follow
Started low stress training this week. Still doing every 2nd day nutrient feeding. Good growth so far. Let’s see how LST goes, only issue with LST is that plant keeps obviously growing towards sun. But I am monitoring it to check the angles it’s growing at.


Likes
47
Share
@Ultraviolet
Follow
What's in the soil? What's not in the soil would be an easier question to answer. 16-18 DLI @ the minute. +++ as she grows.
Probably not recommended, but to get to where it needs to be, I need to start now.
Vegetative @1400ppm 0.8–1.2 kPa 80–86°F (26.7–30°C) 65–75%, LST Day 10, Fim'd Day 11
CEC (Cation Exchange Capacity):
This is a measure of a soil's ability to hold and exchange positively charged nutrients, like calcium, magnesium, and potassium. Soils with high CEC (more clay and organic matter) have more negative charges that attract and hold these essential nutrients, preventing them from leaching away.
Biochar is highly efficient at increasing cation exchange capacity (CEC) compared to many other amendments. Biochar's high CEC potential stems from its negatively charged functional groups, and studies show it can increase CEC by over 90%. Amendments like compost also increase CEC but are often more prone to rapid biodegradation, which can make biochar's effect more long-lasting. biochar acts as a long-lasting Cation Exchange Capacity (CEC) enhancer because its porous, carbon-rich structure provides sites for nutrients to bind to, effectively improving nutrient retention in soil without relying on the short-term benefits of fresh organic matter like compost or manure. Biochar's stability means these benefits last much longer than those from traditional organic amendments, making it a sustainable way to improve soil fertility, water retention, and structure over time. Needs to be charged first, similar to Coco, or it will immobilize cations, but at a much higher ratio.
a high cation exchange capacity (CEC) results in a high buffer protection, meaning the soil can better resist changes in pH and nutrient availability. This is because a high CEC soil has more negatively charged sites to hold onto essential positively charged nutrients, like calcium and magnesium, and to buffer against acid ions, such as hydrogen.
EC (Electrical Conductivity):
This measures the amount of soluble salts in the soil. High EC levels indicate a high concentration of dissolved salts and can be a sign of potential salinity issues that can harm plants.
The stored cations associated with a medium's cation exchange capacity (CEC) do not directly contribute to a real-time electrical conductivity (EC) reading. A real-time EC measurement reflects only the concentration of free, dissolved salt ions in the water solution within the medium.
98% of a plants nutrients comes directly from the water solution.
2% come directly from soil particles.
CEC is a mediums storage capacity for cations. These stored cations do not contribute to a mediums EC directly.
Electrical Conductivity (EC) does not measure salt ions adsorbed (stored) onto a Cation Exchange Capacity (CEC) site, as EC measures the conductivity of ions in solution within a soil or water sample, not those held on soil particles.
A medium releases stored cations to water by ion exchange, where a new, more desirable ion from the water solution temporarily displaces the stored cation from the medium's surface, a process also seen in plants absorbing nutrients via mass flow. For example, in water softeners, sodium ions are released from resin beads to bond with the medium's surface, displacing calcium and magnesium ions which then enter the water. This same principle applies when plants take up nutrients from the soil solution: the cations are released from the soil particles into the water in response to a concentration equilibrium, and then moved to the root surface via mass flow.
An example of ion exchange within the context of Cation Exchange Capacity (CEC) is a soil particle with a negative charge attracting and holding positively charged nutrient ions, like potassium (K+) or calcium (Ca2+), and then exchanging them for other positive ions present in the soil solution. For instance, a negatively charged clay particle in soil can hold a K+ ion and later release it to a plant's roots when a different cation, such as calcium (Ca2+), is abundant and replaces the potassium. This process of holding and swapping positively charged ions is fundamental to soil fertility, as it provides plants with essential nutrients.
Negative charges on soil particles: Soil particles, particularly clay and organic matter, have negatively charged surfaces due to their chemical structure.
Attraction of cations: These negative charges attract and hold positively charged ions, or cations, such as:
Potassium (K+)
Calcium (Ca2+)
Magnesium (Mg2+)
Sodium (Na+)
Ammonium (NH4+)
Plant roots excrete hydrogen ions (H+) through the action of proton pumps embedded in the root cell membranes, which use ATP (energy) to actively transport H+ ions from inside the root cell into the surrounding soil. This process lowers the pH of the soil, which helps to make certain mineral nutrients, such as iron, more available for uptake by the plant.
Mechanism of H+ Excretion
Proton Pumps: Root cells contain specialized proteins called proton pumps (H+-ATPases) in their cell membranes.
Active Transport: These proton pumps use energy from ATP to actively move H+ ions from the cytoplasm of the root cell into the soil, against their concentration gradient.
Role in pH Regulation: This active excretion of H+ is a major way plants regulate their internal cytoplasmic pH.
Nutrient Availability: The resulting decrease in soil pH makes certain essential mineral nutrients, like iron, more soluble and available for the root cells to absorb.
Ion Exchange: The H+ ions also displace positively charged mineral cations from the soil particles, making them available for uptake.
Iron Uptake: In response to iron deficiency stress, plants enhance H+ excretion and reductant release to lower the pH and convert Fe3+ to the more available form Fe2+. The altered pH can influence the activity and composition of beneficial microbes in the soil. The H+ gradient created by the proton pumps can also be used for other vital cell functions, such as ATP synthesis and the transport of other solutes. The hydrogen ions (H+) excreted during photosynthesis come from the splitting of water molecules. This splitting, called photolysis, occurs in Photosystem II to replace the electrons used in the light-dependent reactions. The released hydrogen ions are then pumped into the thylakoid lumen, creating a proton gradient that drives ATP synthesis.
Plants release hydrogen ions (H+) from their roots into the soil, a process that occurs in conjunction with nutrient uptake and photosynthesis. These H+ ions compete with mineral cations for the negatively charged sites on soil particles, a phenomenon known as cation exchange. By displacing beneficial mineral cations, the excreted H+ ions make these nutrients available for the plant to absorb, which can also lower the soil pH and indirectly affect its Cation Exchange Capacity (CEC) by altering the pool of exchangeable cations in the soil solution.
Plants use proton (H+) exudation, driven by the H+-ATPase enzyme, to release H+ ions into the soil, creating a more acidic rhizosphere, which enhances nutrient availability and influences nutrient cycling processes. This acidification mobilizes insoluble nutrients like iron (Fe) by breaking them down, while also facilitating the activity of beneficial microbes involved in the nutrient cycle. Therefore, H+ exudation is a critical plant strategy for nutrient acquisition and management, allowing plants to improve their access to essential elements from the soil.
A lack of water splitting during photosynthesis can affect iron uptake because the resulting energy imbalance disrupts the plant's ability to produce ATP and NADPH, which are crucial for overall photosynthetic energy conversion and can trigger a deficiency in iron homeostasis pathways. While photosynthesis uses hydrogen ions produced from water splitting for the Calvin cycle, not to create a hydrogen gas deficiency, the overall process is sensitive to nutrient availability, and iron is essential for chloroplast function.
In photosynthesis, water is split to provide electrons to replace those lost in Photosystem II, which is triggered by light absorption. These electrons then travel along a transport chain to generate ATP (energy currency) and NADPH (reducing power). Carbon Fixation: The generated ATP and NADPH are then used to convert carbon dioxide into carbohydrates in the Calvin cycle. Impaired water splitting (via water in or out) breaks the chain reaction of photosynthesis. This leads to an imbalance in ATP and NADPH levels, which disrupts the Calvin cycle and overall energy production in the plant. Plants require a sufficient supply of essential mineral elements like iron for photosynthesis. Iron is vital for chlorophyll formation and plays a crucial role in electron transport within the chloroplasts. The complex relationship between nutrient status and photosynthesis is evident when iron deficiency can be reverted by depleting other micronutrients like manganese. This highlights how nutrient homeostasis influences photosynthetic function. A lack of adequate energy and reducing power from photosynthesis, which is directly linked to water splitting, can trigger complex adaptive responses in the plant's iron uptake and distribution systems.
Plants possess receptors called transceptors that can directly detect specific nutrient concentrations in the soil or within the plant's tissues. These receptors trigger signaling pathways, sometimes involving calcium influx or changes in protein complex activity, that then influence nutrient uptake by the roots. Plants use this information to make long-term adjustments, such as Increasing root biomass to explore more soil for nutrients. Modifying metabolic pathways to make better use of available resources. Adjusting the rate of nutrient transport into the roots. That's why I keep a high EC. Abundance resonates Abundance.
Likes
Comments
Share

