
Likes
Comments
Share

@DogDoctorOfficial
Follow
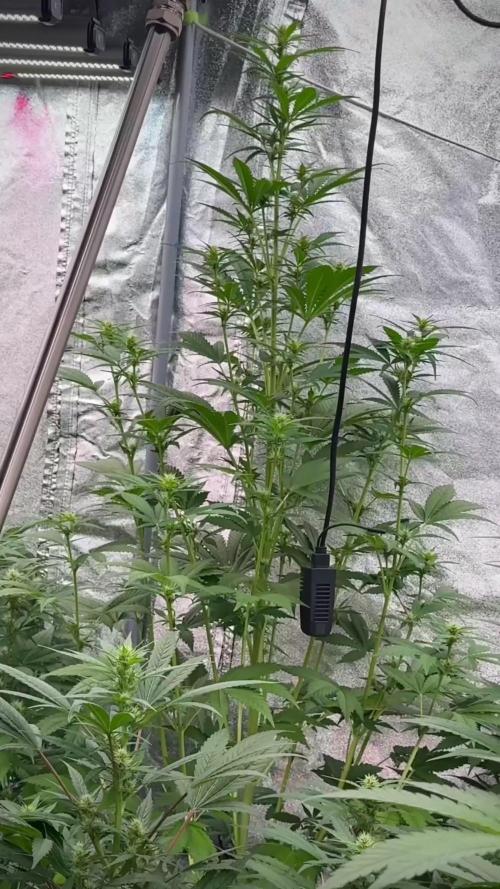
White Widow – Week 6 | Second Big Flower, Buds Forming 🌸🌿
Light Schedule: 12/12 from seed
Room Temp: ~28°C (stabilized with AC)
Humidity: ~66%
VPD: ~1.33 kPa
CO₂: 450–800 ppm
Watering: Hand watering
Soil Content EC: ~2.96
⸻
From Hairs to Buds
This week marks a real turning point. Our White Widow is moving past simple hairs, now we can clearly see the beginnings of tiny buds forming. It’s the second big flower stage in her journey, and the structure is starting to express the true White Widow personality: compact, resinous, and promising.
I took her out of the tent for another photoshoot, capturing her in detail with the Sony A6000. Close-ups show her leaves, structure, and those first clustered flowers. I also filmed short videos, including one where I share how I talk with my plants daily. For me, it’s not optional — it’s part of a symbiotic relationship. Plants respond to energy and care, and I believe everyone should try it. 🌱💭
⸻
Light Strategy – Emerson Effect Simulation
A special note this week: I recorded a screen video from the TrolMaster TM+ app to show how the lights are scheduled.
🌅 Wake-up: The reds switch on 15 minutes before the whites and blues.
🌇 Wind-down: At night, the reds also stay on 15 minutes longer than the other spectrums.
This is designed to simulate sunrise and sunset while taking advantage of the Emerson Effect, a synergistic boost in photosynthesis efficiency when far-red and red light are combined with other wavelengths.
The result? Plants wake up and settle down more naturally, with smoother light transitions, reduced stress, and potentially increased energy capture. It’s a small tweak, but it reflects how every detail of this environment is tuned with intention.
⸻
Environmental Changes
This week, a big addition: the AC unit. Before, the room was running hot at 31–32°C and more, but now it’s stable at 28°C (occasionally 29°C). Combined with ~66% RH, this gives a steady VPD of 1.33, right in a comfortable zone for flower.
CO₂ naturally fluctuates between 450–800 ppm, and the plants are thriving in these conditions. Even during the hotter weeks, they adapted beautifully, proof of the resilience of both the genetics and the environment we’ve been building.
⸻
Feeding & New Recipe
Until now, she’s been on the Aptus base recipe:
• Regulator – 0.15 ml/L
• CalMag Boost – 0.25 ml/L
This week, I introduced a Plagron trio to push flower development:
• Power Buds – 1 ml/L
• Sugar Royal – 1 ml/L
• Green Sensation – 1 ml/L
Why now? Because she’s transitioned from stretch to actual bud formation. Power Buds helps with compact flowering sites, Sugar Royal enhances metabolism and energy (especially under high light), and Green Sensation supports resin and bud swelling later on. Together with Aptus, it’s a blend of precision and experimentation, trusting experience, intuition, and past results.
⸻
12/12 From Seed – A Quick Recap
This run is about exploration:
• Started from seeds, with early germination struggles (mistakes included, lessons learned).
• This White Widow is the sole survivor of those early days.
• Straight into 12/12 from seed, she grew compact and resilient, surprising us by taking her time to flower despite the cycle.
• Now, at Week 6, we see her first true buds.
She’s not the tallest, but she’s beautiful, living proof of how genetics + environment + patience = results.
⸻
Looking Ahead
What to expect:
• Buds thickening and clustering.
• Stronger aroma starting to emerge.
• More demand on nutrition as flowering sites expand.
What not to expect:
• A tall, stretchy plant — she’s compact and will likely stay that way.
• Early harvest — White Widow still takes her time, even under 12/12.
⸻
Shoutouts & Gratitude 🙏
🌱 Zamnesia – for the legendary White Widow genetics
💧 Aptus Holland – for the precise, reliable base nutrients
🌸 Plagron – for the flower enhancers that now join the recipe
💡 ThinkGrow – for the bar LEDs keeping perfect spread
🚀 Future of Grow – for the Black Series 600W full-spectrum power
🧠 TrolMaster – for automating and stabilizing the grow environment (and letting us dial in the Emerson effect with custom light scheduling!)
And of course, thank you to everyone following this diary, reading, supporting, and sharing this journey. This project is about more than just one plant, it’s about experimenting, learning, and connecting with the grow along the way.
⸻
📸 Check the gallery for:
• Close-ups of bud formation
• Studio shots with the Sony A6000
• Behind-the-scenes of the grow room
• Video captures including the TrolMaster light scheduling demo
• Daily plant connection moments 🌱
📲 Don’t forget to Subscribe and follow me on Instagram and YouTube @DogDoctorOfficial for exclusive content, real-time updates, and behind-the-scenes magic. We’ve got so much more coming, including transplanting and all the amazing techniques that go along with it. You won’t want to miss it.
• GrowDiaries Journal: https://growdiaries.com/grower/dogdoctorofficial
• Instagram: https://www.instagram.com/dogdoctorofficial/
• YouTube: https://www.youtube.com/@dogdoctorofficial
⸻
Explore the Gear that Powers My Grow
If you’re curious about the tech I’m using, check out these links:
• Genetics, gear, nutrients, and more – Zamnesia: https://www.zamnesia.com/
• Environmental control & automation – TrolMaster: https://www.trolmaster.eu/
• Advanced LED lighting – Future of Grow: https://www.futureofgrow.com/
• Root and growth nutrition – Aptus Holland: https://aptus-holland.com/
• Nutrient systems & boosters – Plagron: https://plagron.com/en/
• Soil & substrate excellence – PRO-MIX BX: https://www.pthorticulture.com/en-us/products/pro-mix-bx-mycorrhizae
• Curing and storage – Grove Bags: https://grovebags.com/
⸻
We’ve got much more coming as we move through the grow cycles. Trust me, you won’t want to miss the next steps, let’s push the boundaries of indoor horticulture together!
As always, this is shared for educational purposes, aiming to spread understanding and appreciation for this plant. Let’s celebrate it responsibly and continue to learn and grow together.
Friendly reminder all you see here is pure research and for educational purposes only,
With true love comes happiness. Always believe in yourself, and always do things expecting nothing and with an open heart. Be a giver, and the universe will give back in ways you could never imagine.
💚 Growers love to all

Likes
8
Share


@TrueNorth
Follow
-Strain: Purple Lemonade - Fast Buds
-Tent: 5x5 Gorilla Grow Tent
-Lights: Budget LED Grow Lights 2 x 250 Watt
LED Full Spec/Red Spec mixed boards
-Light Cycle: 18/6
-Soil: Fox Farm
-Air Circulation: AC Infinity Cloudline T4 Inline Duct Fan
WECLOME BACK GROWMIES! Week 8 here with our GELATO AUTO by Fast Buds!
January 14, 2020 (DAY 52) - Hey there growmies sorry for the one and only update this week, i got sick and just cant do it. i hope you all understand.

Likes
13
Share


@Optico45
Follow
All seems well so far. Had a nice sprout towards the end of week 2. All six plants now how adult leaves. Raised the CO2 levels this week. Plants seem to be enjoying it.

Likes
18
Share


@TheGrowHouse
Follow
Week 8 tomorrow, will be harvesting these very soon maybe a few more days, colas are of a good size for the short time they have been showering, next update will be harvest time, keep it green people
🌱🌴💚🙏

Likes
59
Share


@JeyGanesha
Follow
Prima settimana di fioritura,tutto procede più che bene,,anche questi altri giorni si sta riprendendo ogni giorno di più. ..


Likes
15
Share


@AlienScrOG
Follow
The final phase... Lot of wrong and lot of broken... All job is is gorgeous.. end I love teach by my wrong Everybody see my diaries I love you tell me a little comment about... I like received teach to experience people...... By my now grow call purple lush and ayawascha purple barney's seeds... My Las is only a 205watt effective... I wrong to not buy another 200w... È and the harvest is more little than 400w... But after in 2 time after I want yield 100gram?.... Whats you think about the max yield?

Likes
36
Share


@gottagrowsometime
Follow
Week 14 Day 101 Flower Day 51, she's just about there. Going to apply Terra Powers finisher later during the week. She still has a lot of mycelium left on top and throughout her, I really dialed in the enzymes on this grow. My charts aren't updated properly I'll finish it this week, and will be showing root shots and hopefully we will be seeing a covered pot in roots and not just compacted soil. There's been a lot of fungi and mycelium, that is partly down to Terry Power mixing well with organic soil, it works well as a great soil conditioner. But it takes a while, I constantly fed this girl enzymes. And man O man, look at them buds. The colas are huge in length, and that's down to poor mainline practices and uneven energy distribution. As for left and right been similar, well, put it this way, you'd struggle to actually make something that's more uneven energy wise than this, there's nodes growing over nodes, nothing is even, really terrible mainline it the way it's meant to be done, the purpose was totally ditched here and it was very lazy. And to be honest, unknowingly is an understatement. And the fact I had such failures on my 2nd round with germination, I got to focusing the last few weeks, and pult it all back together and I've hit l got 2 pretty darn good looking phenos, (with no clones taken, another rookie mistake, if you find a pheno you should always have a clone tent and a few weeks into flowering if it's no good or hermies than ditch them, but if you get one like my SLH dwc with very low leaf to calyx ratio if you just have 1-2 clones, you are golden. So currently I have 5 different photos running and I'm pheno hunting. Anyways back to this grow. So, she's nice and fat, but nothing you'd really want to clone, there's nothing special about it. Medium-calyx ratio and good frosty bud. I'm happy with it. Thankfully I'm running a few of the New Green House Unreleased Strains for testing also for barneys so I think photos have stolen my attention.
Keeping the RH between 40-45 temp is more stable atm at 28c not really getting low temperature as we are in the height of summer. But I don't care, I have the winter coming to do terpness. I've got 1 SLH left, I just hope she's a good pheno. The buds on this are monsters, and really happy with them. Lots of mycelium left so there's food left and then later in the week I'll apply the finsher. Just a low dose.
D103 Sadly my mycelium got hit with some mold. Only 2 small spots, 90% most of the mycelium went through the norm, it degraded as organic matter and made for some heavy buds, she is struggling to hold herself up altogether now, am going to have to brace her to get the best out of the last 10days. She is done, but because of ALL the heavy minerals, that aren't organic, it has HAS to be flushed. Now I was on the ropes the last few weeks about flushing but I've been flushing both my SLH for the last 4 days and when you walk into my tent now, wow, the bang of 🍋 is so strong. I'm so glad I flushed these, As I was like, this is a multiple award winner, so I was like, its not from the smell of the bud as it stands but wow, its like she's at to been doing a 10k run and is sweating, the smell is so beautiful. Wow, wow, wow. I haven't been this excited to try some weed, ever. About the mold, its never a good thing. But as it started on actually fungus I'm not too worried about it. Now, if it had of just been there, I'd be like shit wtf, so I dug through some soil and scraped away the 2 bits of mold, DISCARDED, and mixed up the remaining mycelium into the soil with the spoon I use to mix my soil on top to help dry a little if over watered. Also it help let air into your plant, as your soil dries o2 gets sucked into your substrate and that.
COUPON FOR MARSHYDRO
use code GGS for discount at any mars site.
Big thanks to my sponsors terra power nutrients and marshydro and to the 2 reps who I dealt with.
Thanks for reading,
Drop a like if you'd like me to visit your grows, either way thanks for dropping by.

Processing
Likes
24
Share


@GrowGuy97
Follow
Day 28 - RH 58% Temp 81F . Ladies are growing great, they are really starting to turn into little bushes & the double mainline is going strong 💪🏻 Thanks for following friends & make sure to check back for daily updates! Happy growing✌️🏼🌱
Day 29 - RH 57% Temp 78F . Couldn’t be happier with the growth!
Day 30 - RH 60% Temp 78F . Everything is looking great!
Day 31 - RH 51% Temp 78F . Watered today with PH at 6.5, all 3 ladies are doing amazing!👍🏼
Day 32 - RH 53% Temp 81F . Considering topping the ladies tomorrow not sure yet! Still growing beautifully!
Day 33 - RH 52% Temp is 80F - Bushing out like crazy & growing strong! The double mainline seems to be bouncing back as well! So far very impressed with this strain😍👍🏼
Day 34 - RH 56% Temp is 79F - Decided to top the two bushy plants today, they also got fed today with PH about 6.3

Likes
3
Share

Likes
12
Share


@The_Good_Twin
Follow
7/3/22
Stella is still moving along with the late bloom nutrient level this week. She’s getting close to the ripening stage, but still a week away.
Today she received a full gallon of water mixed with the following nutrients:
CALiMAGic - 2 ml
FloraMicro - 3.8 ml
FloraGro - 3.8 ml
FloraBloom - 4.2 ml
Floralicious Plus - 2 ml
Liquid KoolBloom - 1 ml
The pH was 6.6, and wasn’t adjusted. She took nearly the whole gallon before giving back some runoff, but it was sufficient.
The runoff pH was 6.3. The tent was 80.5F, with a humidity of 60%.
She is starting to fatten up and her branches are starting to get weighed down. I’ve already used all of my LST poles on other plants, so I’m going to have to figure out a way to make more space.
She sits in the middle of the tent, surrounded by 4 of her daughters, and a smaller auto-period plant sitting on a box in front of her.
My tent is FULL! I ran out of time today and didn’t get any new pics of her, so I added one that I didn’t use the other day.
Take care, and happy growing everyone!
If you’re in the USA 🇺🇸, July 4th💥, happy Independence Day!!
7/5/22
Well, it finally happened! Stella’s branches have gotten heavy enough to tip her over when she has space to herself. She is in the tent with several other large plants (her 4 daughters + 1), so she rests nestled amongst them, so she stands. When I took two of her daughters out of the tent to feed them, she tipped right over.
To make a VERY long story short; I tied her upright with almost all of her branches bundled up loosely so that they all get light, then fastened her to the back of the tent. It’s going to make feeding her tricky, but she’ll be stable, and getting full light exposure. It also opens up more space in the tent. Not much, but some. I tied up her daughters branches too.
Enough about that.
She received a full gallon of water mixed with the same nutrient level as the last feeding noted above.
The solution pH was 6.5, and wasn’t adjusted. She gave back plenty of runoff with a pH of 6.3.
The tent was 83F, and humidity was 65%. That’s a little high to me, at least compared to my previous grows. However, my tent has never been this full before.
I adjusted the fan to a higher height, and with all the plants tied up somewhat using LST methods, I’ve increased open space between them with hope of improving air flow.
We’ll have to see how it goes. Happy growing everyone!
7/7/22
I’m just going to write the basics today. Stella is still triced up nicely in the back of the tent so that she doesn’t fall over because of the weight of her own branches. Her buds are continuing to fatten up, and she looks lovely! Orange hairs all through her buds!
Yummy!!
She’s still getting the late bloom nutrients till next week when we actually begin the ripening stage. Today she took a gallon of the following:
CALiMAGic - 2 ml
FloraMicro - 3.8 ml
FloraGro - 3.8 ml
FloraBloom - 4.2 ml
Floralicious Plus - 2 ml
Liquid KoolBloom - 1 ml
The pH was 6.6. I thought of adjusting it, but decided that it was good enough. She gave back plenty of runoff with a pH of 6.3.
The temp was 83.3F, with a humidity of 54%.
I didn’t take any pictures of her today. I was running between 2 rooms, and feeding other plants and just forgot. 🤷♂️
I’ll get pics later. Happy growing everyone!

Processing
Likes
5
Share


@Mr_nugs_lover_David
Follow
She looks as healthy as her sister,she's happy,no issues at all,and starting to show the first pistils on August 24th.let's see how this wonderful strain performs. 😊💚🌱

Likes
25
Share


@Grower_Of_Persia
Follow
my dry and cure style is this:
4 days of hanging upside down to get water activity lower to around 0.6 in 50% humidity and 26 C temp (i know its a little high but we are in a hot summer right now and i cant get it lower even with air conditioner) and then after 4 days of drying i remove leaves and stalks, trim buds and move them to jar for the rest of their life :D . and in the first 4 days of curing i open the jar door and let hem get some fresh air in the jar for about 5 minutes and close the jar door again, after 4 days of curing like that buds are smokable but they will get better as they getting cured about 1 month.
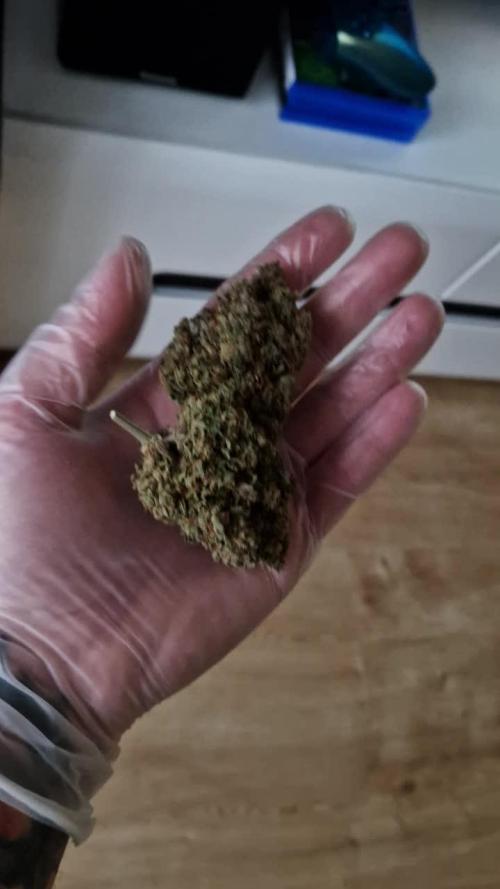
buds are one of the hardest as fucking rocks type of buds! very dense , compact , sticky , smelly , amazing at every aspect
growing stage was 60 days and flowering stage was 70 days total (harvested tops at day 63th)
the total weight of dry buds was : top buds 174 G + lower buds 55 G = 229 G
my overview of strain with details:
the seeds:
unfortunately i only got 1 seed cracked out of 5 so i will not know how much this genetic can get different but at least i got the chance to grow once of this wonderful strain
the plant :
in every stage you can ensure that you are dealing with a high level plant ,
she will get big so you have to control her height LST and SCROG highly recommended , will grow very well with tick stalks and big fan leaves , has good resistance for stress and will respond very well to stress trainings , she really has gorilla power in herself ,
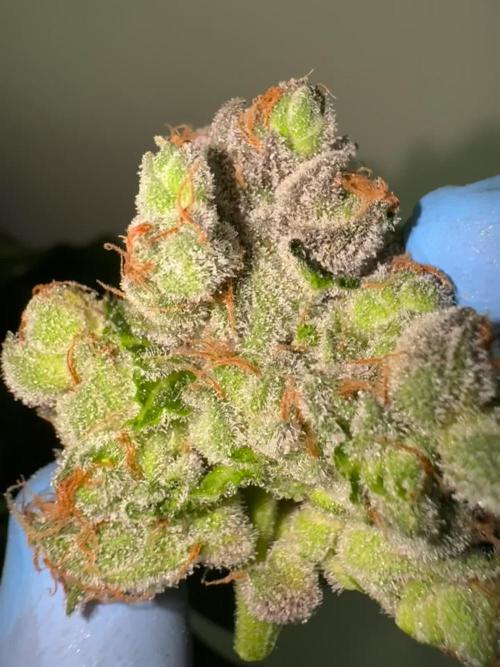
fresh buds on plant :
buds are very compact and dense even from start , fresh blossoms smells like pineapple and mango , 2 different shades of sweet smells like you hold 2 junks of pineapple and mango in your hand and you smell them together, she is a trichome and resin factory , very very sticky , very oily , strong smell
dried buds:
very compact and dense , hard as rocks , has dark colors with purple hues inside it , it smells sweet
smoke :
very smooth and sweet like lollipop , pineapple , mango like , after 2 minutes it'll kick in and you'll get higher and higher with every breath , has a strange and especial high mind high mostly


Likes
Comments
Share


@HideAndFly420
Follow
02/11 strong LST still going on. Today news ferrisilosation, last 2-3 days of veg and the push all into flowering.
Still pushing this plant trying to get all the brush are possibles.
980 ppm
Ph 6.2
Let’s see!!
Likes
45
Share


@PapaSmurf416
Follow
Pbb has been chopped! Saw a decent amount of amber trichomes and the calyxes were quite swollen also she has been fading beautifully for quite some time now. Went into the dark for 48hours then I trimmed any dead leaves off and a few larger easy to reach leaves. She’s hanging in a dark tent now with a fan blowing at the bottom of the tent. Ducting to my flower tent to keep it from stagnating. Frost is starting to fade and swelling quite well. Afghani is getting a much more complex smell not as sweet as before still looks like looks like at least 2 weeks for her. They have all just been getting water for a while now.
Likes
24
Share


@chee_52
Follow
👉🏽 Day 78 (5/17): Watered for the last time and will harvest on either Day 80 or 81, with 24 hours of darkness the day before harvest. Reduced light intensity to 50% due to emergence of white stigmas. Loving the fade and the whole grow experience with this plant. It's a sticky one, for sure.
👉🏽 Day 81 (5/20): Harvest day! Will be doing a dry trim, so I just removed fan leaves. Now drying in the tent at 75ºF & ≈55% RH. (Will post harvest info/page after drying, since I forgot to weigh her wet.)
Thanks for dropping by! 🖖🏽🌿


Likes
2
Share


@Lacremelabs
Follow
She has grown quite a bit over this past week. I'm excited to clone her and continue another cycle with good genetics. The watering routine remains the same, with alternating days of fertilizer and aerated tea. I also let it dry back for about 2 days. It's very healthy, with very green leaves and they're getting wider every day.
I'll soon do a toppinp. See tou.
Likes
3
Share

@valiotoro
Follow
The terps are absolutely incredible!
Very complex, with that unique umami touch that truly makes all the difference. 🔥

Likes
7
Share


@wascanna
Follow
👹 Oni Seed Co.
I've been thinking of an all-Oni run for awhile now as he's been one of my favourite breeders since I started! I convinced myself I didn't deserve to run these until I felt more confident in my abilities so here we are, finally giving them an honest go!
🍭 Dub Trop BX1 // Dubble Trop x Tropicanna Cookie F1
🍓 Straw-Picanna // Strawberry Bananna x Tropicanna Cookies
🌿 Tropicanna Kush // SFV OG x Triangle Kush
🔥 Sunburn // TKT (Triangle Kush x Tangie) x Tropicanna Cookies
📦 Likely equipment/materials:
Gorilla 5x5
ChilLED Growcraft x6 / 1000w DIY
StepWell Super Soil + Amendments
Dynomyco Mycorrhiza
📅 Day 1
- Soaked for 20 hours in RO and kelp. 99% Germination
- Went into paper towel.
📅 Day 2
- 24 hours in paper towel.
📅 Day 3
- 100% germination!
- Labelled and into Rapid Rooters
📅 Day 4
- Added super special diffused light shield lol
- Started popping through!
📅 Day 5
- Success! Unfortunately, I accidentally decapitated a Dub Trop :(
📅 Day 6
- "Transplant" into first home! (Tray wouldn't fit 11, so one Tropicana Kush is hanging out in a veg tent with siblings)
- Used BioBizz Light Mix (0.4-0-0) soil.
📅 Day 7
- New home, no dome, with special guest: a small fan. 💪
- That 1 day growth though, let's gooo!
