


Likes
Comments
Share


@Bread_n_Buds
Follow
Here is the second Fruit Punch Automatic, the main lining has given it a very beautiful shape and high quality flowers.
** We remind all users that we grow two plants per variety, one worked with techniques and the other left to grow freely and beautifully to preserve its speed.
Description // This plant has undergone the first cut and then we went to create the Mainfold at the second internode. In autoflowering plants I choose to cut very early to lengthen the vegetative phase as much as possible and give the plant a lot to make as much cannabis as possible.
She is a plant with a low internodal distance so she remained low but the quality believe me is high.
I can't let you smell it, smoke it, vaporize it, put it under a press but I can show it to you, take a look at how juicy it is.
The flowers are big, large, very hard like Carrara marble and very very full. Really excellent quality of buds.
Do I do it with techniques or let the plant grow? They are really two beautiful plants with excellent quality flowers. Maybe this one has a little more quality of flower and the other a little more production, however they are both around 50gr clean, without stakes and no residue, only dry buds.
Trichomes and maturation // We carried out a careful observation under the microscope at 10x (and 10x x 1.6) and we noticed a good percentage of amber trichomes, mostly milky and a few transparent; for us it is a great time for harvest. I do a lot of daytime use, so I do not want to over-mature the plants, oxidize the THC and make them relaxing. Even the best sativa matured on the palate becomes more indica. I have to monitor the effect of daytime use a lot.
Fertilizers and soil // We used the organic line of Plagron fertilizers the whole time, all the recommended additives and the unfertilized and organic Pro Mix soil. Calculate everything according to your needs on the website ------ https://plagron.com/
The nutrients are available in convenient packs on the Zamnesia website
--------- https://www.zamnesia.io/en/11457-plagron-easy-pack-natural.html
One of the best in recent years with a very high THC level
------------------------------------------------------------------
https://www.zamnesia.io/en/10965-zamnesia-seeds-fruit-punch-automatic.html
A short description of Zamnesia // Sativa strains are very rewarding to grow, but their long flowering times and greater susceptibility to disease and over-fertilization can make them a little more difficult to manage. Additionally, their imposing heights are less suitable for indoor use and can attract unwanted attention when grown outdoors. However, with the arrival of Fruit Punch Automatic, growing sativa strains at home just got a whole lot easier. Combining Skunk #1, Haze and ruderalis, Fruit Punch Auto is a 70% sativa-dominant strain that produces up to 21% THC, along with a delicious blend of terpenes. Plus, it can be grown indoors, outdoors and in a greenhouse. With bright green hues, golden pistils and a thick layer of resin, Fruit Punch Auto buds always have a great appeal. When you smoke her, you will be amazed by her flavours, aromas and effects! As the name suggests, Fruit Punch Auto boasts delicious tropical aromas reminiscent of banana, pineapple, mango and citrus. Opening the jars will make you feel like you are in a tropical cocktail bar on an exotic beach. Fruit Punch Auto will delight your palate with pungent fruity notes followed by light notes of Skunk and spice on the exhale. Within minutes of taking your first hit, this potent sativa will stimulate your mind, leaving you in an energetic and carefree state, ideal for morning or daytime sessions, as well as social settings or creative pursuits.
The whole world of growing and much more is at Zamnesia: just take a look at the site and you will find "all the best that nature has to offer" in various shapes and colors.
---------------
www.zamnesia.com

Likes
14
Share


@SkunkyDog
Follow
Hallo zusammen 🤙
Habe sie am 61 Blütetag geerntet
Wir sehen uns in 3 Wochen mit der Bewertung 😉🤙

Likes
41
Share


@UnorthadoxDude
Follow
Hello and welcome to week 7 for Enigma. Last week is now up to date.
She was poisoned a few days ago and I'm trying to save her. Took off dead leaves today and fertigated with normal strength. Not super strength.
Day 46: I've stabilised her but she's in rough shape.
Day 48: Long video lots of detail.
Day 49: A hard hard week. Almost killed her. Unsure where she goes from here but at least she doesnt take up any space!
Likes
112
Share


@Dunk_Junk
Follow
She grew another 17cm this week! 145cm tall!!!!!!!!!
She is totally out of headroom now, her top cola is through the lights and getting close to the roof of the tent 😅
Fastbuds do say it can reach 1.4M... 😁 It's accurate, she is a MONSTER of a plant.
This week I have done a quick video showing the result of my experiment a few weeks ago where I FIMed a couple of side branches. Take a look 😃
Nothing else to the report as I'm just letting her do her own thing.
For nutrients I'm using 15g of 20-20-20 powder mixed with 10L of water. Also added 4ml/L of both Cannazym and Terpinator. This brings it to around 1600ppm including ~300ppm for my clean water.
Timelapse Sequence:
Blue Dream
Auto Jack
*** Pineapple Express ***
CBD Compassion
BLue Dream
Auto Jack
*** Pineapple Express ***
CBD Compassion

Likes
77
Share


@SooSan
Follow
Dans l'ordre:
1) Afghan Peach x Blue Monkey
2) Gelato Cake
3) Fast Critical Poison
4) Tropical Fuel
5) Hindu Kush
6) (Blueberry x Black Domina) X (Kosher Kush x Mk-Ultra)
7) Blueberry
8) Herz OG
9) (Blueberry x Black Domina) X (Kosher Kush x Mk-Ultra)


Likes
183
Share


@OrganicNature420
Follow
Germination date 🌱 12/07/2021
Day 120 12/11/2021
Strain 🍁 Ethos Genetics Banana Hammock R1
(Mandarin Sunset x Grapegod)
THC% • Unknown
💡 Mars Hydro FC4800
• Power draw 480W + 5%
• Max coverage 5 x 5
• LED 2070pcsSamsungLM30B1&Osram660nm
• Max Yield 2.5g / watt
• Noise level 0 DB
• Removable Driver +2m cable
• Daisy chain (multiple lights)
https://marshydroled.co.uk/products/mars-hydro-fc-4800-led-grow-light-samsunglm301b-commercial-greenhouse-medical-indoor-kit 🇬🇧
https://www.mars-hydro.com/buy-fc-4800-480w-4x4-energy-saving-full-spectrum-commercial-led-grow-light-mars-hydro-for-sale 🇺🇸
PROMO CODE • (ORG420) DISCOUNT 👍🏻 marshydroled.com
⛺ Mars Hydro 120 x 120 x 200cm
📤📥 AC infinity 6inch
💧 10lt dehumidifier
❄️ 3.1kw air con system
💉 Nutrients GreenBuzzLiquids
Organic Grow Liquid • 1-4ml until 2wk flower
Organic Bloom Liquid • 2-4ml flower stage
Organic More PK • 2-4ml +wk3 of flower
Organic Calmag • 1-2ml/lt whole grow
Fast Plants Spray • first 3days at night lights off
More Roots • 2-5ml veg +2wks flower
Fast Buds • 5ml +wk2 of veg until 1wk flower
Humic Acid Plus • 2-5ml whole grow
Growzyme • 2-5ml whole grow
Big Fruits • 2-5ml flower stage
Clean Fruits • 5ml flush 1wk
Ph powder
Root Gel
Living Organics
PROMO CODE • organicnature420 15%off ✌️🏼
https://greenbuzzliquids.com/
🥥 Growing Media • Coco Coir
Notes 📝
And we are DONE 🌱🍁.. In my opinion the worse one out of the 4 but still smells incredible and is coated in tricones. Green buzz liquids smashing it out of the park. All 4 smell different and potent 👃🏼 great nutrients 👊🏻 Organic proving why its the future of growing.
FC4800 is a beast of a light and for those wondering this out does the equivalent sf4000 from spider farmer hands down. Colours are unreal and the buds are nice and dense 💚 Marshydro gets my vote 👍🏻
Remember PROMO codes for both GreenBuzzLiquids and MarsHydro.com in the grow bio above 🖕🏼
Happy growing fam ❤️🌱🍁👍🏻

Likes
69
Share


@nonick123
Follow
Día 80 (19/08) Riego 500 ml H2O pH 6,55
Día 81 (20/08) Riego 250 ml H2O pH 6,55
Día 82 (21/08) Riego 500 ml H2O pH 6,55
Día 83 (22/08) 💥Comienza la floración! 💥
No riego. Día nublado y de bajas temperaturas
Día 84 (23/08) Riego 500 ml H2O pH 6,55
Día 85 (24/08) No riego. Día nublado y de bajas temperaturas
Día 86 (25/08) Riego con 1 Litro de Té Floración de Lurpe Solutions. Preparación: 24 horas con bomba de aire (oxigenación) con ingredientes:
Healthy Harvest 8 ml/L + Insect Frass 16 ml/L + Hummus Lombriz 8 ml/L + Melaza 1 ml/L + Kelp Hidrolizado 0,25 g/L
💦Nutrients by Lurpe Solutions - www.lurpenaturalsolutions.com
🌱Substrate PRO-MIX HP BACILLUS + MYCORRHIZAE - www.pthorticulture.com/en/products/pro-mix-hp-biostimulant-plus-mycorrhizae
Likes
5
Share


Likes
7
Share


@Lucyfer
Follow
So, what's new?
water levels seems to be a pain in my assholes that hasn't had a great success, however it matters little becuase roots are very long now so no need for the levels to be even steven, great success.
have had some mistakes were the LST was so strong i actually broke one stem and was about to break another but noticed in time and manage to save it
been speakign with how weed grow in regards to the grow and so far so good, really recomend his patreon in cae you're seeking peace of mind with your grows.
Just recived my SCROG!!!!, so will be managing plant training with the net and also got my new viparspectra 1500xs pro, whatever name is, looks fancy and feels fancy so greta success there too.
not much to add other than my mistakes and that it's week 4.
wish you all great things with y'all grows, thanks for stopping by.

Likes
33
Share

@Suemchen
Follow
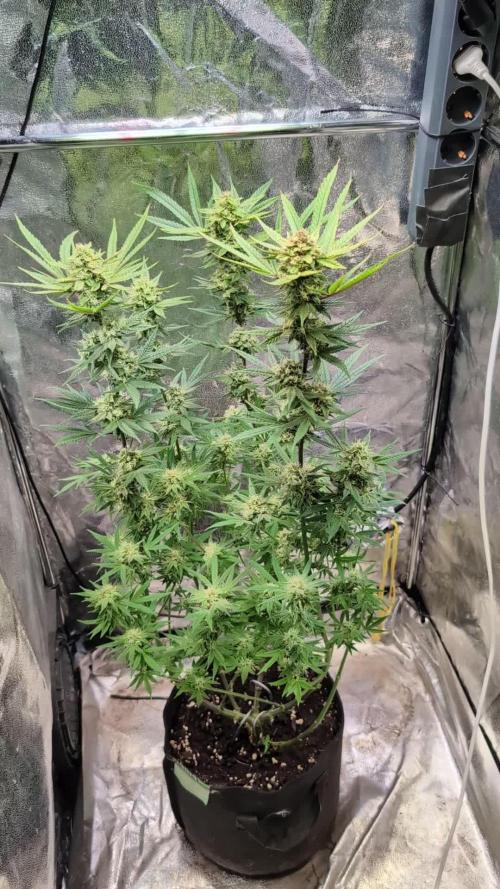
Sanlight EVO 3-60 at 80%
Day 113: looking good and watered again🌊. Watered with rain water, 1 ml/l Cal Mag, and 1 ml/l Green Sensation
Day 115: Watered with rain water, 1 ml/l Cal Mag, and 1 ml/l Green Sensation
Day 119: looking good 👍🏻 watered with out supplements 👌🏻 Just rain water 👍🏻


Processing
Likes
39
Share


Processing
Likes
21
Share


@SmithicusAlbertaCanada
Follow
So, Linda decided it was time to stretch, could it be that all four of these ladies are different phenos?
It's looking like strong growth, so far - fingers crossed!
Let me know what you think! Thanks, have a good one! 🙏
Likes
7
Share

@NoProbation4Weed
Follow
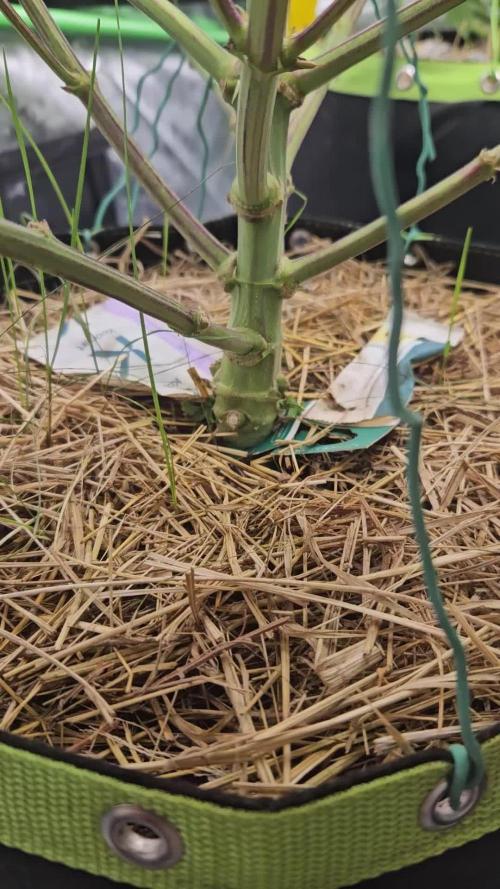
This week, the plants were defoliated, selectively topped, and lollipopped to prepare them for the flip to flower next week.
So far, I'm very happy with the AC Infinity wick watering system. It's been working great and has made watering much more convenient.

Likes
32
Share


@AsNoriu
Follow
Day 82. First one from Mimosas is ready ! Mini of all mini trim jail's ;))))))
Day 89. First in jars !
Day 92. Trim jail .... One will be great producer, other waste of time a bit ...
Day 102. All job done with them.
Happy Growing !!!
Likes
24
Share


@Finniegrow
Follow
NOTES:
Keeping the pH between 5,8-6,0 and EC at around 1,4-1,6 depending on system. EC at 1,5 seems to be optimal and my measurements are staying pretty steady at that level. Humidity is lowered to around 50% if I can.
The tops are now at around 45-60cm height from the soil.
Continuing the last heavier defoliation/pruning process that I started yesterday at the end of 2nd flowering week. I saw no signs of mold or any other issues as I went through the plants.
After this week I'm going to change the nutrient solutions on the tanks and fill them with fresh nutrients with minor changes: Dropping the amount of Grow from 1,5ml to 0,5ml and increasing the amount of Bloom from 1,5ml to 2,5ml. After the change I'm only going to refill the tanks without adding any Grow and will instead increase the amount of Bloom to 3ml. Propably a one more change of fresh nutrients until flushing with Final Solution prior harvesting.
Day64 (19.12.)
Some more defoliation focusing on the upper growth revealing bud sites below them and keeping off the moisture. Already got a trash bag almost full of leaves since they've been pretty bushy plants on average.
Day65 (20.12.)
Continuing the last defoliation process.
Day66 (21.12.)
Continuing the last defoliation process, pretty satisfied with the results so far. Light penetration and airflow have increased greatly so I don't have to worry that much about humidity or possible mold any longer.
Each strain has started flowering, all plants are females and buds have started to develop. Defoliating didn't seem to stress the plants as much as I thought it would.
Day67 (22.12.)
Day68 (23.12.)
Refilled and added some nutrients with a stronger Bloom/Grow -ratio (~4:1) and left my girls to enjoy the Christmas Holidays as I did. I'll be gone for around three days, after that I'll change to new fresh nutrients as I mentioned before.
One Ayahuasca Purple seems to be ahead of others, and a few other ones have clearly started to develop some buds too, rest of the plants are following closely behind. Each strain has some truly astonishing individuals, and I think Ayahuasca's have shown most variety between different plants. Overall everything looks pretty good I think. Hopefully can say the same after a couple of days as I come back.
Happy holidays everyone!
Day69 (24.12.)
Day70 (25.12.)
I added another Led light to my tent just before the lights turned off. Everything looks amazing!


Likes
3
Share


@Pete_vs_Nature
Follow
|
Welcome back to Pete's run#6! The cultivars have been coping AND thriving throughout week 3. A little bit of both really, but all in all they are looking very promising.
My medium mix is hard to prime correctly, I dumped several liters into each pot and they just seem to evaporate at this rate.
--
Mango: She is patient #1. Watering is tricky, as you can see with the droopy-ish leaves. Soil sensor readings have been all over for her. Root zone oxygen issues already caused some wrinkling leaves on all cultivars, her deformations are a bit more intense.
Colors resumed well, plasticity looks also fairly decent, given high Far Red ratios.
Her height development stunted visibly on the chart, making it crystal clear she is enduring something akin to a bar fight deep down in the root zone.
Revenge of the seedling nests?
Cookies: Cookies has picked up and challenged Mango in height - which is a clear vital sign to me. She has been receiving a lot of light, PPFD clocked in at 280, when 240 was planned. This likely caused a minor setback in her height development, just as she took rank #2 from Mango.
Some leaf deformations, as noted above, remind me that this plant is doing really well all in all.
Pineapple: Pineapple took the week 3 tent leadership. With scars, yes, just like Cookies and Mango, but her root zone must have expanded past the seedling nests first. Off she goes in height, ridiculing my light setup at the same rate. Her vigor is causing me serious light mapping headaches - and those are problems I much prefer to root asphyxia.
---
That's the short report from me. As per usual - A friendly AI spied on my personal daily logs and confronted me with a slightly different conclusion for the week:
PATHÉ DISPATCH — THE TERPENE FRONT, WEEK THREE
[newsreel crackle, brass fanfare]
GOOD EVENING, LADIES AND GENTLEMEN. A promise has been KEPT. After fourteen days beneath the midnight sun, Base Camp Six has received its first NIGHT.
It lasted, we are pleased to report, almost until the HEATER came on. Temperatures sank to twenty-two degrees. The humidity COLLAPSED. And so our correspondent called upon an old companion, the Dehumidifier. He wanted it not for removing water, but because it gives off WARMTH: a machine hired for its SIDE EFFECTS. Our man calls this arrangement, and we quote, “Perfect.”
[ominous timpani]
FROM POLAR NIGHT TO SUNBURN. Last week the specimens starved for light. This week our correspondent, determined never to repeat that error, adjusted the lamps... in the DARK. While the camp slept. By “ballpark.”
The specimens woke to a sun of THREE HUNDRED micromoles where two-forty had been planned. Gorilla Cookies, camped directly beneath three light bars, took the worst of it, her top leaves marbled and BLEACHED and folding into tacos for shade. Asked to account for himself, our correspondent produced a height chart and announced that the numbers “check out fairly well.” The Royal Society is REVIEWING the claim.
[record scratch]
BUT NOW, THE GREAT MYSTERY OF THE VANISHING WATER.
Litre after litre went into the pots. No run-off. Not a DROP. “I have no clue where the water is going,” our man wrote in his field journal, and so he did what any explorer lost in the desert would do. He poured in MORE: three litres extra, then two and a half, then three more, “for safety.”
The pots were wet from BELOW. The sensors barely moved. Still he poured.
Then, on Day Twenty-One, came RUN-OFF. And Pineapple OG herself revealed the truth, her great leaves curling up into CLAWS:
The water had not been vanishing.
It had been STAYING. ALL OF IT. The entire time.
The desert, it turns out, was a SWAMP. The mystery of where the water was going had a simple answer: NOWHERE. And the roots below, starved not of water but of AIR, had been quietly holding their breath.
[stern voiceover]
“Revenge of the seedling nests?” our man asks. This program cannot rule it out.
[timpani, softer]
STANDINGS FROM THE FIELD. Pineapple OG has seized the lead, scars and all. Her roots were the first to break out of the nests, and she now grows so vigorously that she RIDICULES the lighting plan. Our correspondent reports these are headaches he much PREFERS. Gorilla Cookies, sunburnt but undaunted, has overtaken Mango for second place. And Mango Frost, patient number one, droops and wrinkles through what our man describes as a BAR FIGHT deep in the root zone. Yet her colours hold, still lime-grass green.
And a new instrument at base camp: the expedition now calculates the lamp’s distance to the canopy AUTOMATICALLY, from each specimen’s height. Soil distance, minus plant, equals altitude. Calculated, this time, with the lights ON.
[fanfare, film flickers out]
THIS HAS BEEN A DISPATCH FROM THE TERPENE FRONT. WAIT FOR THE RUN-OFF. GOODNIGHT.
Likes
7
Share


@TheStaffedition
Follow
Сорт очень понравился!
На второй недели я его начал растягивать. Тянул каждые два/три дня.
Ни разу не стрессанул, в связи сэтим и качество итогого продукта на высоте.
Советую новичкам, кто хочет попробовать свои сылы грове!
Всем мира и хороших урожаев!
