


Likes
Comments
Share


@Bread_n_Buds
Follow
Trainwreck is now an established strain in the history of cannabis, now we can see how it turns out on the automatic one from Zamnesia.
Remember that we are growing a plant worked with the techniques indicated and another left to grow without pruning to preserve its speed; in the previous/next diary you will find the other plant of the same variety.
In this diary we find worked with the Main Lining. Topping at the second internode to create the MainFold, growing shoots worked parallel to the ground for another three internodes and then topped again. We have removed the branches of 1 internode on each side and topped the remaining two branches on each side.
Slow down the use of nitrogen during this technique, you may not need everything recommended by the manufacturers. So, if the leaves become too dark or, worse, the tips of the leaves arch downwards and the leaf becomes "crunchy", it is time to lighten or stop the basic fertilizer. She is a bit dark and I slowed down by giving only additives.
Comparison is the salt of experience, so the plant in the other diary will be treated very differently, go see it to compare.
We started the Plagron fertilization program, we are in 100% organic configuration, the soil is recycled Promix + 1/3 fresh soil + 10% Perlite + RQS Mycorrhizae Mix (4 g in the mix, 1 g under the small fiber pot).
We fertilize with: 1 ml/l Power Roots - 1 ml/l Pure Zym - 1 ml/l Sugar Royal - 3 ml/l Alga Grow
We sprayed 3 ml/l Vita Race foliar fertilizer once a week.
https://plagron.com/it
We always have the excellent RQS mycorrhizae flowing in the soil.
https://www.zamnesia.io/it/5778-mix-micorrize-easy-roots.html
Take a taste of this strain, it's a cross of legendary strains
https://www.zamnesia.io/en/11055-zamnesia-seeds-trainwreck-automatic.html
Short Description Zamnesia // Trainwreck Automatic is the autoflowering descendant of the popular cannabis strain Trainwreck (a stunning cross of Thai and Mexican landraces). Much loved for its 70% sativa genetics and sativa-like effects, Trainwreck Automatic is as easy to grow as an indica (even in cold climates).
This autoflowering strain goes from germination to harvest in 11–12 weeks, meaning you'll be harvesting sativa buds in no time. It prefers warmer climates, but thanks to its short life cycle, it can also be grown in more northern areas (provided it is germinated a few weeks early when growing outdoors)
Trainwreck Auto offers delicious lemon and lime flavors that enhance the classic sativa profile of its parents. Furthermore, thanks to the spicy and earthy notes, the overall experience will be even more intense, regardless of whether you smoke or vape it. In terms of its effects, Trainwreck Auto is euphoric, uplifting and energizing. Fueled by a THC content of around 21%, this strain is perfect for socializing and best suited to smokers who prefer to stay active after consuming cannabis, rather than lazing around doing nothing.
The whole world of cultivation and much more is from Zamnesia: just take a look at the site and you will find "all the best that nature has to offer" in various shapes and colors.
-- // www.zamnesia.com

Likes
5
Share


@prem895
Follow
Well here we are at the beginning of week 8. Super windy today but I got my new rain tarp up. June 25th gave all the plants pretty good snip except for Cinderella number 2 which is still slow but coming along tomorrow I may top all the other little branches not quite sure yet. just fucked up my pH metre by hitting the calibration button by accident and now I have no solution to recalibrate it so I'm going to have to wait and kind of wing it until the new one gets here in a couple of weeks but my pH in my house water is around 7- 7.5 12 ml of vinegar in 12 qts should be the ticket. Friday June 26th well I found a way to use clothes pins to use them as wait to hold the branches down I kind of like it tell me what you think. well looks like everything is coming along okay I keep the newts down I rather have them a little too lower than too high. well this is the last day of week 8 in July 1st and everything seemed to be going along fine but it looks like my Cinderella 99 run into a bit of a deficiency on the nitrogen and somebody let me know if this is right or not and if there's somebody in Toronto who can test the tap water for pH levels and let me know my pH metre is broken right now





Likes
17
Share


@The_Projexx
Follow
Welcome to week 6 of flower! Things are starting to shape up quite nicely and some of the plants are starting to get colourful! Its hard to capture on the current camera I'm using but my new one that's on its way should be much much better! Overall really excited to see what this week will bring!
I will be checking some of the ladies trichomes to see how far along we are either this week or next week to give me an approximate harvest window!
Huge shout outs to @MarsHydroLED for all their outstanding work on lighting and grow spaces that make it fun and easy to grow! Huge shout outs go to @Seedsman , @PyramidSeeds and @GreenHouseSeedCo for all their outstanding work developing genetics that give us that fine medicine!
HUGE HUGE shout outs to all my followers and to the people who stop into the diary alike! Keep inspiring to grow!
-The Projexx
Day#36F Pictures N/A. Ladies are starting to fade but they're still putting on mass daily!
Day#37F Pictures N/A. The terpenes an nose coming off the plants its INSANE we got lots of nice and unique smells going hard here!
Day#38F Removed some of the leaves blocking nodes, cleaned up the bottoms abit more.
Day#39F The ladies continue to put on mass and some of the leaves are really starting to turn purple!
Day#40F The ladies continue to cruise along. Fuel D.og#2 is starting to come back to a nice green
Day#41F Kings Juice#1 is really starting to show her fade now! Ladies continue to put mass on.
Day#42F Water increased to 5L each at 550PPM. Stalks are getting massive!
Recap: Things went really well this week, the ladies continue to put on mass on their rock solid flowers! With some of the plants starting to show signs of an open window for harvest Im going to break out the microscope next week to see exactly how far along we are! Over all really really pump about the plants , looking like its going to be a great harvest!


Likes
8
Share

@OnlyBuds
Follow
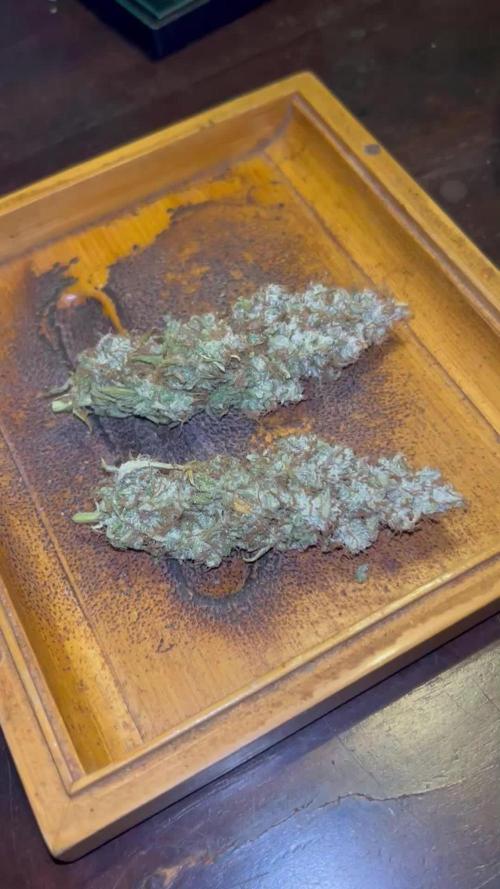
Harvest Update – The Finale 🌱🏁
Alright Muchachos, this is the harvest update.
Everything is done now: chopped, trimmed, dried and jarred.
Yield-wise, it wasn’t exactly what I originally expected – but honestly, the quality makes up for everything.
The smell is already absolutely insane.
Heavy lemon, sweet candy, bonbon vibes, fresh and fruity. Really loud. And that’s before a proper cure. After another 2–4 weeks in the jars, I already know where this is heading.
Smoke report so far:
• Joint: burns great, smooth, tasty
• Vape: super clean, very smooth, flavor pops hard
• Aroma: lemony, fresh, fruity, slightly sweet – just perfect
One thing still hurts a bit: the front-right plant.
That phenotype was something special – really special. A shame I didn’t take backups, because that one was absolute fire. Lesson learned.
All in all:
A bit wild, not everything went according to plan, but a hell of a fun run and an amazing result in terms of quality.
And don’t worry – this is not the end.
In the background, the next ladies are already lined up, waiting for their turn in flower. More on that very soon.
Muchachos, thanks for following along.
Stay tuned. Hasta la vista. 🌱🔥
Likes
2
Share


@Easygrower
Follow
Hello growers day 22 with the hulkberry auto what can I say but wow this girl is really taking off the stem and branching so thick and strong very impressive in 22 days I see her first pistols yesterday so iv added biobizz top max / bio heaven 2ml of each to the mix the 4 other girls I have in 6.5l it’s are doing well 2 of them are just like the 1 in the 11l pot doing very well but 2 are abit slower all in all a very good week iv also been trimming the lower big fan leafs through out the week just to help them breathe thay are growing some big ones so snip them off that’s all for this week be safe and happy growing


Likes
15
Share

@DogDoctorOfficial
Follow
🌿 Super Silver Haze – Harvest Report (Zamnesia Seeds)
Grower: Dog Doctor
Strain: Super Silver Haze
Breeder: Zamnesia Seeds
Lights: Future of Grow Black Series 600W | ThinkGrow ICL-300 | Lumatek Zeus 465 Compact Pro
Control System: TrolMaster Hydro-X Ecosystem
Medium: Custom Super Soil Mix with Aptus Holland Amendments
Environment: 8x8 Shared Tent | Day Temp 29.6°C | RH 67% | CO₂ 700 ppm
✨ From Seed to Soul – A Legendary Journey
What a ride this one was. From the first spark of life in the Cannakan to the final aromatic breath from the Groove Bags, this Super Silver Haze journey was everything—a perfect reflection of the plant herself: bright, strong, unpredictable, and utterly timeless.
Three seeds were germinated — all three came out strong, though one was shy. From there, two phenos took the lead, both with stunning vigor, hybrid leaves, and perfectly compact growth. Throughout veg and flower, they mirrored each other so closely it felt like growing twins.
There were highs — lush foliage, incredible root growth, and perfect structure — and there were lows — a bout of bud rot, handled quickly and carefully. But like in life, every setback was a lesson. The environment taught us, the plants guided us, and we adapted.
💧 Feeding & Soil
The foundation of this run was a custom super soil charged with Aptus Holland amendments — Mycor-Mix, Micro-Mix, and Substrate Buffer Powder.
Throughout veg and early flower, the girls enjoyed a balanced routine of:
Aptus Regulator – For strength & stress control
Aptus CalMag Boost – Supporting cell structure
Plagron Power Buds, Sugar Royal & Green Sensation – Enhancing bloom, resin & sweetness
Aptus All-in-One Liquid & Top Booster – Brought in at key stages for balance and final push
By the final weeks, we tapered down to pure water — a gentle flush that allowed the plant to use her own reserves. This stage is vital; it purifies the flavor, softens the smoke, and reveals the true essence of the strain.
🌬️ The Harvest
The girls were harvested whole and dried for about 14 days at 60°F (15.5°C) and 60% RH, the perfect “60/60” for slow, even drying.
Branches were ready when they snapped cleanly — a satisfying sound of readiness.
Trimming was done entirely by hand on a Trim Bin, using Zamnesia curved blade scissors — slow, patient, and meditative. Frost everywhere. The gloves were covered in resin, leaving behind sticky charas that smelled like pure nostalgia.
Yields:
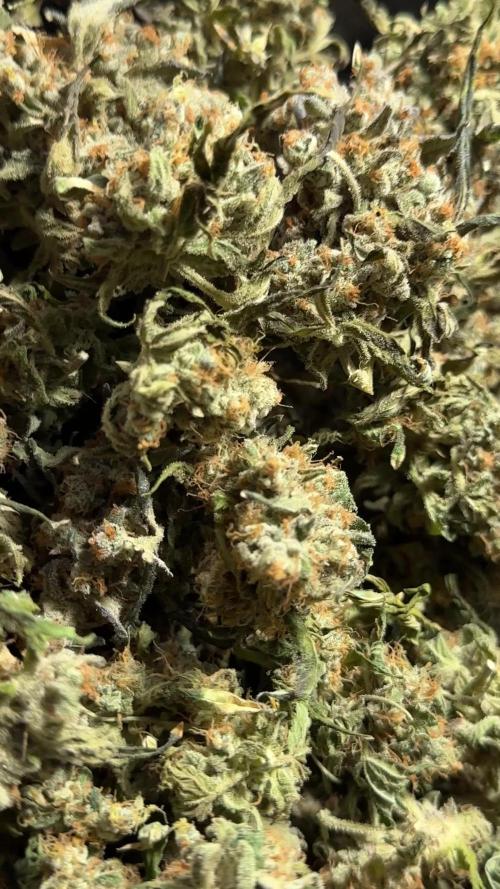
🌿 Pheno #1: 153.15 g of dry, dense, frosted flowers
🌿 Pheno #2: 126 g of equally beautiful, slightly sweeter buds
🍋 Aroma, Flavor & Smoke
Open a Groove Bag and you’re met with a wave — sweet citrus, ripe fruit, and that unmistakable Haze spice.
Both phenos share the same terpene fingerprint, but #1 carries a deeper, earthier tone while #2 shines with fruity brightness.
The smoke itself is smooth, creamy, and elegant — full-bodied yet gentle.
Inhale: Fruity citrus sweetness
Exhale: Earthy, classic Haze with a spicy afterglow
It’s like smoking sunshine filtered through memory.
🌀 Curing – Glass & Groove Bags
Curing took place in Groove Bags and glass jars — both excellent, but different in spirit.
Glass jars (Pheno #2): require daily “burping,” opening to let moisture escape.
Groove Bags (Pheno #1): a modern evolution — engineered with breathable film that automatically balances RH. No burping, no fuss, just perfection.
The result? Two styles of cure, both producing world-class aroma and velvet texture.
⚙️ Gear That Shaped the Legend
Zamnesia Seeds – For the timeless Super Silver Haze genetics
Aptus Holland – For balanced, bioavailable nutrition
Plagron – For the bloom magic and resin push
Future of Grow, ThinkGrow, Lumatek – For perfect full-spectrum lighting
TrolMaster Hydro-X System – The digital brain of the grow
Grove Bags – For preserving freshness and flavor
Each piece of gear played a part in writing this chapter.
🌈 Reflections & Gratitude
This run was a story of resilience — of learning, adapting, and never losing faith.
Bud rot appeared, but so did strength. Mistakes came, but so did lessons. And in the end, she rewarded us with medicine so beautiful it transcends the difficulties.
To everyone following the journey — the growers, lovers, haters, dreamers, sponsors, and the Zamnesia family — thank you. This wouldn’t be possible without you.
For the full visual story — from seed to harvest, from green to gold —
🎥 Watch the complete Super Silver Haze grow in 4K on YouTube:
👉 @DogDoctorOfficial
And for more behind-the-scenes magic:
📸 Instagram: @DogDoctorOfficial
📓 GrowDiaries: DogDoctorOfficial
“Every grow, like life, is a cycle.
Some days bring storms, others bring sunlight —
but in the end, what matters is how we grow through them.” 🌿💚
📲 Don’t forget to Subscribe and follow me on Instagram and YouTube @DogDoctorOfficial for exclusive content, real-time updates, and behind-the-scenes magic. You won’t want to miss it.
• GrowDiaries Journal: https://growdiaries.com/grower/dogdoctorofficial
• Instagram: https://www.instagram.com/dogdoctorofficial/
• YouTube: https://www.youtube.com/@dogdoctorofficial
There’s a new series blooming and it’s more than just plants. It’s about process, patience, and paying attention.
⸻
Explore the Gear that Powers My Grow
If you’re curious about the tech I’m using, check out these links:
• Genetics, gear, nutrients, and more – Zamnesia: https://www.zamnesia.com/
• Environmental control & automation – TrolMaster: https://www.trolmaster.eu/
• Advanced LED lighting – Future of Grow: https://www.futureofgrow.com/
• Root and growth nutrition – Aptus Holland: https://aptus-holland.com/
• Nutrient systems & boosters – Plagron: https://plagron.com/en/
• Soil & substrate excellence – PRO-MIX BX: https://www.pthorticulture.com/en-us/products/pro-mix-bx-mycorrhizae
• Curing and storage – Grove Bags: https://grovebags.com/
⸻
As always, this is shared for educational purposes, aiming to spread understanding and appreciation for this plant. Let’s celebrate it responsibly and continue to learn and grow together.
With true love comes happiness. Always believe in yourself, and always do things expecting nothing and with an open heart. Be a giver, and the universe will give back in ways you could never imagine.
💚 Growers love to all 💚
P.S.
Due to the new GrowDiaries upload restrictions, I wasn’t able to include all the photos I wanted for this final week. 🌱✨
If you’d like to see the complete visual story — from seed to harvest — many of the missing shots are shared in the previous weeks’ updates. Please take a look there to enjoy the full evolution of these beautiful Super Silver Haze queens. 🌿💚


Likes
12
Share


@Greenshift
Follow
Hallo zusammen!
Sie wurde die Woche 2x mit 1,2 L abgestandenem Leitungswasser (PH reguliert) gegossen.
Sie wird jetzt noch für ein paar Tage ins Dunkel gestellt und dann geerntet.
Nächsten Sonntag gibt es wieder mehr :)
Bis dahin:
happy growing u awesome people!


Likes
2
Share


@PalmaGrow
Follow
Se inicia nueva semana con transplante a maceta final donde se orientará las ramas para maximizar producción
21 - 27 julio


Likes
Comments
Share


@Appalachia_bucket
Follow
Week 3 from clone, wicking buckets, the smaller plants are in 2 gallon pots. Going to weed out the males, clone the females and keep the best one


Likes
18
Share


@Greymangenetics
Follow
These genetics are amazing! So hardy! These are two identical clones taken from the best mother out of a 5 pack of seeds. Still got the mother. This pheno’s Unique aroma is already pushing my carbon filters to the max.
Cannot wait to get some of this dangerously addictive cheese down me gullet!! 😂
Hope you all like the setup have had some very kind compliments from people and I am happy to share my learnings lol.
Peace out A-town!!


Likes
48
Share

@Tower84
Follow
Weekly Update
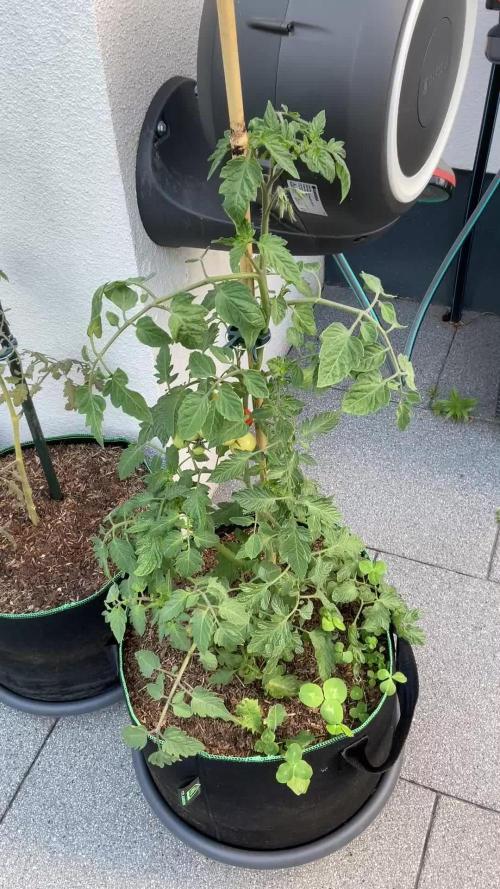
This week showed a very noticeable difference between the two Primabella tomatoes. The plant on the right is growing in Sonnerde vegetable soil, while the one on the left is planted in Neudorff tomato soil. Unfortunately, I only had enough Sonnerde left for one plant, so the other three tomatoes ended up in the Neudorff mix.
The difference in vigor and overall health is quite striking. The Sonnerde plant has established itself much better and shows stronger growth, while the plants in the Neudorff soil are clearly struggling and lagging behind.
I contacted Neudorff about the issue, and they suggested that the soil may have been stored for too long at the garden center. As compensation, they offered to send me a bottle of tomato fertilizer free of charge. While I appreciate the gesture, I am still quite disappointed, especially considering that this was one of the more premium potting soils available at the store.
For now, I will continue to monitor the plants and hope that the Neudorff tomatoes can recover and catch up over the coming weeks. 🍅🌱