


Likes
Comments
Share


@valiotoro
Follow
Hello everyone 😎
Week 7 of flower for the KK auto from Dutch Passion ❤️🔥
Spider Farmer SE-7000 100%
For the nutrient 4ml/L terra bloom & 1ml/L power buds + green sensation 0,5ml/L from plagron
Weight is coming 😎
Have a nice day 🤩

Likes
179
Share


@StarLorr
Follow
Welcome to my Øpium diary.
In this diary:
Seeds: sponsored by Ðivine Șeeds
Media: Promix HP
Nutrients: Advanced Nutrients, Diablo Nutrients.
Light and Weather: Şun☀️and Mother Earth.🌎
___________________________
Feeding:
Tue 23Jul: 4L nutrients pH'd 6.5 and 4L water not pH'd
Wed 24Jul: 10L water not pH'd
Thu 25Jul: 4L water not pH'd
Fri 26Jul: 8L water not pH'd
Sat 27Jul: 4L nutrients pH'd 6.5 and 2L water not pH'd
Sun 28Jul: 10L water not pH'd
Mon 29Jul: 8L water not pH'd
*please note that most water only feedings are 2L at the time throughout the day in bottom saucer*
___________________________
What a beautiful summer that we're having. Just one day last week it was cloudy and colder and got some rain, rest of the week sublime weather.
My Ðivine Ladies are pre flowering and hopefully will be blooming soon, next week update should be FLO fingers crossed😄
______________________________
Øpi was found with a spider mites nest..squished the squatter with my thumb and index... all 3 Ðivine Gals got the spa treatment, soap insecticide
spray 2 litres each soaked them real good, before flowering it was a smart move😉
______________________________
Thanks for stopping by, likes and comments are appreciated!👊🏻😎
Keep on growin!
Keep on tokin!!!
😙💨💨💨💨💨

Likes
19
Share


@NeedOner
Follow
In questa settimana ho notato che anche la pianta numero 2 sta diventando rosa. Proprio come nella foto principale di sweet seeds. Le cime ingrossano bene.

Likes
6
Share


@Cheechsdad
Follow
Any help on what may be happening with the slight browning? Maybe over watering? I have not used any nutes up until now with FFBB I would be surprised if burn but it does look like it by the tips

Likes
14
Share

@paetel
Follow
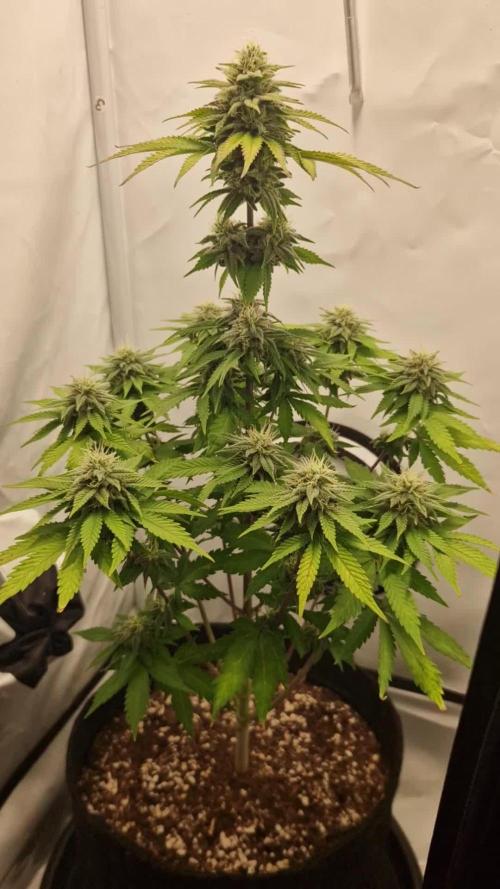
Bought Epsom salt to counter the developing magnesium deficiency. Removed a few fan leaves that didn’t recover. During Week 9 the aroma intensified significantly. Opening the tent now fills the entire room with a strong sour scent.


Likes
27
Share


@Ferinky
Follow
Ya se acerca el día de la cosecha, aun sigue pidiendo agua aunque ha bajado su demanda con respecto a las semanas anteriores. Voy mirando los tricomas esperando el punto óptimo.

Likes
6
Share


@Kloud9gardenz
Follow
Got a hold of these beans direct from the UK and couldn't afford to have them sitting. This is a sativa dominant strain that checked all the boxes for my 4/20 smokes
UPDATE: 14 days from germination, I posted a video and she's already has side branch action and we have only begun veg as of 12/14/22. Genetics shining on this one and I only feeding water, will introduce some light nutes over the wknd MAYBE
Likes
32
Share


@Belverde
Follow
Hello everyone 🙂
Here we are finally with the Harwest report of this fantastic variety🍪
COOKIES KUSH from Barney's Farm..
GIRL SCOUT COOKIES ×ROLLEX OG KUSH..
I love this hybrid , from seed to flower, so I will try to be as partial and honest as possible, although I have very little negative to say, maybe nothing..
But let's we started..
Initially I germinated three seeds, all three born after two days at a constant temperature around 24 °, placed inside two pieces of wet paper, in turn closed between two coffee saucers..
I was unable to post the first two weeks because I was on vacation by the sea, finding the best canarian cannabis social club, while they were growing up😎: 1:
Towards the end of the third week the show started🎬..
A massive attack of thrips led me to have to use neem oil to try to counter these little ones. bastards🙄.
The oil was sprayed on the leaves using a pump sprayer..
First though mixed it with about 1/5 of potassium soap, as I have always found written to do..
As you can see in the first photos📷 the plant (and also her two sister in diari "COOKIES×KUSH") has undergone enormous stress making the leaves as if they had been bitten by some animal..
But the fault was all of neem oil or the wrong mix🤷♂️
Trying to inform me here and there, I did not find much specific information, but I really believe that the plant has undergone a phytotoxic effect as a reaction following the use of the neem oil..
The despair was great, but I tried to remain calm and understand what had happened in the hope that the effect would not extend going to compromise the health of the plant💆♂️🧘♂️..
After a couple of weeks in the Flowering cycle, this great Cookies pheno recovered great and as if nothing had tripled in size, maintaining a beautiful main top with vigor branches full of dense buds all around..
In the first week of flowering I cut the first two branches, focusing the energies on the upper ones.. After a few days I made a super Cropping on the central top, always trying to increase the vigor of the branches below💪🌲..
And the plant has always reacted very well, as if nothing had happened..
I also thought of defoliating, but then I left the idea to not stress it further..
In carrying out the final transplant I placed mycorrize in the ground, directly in contact with the roots..
In the first week of flowering I gave again once a bit of fish mix to facilitate the stretch phase..
Later during the flowering I used the slow release organic powder of the Greenhouse, plus twice the Biobloom fertilizer from Biobizz..I increased everything with biomass biomass , once / twice, more enchancers once through irrigation (always greenhouse), more than molasses..
I also gave some banana macerate made by me, but honestly I don't know if it influenced or not exactly, but I don't think bad did it..
Flowering was very quiet and without too many complications, if not some insect that I tried to fight using yellow and blue traps..
After 55 days from the transition to 12/12 I could have safely cut, but I decided to wait a ten more days, up to 65 °..
Towards the end of flowering, this beautiful girl had fantastic colors..
The yellow of most of the leaves, due to the discharge of nutrients, contrasted very well with the purple color that had taken on the other leaves and in small part also the flowers..
Unfortunately in the photo does not give a good idea of how beautiful it was..
The plant, as I usually do, was cut entirely and placed upside down in a wooden wardrobe controlled temperature and humidity, without becoming too crazy, always trying to maintain a balance..
More or less I always dried around 21/24 ° with a ur around 55/60%..
After about 7 days, when the outer leaves were dry enough to the touch, but not to crumble, I cut the branches to one by one keeping the flowers attached..
I then performed a manicure in a best art-way possible..
Nice, slow hands trimming..buds to buds..
Afterwards I put the branches with the flowers on a net for about a day and a half..
When I heard that the Popcorn Buds came off without leaving "the thread", I cut all the flowers from the branches and I have them stored inside a brown paper bag..
I left them inside for about two days until the flowers were almost completely dry as I wanted, always being careful not to let them dry out too much..
This phase is very delicate so you need to check the condition of the flowers several times a day.. Once ready I put them inside an airtight jar..
For 24 hours I didn't open, letting the humidity present in the flowers come out making them still slightly wet..
After a day, I found that the flowers had moistened to the touch, but not in an excessive way, just as I wanted..
From this moment on, I ap straight up the pot about three / four times a day at a distance of about 6h (always without getting too mad)..
For the first week I did so, then going to decrease the openings in the following two weeks..
After three weeks the perfume is came to be created in a clear, sweet and pungent way..
The first few weeks of opening the jar, for those who may not know it, it is normal to feel a fragrance of almost wet hay, which leads you to believe that you have made mistakes going to eliminate those incredible aromatic notes present during flowering..but not it is so..
The cure process, if well carried out, leads to reducing from time to time that unpleasant smell of hay until it transforms into that complex bouquet of terpenes that are cannabis can give..
It is fantastic to observe the transformation in the terpene profile during this phase♥️🤩..
I think it is a highlight, where patience and attention play a fundamental role in being able to obtain a high quality product, from connoisseur..
Just my opinion🤗
Cannabis, if well tanned, maintains and intensifies its aroma and potency in the coming months📆..
The flowers burn slowly and steadily inside lla map releasing intense aromas💐..
The smoke inhaling it remains soft and velvety without creating throat disorders..
I believe this phase is fundamental to be able to enjoy a unique product with organoleptic characteristics which it is difficult not to fall in love with👌..
In the case of this variety, specifically of this pheno, the aroma is undoubtedly mint, mint mint with some sweet earthy notes..
Very complex..
The taste in smoke is more tending to earth, but very sweet and delicate with other notes that I can't to recognize, complex to describe, but mint is not very present as in the perfume (after 40 days of care)..
Basically you are faced with a kush 2.0 , very very good and powerful..
A must have for kush lover's👌🏆..
As you can see in the video, the grass burns very well going to fill the map with oil..
The joint in question is obviously a pure without tobacco, rolled with organic papers and organic filter. If well cared for it gives off scents that potentially can hear hundreds of meters, so be careful you have neighbors (Ps, mine are the ones that nobody would like)..
I do a smoke test only to evaluate if the treatment process has been successful, otherwise in my days I usually use vaporizers ( mighty / ghostmv1 / dynavap m / vulcano sometimes )..
Thanks very much to those who created them🙏🙏🙏🔝🔝..
Anyway
In the test carried out with mighty (from 177 ° to 195 °) the aroma is pungent, much more than in smoke..
Excellent Kush flavor, sweet enough but with earthy and spicy notes..
Complex to describe and I would not add anything else to try to be as honest as possible..
Regarding the effect, I won't go too far..
In general it is a herb that acts on the body, leaving the mind calm and able to do anything (at least for me)..
As a good Kush that respects itself..
It is not not at all mentally invasive..
Wanting to be honest though, most of my friends (all daily smokers, around 30) are overwhelmed by this variety because it relaxes them too much..
I personally find myself to be god and I could use it in every moment of the day, also before intense physical activity..
something that does not always happen with sativa..
Just for this subject🤯.
In this way I cut the plant when the trichomes were roughly 10% amber and the remaining milk color..
It was a great experience to see this girl grow up..
Her strength and endurance were impressive and maybe I was lucky to have the problem of neem oil with her, because she endured great, allowing me to learn without compromising too much the final result..another plant would probably die..
I thank everyone who read the diary over the various weeks..
And thanks Grow Diaries for creating this community and connecting with it🙏🙏👌👌..
For more and more precise info I refer you to watch every single week where I tried to post everything as precisely as possible..
I hope you had Fun..
Remember to make some ClouDs☁️
And to the next story diary 😉🌱..
Thanks for the support🙏💚
Bye ✌️
Ps.
The final weight of the flowers is calculated with only the main buds, dried, cleaned from each leaflet and finally cured for more than a month.
The 205w light must be divided by three (she is the one who has used the least amount seen the position in the grow)
Hope you enjoy
Happy growing
As always, hope English will good



Likes
5
Share


@Andres
Follow
here is in winter with cloudy days ... if she is like that it is my fault for not spending enough time on her ... she grew up in a 1 liter pot ... and one of my dogs ate all its leaves ... we will say that of a flavor and good effect .
Likes
17
Share


@CannaArchive
Follow
The Banana Purple Punch is looking fantastic as it enters its 7th week of flowering!
After checking the trichomes, it’s clear this plant needed a bit more time to mature compared to others, but the wait has been worth it.🌱
This week, I’ve started flushing to prepare for harvest. If all goes as planned, it’ll be ready to cut and hang by the week after next.
The buds are looking dense and frosty, and I’m excited to see the final result!😊
So far, everything is progressing beautifully, and I’m really happy with how this plant is finishing up.

Likes
2
Share


@902EastCoast
Follow
Easy to grow, beautiful structure and plant. Big frosted, dense buds with very good odour 🤤. Would 100% recommend.
Likes
Comments
Share


@Krautis_IndoorFarm
Follow
🌿 Update nach 6 Tagen! 🌿
Die Pflanzen machen sich wie immer richtig prächtig 💪
Heute gab’s wieder angepasstes Wasser 2,5 L pro Pflanze mit einem pH-Wert von 6,5.
Gedüngt wurde diesmal mit dem kompletten Sortiment von Bio-Bits, nach dem Blütewoche 2 Schema.
Ab morgen startet Blütewoche 3 wir haben also fast schon Halbzeit, Wahnsinn wie schnell das geht! 😍
Nächste Woche steht dann wieder Top-Dressing mit @panova25.de an.
Die Ladies, die ihr hier seht, stammen natürlich wie immer von meinem zuverlässigen Partner @ganjafarmer.seed 🌱
Bis dahin Leute lasst gern ein ❤️ und ein Follow da!
Euer Krauti ✌️


Likes
6
Share


@Kolakk420
Follow
Very good strain selection, good quality,easy to grow, recomended this strain, thx dutchpassion seeds company for good strain choices and thx for watching!!!

Likes
24
Share


@Kirsten
Follow
9.1.25:
Watermelon 🍉 is doing well, slowed down a bit, but at least I got the LST going earlier on her. Which will hopefully stand her in good stead going forward.
I've been readjusting the LST. I just took all the pegs out and reshaped her.
Watering with 1ltr of dechlorinated water PH'd to 6.0 with the following nutrients;-
♡ 4ml Biobizz Bio-Grow
♡ 2ml Biobizz Bloom
♡ 2ml Biobizz Top Max
♡ 2ml Cal-Mag
♡ 2ml Ecothrive Flourish.
I water with this every 3 days.
Thanks for checking out my diary 🍃 ✌️
Likes
20
Share


@CzAlmighty
Follow
Omg , love this flower. 🔥🍀 really a great and strong flower. You have to try. Amazing smell . 🤓

Likes
6
Share

@nonick123
Follow
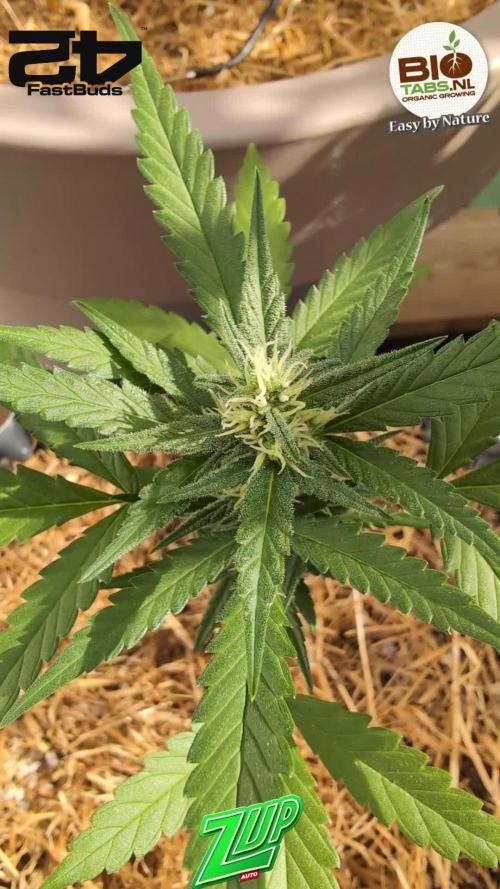
Una pequeña chica que ha salido adelante tras germinar con temperaturas cercanas a los 42 ºC en la horas centrales del día
Por eso está pequeña!
ZUp Auto by @42.fastbuds @42.fastbuds @fastbuds_espana
🚀 FastBuds 15% DISCOUNT code "NONICK" 2fast4buds.com
💦 BioTabs 15% DISCOUNT code "GDBT420" biotabs.nl/en/shop/ @biotabs_official
🌱Substrate PRO-MIX HP BACILLUS + MYCORRHIZAE @promixmitch @promixgrowers_unfiltered