
Likes
Comments
Share


Likes
33
Share


@SkunkyDog
Follow
Hallo zusammen 🤙.
Sie wächst sehr schön und macht keine Probleme.
Sie bekommen 20 % Rabatt bei Zamnesia und der Code lautet ZAMMIGD2023.

Processing
Likes
21
Share


@LittleBigTrees
Follow
Fed once this week with a weak feed including top max.
I use kombucha vinegar as pH down. Water from my tap is ph6.8-7.0 and 38-42ppm so I might start using calmag supliment as the ppm at my old house used to come out of the tap at ph7. 2 and 200-220ppm.
I had 2 plants that didn't like the light at 30000 lux and started bleaching so I took them out.
I've defoliated today day 35 as humidity was getting over 80% and also to let light to the lower bud sights.
Pre flower pistils showed on some plants around day 33 (some still have none) so I'll consider this the end of veg start of flower. The kalimist indica pheno is still not showing pre flower pistils but is always hard to force flowering when it's not mature for some reason. It's always 7-14 days behind everything else 🤔


Likes
Comments
Share

@TyRun
Follow
Still have 4 clones just flipped to flowering in my main box, so stay tuned. Will see how they'll show up in more spacious tent.
Likes
2
Share


@LoganatorDude
Follow
I absolutely love to watch them grow! Especially that moment they hit their first growth spurt.
I started with RO water that is remineralized for drinking purposes. The ppm is only 18! My tap is 156! So considering they don’t need much water, I’ve been stealing some of our drinking water. The RO water starts at pH of 7. After I add the nutrients, ppm of 249 @ pH of 5.8 while soil is still sweet @ pH of 7
I think my days are off as a new week begins on the last day of the previous week. I am going to leave that for consistency.
04/21 - Noticing some possible nutrient issues with the Fruity Pebbles for several days now. Going to see what she needs. Up front I’m thinking maybe just a super small amount of Amino Acids with a little Epsom Salt. Maybe she is struggling to access the nitrates from the neem cake. IF it’s a issues with nitrogen. We will see. Maybe she would benefit from some extra calcium?… Any ideas are greatly appreciated.
Day 22 and I am noticing how these girls have been burning up a lot of potassium lately, dealing with the wind and sun 💨 ☀️, getting pushed around all day.
I plant to top dress with some Kelp Meal pretty soon.
Day 24 -> 4/22/22- a quote from the weather on today’s red flag warning and dust storm warning.
“ HAZARD...Less than a quarter mile visibility with damaging wind in excess of 60 mph. SOURCE...Satellite imagery. IMPACT...Dangerous life-threatening travel.”
I’m keeping the girls inside today.
Day 26, I was planning to check the runoff on some of these girls, especially the fruity pebbles, however I messed that up as I also top dressed WAY too much of the seaweed bliss. So I flushed with plain RO water at pH of 7 until there was only slight coloration in the runoff. I didn’t check the runoff as a lot has changed with all that flushing. So next watering/feeding I will make sure I check the runoff on multiple plants.
So the seaweed bliss with its 17 on potassium, seems to be the most likely culprit for why there is a bronze-ish color on the inside of the new growth. Hopefully a foliar feed of Epsom salts can correct the problem. Inside tent, lights on LOW. Noticing similar pattern in all of them to a degree, most noticeable in the fruity pebbles.


Likes
65
Share


@Dendegrow
Follow
The colors of autumn are in full display 🍂 – deep purples, fiery reds, golden yellows, and even shades of black. The garden is alive with vibrant beauty, a final burst of energy as the cycle nears its end 🌿✨. The plants are absolutely stunning, their buds sparkling with trichomes, and the aroma is mesmerizing – a sweet and fruity scent reminiscent of ripe cherries filling the air 🌺🍒.
Week 7 is behind us, and while I managed to increase the nutrients again, it came a bit too late. The result? Potency is reaching its peak, but the potential for quantity has passed. Still, the plants stand proud, exuding beauty, sweetness, and character in every bud.
As the holidays approach, so does the conclusion of this grow 🎄🌺. By the end of the week, it’ll be time to bring this chapter to a close – a moment to celebrate the journey, admire the elegance of these plants, and look forward to the harvest.
Wishing you all a wonderful holiday season and a fantastic start to the new year 🎉✨. Stay tuned for the final updates and the results of this colorful and aromatic adventure 🌿📸.
---
Die Farben des Herbstes zeigen sich in voller Pracht 🍂 – tiefes Lila, feuriges Rot, goldenes Gelb und sogar Schwarz. Der Garten leuchtet in seiner ganzen Schönheit, ein letzter Energieschub, bevor der Zyklus zu Ende geht 🌿✨. Die Pflanzen sind einfach atemberaubend – ihre Buds glitzern vor Trichomen, und der Duft ist unwiderstehlich: ein süß-fruchtiges Aroma, das an reife Kirschen erinnert und die Luft erfüllt 🌺🍒.
Woche 7 liegt hinter uns, und ich konnte die Nährstoffe wieder anpassen, aber leider ein bisschen zu spät. Das Ergebnis? Die Potenz erreicht ihren Höhepunkt, aber die Menge ist nicht mehr zu steigern. Trotzdem stehen die Pflanzen majestätisch da und verzaubern mit ihrer Schönheit, ihrem süßen Duft und ihrem Charakter in jeder Blüte.
Mit den Feiertagen vor der Tür nähert sich auch dieser Grow seinem Ende 🎄🌺. Am Ende der Woche ist es soweit – Zeit, dieses Kapitel abzuschließen, die Eleganz dieser Pflanzen zu bewundern und sich auf die Ernte zu freuen.
Ich wünsche euch allen eine wunderschöne Weihnachtszeit und einen großartigen Start ins neue Jahr 🎉✨. Bleibt dran für die letzten Updates und das Ergebnis dieser farbenfrohen und aromatischen Reise 🌿📸.


Likes
16
Share


@eldruida_lamota
Follow
Familia, estoy de vuelta y actualizo la cuarta semana de estas Blueberry Cheese de Zambezaseeds.
Tienen alguna carencia que próximamente a de ser solucionada 💪 espero la próxima semana se solvente.
Por lo demás fenómeno las flores ya están formando tricomas y me encanta.
Aparte de que siguen formándose progresivamente todas sus flores.
Agrobeta:
https://www.agrobeta.com/agrobetatiendaonline/36-abonos-canamo
Mars hydro:
Code discount: EL420
https://www.mars-hydro.com/
Las maximas de temperatura no superan los 26 grados y las mínimas no bajan 20, así que no me puedo quejar.
Los niveles de humedad también son los correctos van entre 50%/65% de humedad relativa.
Por supuesto el Ph lo estamos dejando alrededor de 6.
Hasta aquí es todo, buenos humos 💨💨💨.

Likes
Comments
Share


@8_SafeMode
Follow
Biological fermentation of guano good!
#organic #livingsoi Friendly to nature

Processing
Likes
12
Share


@GrowGuy97
Follow
I have to say, overall out of all 5 purple Lemonade seeds I’m not very happy with the results so far considering they was a little more pricey & the fact that I know how good these plants can turn out! Not sure if I just got some bad genetics or what’s up but pretty bummed about this run so far😅😅 hopefully things will start to look up! Thanks for following & happy growing friends!✌️🏼🌱
Day 24 - Decided to pull the smallest purple lemonade that wasn’t doing anything so I can go ahead and get something else going in it’s place! Watered the other ladies today.
Day 25 - Ladies are still stretching like crazy!

Processing
Likes
14
Share


@Fullmeltalchemist
Follow
D22 - 10.4 - All the plants recovered well from topping and I'm just letting them put out new grow for the next weekish. We might come across some opportunity to LST this week 😀👍
D26 - 10.8 - I've been learning a lot. At this point, even though I snapped a branch 😤😪😂 I'm super happy. I managed to save the snapped branch with duck tape. It lost a fan leaf but I think she'll be ready to train again in a wee. All my other training is going well. I've figured out how I like to hook my lst anchors etc. Whole lot of fun watching them adapt and grow.
D28 - 10.10 - Heck, we have had a massive heat wave! 😤😫😣 I've been managing temps as best I can, but it has crept up to 33C near the soil the past couple days. I'm sad I already stored my window A/C but trying to keep the vibes good 🙏👍


Likes
3
Share


@Kokot
Follow
It was cold at night, so every evening i would put them in to the pool cover (there is like 3 degrees more) BTW because of the wind i lost my strain tag papers… So let me know if you know the strains😂
Likes
8
Share


@FrostyAutoflowersTV
Follow
I harvested 2 of the 5 plants on day 71. The other 3 plants got harvested on day 80 and are in the drying process. My inline fan is running on 25% and I got a fan running on the lowest setting on the bottom of the tent, so I doesnt blow on the buds directly.
Likes
11
Share


@sunshinegroww
Follow
Here we go the big girl its on fire so far so good big leafes happy times just doing her things

Likes
Comments
Share

@whatsupgoodboy
Follow
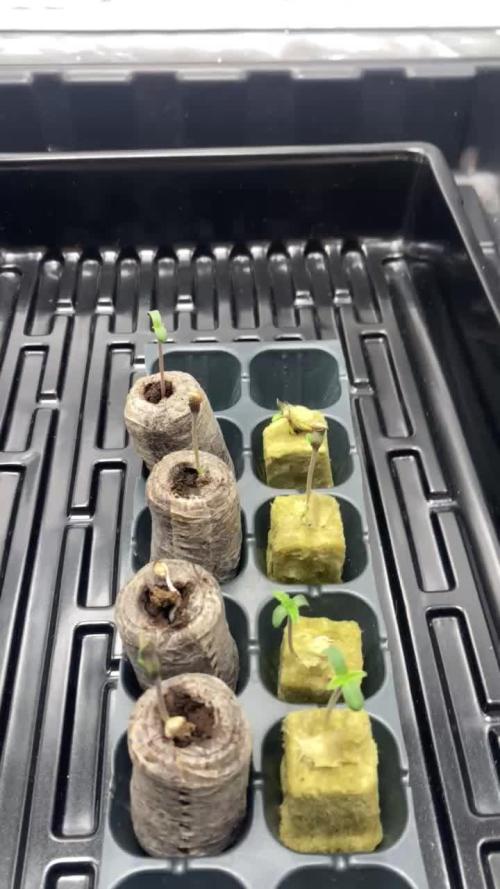
Just today the last one sproud out and up above the substract. i did half of seeds of each pack in Rockwool and half Peat Pellet.

Likes
15
Share


@Crwfz1
Follow
I love this strain i got it from them a long while back and some reason. It made seeds every time but gives me a female every time also so cant complain and i love the smoke really great taste grows easy all around good buds!
Likes
27
Share


@RDWCGrowing
Follow
I had a lot of fun with this strain and it was grown against 400 growers so let me say PHENO hunting is a true thing. Overall the Bud was a nice dense structure and the smoke on it was smooth and the high nice and even.

Likes
18
Share


@BudMunchies
Follow
11/27: harvest day. Well, i have chopped them all down. I trimmed all the bud and put it in seal bags in the freezer. No drying - fresh frozen. Sometime in the next few days i will turn it all into bubble hash. If i had gotten the buds that i wanted I would have dried and cured much of this. But as this is just a typical looking and smelling lemon strain, it all went in the freezer.
If not for all of their expectations set by FastBuds, i would likely have loved at least one of the plants. The one labeled PL1 was a monster. It produced over 27oz of trimmed wet bud. The hat is more than the other 3 plants combined. With a total of 53 Oz of trimmed wet bud harvested and frozen. The one that i labeled PL4 was insanely frosty when compared to the other 3 phenos. I have clones of bother PL1 and PL4 that i may consider using for breeding projects where i want a strong lemon. The other two plants were mostly forgettable.
Processing
Likes
21
Share


@JuicyFruit
Follow
Day 55 - 18/11/19
i still think another 1-2 weeks for this one, getting a jewelers loupe for the beginning of week 9 so i can tell exactly where were at in terms of harvest :) anyone got any thoughts on this little plant? have a look at the photos and videos and let me know in the comments below :) oh and i finally nailed what this strains smell is - tropical hubba bubba gum with cheese :'D
Day 59 - 22/11/19
Got my jewelers loupe 2 days ago and ive been having a look at them. its pretty hard to see for a newbie grower. ive looked at harvest guides online and seen pictures of clear, cloudy and amber trichomes. mine look mostly cloudy (60%) and slightly glassy (40%) with barely any ambers. i may be wrong but the reason i think its cloudy is that it looks white against the leaves instead of see through or like glass. so going on this for my first trichome inspection im gonna harvest in the middle of next week.
Smell is getting strong enough to stink out a room, still that tropical cheese smell, although its just so pungent it lingers in the rooms after bringing it out of the tent to inspect it. smell isnt a problem if you put it back in the tent and spray some air freshener stuff in the next room. the carbon filter is doing its job exactly as described along with the fan.
The fan leaves started to get yellow patches and sugar leaves starting to curl. and a friend thinks its nearing the end of its life.
I flushed yesterday and will flush again today to drain out any excess salts and nutes.
Thanks for following along.
im excited for week 9!
Happy Growing!