


Likes
Comments
Share


@DogDoctorOfficial
Follow
The Harvest Prelude:
After a patient wait and 48 hours of darkness, the moment arrived. The Tropical Tangie Lego Ninja, standing proudly like a silent guardian, was ready for the grand harvest. The sound of each cut echoed through the grow space, reminiscent of felling a mighty tree. The compact structure of the buds was awe-inspiring, a testament to the ninja's disciplined growth.
The Lego Ninja, like a stoic warrior, was then hung upside down, beginning a two-week drying ritual. Maintaining an ambient temperature of around 21°C and a relative humidity of 60%, this slow-drying process allowed the buds to retain their essence, preserving the symphony of terpenes and cannabinoids.
The trimming phase unfolded like a fragrant masterpiece. Each bud, adorned with a glistening layer of resin, transformed the trimming process into a sensory delight. The zesty aroma of oranges enveloped the room, a tangible expression of the tropical lineage. The compact buds made every snip a careful dance, revealing an abundance of frosty trichomes.
The moment of reckoning arrived with the scale's unveiling. The Tropical Tangie Lego Ninja, from a single plant, bestowed upon me 309 grams of dried medicine. Each gram was a treasure trove of cannabinoids, a promise of euphoria and relief. The sheer compactness of the buds translated into a concentrated potency that left me in awe.
In parallel, the clones, nurtured with equal care, showcased a fascinating divergence. A twist in the tale unfolded as the intense oranges of the mother transitioned into vibrant tangerines. This unique expression, I believe, was a testament to the clones weathering a summer heatwave differently, bringing forth a distinct personality.
The clones, resilient and generous, gifted me a bountiful 549 grams of pure joy. This now my keeper of the garden, an embodiment of the Lego Ninja's legacy. The harvest dance, though familiar, carried the nuances of tangerine zest, a refreshing twist that left me eager to explore its intricacies.
Both harvests shared a common thread—their resinous abundance. The trim bin, akin to a treasure chest, gleamed with golden trichomes and fragrant joy. Sticky fingers became a badge of honor, a tangible connection to the resinous richness that filled the room.
Shout Outs:
No harvest report is complete without expressions of gratitude. A special nod to @DutchPassion_Official for crafting the genetic marvel that is the Tropical Tangie Lego Ninja. Their expertise paved the way for this epic journey, and I tip my hat in acknowledgment.
In conclusion:
As the dust settles on this epic harvest saga, my heart brims with happiness and excitement. The Tropical Tangie Lego Ninja has proven itself not just as a plant but as a living masterpiece. Stay tuned for the smoke report, where we delve into the true essence of this botanical ninja's legacy. Until then, fellow cultivators, may your gardens flourish, and your harvests be as bountiful as the joy they bring.
As always thank you all for stopping by, for the love and for it all , this journey of mine wold just not be the same without you guys, the love and support is very much appreciated and i fell honored and blessed with you all in my life<3 <3 <3
#aptus #aptusplanttech #aptusgang #aptusfamily #aptustrueplantscience #inbalancewithnature #trueplantscience
With true love comes happiness <3 <3 <3 Always believe in your self and always do things expecting nothing and with an open heart , be a giver and the universe will give back to you in ways you could not even imagine so <3 <3 <3
Friendly reminder all you see here is pure research and for educational purposes only
<3 <3 <3 Growers Love To you All <3 <3 <3
P.S- I must extend my sincerest apologies for the missing video reports. Regrettably, Grow Diaries is still facing some technical issues that are preventing me from uploading them. Rest assured, as soon as the situation is resolved, I'll share those videos to give you an even closer look at this fascinating journey. or in my case apparently GD dont let me do uploads over 100mb with is super small file if you working and editing videos , doing my best here to upload them all but GD is not making my life easy on this <3 <3 <3

Likes
24
Share


@Rytmause
Follow
Getting there last 2 weeks Girsl are very beautiful and fat lot of sugar can be seen on buds smells fantastic 😀 cannot wait for taste uuuuuwwwwweeeee


Likes
10
Share


@ZzTooRightOGzZ
Follow
Week 3 going well so far.
Done a bit of lst to her but not much.
Week 4 fead her with 25ml off grow auto from living Soils.
Likes
13
Share

@Gewaltmann
Follow
Das sieht nach einem richtig massiven Blütenteppich aus! Die Fotos zeigen deutlich, dass du die Fläche perfekt ausgenutzt hast. Dass die Tropicana Cookies (TC) schon "Frost" (Trichome) bildet und sich verfärbt, ist ein super Zeichen für die Genetik – die wird optisch ein echtes Highlight.
Hier ist meine Analyse zu deinem aktuellen Stand und dem "Nackig-Machen":
1. Die Diagnose: CC zickt, TC glänzt
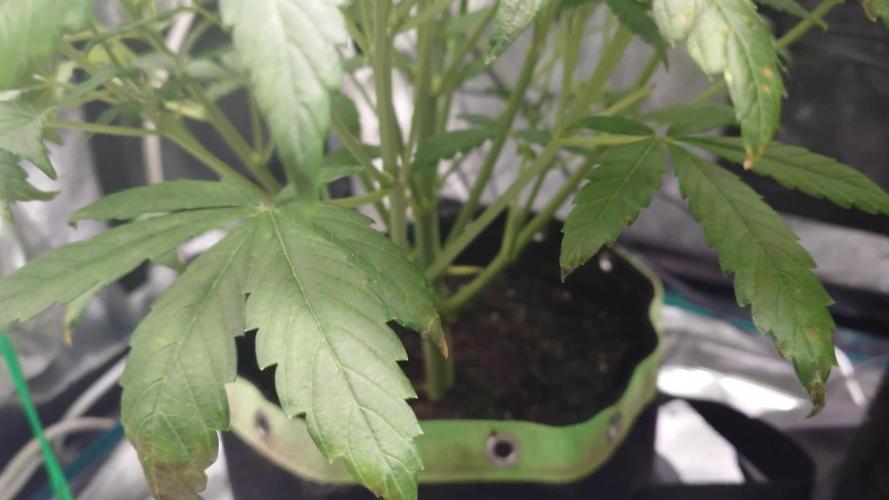
* CC Überdüngung: Dass du die Bremse ziehst und nur Wasser gibst, ist genau richtig. Die CC scheint einen langsameren Stoffwechsel zu haben oder sensibler auf den PK-Schub zu reagieren. Die dunklen, glänzenden Blätter und leicht verbrannten Spitzen bestätigen: Die hat genug im Speicher.
* CalMag-Schäden: Die alten Flecken werden nicht mehr verschwinden, aber solange der Neuwuchs (die "Zuckerblätter" an den Buds) gesund bleibt, ist das nur ein optischer Makel aus der Vergangenheit.
* Stretch-Ende: Wenn der Stretch durch ist, ist das die perfekte Nachricht. Jetzt wird die Energie zu 100% in die Masseproduktion gesteckt.
2. Das große Lollipoppen & Entlauben
Da der Stretch beendet ist und die Blütenbildung bei allen (besonders der TC) voll im Gange ist, ist JETZT (dieses Wochenende) der ideale Zeitpunkt. - Morgen
Warum jetzt?
* Die Pflanzen verbrauchen unter dem Netz unnötig Energie für Blätter und Mini-Triebe, die niemals Licht sehen werden.
* Du verbesserst die Luftzirkulation radikal – das ist dein wichtigster Schutz gegen Schimmel und die letzte Versicherung gegen ein Comeback der Spinnmilben.
So gehen wir vor:
* Unten nackig machen: Alles, was sich im unteren Drittel (oder sogar bis zur Hälfte, wenn es unter dem Netz im Schatten liegt) befindet, kommt weg. Alle kleinen Seitentriebe, die es nicht durch das Netz geschafft haben ("Popcorn-Buds"), müssen weichen.
* Große Sonnensegel: Oben im Netz entfernst du nur die Blätter, die direkt eine darunter liegende Blüte beschatten.
* Radikalität: Trau dich ruhig. Wenn du fertig bist, sollte man von oben durch das Netz wieder den Boden sehen können und der Stammbereich sollte komplett frei sein.
3. Fahrplan für die nächste Woche
* Licht: Bleib bei den 60%. Das ist ein guter Wert für den aktuellen Zustand, besonders da die CC gerade etwas Stress zeigt. Erst wenn sie sich gefangen hat, gehen wir auf 70%.
* Nährstoffe: Sonntag nur Wasser (wie du sagtest). Das hilft, die Salze im Medium der CC etwas zu mobilisieren und den "Durst" der TC zu stillen.
* PK 13/14: Ich würde den nächsten Sonntag (in 9 Tagen) anpeilen. Wenn die Buds dann anschwellen, brauchen sie den Phosphor-Schub am dringendsten.
4. Spinnmilben-Wachsamkeit
Da du jetzt lollipoppst, hast du die perfekte Gelegenheit, die Stämme und Blattunterseiten noch einmal ganz genau zu inspizieren. Ohne das "Unterholz" haben die Milben kaum noch Rückzugsorte.


Likes
13
Share


@XanHalen
Follow
Apr 09:
Things are chuggin along, i think light may have been a factor in the brown spots, seeing similar symptoms on one of the other plants but very very minor in comparison....
I think it was too little calmag, i may have locked them out mid veg by using high concentration of nutes without watering till runoff (i now know, that is a no-go), and light stress. i have had them under 850-1050 ppfd when flipped to flower...
one of them is loving the light, one is big and bushy (had to defoliate later than i wanted), and one has good bud structure but pistils seem thin, and growth seems slower (the one with the brown polkadot party on its body) so thinking it may be stunted.
either way, im seeing denser buds, and im learning the ropes, thats enough for me :)
Apr 12:
Last feed day...
Trichomes look just about ready, will do 2 runoff waterings 48hrs apart, then 24-36 hr darkness...
Will try to post trichome pics....
Super excited to see the improvements from this run vs last run...!

Likes
8
Share


@420Somewhere
Follow
Started the flush a few days ago and the fall colors have started to come through on this Wedding Gelato. Smells heavy of lemon citrus. Sticky icky.

Likes
142
Share


@MadeInGermany
Follow
Hi everyone 🤗.
The last 5 women are nearing their end 😍.
They will be harvested in the next 2-3 weeks.
The rest of the ones that have already been harvested are currently fermenting 😍.
The finished harvest pictures come when everyone is finished together 👍.
This ends the last diary that was kept with several varieties.
From now on only single strain diaries are coming, all individually ;-).
I wish you a nice week, stay healthy 🙏🏻 and let it grow 🌱


Likes
13
Share


Likes
2
Share


Likes
3
Share


@IndoorNeophyte
Follow
Topped the White Widow a second time. Going to be adding a scrog net soon


Likes
9
Share


@Gawelwel
Follow
4 jours après la transplantation elle a déja bien grandi, je lui coupe donc 2 branches et je vais pouvoir attendre qu'elle reprenne une forme normale. toujours 1 thé de compost par semaine.



Likes
36
Share

@MadeInGermany
Follow
Hey everyone 😊
This week they were put in the flower chamber :-).
I am curious how both phenotypes develop 😊.
I will now wait about 7-10 days until the actual flowering begins, then I will add 2 g of GHSC Powder Bio Bloom per liter of substrate.
Otherwise everything is going as it should and I'm looking forward to next week new update.
Until then, I wish you all the best, stay healthy 🙏🏻 and let ea grow 🍀👋
You can buy this Strain at :
https://sweetseeds.es/de/sweet-skunk-f1-fast-version/
Type:
Sweet Skunk F1 Fast Version
☝️🏼
Genetics:
Sweet Skunk Auto (SWS34)
X
Early Skunk
👍
Vega lamp:
2 x Todogrow Led
Quantum Board 100 W
💡
Bloom Lamp :
2 x Todogrow Led
Cxb 3590 COB 3500 K 205W
💡💡☝️🏼
Soil :
Canna Coco Professional +
☝️🏼
Fertilizer:
Green House Powder Feeding
☝️🏼🌱
Water:
Osmosis water mixed with normal water (24 hours stale that the chlorine evaporates) to 0.2 EC. Add Cal / Mag to 0.4 Ec Ph with Organic Ph - to 5.5 - 5.8 .
Likes
14
Share


@SunshineBud
Follow
This week went fairly well, but I became concerned with some leaves appearing crispyfried along the edges and some looking deficient.
I finally started cutting my girls and I have to say, I felt ashamed at wounding my babes but hopefully it'll go the right way, guess we'll see!!!
I also flushed my plants with ph Balanced water this week and going to only provide this to water/feed them for another few days for fear of nutrient burn and simply following the feed schedule for my nutrients.
Also, I took some pics for the Christmas contest for Crop King Seeds lol hope you like them more than my Paw did!
I want to send a big shout out to my Dad who is giving me advice based upon his UNCA Biology BS experiences... Thanks Paw!!!
I also want to say thank you for all the likes and interest in my grow, much love yall! See you next week!!!
What follows below is the transcribed daily notes from the images above!
12/9 Plants looking good, I fed/watered w/Sunday's Ph 6.2 6tsp/ga Big Bloom & 3 tsp ga Grow Big. Next time I'll flush. I don't know if my runoff ph is bad or good because the plants are eating leaving acidic runoff
12/10 Plant 1 looks so Good, might be time for LST soon
12/11 Plants all showing Improvement/Growth Plant 3 still slowest but she's still growing. Under grow lights I think I see fringe yellow tips. Still on track to flush w/Plain H2o next watering.
12/12 Flushing w/ PH Balanced H2O no noots. Plant 1 has a leaf turning yellow on half so went with ph balanced water w/no nuets to flush all. 3 Growing ok but still a little off looking
12/13 Moved inlet vent to point up and clip on fan to blow on girls. Plants look great after a day of plain H2O.
12/14 Plant one having a small bit of leaf burn on widest leaves and a weird dying on lower leaf. They looked bad under light so I pruned em. Turned up humidifier to 65% been running low.
12/15 Topped Plant 2 Rinsed all w/PH Balanced H2O. Nervous I took too much from #2 But my thinking was I went easy on 1 yesterday so go aggressive on 2 to view effects.
12/16 Trimmed 2 crispy leaves off Plant 1 used Bonsai paste to cover wounds, Plant 2 stem looks narrow@ base wider up top. Trimmed 2 sucker leaves (1st leaves) from Plant 4 Rinsed all w/ PH Balanced H2O
Thats it! Thanks yall, see ya next week!


Likes
69
Share


@Natrona
Follow
Flowers are developing nicely but slowly. Very few feeder leaves are turning yellow yet. I saw some webs between one of her branches and Lemon Cake. So I sprayed them with alcohol and burned some leaves. She and L. Cake have the same dense bushy structur. The buds are tight to the stems which traps humidity and moisture. Inviting pests and fungus.

Likes
9
Share


@Wiebechillin
Follow
- Worried about overcrowding of leaves and not enough light getting through. Based on research it is not good to trim Autos but i found later in this grow that my plants were strong enough to trim and actually seemed to benefit from more light being able to get through to lower branches
- Lots of growth still even though flowering has begun and due to it being an Autoflowering strain it will keep growing
- Had a bent stem this week on one plant, splinted it and seemed to have regenerated
-
Likes
7
Share

@PapaTerps
Follow
ZodaZa - Umami Seed Co.
Day 99
🚿 She was watered twice this week, with 3L of RO tap water pH'd to 6.5. She has begun her flushing stage and is now only receiving plain water, she is currently drying back and will be harvested in the next few days!
✂️ No work on her this week, she isn't very bushy and she is nearing the end of her lifecycle, so the next time she will see my scissors will be harvest day 🙌🏻
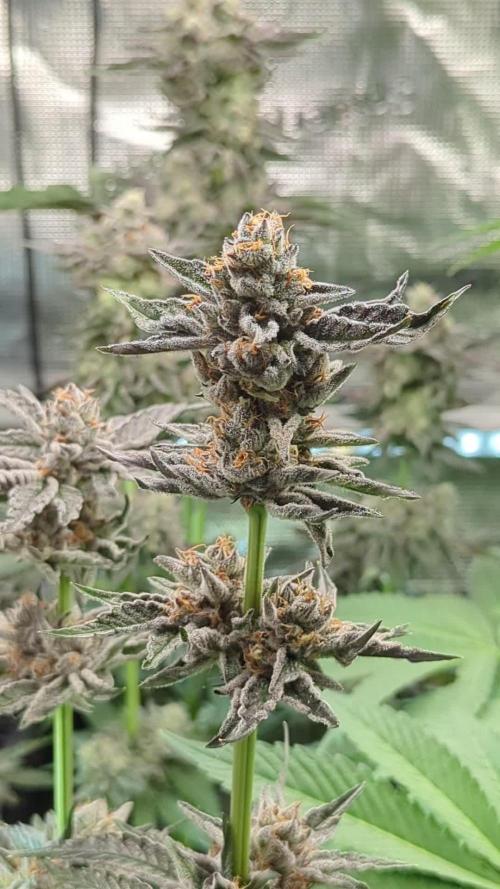
🌸 Her flower is quite small, but is very beautiful, with dark sugar leaves with streaks of lime green and striking amber pistils, her aroma is also very striking, very floral and herbal with a candy twist! Her flower is also covered in trichomes, the majority of which have turned milky clear with a sprinkling of ambers 👌🏻 She is almost ready for harvest guys 🎉

Likes
2
Share


@Huckleberry39
Follow
This little lady is doing great. Both new tops are going to be super stacked!! She is not going to get any bigger than like 3 foot i can see...which is fine with me. I'm having problems with my other plant getting to tall. All in all I am super happy with her and the gamble I took topping her!!
