


Likes
Comments
Share


@TgOgFaRms
Follow
Week 6: Aroma, Buds, and Excitement! 🌿🌸💨
Hey there, fellow growers! It's time for an exhilarating update on my flourishing journey. We've officially reached week 6 of the flowering phase, and let me tell you, it's getting pretty amazing in my grow tent. Here's what's been happening:
The aroma that fills the air when I open my tent is mind-blowing! It hits me right in the face with its funky skunkiness, and I can't help but smile. These ladies are developing some seriously potent terpenes, and I can't wait to savor the flavors when it's time to harvest. 🌿👃💨
Speaking of buds, they are looking absolutely stunning. The development is on point, and the density is increasing day by day. I find myself gazing at them with a sense of pride and excitement. These girls are going to be something special. 🌸🌿🌱💪
I'm thrilled to report that there are no signs of seed pods or hermaphroditism. The ladies are staying true to their femininity, focusing solely on producing those gorgeous, resinous flowers. It's a relief and a testament to the genetics and care they've received. 🚫⚡️
To ensure their continued growth, I've upped the watering to 5 liters every two days. These thirsty beauties need their hydration! Along with the increased watering, I've noticed some oranging on the tops and a touch of purpling on the leaves. It's a delightful display of colors that adds even more visual appeal to the grow tent. 🌿🍊💜
As for the nutrient solution, I've maintained a stable pH of 6.33, allowing for optimal nutrient uptake. The TDS level has remained between 1150 and 1250, providing the perfect balance of nutrients for the plants' needs. ⚖️📈
With everything going so well, I'm buzzing with excitement for what the next week of flowering will bring. The anticipation of harvest is growing stronger, and I can almost taste the rewards. Happy growing, everyone! Catch you next week with more updates. 🌿💚🌸😄


Likes
26
Share


Likes
4
Share


@Growin_Ish
Follow
Day 17
Both girls have been progressing nicely. Nice growth. Removed a male tentmate today. Pots are roughly half weight, may need water tomorrow or the day after.
Day 18
Gave then both a neem oil top drench. Switched light schedule to take advantage of cooler night temps and lower electric use cost. Just gotta make sure I can prevent light leaks. (12p to 6p)
Day 19
Gave both girls a light top fill of CocoLoco to reduce stretch. Great growth this past week.
Likes
5
Share


@CannabisAprendiz
Follow
Quinta Semana de floración del scrog de una variedad indica con un olor muy intenso con flores muy resinosas y compactas / Fifth Week of flowering of the scrog of a variety indicates with a very intense smell with very resinous and compact flowers

Likes
5
Share


@Misterindoor
Follow
Esta semana pasa a floracion y continua la estimulacion con delta 9 y mañana cambia el fotoperiodo a 12 /12

Likes
57
Share


@TheBudWhisperer
Follow
Week 7 of flower in the books and we’ve had to adjust to the height issues in an attempt to salvage what we can of the largest mains on the cheese. Really should’ve done this 2 weeks ago and while it’d be preferable not to supercrop this late in flower - there really wasn’t a choice. It was done early in the week and the plant is none the worse for wear. On the whole, the nute burn issue has been rectified and while the damage isn’t massive, it’s still really obvious. For all the above reasons, We’re really not going to get that late flower look with this plant. Kinda sad there. Otherwise, the plants have begun to colour up and were quickly coming in to the harvest window. At this rate it looks like the gorilla cookies and cherry Bomb will go off first, with the cheese to follow and the lemon haze last. The GC is absolutely covered in trichs. We expect a great finish for this one. She’s unlike any pheno I’ve seen on here - ducksfooted with a pineapple shape to her heads but again, got it where it counts. The cherry Bomb is similar but also true to her description - huge cherry diesel scent coming off this plant. She’s chunky and sticky too so very pleased she’s made something of herself. The lemon haze is developing And rounding out slower. Trich production is moderate and I suspect she’s got a week longer than the rest. We’re getting there - maybe a week to 10 days. Almost time for jazz hands👍😎.
Background/Repetitive Nonsense
The strain line up on this grow is look’n quite saucy 😈. We’ve got 2 FB strains this time around - Gorilla Cookies (seems we always have some GSC cross in the works). Mainly because the colours look stellar and remind me of a sugar breathe we did last year that was 🔥. The other FB is their original Cheese strain... because we already smoked all our cheese... and we really like our cheese...😉. Emerald triangle was kind enough to include a freebie of Lemon Haze. Wasn’t really big on the list but we haven’t done a haze strain to write home about yet so worth a go👍. The last is a Cherry auto from Bomb seeds that we’ve been trying to get to for months. Let’s just hope that she’s not a dud like the last bean.
The new digs for this run are courtesy MarsHydro👊. Their 2x4 single grow tent, paired with a shiny new 240w QB courtesy ViparSpectra.
These folks were kind enough to discuss a collaboration and as a result, here we are to test out the gear with an inaugural run of autos. Each week, we’ll try to expand on some of the benefits of each, as well as any limiting factors or considerations that need attention when pondering purchase.
Already I can say that both are high quality products in terms of overall craftsmanship.
MarsHydro 2x4 Grow Tent:
Excellent construction in terms of durability. Reinforced stitching on the zippers and corners ensures zero tearing. Conveniently placed screen vents and intake/exhaust ports. The ceiling exhaust port only exists on the right side. Perfect for me but not great if you’re running exhaust from the top on the left side (left side wall port makes up for this however). The aluminum frame is rigid enough to support the weight of the lights and accessories. Once you have some weight in the tent, she’s go’n nowhere and you can assemble and break it down in record time if moving or stashing the grow op.
Only limiting factors I’ve noticed is that temp. Control will be an issue for a tent. It just doesn’t have the same insulating ability as a wood cabinet or other permanent enclosed space. No worries, this is offset by a small desktop heater and keeps the environment exactly where desired. The other issue was a production problem - the ceiling vent was accidentally stitched into the corner seams on the assembly line. Again, no real issue - just pulled it out with no damage or fraying to the tent or port👍.
Website link here:
https://www.mars-hydro.com/grow-tent/buy-mars-hydro-grow-tent-24x48x70-2-x-4-cabinet-closet-grow-box-upgraded-diamond-1680d-mylar-for-sale
ViparSpectra 240w Quantum Board:
This thing is sleek and slick in terms of design. Closest comparable to it that I’ve seen would be spiderfarmers line of qbs. They feature the same top-o-the-line components and roughly similar spectrums. Where VS takes the advantage is in the convenience of the dimmer nob which is easily accessible and works great at 50% with no strobing👍. The heat sink is also larger which contributes to lower temps. That’s not a good thing in my case but beneficial for most folks.
I can already say that this will be a great fixture through all stages of growth. Where I know this light will excel will be in the veg. Stage for sure. Dimming function gives seedlings a much better chance of success with the ability to use lower lighting levels early on and the coverage area on a 240w is great. The average grower will find this panel suitable and fitting to their needs in a 2x4 grow space although I’d suggest 2 units if going any larger than that. The total output in this space equates to about 30w/sq.ft. Which is a decent amount of coverage based on power vs. Growprint. Ideal for veg. Certainly but, in flower - I tend to run closer to 50-60w/sq.ft to achieve higher yields. Again, similar fixtures have performed admirably in the past and while this wouldn’t be considered an “entry-level” fixture, I’d recommend that any grower new to the game not skimp on lighting and start with one of these. The price points are a great value for quality LED tech. These days, so there’s little reason to even consider a lesser fixture👍.
I have no detail on limiting factors for this light as yet but have heard that stock branded fixtures don’t necessarily incorporate enough red diodes. I’ve seen no issue myself but confess - I’m no lighting guru.
Website link:
https://www.viparspectra.com/collections/xs-series/products/xs-series-xs2000
***8% discount when using code: “ItBudWhisper”***
Happy to have you along for the ride if you made it this far through my opening rant!!😎🤟😎🤟😎


Processing
Likes
20
Share


@Mr_nugs_lover_David
Follow
She looks super heath and happy, I Supercroped her to get much more light penetracion and avoid a high height because I don't want her to be seen from the street,looks like a big green spider. Let's see how this beauty performs,she's smelling pretty strong so far,this is gonna be beautiful to watch! 💚😍🤤 Peace everybody! 💚💛❤️✌️🌱

Likes
36
Share


@MadeInGermany
Follow
Hey everyone .
This week she was left in her 1 L pot, and will not be in the 11 L pot until next week :-).
She was topped again and accepted it super 😃.
By the time she is repotted next week and given Green House Powder Feeding for the first time, she will have received a small portion of Canna Vega :-).
Otherwise it grows very quickly and vigorously, and they look beautiful 😍👌.
I wish you all a lot of fun with the new update, stay healthy and let it grow 🙏🏻👍
You can buy this Strain at :
https://sweetseeds.es/de/sweet-skunk-f1-fast-version/
Type:
Sweet Skunk F1 Fast Version
☝️🏼
Genetics:
Sweet Skunk Auto (SWS34)
X
Early Skunk
👍
Vega lamp:
2 x Todogrow Led
Quantum Board 100 W
💡
Bloom Lamp :
2 x Todogrow Led
Cxb 3590 COB 3500 K 205W
💡💡☝️🏼
Soil :
Canna Coco Professional +
☝️🏼
Fertilizer:
Green House Powder Feeding
☝️🏼🌱
Water:
Osmosis water mixed with normal water (24 hours stale that the chlorine evaporates) to 0.2 EC. Add Cal / Mag to 0.4 Ec Ph with Organic Ph - to 5.5 - 5.8 .

Likes
16
Share


@BLAZED
Follow
1-11
At the end of the day i chopped her down, did a small wet trim removing some big leaves, and hang the buds to dry.
2-11
Temps: 19.3 to 20.5 degrees
Humidity: 55% to 64%
3-11
Temps: 17.1 to 20.4 degrees
Humidity: 54% to 66%
4-11
Temps: 18.1 to 19.6 degrees
Humidity: 62% to 66%
5-11
Temps: 17.9 to 20.1 degrees
Humidity: 56% to 64%
6-11
Temps: 17.6 to 19.4 degrees
Humidity: 59% to 67%
7-11
Temps: 17.8 to 19.2 degrees
Humidity: 60% to 66%
8-11
Temps: 17.4 to 19.9 degrees
Humidity: 58% to 67%
9-11
Temps: 17.8 to 20.1 degrees
Humidity: 62% to 64%
10-11
Temps: 18.2 to 20.5 degrees
Humidity: 62% to 65%
11-11
Temps: 18.7 to 20.4 degrees
Humidity: 57% to 65%
12-11
Temps: 18 to 20.1 degrees
Humidity: 54% to 66%
13-11
Temps: 17.8 to 20.2 degrees
Humidity: 61% to 67%
Started trimming today.
14-11
Finished trimming.
I was afraid of finding a lot of budrot, luckily it was only the one cola.
The buds are very frosty, the bottom at the base of the branch looks a bit brownish on some buds, i inspected it with a microscope and didnt find any mold or weird things. There are a lot of amber trichomes tho.
I think that's why it looks brown like that. It smells and smokes good, so i think its fine.
If someone thinks otherwise, let me know!
End results:
Buds: 92 Grams
Small Buds: 18 Grams
Trim: 16.7 Grams
Total weight of the buds: 110 Grams.
I calculated that i used a total of 72.3 watts this grow, that makes it 1.52 grams per watt!
Very happy with the end results, and its by far my personal record hahaha.


Likes
19
Share

@All_our_small_plants
Follow
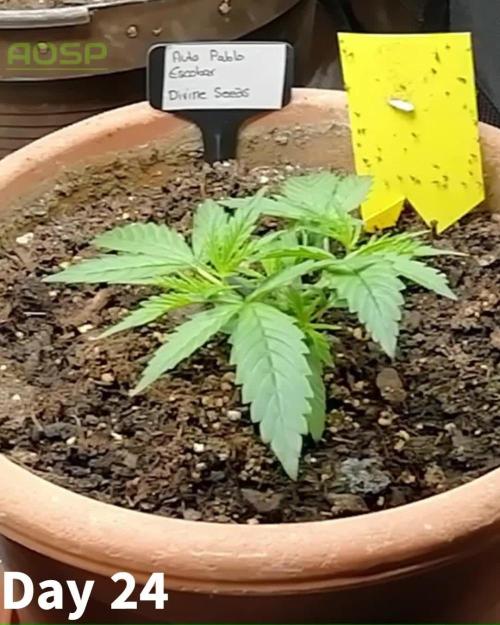
Bewässerung: 500 ml jeden 3 Tag in der Vierten Woche
pH-Wert: 5,9
EC-Wert: 1 mS/cm
Temperatur: 26ºC
Luftfeuchtigkeit: 55%
Schädlingsbekämpfung: im Moment haben wir keine Anzeichen das es was zu bekämpfen gibt, sobald die ersten Anzeichen da sind werden wir handeln :)
PPFD: 200 µmol/m²/s
DLI: 15 mol/m²/Tag
Düngemittel: Sie bekommt CalMag von BioBizz zu Prävention. Ab Tag 8 haben wir angefangen sie mit einem Mineralischen NPK Dünger (NPK 10-4-7) zu Gießen .
Besonderheiten: Sie wird etwas länger im Vorzuchtzelt bleiben da wir das Hauptzelt umbauen und es erst in 2 Wochen wieder bereit haben.
-Tag 23 sie hat das Topping sehr gut verkraftet und wurde heute etwas entlaubt. Sie hat auch Dünger bekommen.
-Tag 27 Baustelle fertig und Zelt wieder aufgebaut, nun haben wir die Pablo Escobar ins Große Zelt gebracht. sie wird dann in den nächsten Tagen umgetopft. Wir wissen das man Automatics nicht umtopfen soll aber haben es schon ein paar mal gemacht und es gab nie Probleme.
Sie hat sie Weiter gut entwickelt und hat heute wieder Dünger bekommen.


Likes
24
Share


@Kirsten
Follow
26.1.25:
I have had a mistake 😕 i spilt some Fish Mix as I was experimenting with a syphon from some aquarium tubing I have. Unfortunately, I forgot to take the syphon out! Ugh 😣
However, it is fish emulsion and very thick consistency. Therefore, I was able to scrape it up with 2 of my business cards up off the counter. So added this extra into the next 2 ltr solution I mixed.
All plants were watered with at least 1ltr of dechlorinated water PH'd to 6.3.
Containing the following nutrients;-
♡ 3ml Seachem Seaweed
♡ 4ml Biobizz Fish Mix
♡ 4ml Biobizz Bio-Grow
♡ 3ml Biobizz Bloom
♡ 2ml Xpert Nutrients Bloom Booster
♡ 2ml Xpert Nutrients Cal-Mag
♡ .25g Ecothrive Biosys.
♡ 2.5g of Bicarbonate of Soda as PH UP.
Unfortunately I have broken my PH pen too. Accidentally submerged it under water, then the readings went crazy.
I'm leaving it to dry by standing it up but I'm most likely going to need a new one, which is extremely annoying 😑
I'm going start implementing the Scrog net probably some point next week if I let the plants that are in flower to just grow up now, as I do believe that I stunted Watermelon 🍉 by using too strenuous LST.
Hopefully the plants still are able to grow upwards at this stage during flower for all the Purple Punch P1, P2 and P3.
We will soon see!
28.1.25:
My PH pen has packed up 😣
I've got to wait to get another.
It's super annoying 😑 so I'm just judging by memory how to regulate it.
Unfortunately, that's my only choice! I'm also out of the dechlorinator 😕 things are not going very well this week so far 😅
I guess we will have to make do, until I can get replenished.
29.1.25:
I removed all the plants, hoovered, and disinfected the tent.
There were several accidents when watering, causing some debris and splashes.
I decided to just go ahead and get a few other things done. It's crazy how quickly things can become neglected! 😣
So I defoliated moderately on all plants except Gorilla Cookies seedling.
I have absolutely dropped the ball on my lighting situation!
My light was much further away than I thought!
I turned it up to 100% and dropped it down to just under 2 feet away.
After I reset the tent, I set up my scrog net. I removed 80% of all LST pegs. I am planning on letting the scrog net take over the training from here.
I really want to minimise the risk of mould, so I decided to start using my dehumidifier. It has raised up to 73% RH this week, so it's necessary.
Hopefully, I will be able to get my dechlorinator and PH pen soon! That's kind of essential to me.
It's been a little bit of a stressful day in the garden, to be honest 😅
30.1.25:
So I am expecting the arrival of my new PH pen today, as well as my new bottle of Ecothrive neutralise.
It is supposed to measure the TDS and EC in addition to the standard TEMP and PH, which I had previously. Obviously, time will tell if it's any good or not.
I realise, much too late now, that my lighting is very insufficient for this many plants. I need double the watts at least, and coverage is very poor.
I remembered I had an old LED floor lamp, which was in a corner being unused.
I decided to take the stand off, and Zip tied the pole onto the tent pole at the back left corner.
I have no idea what the wattage is, and it's quite pathetic 😅 but I mean, I might as well use it, being as I definitely cannot afford more lights! 😣
Next grow, I will probably only grow 2 plants, max 4, and just use larger 7-10 Gallon pots.
Being as I ran out of dechlorinator, I only watered some plants properly because I only had enough to make 6 litres. When my pen arrives, I will get everything properly watered.
31.1.25:
The leaves of several plants are showing signs of iron deficiency. This is likely due to my PH pen packing up earlier. I now have a new pen.
Due to this, I decided to use my Seachem Prime, which I use for my aquariums. As I wanted to get them watered properly, and my Ecothrive Neutralise hasn't arrived yet.
I watered each plant with 1ltr of dechlorinated water PH'd to 6.0. I added .25g Ecothrive Biosys to the water.
May give them a breather on the nutes and just use the Cal-Mag and Biosys.
Being as I've just topped dressed with rich fertilisers, I'm sure that will be OK for the next several waterings.
1.2.25:
Watermelon 🍉 has started flowering.
The size and shape of her is quite laughable 😅
Retrospectively I started the LST too early and went in too heavy with it too. That obviously wasn't a great idea.
Still, this is my first run attempting to do LST, and I have a whole bunch to experience and learn from here! 😅
We may get lucky with a stretch. Who knows right.
I remember this one was supposed to finish really early, like 10 weeks or something so hopefully will get at least a bit bigger 🤞
Also the new growth is still a little bleached out.
Hopefully the switch to a functional PH meter will correct the imbalance which may have occurred due to my previous one packing up.
Snipped another couple leaves which were annoying me 😅
I realised this is one of the pots I put my clay pebbles the bottom of.
So I've probably not been watering enough, as she's right at the back, and assuming all was good because the pot was heavier.
Removed a couple of leaves from Bubble Kush
Likes
6
Share


@organicman
Follow
6 plants temporary moving out to the new room until new seeds arrive
4 days later:
9 more (all) plants moving out to the new room
____________________________________________
light- and watering schedule: see photos
now:
15 plants
3 x Auto Orange Bud > Dutch Passion (early80's)
1 x Haze Berry Automatic > Royal Queen Seeds (2018)
2 x Auto Euforia > Dutch Passion (late 90's)
2 x Auto Bubblegum > TH Seeds (late 80's)
2 x Original Auto BubbleGum > Fast Buds Company (late 80's)
1 x Strawberry Pie Auto > Fast Buds Company
1 x Gorilla Cookies Auto Seed Stockers (2015)
2 x Auto White Widow x Big Bud > Female Seeds
setup + strategy:
18 seeds
3 x Auto Orange Bud > Dutch Passion (early80's)
3 x Haze Berry Automatic > Royal Queen Seeds (2018)
3 x Auto Euforia > Dutch Passion (late 90's)
2 x Auto Bubblegum > TH Seeds (late 80's)
2 x Original Auto BubbleGum > Fast Buds Company (late 80's)
2 x Strawberry Pie Auto > Fast Buds Company
1 x Gorilla Cookies Auto Seed Stockers (2015)
2 x Auto White Widow x Big Bud > Female Seeds
setup:
18 x gronest 2 liter
60 cm x 120 cm x 180 cm (2 x 4) growtent
4 l humidifier
25 watt axial fan
15 watt clip fan
ro-filter
bath room with a 50 watts room fan (-> carbon filter not necessary)
...and a lot of odds and ends.
grow strategy:
max yield by stressing with:
1. tiny shoes (2 l fabric pots standing on 3 plastic rings (4 cm) for max oxygen)
2. tiny growspace (18plants on 0.72 sqm)
3. many strains (8 strains)
4. annoying neighbourhood (mixing old - i.e. bubblegum (late 80's) - with young- i.e. hazeberry (2018) - genetics)
5. no stress by light or food or water
6. unintentionally too much food
plus:
- no lst - no hst - just leaf tucking
- positioning bigger strains (euphoria, orange bud, haze berry) or just bigger phenos on less intense light spots (end of tent + edges)
- music-rotation: 24 hrs reggae (for sativas) - 24 hrs classicals (because it's scientifically proofed) - 24 hrs traditionals from the hindukush region (for the indicas)
max efficiency (min electricity - max yield):
- light: 23 h on - 1 h off
- keeping the distance of 18" (45 cm) and dimming to the right par (lux) - value depending on growing stages (see sheet: beginning 185 par ( 10000 lux/100 watt )/end 340 par ( 18000 lux/175 watt )) => ends up in approx. 170 watts in average over max 15 weeks
temperatur management:
- using approx. max. half of what the lamp can do keeps temperature low:
my tsl 2000 is pulling max. 360 watts of the wall - i need only 175 watts, results in less temperature than using a 175 watts lamp
- adjusting the temperature by using a humidifier outside of tent:
blown in humidity is soaking degrees and is transported out by fan, works much better than doing the same with pure air
summer extreme: no humidifier: 36°C / 35 rh - with humidifier: 29°C / 65 rh
works for 1-2 weeks of real hot summer days, no mould, no signs of stress in two summers
germination:
seeding in waterglass
spraying "basic"-water: ro-water (22 ppm) + calmag to 180 ppm every 4 - 8 hours until sprouted
man versus fungus gnat:
5 days before seeding i'm running the tent with "basic"-watered pots as if there were plants inside - led on, fans on, humidifier on. Fungus gnats coming with the soil might take the chance to come out now for breeding. i'm waiting with a 9 mm rifle. in the past i found 6 gnats in 2 of 8 x 50 l biobizz lightmix bags coming out of the soil. i could eliminate every single gnat successfully ;)
rotating harvest:
the little ones will be harvested completely when ready. at this point only the top branches of the big ones will be cut...and the new (basic-watered) pots of the new grow will move into the tent. 2-3 weeks later the secod half of the big ones will be cut and the second half of the new grow will move in...
nutes:
biobizz / soil: biobizz lightmix
bloom,grow,topmax,activera,algamic
+ aminopower instead of bio heaven (too expensive)
individual feeding schedule/once a week:
veg: 200 - 600 ppm
bloom: 600 - 900 ppm
water:
ro-water with:
veg: 100-150 ppm calmag
bloom: 150 ppm calmag


Likes
9
Share

@DaedalusGrow
Follow
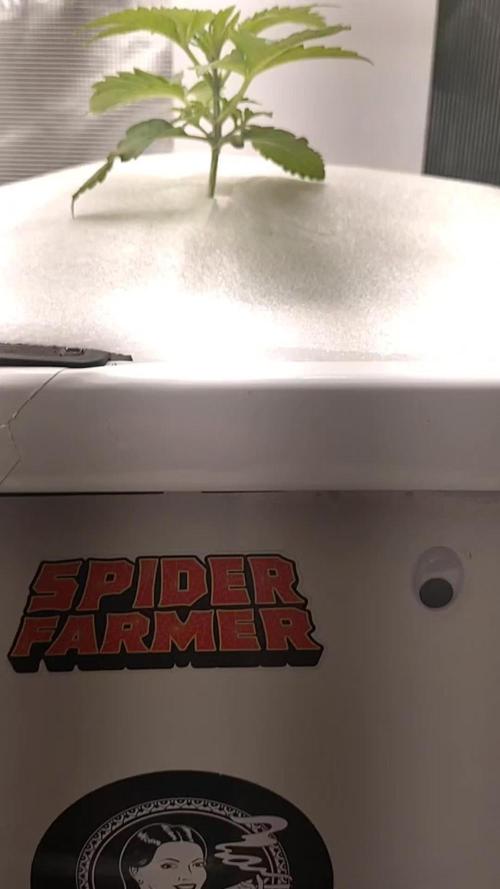
Heute morgen sieht die Pflanze sehr gut aus Wurzeln Zuwachs und die Blätter sind straff nach oben gestellt, habe zusätzlich noch etwas Silizium hinzufügt. Top 🌱🔨 Nice Day allen!

Likes
3
Share

@GoldenWeedGrower
Follow
📅 07/04/26
🗓️ D036 (V5 / D1)
🌡️ 1.2
💨 1000
💧 30L (New Setup)
🥗 4 ml for mains , 2 ml for additives
⚗️ 1.2
🔬 6.2 (pH- added)
🛠️ Transplant
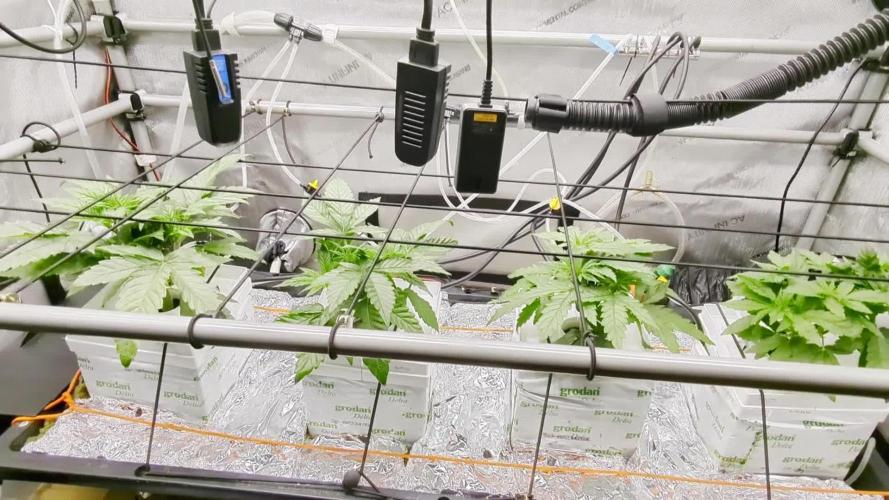
📋 New home, more space and a new setup with Aqualoop custom made DWC System
📅 08/04/26
🗓️ D037 (V5 / D2)
🌡️ 1.2
💨 1000
💧 -
🥗 -
⚗️ 1.2
🔬 6.0 (pH- added)
🛠️ Added Scrog Net and finished setup
📋 First day in the new home. Made a nice video of Aqualoop DWC System
==============================================================
Legend:
📅 DATE
🗓️ DAY (StageWeek / Day)
🌡️ VPD
💨 CO2
💧 WATER ADDED
🥗 FOOD ADDED
⚗️ EC
🔬PH (adjustements)
🛠️ ACTIONS
📋 NOTES
📅🗓️🌡️💨💧🥗⚗️🔬🛠️📋

Likes
17
Share


@Pochogrower
Follow
So week three of flower is looking good. Optic 1 XL is really helping the flower bloom. I started using beastie bloomz and I stared to see the blooms come out by mid week. What I thought was a nut burn was lack of calmag. I just started to double the dosage. One day the full line of the go box the next day I’ll do full dosage of base, calmag, and a full dosage of beastie bloomz. Seems to be working out fine. Smell is starting to kick in. I love the smell of it. I can only imagine how it’s going to smell when ready to smoke.

Processing
Likes
3
Share


@macrocefalo
Follow
The plants grow well in the first week I had 100% germination in the seeds, for a first-time sailor I'm happy. I added the humidifier to keep the humidity at 65%. Now in the second week I increased the quantity of fertilizers but always following the supplier's table and the plants seem to be enjoying their food.
Likes
5
Share


@Stretch448
Follow
Not sure why the other seeds didn’t germinate. One of the other Bananacane’s started to but died off upon sprouting

