
Likes
Comments
Share


@Roope
Follow
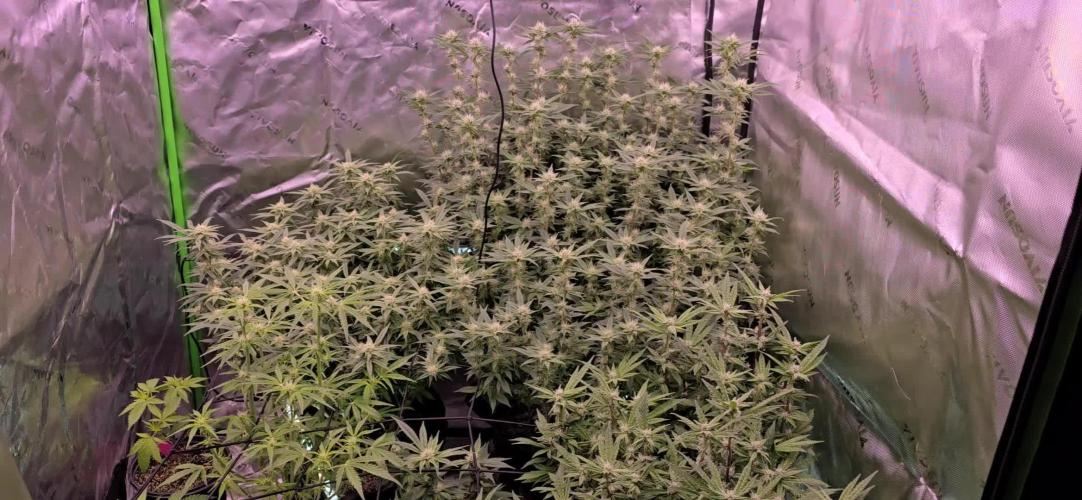
Ewerything works and im so bananas right now and broud of those ladys that comment will be,
Start u'r own project and dont race becouse somebody may have 20+year of more info and they get moster no epic size planta but thats the goal be like pro at this lifetime.
Aint do any modification only extra bag of co2 and wery mild start nutriments so stay in tune!

Likes
16
Share


@Mrg7667
Follow
Good week same as last time couple more tears, some more major then others. But the original first snap seems to be healed so im confident with tapping they would heal fast.
Going to be cutting for clones because i want to flip into flower ASAP going ti transplant into 5gallon first. Also ordering a new LED. Amazon led did okay for the budget but its time to see what i can really do! Very excited 🤠

Likes
5
Share

@SuparWawfflez
Follow
They slowed down drinking a bit, for now.
2/4
I put the new light in yday, tarantula borg v3.
I don't have the controller yet, but I did my best to set it to spectrum #49. Resulted in 11-1400 PPFD across the lower and higher canopy. The plants loved the first day.
I got the controller, set it to 59% power spectrum 49 which lands me at 640w. The same wattage as the previous light, much more photons.


Likes
2
Share


@MR_S_theGardener
Follow
Die Woche lief sehr gut, alle Pflanzen haben gute Fortschritte gemacht und sehen meiner Meinung nach auch gesund aus 😄 das Wachstum der beiden Z-ups ist nahezu identisch und wenn ich sie mit anderen diaries vergleiche, dann finde ich das Fastbuds mal wieder einen sehr soliden Strain rausgebracht hat. Von den Mandarin Panties gibt es wenig bildliche Dokumentationen, was einen Vergleich schwer zulässt, aber ich finde den Wuchs ganz schön. Mal sehen wann die Ladies in die Blüte kommen, ich gehe ja davon aus das sie diese Woche in die Transition gehen


Likes
8
Share


@NoProbation4Weed
Follow
Very Nice looking and good Smelling Plant. Buds after Trim are medium dense but very tasty.
Flavourwise it goes into ripe Berrys with a hint of Citrus and Soapyness in the background.
The Plant looks exactly like on the pictures High-Giraffe-Seeds shows on their website.
All in all definetly a recommendable Plant to grow.


Likes
10
Share

@Prilyfe13
Follow
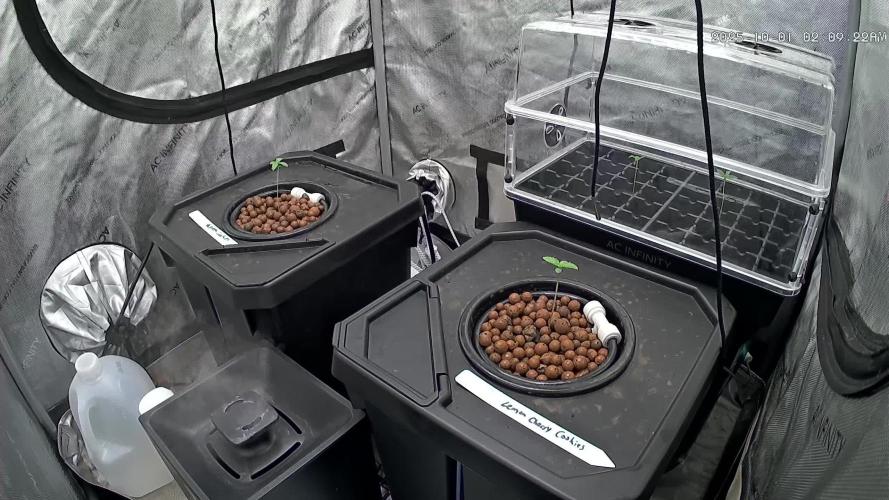
11/04/2025
What a busy day. I put up the trellis net last night and had to take it down today for a little while. Both ladies got a new water swap and a new week of nutrients. We've taken out the Grow nutrients and replaced it with Boost.
So far they seem to be fine. Looking great even. Not much else to report. It was a busy day. Setting up for a new feed. Then other stuff not related to weed.
Both plants have grown to about 17". A little shorter than I'd hoped by now, but they still have stretching to do. I feel like it should be a few more days of stretch then full blown flowering. It looks like Lemon Cherry Cookies is gonna have some super tight stacks. Tight internodal spacing. Anyway, let's hope for 24" or more.
On a side note. I'm wondering now if I started the Bloom Nutrients a bit too early. That could be why they aren't already 2 feet tall. Anyway, it's only been a few days. I'm also concerned about stopping the grow nutes this week, but that's what the instructions say. I could add a tiny bit just so they have some growing nutrients left for the stretch? Is that a thing?
So we have an automated environment. Today I dropped the humidity and frankly the tent seems to be having trouble getting down there. The fan is running full blast and the humidity is stuck at 52%. The AI doesn't like that so it's chilling away at it one little percent at a time. Lol. Temp is pretty solid during both the day and night.
Anyway, that's all for today.
11/05/2025
Almost forgot to do today's check in.
First let me start by apologizing for my lack of detailed information. Home life is hectic and I honestly forget to add it. So I'll try much harder to provide more details related to the growing. Like daily TDS and EC. pH is done daily. Although, I have a major problem that I think I found a solution for. How do you change out the water from a DWC system when the top is in a scrog net. Well, in this case it's very simple. A water pump with 2 hoses and a second bucket. Pump the water out, pH, put the water back in. I might have to get a water cooler to do it, but that's ok. I'll get one of the DIY version. For water changes, just as simple. Drain the water into the second bucket then fill the bucket back up with fresh nutrients. However, I think a weekly change would be required to prevent buildup that I can't get to and not every 2 weeks. I'll see what happens I guess, but the ladies are officially in the net. I had to lower it so it's touching the lower colas. I fed the taller ones under the net. And how flat it is. See the pic. Super flat. Very satisfying. Papaya Cookies... Not so flat. Very chaotic with her branches. The left side closest to the wall is like half the height as the middle and the right side is growing straight up to avoid the other plant. It's really weird. Anyway, scrogging that will be a bit of a chore I think. But it needs to be done. I want some quality tops and this is the best way to achieve that goal.
Bushy as ever, Lemon Cherry Cookies is turning out to be a beautiful plant. Super flat canopy and leaves galore. She'll definitely need a haircut after the stretch. Don't know how much of one. I like to keep my ladies a little bit leafy while not blocking bud sites or airflow.
Papaya Cookies is looking great! Her stem is almost as thick as her counterpart even with the damage she survived, but I'm still getting signs of deficiency. Oh well. I know it's not the nutrients. They are at the right strength. I think. Nearly full dose. But still I think it's just a lack of roots and a choke hold still in the stem. Other than that she is looking absolutely fantastic. Buds everywhere, good color and lots of branches. We'll get them spread out in no time.
The Other One...
It's growing bud. How is it growing bud?! I found a fungus in the tray so I took it out and I'm keeping it out, but just in case, I sprayed the plants and the fungus with the crop defender 3 stuff. It's really interesting how you can see what I did throughout the plant. Like I starved her, you can see that. The. I overdosed her, you can see that, and I left her alone. Can kinda see that. Now it's grow light deprivation. Instead she gets a 60 watt bulb with a lamp shade. Hahahaha. We'll see what happens. Honestly I can't wait to see what she ends up doing on the end. Will she make it to harvest? Will she wither and die well before harvest? I don't think so. I'm gonna give her a normal dose when I feed her next. I think I've said this before, but unfortunately I can't lift the tray at all. The roots are routed throughout the tray and can be damaged when I place the tray back down, or exposed to the light. Surprisingly I haven't seen any algae. So that's that with the other one. She has a single cola and it looks like it's gonna get big. Hahahaha imagine that. This beat up science experiment grows a huge juicy cola loaded with terps.
The environment is giving the AI system a bit of trouble today. I changed the environmental settings for the flowering stage. The temp is still 75°, but I changed the Humidity to 50%. That being said, the system can't get the temp below 76° and the humidity below 56%. I have a dehumidifier in there to help, but I think the only thing it's doing is making the tent hotter. Like really, the humidity won't budge. The dehumidifier I'm getting is on pre order, so I'm trying to work with what I have. It's kinda tough. Well, not for me. But the AI is having a tough time. Lol.
I'm gonna open it for a bit and give the exhaust a bit of a break.
Nutrients are looking really good. No negative reacti8at all. Kinda think I should've added a little bit of grow in there to help with the stretch. But I think it's too late. They already have established flowers. Also, they're only drinking around a half gallon a day. I would have thought they would be at a gallon by now. Maybe next week. I think they'll get big enough. They are still in early stretch and they're already 17" or 18" tall and growing fast. If my time lapse video show correctly, they are growing roughly an eighth of an inch every half hour to an hour as of the beginning of the week. If she grows a little faster, like a quarter inch every half hour, she should be pretty tall. Not sure how tall, but I'm guessing maybe 29" to 36" total. 36" would be fantastic. Good internodal spacing with a plant that tall. Lemon Cherry Cookies might just end up with colas as long as my forearm, like my Gorilla Cookies run a couple year ago. Great run, that.
That's all for today.
11/06/2025
Aargh! Lost the whole entry.
Ok, so I'm not writing the whole thing again.
It's now the 7th and I'll update later today.
But yesterday, we had some awesome growth and the trellis net was lowered to the canopy. I tucked the tallest tops. I also topped off their buckets a little over a half gallon each. Don't know if I mentioned it, but I dropped the light power down to level 8. They took to it like I thought they would. Nice little reach. Not that they weren't having issues at level 9, but I want more stretch. Makes it easier to trim. Lol.
11/07/2025
I desperately need help. So I put the trellis net up and now I can't pH the water. I can't get the plants out of the buckets. Does anyone know how to do this? Seriously need help.
Anyway, for now I have taken the trellis off. The branches are really strong, so there shouldn't be any issues. And the pH is now back to 5.8. No idea how it keeps climbing so high. It was 6.7 today. Crazy high. I premix my water too, so it's all settled and mixed up. Then I give it one last good shake and pH before pouring it in. Still climbs. Eventually I'll figure it out... Unlike the damned trellis net thing. Lol.
Anyway, we have some beautiful growth. 19" tall and happy. Well, no. Papaya Cookies has serious signs of deficiency. I'm guessing magnesium. Or whatever helps deliver through the stem. It's clogging up. The roots are also not very impressive. But other than that, she's growing pretty fast and has a whole lot of bud sites. The bad leaves are classic signs of deficiency. Yellow spots and whatnot. But they aren't too bad yet. I'll keep her going just in case she makes it. Maybe she'll have some good bud considering she's dying.
Lemon Cherry Cookies looks great as well! No issues whatsoever. Even with the water pH level. I should also mention that her root ball is naw massive and getting bigger. By the time she's done growing, she should be a good 30" if the light will allow it. It's only 19" from the canopy. But it's maxed out. Damned small tent! I will have to figure out a way to raise the light even higher. But she's looking great! Drinking an easy half gallon a day. Maybe a bit more. Tons of bud sites and what's nice is that they aren't quite flowers yet, so there's more stretching to be done.
The Other One:...
..........
The environment was pretty good today. A solid 76° temp and 52% humidity. Good numbers.
I'm also thinking about the size of this tent and what that entails. Harder to keep the temp and humidity under control. Plants are a bit more difficult to work with unless you don't move them at all... Or only grow one. Nope. Not happening. Lol. 2 or more.
Over all, a 6 foot tent is not the best option. Next is a 4x4. Gotta have it. I'm losing way too much graw space. The two plants I'm currently running. If it were a 4x4, these 2 could flourish without ever touching the other. That makes them even bigger. More space. More growth.
That's all for today.
11/08/2025
We start our day out with a couple clippings. Just a few leaves off each plant. The a few super big ones and 2 that were big and facing inward. It's about an hour before lights out for them, so they are a bit droopy. No matter. They'll perk back up when the lights turn back on.
I've also read that clipping before dark and feeding at first light are a thing. Apparently, and I believe it, training and trimming at night is the best time as the plants heal better in the dark rest period. Feeding in the morning helps the plant to take in nutrients most efficiently. In turn, the plant gets healed quickly and feeds strong. Utilizing the entire day. That's what I've read at least and I'm doing that. Although, I do chack pH and water levels before dark, I don't do anything unless the pH is out of control or the water is really low. So far I've only let it get down about 2 inches, maybe 3. But I top off at the beginning of each day. So far it's about 3/4 gallon. I expect a gallon a day next week. They are growing so fast. And bud sites are everywhere as well as at least 42 tops between the 2 plants. I didn't get an count, but as it looks, it's around 40 to 50. 42 is superficial.
Papaya Cookies looks pretty good for a nutrient deprived plant. She's a fighter. I also started taking the bad leaves off. They don't need to take up energy to heal a leaf. I have a theory. The plant is starving, right? I assume it's due to the size. What happens if I take a whole lot of leaves off. Wouldn't that help the plant distribute nutrients in a more concentrated dose? Maybe the plant will still require all those nutes, but it's no longer supporting tons of leaves and only bud sites. I'd take about 2/3 total off of her. I'll be doing that in small amounts after the stretch.
Lemon Cherry Cookies definitely needs a haircut. She'll also be getting about 2/3 snipped off. I might do it in 2 sessions. She's healthy enough to take it without a problem. Her canopy is super flat, except for this one top that grew about 3 inches last night. I don't have the scrog net there anymore, so I'm trying to figure out how to tie her down. The clips are too big for the internodal spacing. I'm thinking of it gets over 4 inches, I'm gonna supercrop it. However, the rest of the plant grew about an inch. Not quite as fast as I'd hoped. But there's still time.
The light is still topped out with its current rig, and it's only about 18" from the canopy. But the plants seem to be happy with it. I'll keep an eye on it. Hopefully I'll remember to take a reading after the plants wake up. I can't tell, but I might be able to bump the light power back up to 90%. I don't think it will stress them, but it might and I don't want to stress them yet.
The environment is pretty good. Not perfect, but pretty good. The humidity keeps spiking to the top of my limit at 55% it climbs a little bit over, but not for very long. I need a better dehumidifier.
11/09/2025
I can't tell if it's good or bad that I can snap leaves off right at the base just by tugging down on them. I'm guessing good? I've seen people with super healthy plants do that. I wonder if it's better for the plant, like to heal. We'll see. I took some leaves off today. A couple days early, but they were really starting to crowd. So I plucked a bunch off each plant. They didn't seem to mind at all. About an hour and a half before lights out.
I'll also have to top them off again. Definitely thirsty plants. I think Papaya Cookies is a little bit ahead of Lemon Cherry Cookies. Not sure how, but she has very well forming buds, where Lemon Cherry Cookies is just starting to form them. She's also drinking more. Not a lot more, but noticably.
I also think the stretch is over. From my experience and from what I've read, when the buds start to take actual shape, the stretch is coming to an end. Then it's just stacking. I'm starting to see stacks on both plants now. So it was the perfect time to do a. Light defoliation. In a day or 2, I'll do a full defoliation. As they are autos, I'm only taking about 1/3 of the leaves. If I have to pluck a few here and there afterwards, it's fine.
Papaya Cookies is looking really good despite having less uptake at this stage. She's really thirsty though and I'm wondering if that's a good thing absorbing more nutrients to pull in. I'll keep feeding her. I don't think she's gonna die either. Far from it. I give them about 2 to 3 weeks at this growth rate. Probably 3 more weeks. Lol. I'm guessing end of November to early December. She has a whole canopy of tops. The left side is a little low still, but nowhere near as bad as before. So far everything seems to be leveling out on its own.
Lemon Cherry Cookies looks absolutely fantastic. She has a whole canopy of tops now and more coming in as I trim away the foliage. Bud sites all up and down each branch, with stacks starting on some of the tops. She's gonna be a good yielder. I'm not putting any guesses in quite yet. I don't have a feel for what she'll produce. She's an indica, so I'm expecting huge fat dense buds. They should drop with resin. As long as I do it properly that is. Lol.
The environment is looking great. I decided to drop the night temp to 65°. Not that it goes that low. It stays around 67°. Which is fine. I just wanna prep them for some really good colors. My only concern now is the dehumidifier. Mine will definitely not cut it. I can try to plug one more in, but it's also a small one. Hmmmm, maybe the second one will work. I just have to find it. Lol.
All in all a good day. I'll check back in later if there's any updates.
Update: 22" is the end height for the stretch. That's both plants. They are totally level. But they didn't grow one bit during lights out. Not one bit, but the buds are forming. And we have stacking. Next week (in 2 days) I'm going to give them the full trim. Not a ton of leaves. Just big ones and ones facing in. Light height is 18.5" I I had slack I didn't realize I had. 2 inches. Looks great! And they are drinking quite nicely. Papaya Cookies is at about 3/4 gallon a day and Lemon Cherry Cookies is at a little over half a gallon. I got a pic of the root ball for you. It's massive.
11/10/2025
Well, today was trimming day. I had planned on it tomorrow, but I got bored this morning before lights out. So I thought to myself. "Hey, it's about an hour til lights out. They stopped stretching, so why not " lol. The only thing I'm not a fan of is that they are already starting to drop for lights out it's probably because they get too much light, but they don't seem to mind. Anyway, the fact that they are already droopy means I can't tell how much stress I'm putting on the plants during the one and only trim session. I'm assuming because they didn't drop much more, they're good to go and will heal up nicely during theights out period. It's only hearsay, but lights out means healing time. Sure... Why not? Makes sense.
Papaya Cookies is really looking good. She doesn't seem to be showing anymore signs of deficiency, whatever it was. And is growing happily. Her flowering sites are huge. I'm expecting some fat bugs from this one. Probably long though, because of her sativa leaning stuff. Trimming her was pretty easy. I was surprised at how many open spots there are in the canopy. A couple huge ones that will hopefully fill out over the coming weeks.
Lemon Cherry Cookies is really looking good. She has a whole bunch of tops forming and trimming was an absolute breeze. I hardly used the trimmers. No need. The leaves I wanted snapped off with ease. Everything that was big or old. Anything that didn't pop off was left alone. Just over 1/3 of the plant. She's still quite full and has very little space for more tops. Maybe if they spread out a bit around the outside, but that may be the time for scrogging. I don't think so though.
Speaking of scrogging, I found out how to pH the water with the plant still in the bucket. Top off everyday with pHed water. Sounds simple, but what if there's no space to top her off? Well, my solution was to buy a small water pump. Pump a gallon out, pH it, and dump it back in. I haven't had to do that, but if that's the case, it's a great idea. Chances are you won't be doing this much or at all. But yah, I guess a simple top up will do the trick. At least for the most part. I found yesterday that the pH was a bit low, so I topped off with a slightly higher pH than normal. Landed right on 5.8. so it clearly works. So simple I completely looked over it.
So far the environment is nice today. It's been snowing today, so the humidity in the house is super low. It's keeping the humidity in the tent at or around 50%. The temp is a bit high at 71° for lights out. I have it set to 65° for night temps. It won't get that low. Maybe 67° but that's about it without an air conditioner in the tent. Currently it's 68° in the house. 36% humidity.
So that's really it for today. Both pants stopped stretching for sure. But they are stacking. So that's good. Tons of tops. Trimming was awesome. What a morning. Good times.
Likes
17
Share


@Mr_nugs_lover_David
Follow
She's looking super beat ful and healthy, getting that perfect bush shape that I'm looking for, let's see what we can do guys! 💚🌱✌️
Likes
14
Share


@NorthernChemist
Follow
July 3: Great week for new growth and plants are starting to send out first flowers. Big stretch on height. About another inch of rain (2.5 cm) this week and soil has plenty of moisture. Today saw some amazing clear sky and strong sun. Expecting the flowers to start stacking. Still need to mulch around the plants. First resin is skunky with a bit of burned rubber (?) - unusual yet appealing. Great structure and impressive vigor.
Processing
Likes
15
Share


@blendmedmedman
Follow
still up and healthy been in 12/12 now for a week and waiting for take off to start on those flowers. been tucking fan leaves and exposing those lower areas. other wise waiting for things to start looking like flower sites.

Likes
6
Share


@Xpie77
Follow
The Seriously Old School strain from Serious Seeds is a hybrid created by crossing two renowned cannabis strains: AK-47 and Warlock. AK-47 is a Sativa-dominant hybrid with a complex genetic heritage involving Colombian, Mexican, Thai, and Afghani strains, known for its potent effects and sweet, earthy aroma. Warlock, on the other hand, is an Indica-dominant strain derived from Afghani Skunk genetics, offering a relaxing experience with a fruity and spicy flavor profile.
This hybrid strain is feminized, meaning it produces only female plants, making it a reliable choice for growers. It has a flowering period of about 8–10 weeks and can be cultivated indoors or outdoors, offering moderate height and yielding dense, resin-rich buds. The combination of the AK-47’s uplifting effects with Warlock’s calming properties makes it a balanced strain that appeals to both recreational and medicinal users.
If you're interested in growing or learning more, you may explore resources at Serious Seeds or reputable seed retailers.
Likes
Comments
Share

@ThatsmyGrow
Follow
Love how goood she grows. It a very good strain, some water, some nutrients and good


Likes
25
Share


@NONSENSE
Follow
Hi all!
Today I continue to record my DARK Phoenix lady vegetation stage.
This week the plant has grown a little. I continue to stretch the branches to the sides, thereby freeing up space for air circulation and light penetration.
There are enough fertilizers from the Green House Seeds and the plant looks healthy and strong. I added some root food from GHE and also the Urtica from GHE.
I continue to water every day, since it is COCONUT and it should always be wet - then there will be no salting.
And I keep the PH in the range between 6.3-6.5. I Added slightly more fertilizer to water this week, so the PPM is about 650-700.

Likes
8
Share


@Octopot
Follow
Check out our video!! This week was week one, transplanting 3 cuttings into the Octopots with Grids/Liners.
This is our first Research & Development grow here this year! Will the Lil' Girl take off? Maybe the Middle Child is strongest after all?! Or does maturity win it in the end for Big Sis? Come along with us while we have fun learning and testing theories!
Processing
Likes
12
Share


@Mistertemps
Follow
They are still plumping up nicely I’ve been only feeding ph water up until the end of this week. I’ve done a mix of ph’ing and not(laziness) started to notice purple leaves and buds last couple days. Just waiting for more green to disappear from the leaves.
Likes
15
Share


@Mrs_Larimar
Follow
2022-08-16
The Cindarella Jack stacks lovely. we are at the beginning of Week
4 of Flower
that looks very Promising to me
good structure, great ratio from buds to leave, big buds incoming
Breeder Information
Auto Cinderella Jack is a cross of Cinderella 99 ,Jack Herer and Magnum, giving the strain a high THC level, almost 26%. Also, such genetics give high yields of 400-500 g/m2. The variety has very powerful long-lasting effects. The plant grows in any growing environment,and harvesting occurs in 70-77 days. This strain has a compact structure and an average size. It is easy to trim. The buds are abundantly covered with snow-white trichomes. Auto Cinderella Jack is easy to grow, but you should take care of the humidity level.
Aroma and taste this is a mix of pine and herbal flavors, with notes of fruit and citrus. Because of its powerful effect, the strain is recommended for experienced smokers. It gives a body stone and uplifting effects.
There is so much information on the website to this Strain
https://dutch-passion.com/en/cannabis-seeds/auto-cinderella-jack
Genetic (Cinderella 99 X Jack Herer) X Magnum
Harvest 400 - 500 g/m²
Floweringtime70 - 77days


Likes
94
Share


@JUNGLE_B4RNS
Follow
Every beginning has an end ...
The Jumanji by Cellmax is almost over , last few plants left are finishing the fade.
This will be the last week before putting the plants on Harvest.
Greetings to Cellmax for their nutrients, they really rox 👍
I will put details about it on Harvest 😉
N.B: Looking for a job in the Cannabis industry as a mineralogist, plants keeper, master grower, or quality controler 🐞


Likes
11
Share
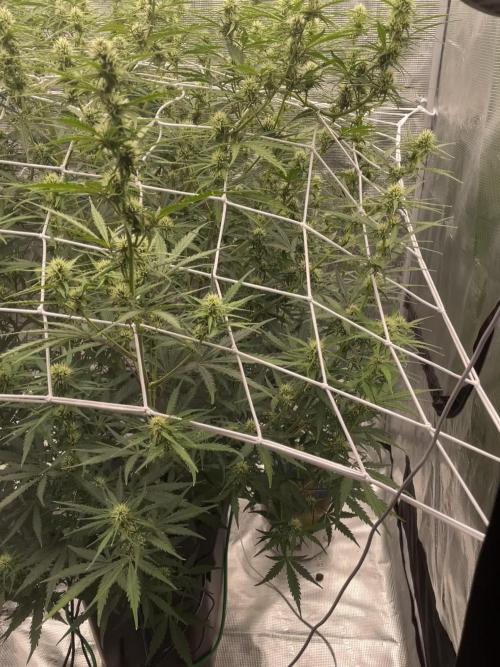

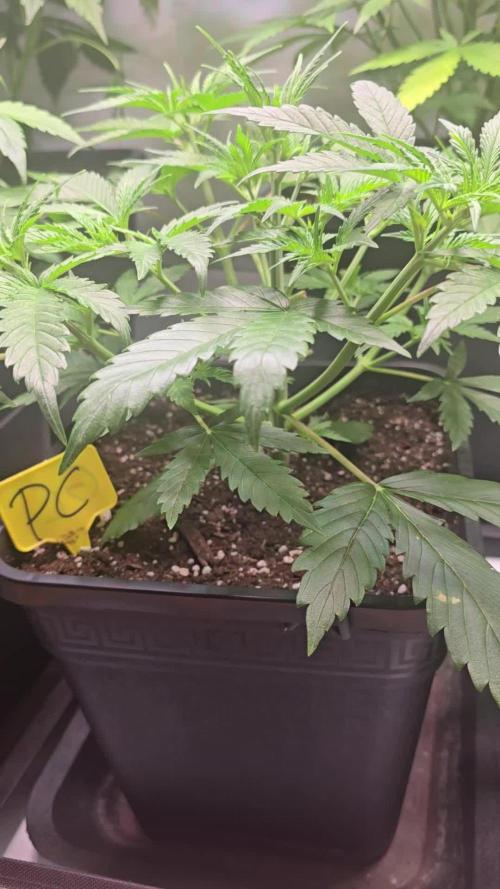
@Philhsy
Follow
Using the scrogg net was a good idea, wluld have overgrown orherwize, its eating alot, trying to keep up, some minor spots showing on random older leafs, but nothing except that maybe a bit tiny leafs.
But the budsites omg, one plant and all this, doesnt account for all the buds below the net you cant see, its föowers all the way down and they seem to get enough light, truly a monster plan.t. Changed bath added calmag, and it ate .3 ec over night, dunno if thats good or bad, my humidofier broke so laying wet towels lol..
Hoping this auro will finish, dont think in. 8 weeks tho because shes huge, from edge to edge in my 120. Alotnof maintnence

Likes
26
Share


@Ageddd
Follow
Last week, 2 irrigations, gave her plain water.
Beautiful colours, it was a pleasure to grow such a pretty plant, production is going to be like 10 grams i expect, Cloudy days and bad weather while growing and flowering, but quality seems pretty good, she is so frosty and smells like fruits.
1 week of drying, and curing at the moment.
Put the weed in jars with Boveda 62.
Im making a harvest post with the smoke effects flavour and all the stuff, so you can get more details about the high, flavour and quality.
Harvested 1/07/2018
Good vibesss