




Likes
7
Share

@DogDoctorOfficial
Follow
💙 Project Blue Tent – Week 5
Blue Waffle F1 – Pheno A (Folder 13A)
Welcome back everyone to another week inside Project Blue Tent!
If this is your first visit, welcome aboard. This project is dedicated to exploring the incredible Blue Waffle F1 genetics from Zamnesia while putting the complete Zamnesia ecosystem through its paces. Rather than growing multiple plants as one crop, every phenotype is documented individually, allowing each one to tell its own story despite sharing the exact same environment, nutrients, lighting and care.
Unlike our 8×8 Adventure, where different cultivars grow together, Project Blue Tent focuses on understanding every subtle difference between identical F1 genetics. Every week we watch these plants develop, compare their structures, and discover how each expresses its own unique personality.
As we like to say...
We are not just growing seeds—we are discovering individual personalities.
This week has been one of the most exciting since the project began. Plant A has responded beautifully to last week's topping, the feeding adjustments have brought back the deep green colour we were looking for, the SCROG net has officially been installed, and one important upgrade has made the entire irrigation system safer and more reliable.
Sometimes the biggest progress isn't measured by the plants alone.
Sometimes it's the grow room that evolves alongside them.
────────────────────────
🌱 Week Five – Everything Comes Together
Looking back over the past few weeks, it's incredible to see how quickly everything has started coming together.
After establishing a healthy root system and recovering perfectly from topping, Plant A has exploded with vigorous vegetative growth. The canopy has become noticeably fuller, side branches have accelerated dramatically, and every growing tip seems eager to compete for its place beneath the light.
One of the biggest improvements this week has been her colour.
The slightly lighter green we observed over the previous weeks has completely disappeared after increasing the nutrient strength. The foliage has returned to a rich, healthy green, confirming that the plants were simply asking for a little more food.
It's always satisfying when the plants respond exactly as you hoped.
Sometimes they don't need rescuing.
Sometimes they just need to be heard.
────────────────────────
🌡️ The Blue Tent Environment
The environment continues to be one of the strongest aspects of this project.
Even with warmer summer conditions outside, the Zamnesia ecosystem has continued providing a remarkably stable environment, allowing the plants to focus entirely on growing instead of constantly adapting to fluctuations.
This week's average conditions were:
• 🌡️ Day Temperature: 30°C
• 🌙 Night Temperature: 27°C
• 💧 Relative Humidity: 58%
• ⚗️ pH: 5.8
• ⚡ EC: 1.92 mS/cm
• 💨 CO₂: approximately 450 ppm
• 💡 Light Schedule: 18/6
• ☀️ PPFD: approximately 350
The Phytonaut LED continues producing an even spread of light across the canopy, while the Grow Environment Controller quietly keeps everything stable in the background.
When the environment remains consistent, every adjustment we make becomes easier to evaluate.
────────────────────────
🥥 Feeding Update
This week's feeding program remained wonderfully simple.
One of the things I'm genuinely enjoying about growing with the Plagron Hydro line is just how uncomplicated everything is. There are no complicated recipes or endless bottles to keep track of.
The plants are currently receiving:
• Hydro A – 1.9 ml/L
• Hydro B – 1.9 ml/L
• Hydro Roots – 1 ml/L
Along with very small pH adjustments whenever necessary.
That's it.
Coming from many years of growing organically in living soil, I've been pleasantly surprised by how stable the nutrient solution remains throughout the week. Once everything is mixed and adjusted, it simply stays where it should.
Even better, the increased feeding strength has delivered exactly what I was hoping for. The richer green colour has returned across all four plants, new growth is vigorous, and the entire tent looks happier because of it.
Sometimes simple really is better.
────────────────────────
💧 Learning From Experience – Installing the Drainage System
One of the biggest upgrades this week wasn't made to the plants themselves.
It was made to the room.
Back in Week Three we experienced a small flood caused by the drip irrigation system. It wasn't anything catastrophic—we cleaned everything up with towels and carried on—but it reminded me of something I've always believed.
Automation is wonderful.
As long as it's supported by good safety systems.
Rather than hoping it would never happen again, I decided to improve the entire setup.
This week I installed the Mars Hydro Auto Drainage System alongside the existing drip irrigation system.
The concept is beautifully simple.
The drip system feeds each plant from the main reservoir. Any runoff is collected inside specially designed trays beneath each grow bag. That runoff then flows into a small collection reservoir, where a compact pump automatically sends the water back into the main reservoir.
The result is a much cleaner, safer and more efficient system that dramatically reduces the chance of standing runoff accumulating inside the tent.
It creates something very close to a closed-loop irrigation system while keeping maintenance incredibly straightforward.
Good automation isn't about removing the grower.
It's about removing unnecessary problems so we can spend more time observing the plants instead of cleaning the floor.
────────────────────────
🕸️ SCROG Time
Another huge milestone this week was finally installing the SCROG net.
Last week's topping created multiple new leaders, and this week those branches were growing so vigorously that it became the perfect moment to begin shaping the canopy.
The goal of a Screen of Green isn't simply to hold branches in place.
It's about guiding every branch horizontally, creating an even canopy where every future flowering site receives equal access to light.
Rather than allowing one dominant stem to race ahead, the screen encourages every branch to become a potential top.
Plant A has responded beautifully.
Her branches remain flexible, healthy and easy to work with, making the first stage of weaving both enjoyable and incredibly rewarding.
The framework is now beginning to take shape.
────────────────────────
🌿 Plant A Herself
Every week this phenotype reveals a little more of her personality.
She isn't the largest plant inside the Blue Tent.
She isn't trying to be.
Instead, she's developing into one of the most balanced plants in the room.
Her branching is wonderfully symmetrical, the internodal spacing remains tight, and every new shoot seems perfectly positioned to become another future flowering site.
The topping has encouraged vigorous lateral growth, while the improved feeding has given her that rich green colour that instantly catches my attention every time I open the tent.
Looking beneath the canopy, her structure is clean, open and well organised, which should provide excellent airflow as flowering approaches.
She's becoming exactly the kind of plant I enjoy growing.
Calm.
Balanced.
Healthy.
And quietly preparing for what's coming next.
────────────────────────
👀 Looking Ahead
Next week will be all about continuing to guide the branches through the SCROG while allowing the canopy to spread naturally across the screen.
Most of the hard work has already been done.
Now it's simply a matter of patience, gentle training and allowing the plants to keep doing what they do best.
If they continue responding the way they have over the past week, I expect the Blue Tent to become a sea of perfectly level tops before long.
Sometimes the biggest improvements don't happen because we force them.
They happen because we create the right conditions and allow nature to do the rest.
────────────────────────
💙 Thank You
A huge thank you goes out to Zamnesia for making this entire project possible—from these beautiful Blue Waffle F1 genetics to the complete ecosystem surrounding this grow.
A massive thank you as well to Plagron for providing the Premium Coco Growbags and the Hydro nutrient line that is feeding these ladies every single day.
A special thank you as well to Mars Hydro for designing the drip irrigation and automatic drainage system that has become such a valuable addition to this grow. Although this isn't a sponsored product, it's one of those pieces of equipment that simply works. After our little flooding adventure a couple of weeks ago, this system has brought an extra level of safety, cleanliness and peace of mind to the grow room, allowing me to spend more time enjoying the plants and less time worrying about runoff management.
Thank you to GrowDiaries for giving growers from all around the world a place to document, learn and share our journeys together.
And finally…
Thank you to every single person reading these updates.
Whether you’ve been following since day one, recently joined the adventure, leave comments every week, simply stop by to look at the photos, or even quietly disagree with my methods—you all contribute to making this community what it is.
I genuinely appreciate every view, every conversation, every piece of advice, every question, every like, every criticism, and every bit of support.
I hope you’re all having an amazing week, and I can’t wait to show you how these beautiful ladies evolve in the next update.
Until then…
Growers Love, happy growing, and I’ll see you all next week. 🌱💙
Likes
9
Share


@TrialAndErrorGrows
Follow
Ok week 5 veg. I usually just let the plants grow through the trellis net.
This time I tried a little bit of everything. I did a fairly big trim on leaves. I tied down branches with twist ties and then lowered the trellis net overtop. I may have gone a little overboard. But looking at other peoples diary’s I am seeing a lot of techniques being used so I will giver a shot. Trial and error.
**Update**
Plants growing up through trellis nicely. After tie down and trim.

Likes
16
Share


@Diips
Follow
new week flower power.
noticed some rust spots on the Orange Apricot, so im thinking about maybe giving her some more calmag.. but i did dose her last week.. so in still not sure. but ive been fertilizing both of the plants in the wrong order.: we all learn hehe. been fert, water, water, water, when i should have been water, water, water, fertilizer…
but anyhow, so far so good.. our orange apricot have really been growing 😅.. so used some lat clips to hold her down a bit

Likes
32
Share


@autoseedsman
Follow
Well harvest day is here, there was so many problems but we got it to harvest and have ended up with some great smoking buds to see us through till the next crop.... thanks again to DankLandDownUnder for sticking by with his help and also helping me plan the next grow...

Likes
7
Share


@RivenWaters
Follow
The buds were big and dense, had to harvest a little early because of PM. It’s a great daytime high for getting things done or just forgetting the world for a few hours. I’ve already used the sugar leafs to make some MCT infused oil and it’s awesome, at least a 6 hour min body high.
BTW, I don’t measure wet weight as I don’t see the point, I wet trim anyhow.

Likes
37
Share


@iGrowCulture
Follow
Conditions have remained stable...realized I forgot to drop the light after cleaning, so dropped her back down to 28.5”. She has reacted well to every slight adjustment made...

Likes
10
Share


@Pakitohaiti
Follow
Desde mediados la semana pasada, algunas plantas muestran signos de carencia de algún tipo, pero sus hojas en forma de garra me hacen pensar en un bloqueo de algun mineral, con esto decido seguir regando sin ningún tipo de nutrientes hasta que muestren síntomas de necesitar comida , está semana han hecho 30 días de crecimiento les dejo acabar la semana hasta el domingo a 20h de luz


Likes
469
Share


@love_2_grow
Follow
D8 - The start of the second week of vegetation.
D10 - Today, the small tent was finally empty, and the girls could move in under the Kingbrite light. They are getting around 170-200 PPFD.
I also watered them for the first time by giving each one a small splash of water @ pH 6.7.
D11 - The girls were getting a bit cramped, so the humidity domes came off today. I set the Inkbird controller to an RH of 85% (+/- 2%) and hooked it up to my larger humidifier. Even without their domes, the environment in the tent should be nice and humid for the seedlings.
D14 - The end of the second week of vegetation.

Likes
7
Share


@Karl_Heinz420
Follow
Original Sensible Seeds - Frosted Guava 🍈
Enjoy - Week 3 🌻
- 25-26 grad Celsius
- 50-55% humidity level
- 20l Air-Pot
(75% BioBizz All-Mix, 25 % BioBizz Worm Humus)
- RO-water (PH 6,3)
Day 17 🌸
- Defoliation
Sanlight Evo 3-60 100%: about 1000-1300 PPFD
Spider Farmer Glow30 12h/12h on

Likes
10
Share


@ProfesorExplicito
Follow
Una semana con lluvia y mucho viento. Han soportado muy bien, estoy sorprendido. El crecimiento sigue constante.
A week with rain and a lot of wind. They have endured very well, I am surprised. The growth is still constant.
Likes
10
Share


@InnerCityGardens
Follow
In they’re final homes, 4 days without the makeshift incubators. Looking good

Likes
9
Share
@LastinG
Follow
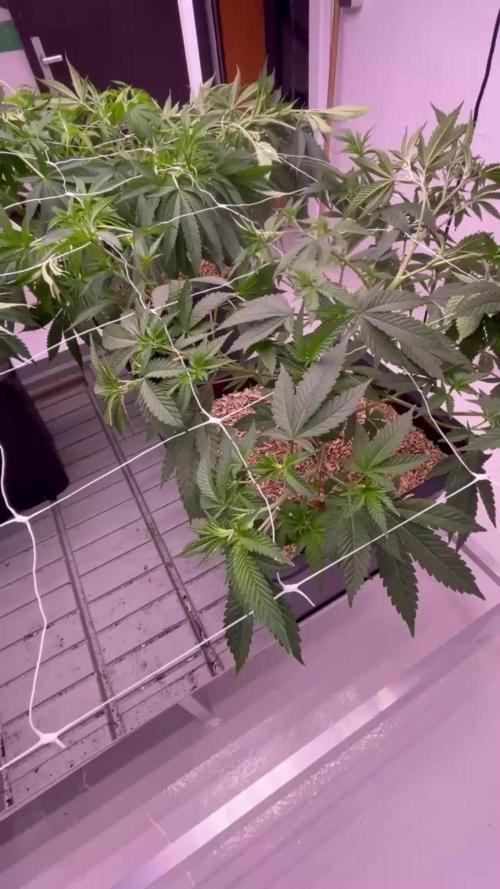
Week 6 veg and we are starting to setup for flower. Got the SCROG net up this week and the if the plants react nice ill start flower. Also spent some time on the 1000W LED controller and set up a proper day cycle – blue heavy early for tight growth, then ramping white and a bit of red later in the day. Here’s exactly how it’s tuned right now.
Nectar is still the most even and balanced of the bunch. Wide bushy shape, strong laterals, and she’s filling the net without any drama. Leaves look dark green and healthy, living soil doing its job like always.
Rainbow Melon is the absolute beast as usual. Super dense and aggressive – she’s really claiming her space under the net. Gonna have to stay on top of training and maybe pull a few more lower leaves soon to keep the airflow right, but she’s loving it.
Something Good has picked up speed and looks a lot more even now. Still the smallest but catching up nicely, good color and steady new growth coming in.
Probably 1 or 2 more weeks of veg to let them really fill the screen before we flip. Also hung the new big Biotabs banner – looks clean in the background. What do you think @Mia_BIOTABS ?? Overall everything’s happy, no stress, just solid progress. All three fertilizer are working great so far. They also got the usual foliar feeding. See you next week
Update: added photos of the stems and a 1 day after applying the trellis net. 15. I flipped them into flower


Likes
7
Share


@Cannabiszimba
Follow
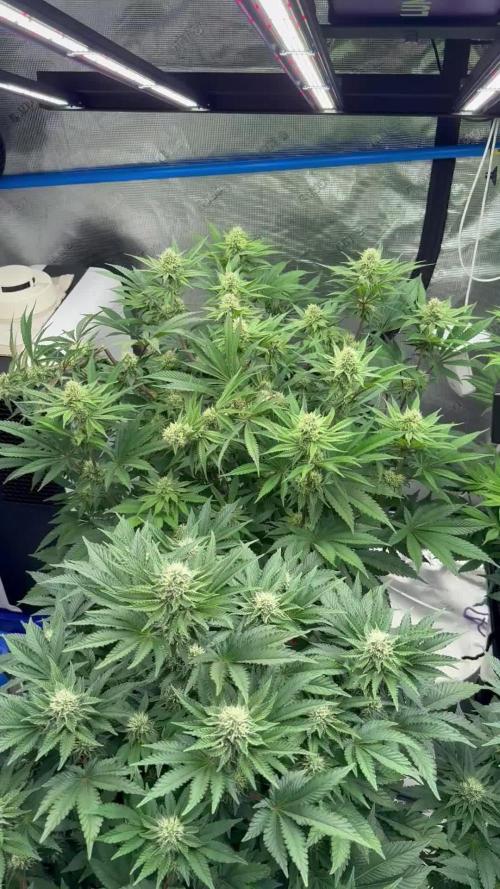
iniciando segunda semana de flora eu dei uma defoliada pra priorizar os galhos maiores e diminuir a umidade ali no meio. vamos ver como ela reage.



Likes
Comments
Share

@ThatOneUKHTA
Follow
Ну что сказать
Досадно недоглядел, потерял 14 верхов жирнейших


Likes
76
Share


@TheFattyMcCoy
Follow
Hey yall! Another week down. A lot has happened.
To start, we up-potted from the red solos into my living soil blend that I have been working on for almost a year. It's so full on living creatures and beneficials. I used to have fungus gnats a lot when working with living soil, it's almost impossible to avoid. .. Then enters beneficials; we have black soldier Flys, persimillis predatory mites, definitely earth worms, most likely a mix of night crawlers.
No more fungus gnats, I highly recommend using beneficial nematodes, cucumeris and persimillis predatory mites are excellent (swirski predatory mites are expensive). Just look at the Soil Food Web and identify what pest you have, then purchase their predators from a trusted insectary.
Anyways I added another 200watt LED and spread out the plants in a 2' X 4' tent. It's extremely dry in my location and having the heat on makes the air even drier. So getting my VPD stable has been an immense challenge. Right now
Also we need to be able to add VPD or at least GD needs a built in calculator to help folks with VPD, Vapor Pressure Deficite.
As of right now I am sitting at 0.85 VPD, so pretty good for today. I have 4 humidifiers and have had to hang moistened towels on the doors of the room I am growing in. It literally has been a huge challenge to keep the humidity high enough for my VPD to be in range for the young plants I have now.
Good thing is my current humidity without running any humidifiers is perfect for the flowering stage, so I can't wait to move this along.
As for topping and training; like I said I really want to move these ladies into flowering sooner than later. I have several reasons to do limited training so I can limit my veg time, also getting this crop done as fast as possible is best for my set up. Until I can get a larger house 🏠 😩 because we got a baby on the way 👶 so need to make space.
I have made compost tea twice this past week, wetting the soil and also spraying the leaves. My sprayer broke so I ended up pouring the tea on the plants gently, I got worm castings on the leaves lol. Gently rubbing that off once they dried. Also I applied the tea at night.
My tea recipe:
Reverse Osmosis water, 2 to 4 gallons
I bubble that with added minerals for a day
Add 2-3 cups of Activated worm castings (To activate the castings I added about 3 gallons of high quality castings with what I consider to be nutrient amendments, SO I add = kelp meal, neem cake, organic coconut flour, organic corn meal, organic wheat flour, and organic cold milled flax seeds and let that sit for a week then add about 2 to 3 cups of that mix to the tea)
I also add biology from about a cup of 2 different soil mixes I have around my compost bin, just trying to get a more diverse biology by adding those two different soil sources. And mind you the grow beds I took the soil from has been organic for many years and has a large amount of beneficials and tons of excellent biology.
Other than that I bubble that for 12 to 24 hours, with as much air as I can get. I use air stones but you really need to clean them off once you are done brewing. I also have an Air Lift with a large air pump that really works great, K.I.S. Organics sells one that works great or you can build one easily with with PVC pipe and a few adapters from any Home Depot or Lowes.
Also I do add DynoMyco to my roots when up-potting. They are an amazing brand that has backed up research, I think they have more propagules per gram of two strains they identified to work great with cannabis. Now having said that, each individual phenotype out of each individual and specific strain/cultivar is going to have different bacteria/fungal strains that it prefers and by growing the same strain, hopefully the same exact cut, and grow 3 to 4 cycles before you truly have the mycelium networks built and fully functional.
What I am saying is stop throwing out "used" soil and go over 7 gallons, bigger the better for biodiversity. Stop buying "new" soil, amend your previous beds and pots. You will see a huge difference. Hopefully I can show you all of this with my Grow.
Anyways please feel free to ask away any questions! This grow is about saving money 💰 🤑 and growing the best clean medicine as possible.

Likes
43
Share


@deFharo
Follow
Bienvenidos cultivadores de marihuana clandestinos, y también, a los que tienen la fortuna de no serlo!🖐️👨🌾
Catorce semanas de vida para esta planta hija de una Reina, nacida en casa y ahora cultivada al calor del hogar, cinco semanas en horario de floración 12/12h.
La planta avanza sin distracciones, se esfuerza en deshacerse de las hojas inservibles, mientras las colas sobresalen, ahora estamos a la mitad del juego, puede que a la planta le queden 4 semanas más, y en este tiempo espero ver triplicado el tamaño de las colas.
Esta semana le he dado dos comilonas (EC: 1.8) con mezclas variadas de Bio Nutrientes, el consumo de agua es muy alto la maceta air-pot lo favorece, riego profundamente cada 3 días, pero por otro lado y a pesar de que las macetas air-pot son buenas macetas, no voy a cultivar más en ellas, porque es complicado y lento regarlas, además, ocupan demasiado espacio con respecto a los litros de tierra que contienen, y yo ando muy escaso de espacio.
Estos días alimentando la planta con mezclas variadas de Bio Nutrientes y a la vez alimentando la tierra con nuevas capas de mulch que traigo de las hojas desechadas por la propia planta, las trituro y las añado al sustrato, estas hojas todavía verdes han demostrado que es un excelente hábitat para la proliferación de la microbiología aeróbica, actualmente todo el mulch de mis cultivos tiene un tacto grasiento, esto es la señal inequívoca de la humificación de la materia orgánica del mulch, además, esta semana he añadido como enmiendas secas harina de huesos (Ca, P...) y Guano de gusano de la harina o mealfrass (P,K, Mg...), este guano para mi es excelente, pues promueve como ninguno la proliferación de la microbiología y es de más fácil digestión que los clásicos guanos de aves o murciélago, también tengo una fórmula donde he solubilizado este guano con Microrganismos de Montaña Activados (MMA) y Pasto Fermentado, demostrando ser un compuesto fantástico para reavivar cultivos perezosos.
Hasta el próximo año...
SALUDOS Y SALUD A TODOS!!
Hasta el próximo año...
SALUDOS Y SALUD A TODOS!!
================================
Semilla obtenida el año pasado de la planta original, probablemente un retro cruce S1, un paso más hacia la auto suficiencia total en cultivos de marihuana! Mira el diario original: https://growdiaries.com/diaries/146971-grow-journal-by-defharo
Info de la cepa original: https://en.seedfinder.eu/strain-info/Queen_Mother/Delicatessen/
Floración: 8 semanas
Queen Mother es una cepa sativa estabilizada, gracias al minucioso y sistemático trabajo de selección y mantenimiento de la cepa, que el breeder Mario Bellandi, afincado en España desde hace más de 30 años, desarrolla sin descanso y con la máxima coherencia.
El cruce inicial de esta cepa, y que hoy permanece intacto, surgió a finales de los 90 entre una sativa desconocida, cultivada en los altos de Tarragona (España) por la misma persona desde los años 60, unas semillas de la isla de Reunión y semillas de un cruce estabilizado de dos landrace congoleñas...
==============
Likes
2
Share


@TheBudWhisperer
Follow
Week 4’s in the box and these plants are lightning quick outta veg. We’ve confirmed the presence of at least 3 males and 1 guaranteed female so far. They’ve all started to hit vegetative maturity in full stride so it won’t be long until we look to flip. A couple have been topped once more for the sake of additional colas and if we get lucky, the remaining females may be suitable for a scrog. Either way, can’t be much happier about how well they’re growing at this stage. Here’s hoping it remains so through flower🤞.
***Notes: strongest plant to this week is first confirmed female. Prob a prime candidate for cuts and back pollination with the F1 pollen dump.***
Likes
125
Share


@Regenwurm
Follow
Die 9 Blütewoche ist erfolgreich abgeschlossen!
Tage der Wachstumsphase = 32 Tage.
Tage der Blütephase = 63 Tage
Wachstum h in Blütewoche 9= 0 cm
Blütenbildung: Hoch
Die Mutationen nehmen ihren Lauf! Die Pflanze (Blüte) wächst und wächst und wächst.....
Wenn ich es richtig recherchiert habe handelt es sich bei ein und derselben Pflanze um mehrere Mutationen
Im Einzelnen...
Mutation 1= strähnige Blüten (wie bei der Dr. Greenspoon öfter mal vorkommt)
Mutation 2 = Gigantismus (doppelt so viele DNA Ketten wie regulär)
2 mal in dieser Woche mit Purolyt Mischung 1:25 besprüht
Lichtstärke: 85 %
Lichtabstand: 36 cm
Std Tag/Nacht: 12/12
Temperatur Tag: 25-26,5 Grad
RLF Tag: 55-61%
Temperatur Nacht: 20-21 grad
RLF Nacht: 50-55 %
VPD Wert: ca. 0,90-1,1
PH Wert Wasser/Düngelösung: 6,5
EC Wert: 1,3
Ventilator Oszillation: Stufe 2
Befeuchter: aus
Entfeuchter: mit Steuerung an
Zusätzlicher Entfeuchter: 1 Stk außerhalb vom Zelt im Raum
Bewässerung: 1* Wasser PH 6,6 EC 0,1/ 5 * bewässert mit Dünger mit den o.g. Mengen
Purolyt Besprühung: 2 mal
Controlling: Grow Control
Dünger: Greenbuzz Nutrients
Licht: Pro Emit Vollspektrum
Abluft: EC Carbon Active 750 m3 gesteuert/PrimaKlima 480m3
https://greenbuzznutrients.com/de/
Danke an Greenbuzz
Ihr bekommt 25 % Rabatt bei der Nutzung des Codes auf der GB Homepage
https://greenbuzzliquids.com/de/shop/
Code: GD42025
(Mindestbestellwert 75€)

Likes
33
Share


@MrStryker
Follow
All plants are finished and drying harvest pictures and weights next Sunday !!!! Happy Growing
