


Likes
Comments
Share


@KinoBudz74
Follow
I think week 8 is when I’m going to chop I already see some amber trichomes🌳

Likes
3
Share


@SpartacaZ
Follow
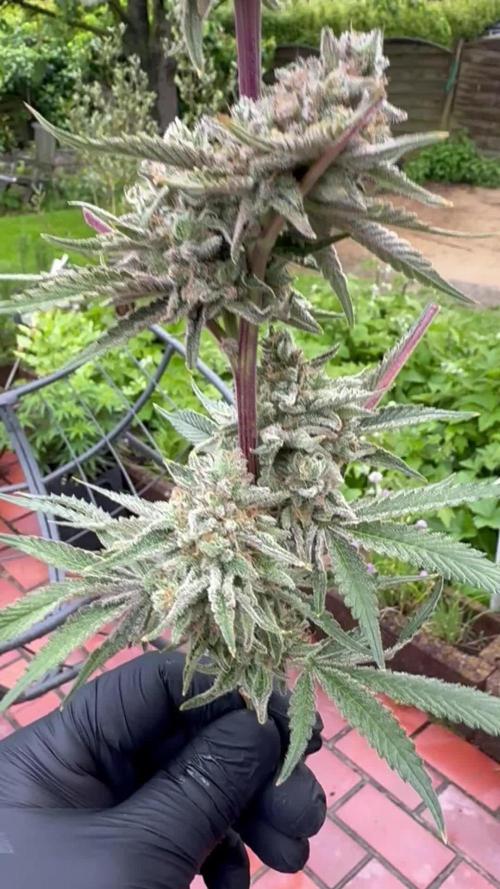
Pultroppo non c'è molto sole ma fa molto freddo ...questo giro poca resa ma tanta resina





Likes
7
Share


@inversi0n
Follow
Hello, readers!
Frida feels alright. She drinks more every day.
Stretching a lot.
83: Photo of usual defolation, which i perform once in 2-3 days.
83. Photo of some pimple, that appeared on the stem. I have no idea, what is that, but it's not insects. It's how she grow something.
I've noticed, water in a tank becoming more greeny, so I should change it.
I recon, I wouldn't be able to finish to finish this grow properly, so I'm trying to shift schedule to 12/12, not rushing yet. But moving towards it day by day.
I'm not sure it helps with autoflower, but i need to finish it faster


Likes
422
Share


@Crashoverite
Follow
Hi all 🧑🌾
Welcome to my 🍌💜👊 week update.
Hope everyone keeping well and having a good week.
Thank you so much for your support on this bananas journey 💜💚💜💚
I am so happy to see how girls are developing in recent days. It's seems that Athena finally stopped her stretch and hoping that Xena will follow her sister very soon. Buds are gaining weight and size rapidly. Lots of nice colours and tonnes of trichomes on those buds already.
Week 10
Dec 18-24
Dec 18-19
Mainly observation. Xena is still stretching like crazy. both girls are developing beautifully.
Dec 20
First watering for this week. 7.5 ltr beetwen both. Runoffs PH's Athena 6.2 Xena 6.3.
Dec 21
Due to lack of light at lower parts of conopy decided for another selective defoliation, lowered a bit tallest branches with colas dangerously close to light by tieing them to netting. Couple cm will make a huge difference here. Could not clear well at the back wall of the cabinet due to limited access.I'm very happy with final result.
Dec 22-23
Joyful observation of my 🍌💜👊girls development 🧑🌾
Dec 24
All is looking great. It's seems that stretch is finally stopped. Girls looking healthy and happy.
Second watering for this week. 8 ltr beetwen both. Both runoffs PH 6.2.
It's the end of this week.
Happy Xmas everyone 🤶🎄❄️🎁☃️✌️💚🌲🎅🎄
Stay tuned for new week update ✨🍀✨✌️💚
Likes
148
Share


@BioBuds
Follow
Greetings my dear Jungletamers,
So a major surprise came when @MarsHydroLED contacted us and asked if would like to try out their new SP 3000 light. Being a fan of Mars Hydro for years, we of course accepted their offer. We are totally in love with this light. I was when I saw it in another grower's setup and was in awe of its output and results.
So with much pride and thankfulness for the presents the Universe bestowed on us, in the form of MarsHydroLEDS offer and the bountiful harvest of the last grow, (which I am thoroughly enjoying btw, such a great weed to have grown ourselves) we start out on a new adventure that we can't wait to share with you.
With many lessons learned from the previous grow, a mighty producing strain in the form of Expert Seeds Gorilla Glue #4, a.k.a Expert Gorilla's and a tweaked super soil mixture, we are setting out to hopefully get over a gram per watt, preferably 1.5.
The Setup
A 4.5 (140 cm) x 2(70) x 6.2 (200) grow tent, giving me a .98 m2 workspace. This space is customized to my needs.
A standing fan will provide airflow through the whole grow, a top fan will help guide cooler air past my lights onto the grow.
3 56 ltr pots will be the home for the plants when they are 2 weeks old, up to then in smaller jars.
The Light
The leading role and star of the show will be played by the Mars Hydro SP-3000, so kindly provided by MarsHydroLED, which we will test and review here and I might say, endorse.
I'm very careful with who I endorse and support these days, but a company with that many wins in design, I'm talking ever since their first range came out in 2009 these guys have been raising the bar for the whole industry, I did not hesitate to support this leading brand.
If you want to compete with these guys, you better bring some quality AND affordable pricing. Why do I endorse the SP-3000 without ANY hesitation?
It is seriously THE BEST light on the market in this price range and size group. It has an enormously effective output in U/Mol and with 30% less energy waste comparing to older LED lights.
Prove me wrong!
And with a company holding a considerable market share selling thousands of units every month, competing on price and quality, one would think that customer service would suffer. Of course, also Mars Hydro is not perfect, but check the sheer amount of people that not only praise the light but also the service received, should the light somehow not perform up to par. It is this dedication to their customer base that made this company have a fanbase... Yes, a fanbase with a website and a wiki.
So if you are looking to buy new lights, check out the END OF SUMMER OFFER at the Mars-Hydro Global Store on Aliexpress:
https://marshydroled.aliexpress.com/ 👈 Check their offers but also their score, they ship from a warehouse near you so you don't have the extra import fees!! Cut out the middleman and have a deal on these lights!!
At the moment I write this in August 2021, the lights are 408,20 euro when sent from Germany to the rest of Europe, that's 40 euro cheaper than the other Mars outlets, BUT EVEN 60 euros cheaper than ordering at a grow store!!
The Strain:
Experts Seeds - Expert Gorilla feminized regular.
Don’t let the name fool you because Expert Gorilla is suitable for growers of any skill level. However, you do need to be an experienced smoker because Expert Gorilla is one of the most potent strains on the market.
Lineage: Chem Sis x Chocolate Diesel x Sour Dubb
Popularity: Extremely Popular
Flavor/Aroma Profile: Chocolate, Earthy, Fuel
Yield: 400 g/m2
Stress Tolerance: High resistance to disease
Potency: 24% THC
Flowering time: 58 - 63 days
The Soil:
Those who saw my Monstercropped Gelato #33 grow (you should see it if you didn't, I'm so proud of that grow), know about my super soil and organic nutrients/ permaculture tea combo that starred in my previous diary.
Because of the great results, we are going to use the same recipe, adjusted some more with some new ingredients that will complete the mix and give an even more sustained super soil buffer.
20% Atami Bi-grow (very similar to ocean forest)
20% Atami worm castings
20% Atami Coco Coir
10% Hydrocorn
10% Peat powder
1 cup Fossil seaweed chalk
1 cup bonemeal
1 cup bloodmeal
1 cup Microlife
3-4 teaspoons of epsom salt
3 cups of activated biochar (activated with our own permaculture tea)
I just made layers, starting with hydro corn on the bottom to aid airflow/run-off. On this I started layering the coco coir, Bi-grow, peat, castings, and amendments in a way that the more mature the plants get, the more phosphorous and less nitrogen they will find. Every time I made three layers, I would mix them by hand. This way we simulate natural soil, which consists of humic layers, composting plant waste, fungal and microbial life, and nutrients from fossilized sources.
The Nutrients
I will start with just adding 6.4 PH water, although this soil should buffer ph itself and regulate, after 4 weeks, I'll slowly be adding:
- Biobizz Grow
- Plagron Alga Grow
- Biobizz CalMag
- Biobizz Flower
- Plagron Alga Flower
- Biobizz Topmax
- Melasses
The Tea
Some of you might remember the permaculture tea from my previous grow, I have a short video in my harvest page showing how we make it), it will star again in this grow.
- (Rain)water
- Comfrey (whole plants)
- Dandelion leaves
- Roots and leaves from the earlier grow
- Minor periwinkle (Finca minor) is a plant we have in our garden, it contains an alkaloid that is associated with increased brain function but also is a light toxin for wee beasties and other unwanted guests like gnats (who hate it).
- When flowering I add some wood ash to this mix
Thank you for checking in on one of my grows again! Thanks for all the love on my previous grow, check it out if you haven't seen it!!
Hug
Bud


Likes
9
Share


@Eastweed2022
Follow
4ta semana dia 17/10/2022
lograron crecer un poco mas cuando cambie a macetas de 1 galon recien regadas hay alguna que estan pequeña pero hay una en especial que es demasiado pequeña seguire observandola o pasare a retirarla para un cultivo en out door.
Por ahora seguiran en crecimiento 2 semanas mas y cambio a floracion

Processing
Likes
26
Share


@Barakuda
Follow
So hi alle zusammen ,so heute ist Tag 77 vom Samen Tag 29 in der Blüte Alles läuft super die Damen sind gesund , die Blüte hat sich gut entwickelt, fangt an zu Düften , sehr schönes Duft , trichomen vermehrt sich nach und nach , habe leider paar Blätter mit thrips Eier gefunden , die habe ich entfernt und Versuch ein lady bug rein zu setzen , kann nicht mehr spüren wegen der blute
💚✌️🏼
Likes
4
Share


@Bdog7878
Follow
Plants are doing well I've started slowly introducing bloom nutes on all but the dynamite which are both 2 weeks behind the mop and og kush. They have been asking for water everyday now so I just been watering in am if its gonna be sunny all day I water. #1 orange punch is way further than all the others the buds are getting big on there. Been spraying with bt and neem oil once a week. Taking some yellowing leaves off once in a while. The smell is strong now my whole back yard smells like weed lol.


Likes
6
Share


@Sticky_Green_Fingers4
Follow
Coming close to the end now folks they were checked on 62 days old with microscope and a good few trichomes still looking very clear so will give them a few more days and check again and most importantly I will keep yea's all updated happy growing folks 😁

Likes
4
Share


Likes
14
Share


@BoboLacetti
Follow
The two Red Hot cookies were by far the fastest strains in this run. And also simply beautiful.
Bag appeal: 10/10
Yield: 8/10 Pheno #1 47 gram dry
Taste:?
High: ?
Once I did a smoke test. I will add the missing information! Pheno number #2 has significantly more yield than Pheno #1.
Pheno #2 smells like bubble gum, I've never had that smell with a strain before. If I had room for a mother tent, pheno#2 would have gotten a spot there.
I'm looking forward to the next harvests !:)

Likes
18
Share


@Dunk_Junk
Follow
She's doing her thing this week.
Watching pistils and trichomes.
I want plenty of amber trichomes before harvesting her.
Likes
36
Share


@Cannabeast40
Follow
Welcome back to yet another short update☺️
Transplanted and filled with tender care and love 🤗 A bit colder temperatures then inside the veg tent , but I’m not worried at all🤩
Videos show the process, hope you enjoy 💯💚
See you next week🤩
------------------------------------------------------------------------------------------
Light source:
Medicgrow SpectrumX
880W LED
Build in PPFD
4 controllable spectrums V1, F1, VS, FS
Visit https://medicgrow.com/ for more informaton.
Light measurement:
Apogee MQ-610 & Apogee DLI-600.
Fertiliser:
Organics Nutrients
https://www.organicsnutrients.com/en/
Green Buzz Nutrients
Discount Code: GD42025
Grants 25% with a minimum Order value at 75 Euro.
https://greenbuzzliquids.com/en/shop/

Likes
30
Share


@Sense63
Follow
🌿 Woche 4 – Vegetative Phase (27. Oktober – 2. November 2025)
Nach drei Wochen stabiler Entwicklung ging es in Woche 4 in die entscheidende Aufbauphase.
Die Pflanzen haben sich sichtbar verdichtet, die Kronen geschlossen, und die Spider Farmer SE3000 liefert bei 55 % Leistung (≈ 480 µmol/m²/s) gleichmäßiges Licht über die gesamte Fläche.
Am 27. Oktober war dann der große Eingriff fällig: erstes Topping und leichte Entlaubung bei allen sechs Pflanzen.
Das Ziel: strukturierter, flacher Wuchs – die Basis für das kommende LST-Training und ein gleichmäßiges Canopy.
🗓️ Chronologie Woche 4
27.10. ✂️ Erstes Topping + Entlaubung Alle 6 Pflanzen getoppt (oberste Nodie entfernt). Je 1–2 untere Blätter/Triebe entfernt. Keine Stresssymptome danach.
28.10. 🌱 Erholungsphase Blätter wieder aufgerichtet, neue Spitzen sichtbar. Kein Gießen. Licht 55 % @ 60 cm Abstand.
29.10. Kontrolle & Beobachtung Erde weiter getrocknet. Wurzeln an Topfböden sichtbar → Umtopf-Zeitpunkt erreicht.
30.–31.10. (geplant)
💡 Klima & Licht (Woche 4)
27.–29.10. 55 % 60 cm 25–26 °C 55–60 % Optimales vegetatives Klima, keine Hitzespitzen.
30.–31.10. 50 % 65 cm 24–25 °C 60–65 % Nach Umtopfen zur Stressminderung.
01.–02.11. 60–65 % 60 cm 25 °C 60 % Wieder Aufbau der Lichtintensität nach Erholung.
🌱 Strain-Layout / Pflanzenstatus
Front L/R Cherry Poppers 🍒 Kompakt, kräftig, gleichmäßiger Austrieb nach Topping Bereit für LST ab 5.–6. Nov.
Center-L (gelb) Karate Kit 🥋 Etwas gedrungener, dunkles Grün, kräftige Mitte Wuchs leicht langsamer, aber stabil.
Center-R (terracotta) Lemon Orange 🍋 Größte Pflanze, sehr vital, breite Blätter Beim Umtopfen leicht tiefer setzen.
Back L/R White Gorilla Haze ×2 🦍 Buschig, dichte Struktur, kräftige Stiele Leichte Mg-Symptome → Bittersalzgabe nach Umtopfen.
💧 Gieß- & Nährstoffplan (Übersicht Woche 4 + Vorschau)
24.10.
Düngung (vor Woche 4) Orgatrex 2 ml/L 0,9–1,1 L Letztes Vorgießen in 5 L-Töpfen
27.–29.10. — — — Keine Bewässerung, Substrat trocknet für Umtopfen.
30.–31.10. Anwässerung Bactrex 1 g/L 0,8–1 L Nur zur Wurzelaktivierung, kein Orgatrex.
03.–04.11. Erste Nachdüngung Orgatrex 1,8 ml/L + Bittersalz 0,5 g/L (nur WGH) 1 L pH 6,2–6,4, langsames Angießen.
07.–08.11. Nur Wasser — 1–1,2 L Erhaltung der Bodenfeuchte, keine Zugabe.
🧠 Beobachtungen & Pflege
Erholungsphase: 1–2 Tage nach Topping leicht verlangsamtes Wachstum, danach starke Triebneubildung.
Bodenleben: aktiv, feine Myzelstrukturen sichtbar.
Keine Mangelanzeichen: außer leichtem Mg-Bedarf bei White Gorilla Haze.
LST: Beginn voraussichtlich 03.–06. November (sobald neue Triebe 4–5 cm lang sind).
Entlaubung: keine weitere vor Mitte November.
✅ Fazit – Woche 4 (27. Oktober – 2. November)
Diese Woche war der Übergang vom Aufbau zur Strukturphase.
Das Topping am 27. Oktober hat den Wuchs geformt und die Basis für das spätere Training gelegt.
Die Pflanzen zeigen kräftige Triebe, gesunde Farbe und aktives Wurzelwachstum.
Mit dem Umtopfen zum Wochenende beginnt die letzte große Wachstumsphase der Vegi-Stage.
Vitales, harmonisches Wachstum, starker Wurzeltrieb, perfekte Vorbereitung für den „großen Umzug“.


Likes
2
Share

@Ger-Smurf
Follow
Hallo und Herzlich Willkommen zurück zur Cherry Cola RF3 von Fastbuds 😸
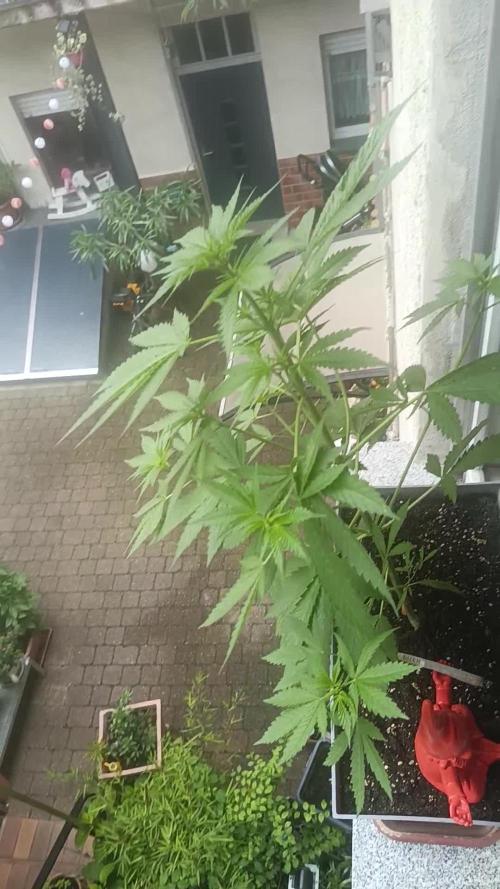
Die letzte Woche war das Wetter sehr wechselhaft, was die Pflanze aber nicht daran gehindert hat ordentlich zu wachsen 👌. Ich habe die ganze Woche über die Seitentriebe unter den großen Blättern hervor geschoben. Dadurch sollen die Seitentriebe mehr Sonnenlicht bekommen.
Während meines Low Stress Training ist mir aufgefallen das sich die ersten Blüten zeigen 😍
Aktuell trinkt die Pflanze alle 2 Tage 1 liter Gießwasser. Den pH-Wert Stelle ich auf 6,2 ein .
Mit 5ml Blüte Dünger auf 1 Liter Gießwasser komme ich auf einen EC-Wert von 1,6 mS.
Ich hoffe euch und euren Pflanzen geht's gut 😁 Bis zur nächsten Woche 👋
Likes
8
Share


@DogDoctorOfficial
Follow
💙 Project Blue Tent – Week 7
Blue Waffle F1 – Pheno A (Folder 13A)
Welcome back everyone to another week inside Project Blue Tent! 💙🌱
If you're new here, welcome aboard.
This project is all about exploring the incredible Blue Waffle F1 genetics from Zamnesia while putting the complete growing ecosystem through its paces.
Rather than documenting four plants as a single diary, each phenotype receives its own individual journey from seed to harvest. They share the same tent, the same environment, the same nutrition, the same irrigation and the same lighting.
And yet...
They still manage to tell four completely different stories.
As I always like to say:
We're not just growing plants.
We're getting to know them.
────────────────────────
🌿 Week Seven – The Final Cleanup
This week feels like a milestone.
The SCROG has done its job.
The canopy is full.
The plants have established their structure.
And now it's time to prepare everything for the next chapter...
Flowering. 🌸
Plant A is looking absolutely beautiful at the moment.
Her foliage has developed into the rich, healthy green I've been hoping to see, and the overall structure is remarkably balanced. After several weeks of gently guiding branches underneath the SCROG, we've managed to create a canopy that is surprisingly even from one side of the tent to the other.
At approximately 60 cm, she's sitting comfortably within the space we've created for her.
And although she could certainly continue growing vegetatively, I don't want to simply keep filling the tent with more and more foliage.
At some point, you have to stop building the canopy...
...and start preparing it for what comes next.
That's exactly where we are now.
────────────────────────
🕸️ From SCROG to Flower
Over the last couple of weeks, the SCROG has completely changed the way these plants occupy the tent.
Instead of allowing individual branches to dominate vertically, we've been gently guiding them horizontally beneath the screen.
The result is exactly what we were looking for:
A broad, relatively even canopy with many developing tops sharing the available light.
SCROG isn't about forcing a plant into submission.
It's about working with its natural growth and redistributing that growth across the available space.
And looking at the tent now...
I'd say the mission has been accomplished.
The screen is filled.
The plants have claimed their territory.
Now we need to create the best possible starting point for flowering.
Which brings us to this week's main job.
────────────────────────
✂️ Defoliation – Cleaning Today for a Better Tomorrow
This week we're performing a deep, purposeful defoliation across the canopy.
For anyone unfamiliar with the technique, defoliation simply means selectively removing leaves from the plant.
But it's important to understand what defoliation isn't.
It isn't stripping a plant bare.
It isn't removing leaves just because they're in the way.
And it isn't something that should automatically be performed every week.
The purpose is to improve the structure we've already created.
After several weeks of SCROG training, there is now a tremendous amount of foliage packed into a relatively small space. While those leaves are essential during vegetative growth, too much overlapping foliage can eventually create unnecessary congestion inside the canopy.
So we're removing selected leaves that are:
• Blocking developing growth
• Creating unnecessary overlap
• Restricting airflow through the interior
• Shading lower areas that we've decided to retain
• Or simply no longer contributing enough to justify occupying that space
The goal isn't to make the plant look empty.
The goal is to make the plant efficient.
────────────────────────
🌬️ Why Defoliate Before Flower?
Timing is everything.
We're doing this now because the plants are still in vegetative growth and have time to recover before we ask them to transition into flowering.
Defoliation is a form of stress.
Even when performed carefully, removing a significant amount of foliage temporarily changes the plant's balance between its leaves, roots and growing points.
That's why I don't want to perform a major cleanup deep into flowering unless there's a very good reason.
Right now, the plants can take that short period of recovery while they're still operating under an 18/6 light schedule and actively producing new vegetative growth.
After the cleanup, we'll give them time to recover, settle and rebuild their foliage before flipping the lights.
The idea is simple:
Stress now.
Recover now.
Flower later.
Rather than asking the plant to simultaneously deal with a major transition into flowering and a significant amount of pruning, we're separating those events.
One step at a time.
That's especially important in a project like this, where I'm trying to observe the plants rather than simply push them as hard as possible.
────────────────────────
🌿 Plant A – Looking Better Than Ever
Plant A continues to impress me.
The first thing that stands out this week is the colour.
That slightly lighter appearance we saw earlier in the grow has completely disappeared. The foliage is now displaying that rich, healthy green that tells me the current nutritional strategy is working extremely well.
She's vigorous without looking excessive.
Healthy without showing signs of nutritional stress.
And most importantly...
She's balanced.
Her branches have responded beautifully to the SCROG, and the canopy has developed into a very usable structure for flowering.
This is one of those moments where you can look at the plant and realize that the weeks of small adjustments have finally come together.
The topping.
The recovery.
The daily SCROG work.
The irrigation.
The feeding.
The environmental stability.
None of those things created this canopy by themselves.
They're all pieces of the same puzzle.
────────────────────────
💧 The Drip Irrigation System
One of the things I have become particularly impressed with during this project is the automatic drip irrigation system.
It's working beautifully.
With the plants now drinking more consistently and the canopy becoming increasingly demanding, having a reliable irrigation system makes maintaining uniformity across the tent considerably easier.
Each plant is currently receiving approximately 1.2 L per 24 hours, delivered through the drip system.
And the plants are clearly enjoying the consistency.
One of the advantages of automated irrigation isn't simply saving time.
It's repeatability.
Instead of relying on every watering being manually performed at exactly the same interval and volume, the system provides a much more consistent routine for the plants.
That consistency becomes increasingly valuable as the root systems develop and the plants transition toward flowering.
So far...
The system is doing exactly what I wanted it to do.
And honestly, watching four plants respond so uniformly to the same irrigation strategy has been one of the most satisfying parts of this project.
────────────────────────
🥥 Feeding Program
The feeding recipe remains unchanged this week.
And for now, I don't see a reason to interfere with something that is clearly working.
Current nutrition:
• Plagron Hydro A — 1.9 ml/L
• Plagron Hydro B — 1.9 ml/L
• Plagron Hydro Roots — 1 ml/L
Current EC remains approximately:
1.92 mS/cm
with the solution maintained around 18°C and pH at 5.8.
The plants are showing excellent colour, strong growth and healthy leaf development, so I'm perfectly comfortable maintaining the current recipe for now.
We may increase the nutritional strength next week depending on how the plants respond after defoliation and as flowering approaches.
But that's exactly why I don't like changing several variables at once.
First, we observe.
Then we adjust.
The plants will tell us what they need.
────────────────────────
🌡️ Environmental Conditions
The Blue Tent continues to remain remarkably stable.
This week's average conditions were:
• 🌡️ Day Temperature: 28°C
• 🌙 Night Temperature: 27°C
• 💧 Relative Humidity: 65%
• 🥥 Substrate Temperature: 24°C
• 💦 Nutrient Solution: 18°C
• ⚗️ pH: 5.8
• ⚡ EC: 1.92 mS/cm
• 💨 CO₂: approximately 450 ppm
• 💡 Light Schedule: 18/6
• 💧 Irrigation: approximately 1.2 L/plant/24h
• ? Pot Size: 8 L
• 📏 Plant Height: approximately 60 cm
The plants are continuing to respond beautifully to these conditions.
The root-zone temperature remains particularly stable, irrigation is consistent, and the canopy has enough air movement to support vigorous transpiration.
As we move toward flowering, environmental management will become even more important.
The room we've created now needs to support not only vegetative growth...
...but the much denser flowering structure that is coming next.
────────────────────────
🌬️ Why the Cleanup Matters
One of my main objectives with this defoliation isn't simply aesthetics.
It's airflow.
When four vigorous plants completely fill a 100 × 100 × 200 cm tent, the amount of foliage inside that space becomes considerable.
From above, everything can look absolutely perfect.
But underneath that beautiful canopy is another story.
Leaves overlap.
Branches cross.
Interior spaces become crowded.
Air needs to move through all of that.
By selectively removing excess foliage now, we're opening those internal spaces before flowering begins.
That gives us a cleaner structure going forward and makes it much easier to inspect the plants, maintain airflow and monitor the developing flowers.
This is also one reason I'm much happier doing the major cleanup before the flip rather than waiting until the plants are deep into flowering.
Once flowering begins, the priorities change.
I want the plant concentrating its energy on developing flowers rather than repeatedly recovering from major structural work.
So we're preparing the room now.
Clean canopy.
Good airflow.
Healthy structure.
Then...
Flower.
────────────────────────
🧠 Defoliation Isn't About Removing Leaves
One of the biggest misconceptions surrounding defoliation is that more leaves automatically means a worse plant.
That's not true.
Leaves are incredibly important.
They're the plant's solar panels.
They capture light and help drive photosynthesis.
So the objective should never be:
"How many leaves can I remove?"
The better question is:
"Which leaves are no longer contributing enough to justify occupying this space?"
That's the philosophy I'm following here.
We're not trying to weaken the plant.
We're trying to improve the relationship between:
Light → canopy → airflow → growing sites.
And because we've already spent weeks creating the structure with SCROG, this cleanup is simply the final refinement of that work.
────────────────────────
🌱 Plant A's Personality
Every phenotype continues to develop its own personality, even when all four plants are living under almost identical conditions.
Plant A has consistently been one of the more balanced girls in the tent.
She doesn't appear interested in becoming the biggest plant in the room.
Instead, she seems much more interested in becoming an efficient one.
Her growth is structured.
Her canopy is balanced.
Her foliage is beautiful.
And after weeks of training, she has settled into the SCROG extremely well.
Now, after today's cleanup, she looks almost like a different plant.
Less crowded.
More open.
More organized.
And ready for the next chapter.
That's the part of growing I really enjoy.
You spend weeks slowly building something...
Then one day you step back and suddenly realize:
It all came together.
────────────────────────
👀 Looking Ahead
The next few days will be about one thing:
Recovery.
No unnecessary training.
No chasing perfection.
No constantly changing the environment.
Just observation.
The plants have been through topping.
They've been trained beneath the SCROG.
They've filled the canopy.
And now they've received their final major vegetative cleanup.
So we're going to let them breathe.
Let them recover.
Let them continue growing.
And then, assuming everything continues to look as good as it does today...
we flip the Blue Tent into flower. 🌸
This is the point where all those weeks of preparation finally start paying off.
The screen is full.
The structure is ready.
The plants are healthy.
Now we just need to let them do what plants do best.
Grow.
────────────────────────
💙 Thank You
A huge thank you to Zamnesia for making Project Blue Tent possible, from these fantastic Blue Waffle F1 genetics to the complete ecosystem surrounding this grow.
A massive thank you to Plagron for providing the Premium Growbags together with the Hydro nutrient line, which continues delivering excellent results and beautifully healthy growth.
A special thank you to Mars Hydro for the drip irrigation and automatic drainage system. After watching these plants respond to the consistency of automated irrigation week after week, I'm genuinely impressed with how well the system is performing.
Thank you as well to GrowDiaries, for giving growers around the world a place to document their journeys, exchange knowledge and learn from one another.
And finally...
Thank you to everyone following Project Blue Tent.
Every comment, every question, every bit of feedback and every person simply stopping by to see how these four phenotypes are developing means more than you probably realize.
We've spent weeks building this canopy together.
Now the really exciting part is about to begin.
The plants are cleaned.
The SCROG has been filled.
The room is ready.
Flower is next. 🌸💙
Until next week...
Growers Love, happy growing, and take care everyone! 🌱💙

