
Likes
Comments
Share


@Tropicannibis_Todd
Follow
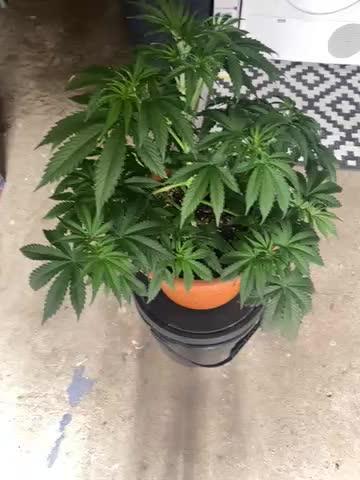
Start of day 91 ...... January 8 2022 Start of week 13 ........ 65 DAYS INTO FLOWERING
😕 LOOKS LIKE THERE GONNA GO A LITTLE LONGER THEN EXPECTED ? 😕 Gonna be honest , I didn't expect it to go over 85 days but here we are ........
( I BELEIVE IT HAS ALOT TO DO WITH THE SIZE OF MY GROW MEDIUM , AS I AM RUNNING 45 LITERS OF SOIL MEDIUM) ....
( OMG THEY SMELLING GREAT ) !!!!!!!
Check out the full grow video on latest weekly update
Super Exceptional Growth Daily
Still adjusting LST when needed and leaf tucking.......
Water Only when needed but its drinking more every otherday and adjusting lights when needed......
Rain Water Only .......
( DAY 26 AND BOTH NL 1 & NL 2 SHOWED PREFLOWERS )
( DAY 49 AND RESIN PRODUCTION HAS STARTED )
( DAY 57 , EQUIPMENT FAILURE , main FAN , over heated😡 tripped breaker , reset light timers , lost a DAY, REPLACED new Main Fan 😁 back up running 👌)
( DAY 70 DID ITS FINAL FLUSHING TODAY TO GET RID OF ANY BUILDUP )
( DAY 77 AND IT SHOWS A SLIGHT DEFICIENCIE MAYBE A CAL/MAG GETTING CLOSE TO END OF LIFE ) IM ALSO DOING VERY LITTLE, SLIGHT DEFOLIATION
( DAY 93 AND ALL IS GOOD , THERE FATTING UP )
DAY 93 .....NL 1 SHOWS MOSTLY CLEAR TO CLOUDY RESIN HEADS , LOOKS LIKE THERES STILL AWAY TO GO .......
DAY 93 .....NL 2 SHOWS MOSTLY CLOUDY RESIN HEADS , AMBER IS JUST STARTING , GETTING CLOSE BUT MORE TIME NEEDED......
I hope you enjoy my growlog...

Likes
3
Share


@Mr_Freeze
Follow
(Back Left) Panama Red, (Back Right) Amnesia Lemon, (Front Left) Super Purple 2.0 Pheno #1, ( Front Right ) Super Purple 2.0 Pheno #2


Likes
7
Share


Likes
11
Share


@Budhunter
Follow
Harvest on day 91 of cycle , day 54 of flowering.. I could leave it few days more for sure however my ladt harvest is nearly finishing so I need to dry this plant as soon as possible hehehe..
Purple punch has really frosty buds, it didn’t grow as much as I wish(I had to move the plant to the toilet with my burple light as there was no space for 3 plants in my 2x4 tent) but they are looking insanely good, with a strong flavor of grape, I am impressed with this smell/flavour, all covered in trichomes, I can’t wait to smoke it..
So my way to harvest it is I cut it down on the main branch and hang to dry out.. all the plant .. I prefer dry trim because it’s way easier to trim.. so now I am gonna hang it for 2/3 weeks and then start trimming.. I will update yield and tasty as soon as I finish trimming..
Overall I am happy with the results 🙌🏼.

Likes
27
Share


@w33dhawk
Follow
03.08.21 Moin Growmies hab mir in der letzten Woche Gedanken gemacht zu meinem Vorhaben mit den Tomatenringen und mir ist aufgefallen das die Ladys nicht Grad gleichmäßig wachsen ,das liegt sicherlich daran das ich Depp wieder schlauer sein wollte und ein paar Seitenäste dran gelassen habe sprich beim ersten topping hätte ich alles entfernen sollen bis auf die 2 Triebe von der 3. Nodie und ich hab die 2 nodie mit stehen lassen weil ich dachte ich bin schlauer 🤬🤬🤬🤬🤬🤬🤬🤬🤬🤬🤬🤬🤬🤬🤬🤬🤬🤬🤬🤬ich könnte mich selber schlagen für die Dummheit naja Ergebniss des ganzen ist ungleichmäßiges Wachstum somit kann ich die Sache mit den Tomaten Ringen vergessen.......... Hab jetzt aber mein System noch einmal überarbeitet andere Topferhöhung ( 2x alte Bilderrahmen aus Holz auf Paletten Balken geschraubt und mit Hühner Draht bespannt das ganze auf Steine gestellt damit ich ne Wanne darunter stellen kann für abtropfwasser) den Rahmen vom scrogg netzt wieder raus gesammelt und neu bespannt ( Rahmen
90x90 cm aus nem alten Pavillon Gestell zurecht gesägt und mit Zaun bespannt die Abstände zwischen den einzelnen Rauten beträgt 6 cm sollte ausreichend Platz für die Triebe sein) habe das ganze gestern auf einer Höhe von 16 cm über dem Topfrand eingebaut mit Kabelbindern an den Zeltstangen befestigt somit hängt es an seiner Position fest und kann nicht von den Pflanzen hoch gedrückt werden wenn sie in die Blüte geht. Also is nun doch wieder ein sqrogg draus geworden aber den Ladys geht es insgesamt gut sie wachsen und gedeihen und wirken insgesamt gesund in den nächsten Wochen werde ich nun die Ladys in das netzt weben und Mal sehen was sie von scrogging Alla Milchschnitte halten.
Ach ja die purps aus dem Garten sind anscheinend direkt nach dem umtopfen in den Stretch zur Blüte gegangen war ein bisschen spät dran fürs raus setzten
aber lässt sich jetzt nicht ändern Mal sehen was draus wird,vll ja ein Gummibärchen Baum 😏😉 hab den outdoor Ladys gestern nen kleinen Regenschutz gebaut, is nicht der schönste aber er sollte seinen Zweck erfüllen damit der Topf Mal abtrocknen kann das Wetter ist seit fast 14 Tagen hart wechselhaft und der Topf noch nicht 1x richtig trocken gewesen das war's eigendlich was bis heut passiert ist cu Growmies und euch noch viel Erfolg........

Likes
3
Share


@Unculti_responsable
Follow
Bueno esta semana se amoldaron muy bien las ramas a la malla ya se levantaron y están engordando muy bien tiraron bastante resina y bienes muy bien, esta va a ser la última semana se fertilizantes después de esta semana vamos a empezar con el lavado de raíces, esperemos que sigan así de bien !


Likes
13
Share


@Cold_Farmer
Follow
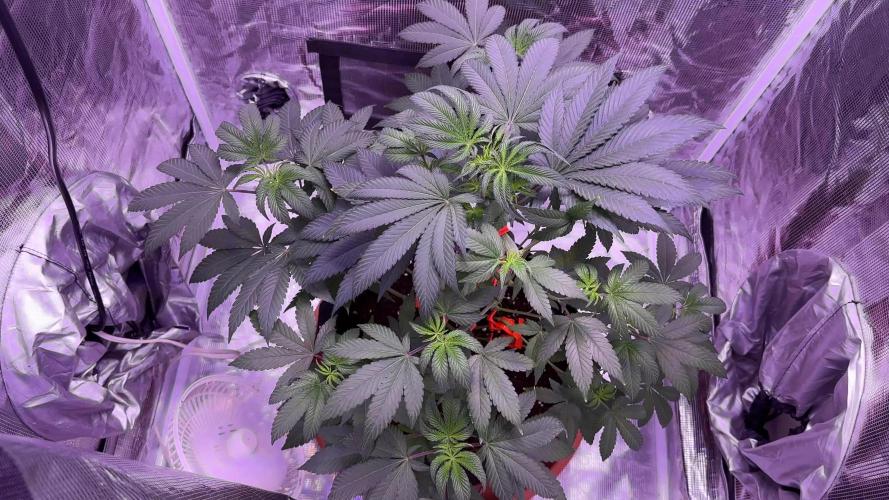
Dieser Versuch läuft verdamt gut. Sie wächst relativ schnell und scheint jetzt dichte Buds zu bilden. Was mir nicht so ganz gefällt, sind die unteren Blätter. Es scheint, als wäre sie sehr hungrig. Aber das war die Sorte in den vorherigen Runs auch. Die Blätter Farben sich bei ihr immer ca 2 Wochen vor der Ernte bunt.

Likes
12
Share


@CANNASIM
Follow
A lot of rain and wind, continuously. Temps have dropped as well.
I’m reading another week or two to chop this plants.
Sativa dominant hybrids did the best, the Fastberry and the banana purple punch did not really develop as the other two.
In specifics the cbd crack developed sizable buds, and the blue dream as well, the flowers are not as developed tight and dense as in the indoor grow. A bit of fox-tailing nothing too expressive.
Minimal work, as per the setup chosen, an no extra nutes this week.
Likes
25
Share


@PacMan420
Follow
I started this week off with Topping and Lst training, only the lsd-25 are getting lst trained. I just tucked some of the leaves on the Lsd plants. The smaller blackberry is showing signs of deficiency, this plant been struggling the whole time. the gorilla cookies was either nute burned or too much fertilizer. So today i just watered all my plants with just plain R/o water
Likes
21
Share


@BrieflyGrowing
Follow
All four seeds sprouted at the same time just within hours. Very lucky for direct in soil germination!
In this first week I just tried to make them nice and cozy with warms temps and high humidity. Trying to keep watering
in check and small dosing so I don't risk overwatering them. Watered about once every two days when top soil was dry with 50/60ml pHed soft water.
Likes
13
Share


@Phaleg
Follow
Last days were mostly overcast weather and fresher temperatures here. All 3 plants slowed down their growth and they also lost some yellow leaves from the lower part of the plant. I hope this is normal.
Plant 3, the one that suffered the bending trauma last week (see photos for details) is not showing signs of lethal damage yet, fingers crossed for me please! XD
Now let's have a look of the heights they have reached
PLANT 1 = 165cm (65"), +5cm (+2")
PLANT 2 = 160cm (63"), +8cm (+3")
PLANT 3 = 144cm (57"), +9cm (+3,5")


Likes
4
Share


@Cannibalgardens
Follow
Always gotta give the respect to fastbuds from all the hardwork they do to supply us with contest winings and bomb genetics ... THIS RUN will be an outdoors run the plant was started indoors and brought out after 5 days she is getting big allready .. The girl will be given a feeding when required probably week 4-5 and then there will be somebig training on the girls .. I'm excited this plant has been one of the tastiest flowers around.
Likes
57
Share


@Roberts
Follow
Runtz Punch has been still giving me issues with the spotting. So I neem oil treated her 4 days ago. It looks like it stopped or slowed down. With the nitrogen toxicity she has been showing I was kinda afraid to do it. It tends to boost the nitrogen when sprayed. I did look for pest under 100 x magnification. I didn't see anything. Regardless, hopefully it is resolved. I might just treat the whole room here to be safe then sorry mid flowering. Beside that everything is still growing and making progress. Thank you Herbies seeds, Athena, and Spider Farmer. 🤜🏻🤛🏻🌱🌱🌱
Thank you grow diaries community for the 👇likes👇, follows, comments, and subscriptions on my YouTube channel👇.
❄️🌱🍻 Happy Growing 🌱🌱🌱
https://youtube.com/channel/UCAhN7yRzWLpcaRHhMIQ7X4g.

Likes
5
Share


@GrowwUp
Follow
Nothing new this week. She's still growing steadily and the nutes seem to be doing a good job so far. I'm using the Dual Fuel with a bit of Growth Solution to raise the EC to follow the Green Plant Nutes program and it feels like it's right so I'm keeping like that. The light is set to 100% as the plants are healthy and the weather is getting a bit too cold. I upgraded my second inlet fan from a generic 150mm ball bearing fan to a 125mm Phresh Hyper Fan V2 w/ speed control. Now my tent is so much quiet with both Hyper Fans V2 working on blowing fresh air in and out. Maybe I get a Phresh Hyperfan V2 Climate Controller to manage them automatically next upgrade.


Likes
14
Share


@BLAZED
Follow
Week 1 (31-1 to 6-2)
As for my waterings, i give RO water, with 0.50 grams of Calcium, and 0.2 ml of Atami Rootbastic a liter.
Growdiaries wont let me put my nutrients in grams so i'm forced to choose mililiters.
31-1
Watering: 20 ml.
They are stretching quite a bit.
I turned on the fan on the lowest setting for some air movement.
1-2
Watering: 20 ml.
2-2
Watering: 20 ml.
3-2
Watering: 20 ml.
Heights:
Kush#1: 9cm
Kush#2: 7.5cm
4-2
Watering: 40 ml.
I attached a wire to the Kush#1 for extra stability as it was a bit fragile in combination with the fan.
5-2
Watering: 20 ml.
6-2
Watering: 60 ml.
Heights:
Kush#1: 10cm
Kush#2: 8.5cm

Likes
14
Share


@Kendoda
Follow
Feed 1
Grow 1ml, bloom 3ml, topmax 3ml.
Feed 2
Alg-a -mic 3ml.
Feed 3
Grow 1ml, bloom 3ml, topmax 3ml.
Three feeds of 1 litre.


Likes
27
Share


@RDWCGrowing
Follow
4/8/2023
Week 8- Day 1 of Veg (Day 66 overall)
I still have 1, 1/2" of clearance to the net. The Competition will hit the half way point on Wed, that leaves exactly 10 weeks left from Wed. So I decided to go ahead and top off the water by adding 10 gallons to the system today. I added the appropriate Nutes. I am considering 2 plans now that I have decided that I am going to flip to flower on Saturday no matter what. Plan 1, I can evaluate throughout this week and flip earlier than Saturday if needed which would mean draining my system on that day adding week 1 Flower Nutes to the tank and start Week 1 of flower that day.
I decided to go before before Saturday I will go ahead and change the water to week 1 flower, the same day I change the lights to 12/12. Then I will wait until the second Saturday so say 10 days if change my lights on Wed and then run Week 2 water/Nutes into Week4 and starting Week 5 change every week for rest of Grow. If I make it until Saturday will keep Week 1 Nutes until Week 3 and then starting Week 4 change every week until done.
Mammoth Silica- Bi weekly addition .5Mil/Gal * 36 Gallons = 18Mil
Added 10 Gallons to the system
Mammoth Silica= .5Mil/Gal = 5Mil
CalMag= .5Mil/Gal = 5Mil
Root Drip = 1Mil/Gal = 10Mil
FloraMicro= 5.4Mil/Gal= 54Mil
FloraGrow= 4.2Mil/Gal= 42Mil
FLoraBloom= 4.6Mil/Gal= 46Mil
ORCA=.5Mil/Gal = 5Mil
4/9/2023
Week 8- Day 2 of Veg (Day 67 overall)
Less than 1/2" left until #3 hits the SCROG line, I think she is going to push me to flip tomorrow. Not much today let them rest and will continue to monitor in the morning to see if I am going to need to flip early.
