Likes
Comments
Share
September 8 will be considered a day for the first time, Day 1 and I’m desire to call names Auto acid is “Tiwa” and Auto Kong 4 is “Ratree” 🍀🍀🍀🍀🍀🍀🍀🍀🍀🍀🍀🍀
Likes
17
Share
📆 Semana 7 La floración continúa avanzando con fuerza y los cogollos entran en una etapa de intenso engorde. Las flores siguen aumentando su volumen y densidad, mientras los cálices comienzan a hincharse y apilarse, dando una estructura cada vez más compacta. La producción de resina aumenta progresivamente y los aromas empiezan a ganar intensidad y complejidad. Los pistilos permanecen todavía mayoritariamente blancos, aunque comienzan a aparecer los primeros signos de retraimiento. La planta mantiene un consumo elevado de agua y nutrientes para sostener el desarrollo de las flores y afrontar las últimas semanas de engorde. ⚡ EC: 1.8–1.9 💧 pH: 6.2–6.5 🌡️ Agua: 20–22°C 🌫️ Humedad: 45–50% 💡 PPFD: 950–1050 µmol/m²/s 🌡️ Temp ambiente: 24–27°C 🔥 Nota: Mantener una nutrición equilibrada y unas condiciones ambientales estables durante esta fase permite maximizar el engorde y la densidad de los cogollos, favoreciendo al mismo tiempo una elevada producción de resina y una excelente expresión de los terpenos. ¡Seguimos creciendo fuerte! 💪
Likes
25
Share
The genetics of this planet of the grapes is amazing her structure her build and ability to pack heavy buds is a must have. Very easy to grow she requires medium feeding and takes well with multiple defoliation techniques
Likes
2
Share
The plants are really throwing lots of hairs Some of the buds almost look white ⚪️ Rqs sweet skunk is starting to fatten up A little more stretch out of fast buds mystery #2 gonna do a heavier defoliation on it soon Gonna give sweet skunk about 3-4 more weeks, maybe more, just gonna play it by ear
Likes
3
Share
Started the week with a sledgehammer flush. Noted the tips to be turning down and browning. Might be nutrient lock out so flushed with sledgehammer. Then three hours later a gallon fresh water flush. Two days later re-added nutrients as listed. Not sure how much longer these will go. Assume another 4-6 weeks before they tell me they are ready. No amber yet.
Likes
74
Share
@Mr_Maes
Follow
Nothing but colas on all 3 this is going to be a big harvest. Another 2 or 3 weeks max.
Likes
37
Share
Cosmic Noodles Auto — Final Strain Review 14 Weeks From Seed To Harvest — 12/12 From Seed What a ride this one has been. Our Cosmic Noodles Auto officially comes to an end after 14 weeks from seed to harvest, grown fully under a 12/12 light cycle from day one, side by side with photoperiods and other autoflower genetics inside the 8x8 tent — no special treatment, no isolated environment, no extended light schedules. And honestly? She absolutely crushed expectations. This entire run was another reminder that autoflowers do not necessarily need 18/6 or 24/0 to produce beautiful flowers and respectable yields. With proper environment, stable feeding, patience, and healthy roots, they can still thrive and deliver excellent results even under a no-veg approach like this one. We started this project with three plants. One of them unfortunately became part of an overwatering experiment that eventually led to losing the plant around early-to-mid flower. While painful, it became an important educational moment. We documented the process honestly so growers could learn from it — what overwatering looks like, how roots respond, and what to avoid. If anyone is interested, those reports are still available further back in the diary. The remaining two plants, however, grew with very little resistance. Easygoing, vigorous, resilient, and surprisingly adaptable considering the mixed environment and unconventional schedule. And in the end? 372.1 grams dry from the two harvested plants. For autoflowers grown under 12/12 from seed, mixed together with photoperiods, we are genuinely very happy with these numbers. But beyond numbers, what truly stood out was the quality. ⸻ Drying Process After harvest, the plants were dried whole for approximately 10 days. The environment stayed around: * ~20°C * ~60% RH During the first couple of days, humidity was intentionally kept closer to ~45% to help remove the initial excess surface moisture from the flowers before stabilizing the drying curve more gently afterward. The slow dry helped preserve aroma, resin texture, and overall flower integrity beautifully. And the smell coming from the drying room… incredible. ⸻ Hand Trimming — Slow, Sticky & Worth It Once drying was complete, every flower was separated and hand-trimmed carefully using the Zamnesia scissors together with the Trim Bin setup. Hand trimming takes time. A lot of time. But it also allows a level of precision and care that machine trimming simply cannot replicate. Every bud gets individual attention. Resin heads stay more protected. Structure remains more natural. And honestly, it becomes part of the ritual itself. Our fingers were absolutely coated in resin by the end of it. Sticky gloves. Sticky scissors. Sticky everything. The Trim Bin itself collected a beautiful layer of golden dry sift during the process, and naturally, none of that went to waste. Everything was collected carefully and stored cold for future enjoyment. Even the smallest parts of the harvest deserve respect. ⸻ Curing — The Part Many People Rush After trimming, the flowers were placed into Grove Bags for curing. For larger harvests especially, these bags are honestly an amazing tool. The TerpLoc technology helps maintain the internal humidity in the ideal curing range of approximately 58–62%, reducing the need for constant burping while helping protect the flowers from excessive moisture swings. This matters because curing is not simply “storing weed.” Curing is the process where the flowers slowly stabilize and mature internally: * chlorophyll continues breaking down * harshness reduces * aromas become cleaner and deeper * terpenes settle and express themselves better * smoke quality improves significantly This is why we usually prefer allowing at least one month of curing minimum, while many flowers continue improving for two or even three months depending on the cultivar and storage conditions. Patience changes the experience dramatically. And Cosmic Noodles definitely rewarded patience. ⸻ Aroma & Smoke Even straight off the trim, the first smoke test was already extremely enjoyable. The dominant profile came through as: * citrus * floral notes * earthy depth * creamy herbal background As curing progressed, the profile did not change dramatically — it simply became more refined, cleaner, smoother, and more layered. The smoke itself leans toward the relaxing side. Comfortable, calming, peaceful. Not a “race your brain” type of cultivar, but more something to slow down with and enjoy properly. A dedicated smoke review will eventually come separately, but first impressions are honestly fantastic. ⸻ The Final Flowers The cured flowers developed beautifully over time. Dense but still natural. Resin-rich without looking artificially swollen. Strong aroma retention. Sticky interiors. Frosty surfaces. And some truly beautiful structure throughout the harvest. We are also sharing photos of the cured flowers after roughly one and a half months of curing so people can see how the flowers evolved after resting properly. Because sometimes the real magic happens after harvest. ⸻ Final Thoughts Cosmic Noodles Auto turned out to be: * easy to grow * adaptable * resilient * productive * aromatic * enjoyable from start to finish And most importantly: fun. No drama. No impossible feeding requirements. No extreme sensitivity. Just a solid cultivar capable of producing beautiful medicine even under unconventional conditions like 12/12 from seed. For us, this one easily earns: ⭐ 10/10 ⭐ ⸻ Thank You Huge thanks to everybody involved in this journey: * the breeders and genetics teams * the companies providing gear and support * the platforms that allow us to document these grows * the communities following along * the OG followers who have been here since the beginning * the new people just discovering the diary now * the supporters * the skeptics * the silent viewers * even the haters stopping by for five seconds Love is still sent your way. And of course… special thanks to Mr. Baggy for accompanying us through the cure once again. 🍃 Because in the end, this was never only about chasing numbers. It was about learning, documenting, improving, sharing experiences, and appreciating the process from seed to final smoke. From grower to growers — much love. 🌱 📡 DELETED @ 1K Please stay tuned.we never quit https://www.youtube.com/@TheDogDoctorOfficial NEW 🙏 Thank you for your patience and continued support. FOR DISCOUNT CODES AND MORE JUST FOLLOW THE LINK https://website.beacons.ai/dogdoctorofficial 📲 Don’t forget to Subscribe and follow me on Instagram and YouTube @DogDoctorOfficial for exclusive content, real-time updates, and behind-the-scenes magic. We’ve got so much more coming, including transplanting and all the amazing techniques that go along with it. You won’t want to miss it. GrowDiaries Journal: https://growdiaries.com/grower/dogdoctorofficial Instagram: https://www.instagram.com/dogdoctorofficial/ YouTube: https://www.youtube.com/@dogdoctorofficial Deleted by Youtube - https://www.youtube.com/@TheDogDoctorOfficial NEW Vimeo : https://vimeo.com/dogdoctorofficial Under construction stay tuned ⸻ Explore the Gear that Powers My Grow If you’re curious about the tech I’m using, check out these links: 🔆 Lighting & Environmental Control • Future of Grow — Advanced LED lighting technology https://www.futureofgrow.com/ DISCOUNT CODE: DOG20 • Lumiflora — Under-canopy LED lighting https://lumiflorade.com/ • TrollMaster — Environmental controllers and automation gear (past collaboration) ⸻ Genetics • Zamnesia Seeds — Genetics used in this project https://www.zamnesia.com/ ⸻ 🌱 Soil, Substrates, Boosters & Root Support • Plagron — Substrates, bio mixes, and supportive products https://plagron.com/en/ ⸻ 🎒 Storage, Curing & Preservation • Grove Bags — Curing and storage solutions https://grovebags.com/ ⸻ 📸 Photography Equipment & Tools (Not sponsors, but part of my creative toolkit) • Sony A6700 • Sony full-frame macro lens + few more • Stacking photography workflow - learning • iPhone (for behind-the-scenes shots) We’ve got much more coming as we move through the grow cycles. Trust me, you won’t want to miss the next steps, let’s push the boundaries of indoor horticulture together! As always, this is shared for educational purposes, aiming to spread understanding and appreciation for this plant. Let’s celebrate it responsibly and continue to learn and grow together. With true love comes happiness. Always believe in yourself, and always do things expecting nothing and with an open heart. Be a giver, and the universe will give back in ways you could never imagine. 💚 Growers love to all 💚 📸 P.S. – The Eye Behind the Lens All photos in this diary (for now — except for the ones showing the camera, which I took with an iPhone) are taken with a Sony A6700 paired with a Sony full-frame macro lens and a few more. Photography is part of the story — it’s how we share the fine textures, the glow, and the quiet details that words can’t always capture. I’ve also started experimenting with photo stacking — a technique where multiple images, each taken at a slightly different focus point, are layered together to create one perfectly sharp image from front to back. It’s not digital enhancement or AI; it’s pure photography — a way to reveal the plant’s beauty in microscopic depth, from trichome to petal. You’ll even see a few shots of "ghost me" capturing the shots — camera, lens, setup — because every grow deserves not just to be cultivated, but documented like art. FOR DISCOUNT CODES AND MORE JUST FOLLOW THE LINK https://website.beacons.ai/dogdoctorofficial NEW DISCORD - Official Server Invite Link : https://discord.gg/ksjAkA5T74
Likes
81
Share
Transplanted to 40l container on week 4 day 1. Container has approx 30l in it. Also added a photo of the setup for size reference. Let me explain my thinking behind the repotting strategy. Firstly I should say that I am quite an old school kind of grower, although I've never grown cannabis before I have grown hundreds of other plants. Due to my experience with other plants, I understand the value of well planned and executed transplants, they can have an absolutely transformative effect upon root systems when done properly, as far as I know it's the main reason why they are done at all. It is fair to say I have never grown any auto-flowering plant indoors before, and I have read all about how you should not transplant autos, and all the good reasons why not. Ultimately though, as I am not called UnorthadoxDude for nothing, I believe that I can make it work with an auto, and get the benefit of improved root growth pattern, without delaying or interrupting the growth. I want to have my cake and eat it, as it were. So the strategy is to avoid transplant shock, which admittedly I have already failed in the first unplanned transplant, but in my hopeful naivety I still believe I can make the second one work! I'm using coco, and I have had the larger pot prepared and have been watering and feeding them as well as the plant. If I am careful not to disturb the plant at all, and move the entire contents of the pot gently into the larger pot (which is exactly the same medium in broadly the same state), then I may be able to avoid shocking the plant and just let it crack on. We will find out in a few days! If it stops growing or slows at all then I failed, otherwise it worked! A note about my use of organic nutes with coco. I have read a lot about coco and nutes and microbes and PH and TDS and what have you, and I know that the overwhelming majority of people believe that you can't or at least shouldn't use organic nutes with coco. The thing is, I like organic gardening, I prefer to cultivate a beneficial microbiota and keep it healthy. I recycle, and reuse all my compost except where a plant is diseased and this has worked well for me for a long time. I've never grown with coco before though, I always used soil. I wanted to gain the benefits of coco (better drainage, more air to roots, lighter, less inviting to pests, etc) - but I wanted to use a method of nutrition that I was already familiar with. I think I've mentioned that I am not called UnorthadoxDude for nothing, so I am using BioBizz and coco. By adding bacterial, mycorrhizal, and trichoderma inoculants and having the unplanted coco in the tent being fed and watered I hope to have cultivated a nice microbiota which will feed my plant. That's the theory. However just in case, I have a trick up my sleeve. Now, I do not know if you are aware of this, but there is a fiery debate raging on the internet about using BioBizz organic nutes with coco for cannabis. Some people try it, most people shout it down, and I have not found much in the way of solid evidence of it being a good idea. Except one! I found a commercial grower that has used biobizz nutes, and he said that as long as you are using "Acti-Vera" you can use anything from the BioBizz organic range. Apparently the enzymes in the mix break down nutes chemically in a similar way to what the theoretically missing microbes do. So I have ordered a bottle of that, and if my microbial cultivation attempts don't work out, I at least know I have a fallback that should work. Those are my thoughts on it, let's see how it pans out. Oh I should also probably point out that I am growing some companion plants, specifically alfalfa (nitrogen fixing), basil (improved flavour), and German Chamomile (increased essential oil production). Update week 4 day 2 dropped PH to 5.8 after advice from a grow question. Look! It's carried on growing... maybe there was no transplant shock? Update week 4 day 3: Growth continues, interveinal chlorosis lessening. Plant is pushing out node five at the moment. Update week 4 day 4: Growth continues, interveinal chlorosis further lessening. Apologies for the poor quality photos for the last few days, I was lazy and didn't want to move everything out to photograph. Today I have done that and the pic is better. I am declaring the second transplant a complete success. I do not believe that plant was in any way shocked. Update week 4 say 5: I think I've finally managed to overwater. Going to skip watering today. Update week 4 day 6: Photo taken just before lights on hence wilting. Growth continues to accelerate. I believe the alfalfa has been raising the PH so I've removed it. Today I will flush through with PH lowered water and then fertigate. The colour is still too pale but the growth and overall look and feel of the plant screams to me that it's happy and about to explode. Day 27.5 flushed with 30l of PH lowered water then fertigated with 5l. Day 28: Height 12cm Width: 28cm Nodes: 6 Weekly growth data: From 5cm Height to 12cm +140% From 12cm Width to 28cm +133% From 4 primary nodes to 6 +50% Summary: Wow, wow. Wow. What else can I say. What a crazy week, amazing and unexpected given the problems. I am really excited to see what happens over the next seven days!! It looks like it has quite severe chlorosis, but otherwise seems robust and is seriously stretching. Almost unbelievable growth. Pre-flowers appeared a few days ago, so I guess this was the final week of veg. Let's see how the first week of flowering stretch goes! Update 7/2/23: My instincts about this plant on week 4 day 6 were absolutely correct, she was happy and, she was about to explode. Since my early attempts at transplanting, I practiced multiple times with Citronella (a photoperiod plant) and then I did it again with an auto (Polly) - this one went flawlessly and further demonstrates that you can transplant an auto without shocking it. Time will tell, because I can compare Polly to both Misty and Nesia both of whom were sown directly in their final pots.
Likes
92
Share
Hella dear growmies! 😁 The seedling is growing well, she is so pretty. 😍 I spray the babies with Fast Plants Spray every 2 days, dim down the LED until they are dry again.. 💦 It gives them a lot of attention and nutrients until they have grown a sufficient root system. I want to pot into 6L pots after the 1L containers have been rooted thoroughly, approx in 2 weeks.. ✌️ Then I will switch to Nutrispray and also I will feed NPK fertilizers. Until then I think they only need Startbooster. 🙏 Thanks APTUS Holland for the amazing goodie pack, I'm already having lots of fun with the product line!! 😍💚 You guys rock! __________________________________________________________________________________ HELLA JELLY SATIVA (30% INDICA 70% SATIVA) | AVG. THC 26-30% | HIGHLY UNIFORM | EASY TO GROW, VIGOROUS HYBRID BLUE COTTON CANDY | STRAWBERRIES | GRAPES FLOWERING TIME 45 DAYS Want a productive, fast flowering strain with a high THC and covered in sparkly trichomes? Then this winner from our 2019 Phenotype Mega-Hunt is for you. A sativa strain with the growth habits of an Indica, Hella Jelly gives you faster flowering with sturdier structure, the best of both worlds! This fruity cotton candy terpene strain will delight extractors or look amazing in the jar. Effects are strong but not debilitating, plus test results found a bit of CBG and CBD for added intrigue. Hella Jelly is a great performer in all growing environments, but particularly ideal for a quick turn or climates with earlier fall weather. https://humboldtseedcompany.com/hellajelly/ ____________________________________________________________________________________________ Setup: 140x70x200 cm Spiderfarmer tent 2x Monkey 16W fans (not oscillating) 1x Secret Jardin 30W 1x box fan 50W oscillating (on lowest level) LED Full Spectrum 320W AGLEX AGL-320W-MA 5,6 kg foldable, dimmable 864 pieces Samsung LH301H 864umol/s 2,7umol/J full spectrum white + RED 660nm + IR 740nm wavelength range 380-780nm covering 3x4ft APTUS Holland - https://aptus-holland.com 💚 Green Buzz Nutrients https://greenbuzzliquids.com/ 💚 ❗ Use code GD42025 for generous 25% discount (for orders of minimum 75€) Biobizz Lightmix + coco + wormcastings + perlite Carbon Active Granulate Filter 125/360 cm³/h PrimaKlima exhaust EC 125-400/240 cm³/h
Processing
Likes
72
Share
@DreamIT
Follow
🐩👤Sirius Black👤🐩 by 🌍🌱WeedSeedsExpress🌱🌍 👤 2.2 ... 👤 3.2 Everything is going well, I like this lamp very much, it also seems to make plants bloom faster than the previous one. Super yeah !!! 👤 4.2 ... 👤 5.2 lumos maxima! 🤣🤣🤣 👤 6.2 👤 7.2 👤 8.2 ____________________________________________________ 👀Are you looking for a good lamp to start?👀 Viparspectra in my opinion has something more than the others, take a look at their site. ➡️ http://bit.ly/pro-seriesproductspro-series-p1500 ⏩Use " GDVIP " for an extra discount💯 ____________________________________________________________________________________ 📜👀 A look at the details of what I'm growing 👀📜 🐩👤Sirius Black👤🐩 by 🌍🌱WeedSeedsExpress🌱🌍 📋 Details 📋 ⚧ Gender ▪️ Feminised ➰ Genes ▪️ 70% Indica / 30% Sativa 🎄 Genetics ▪️ Sirius Black 🚜Harvest ▪️ 450 g / m² 🌷Flowering ▪️ 63 - 70 days ✨THC ▪️ 25.0% ✅CBD ▪️ 0.5% 🏡Room Type ▪️ Indoor 🌄Room Type ▪️ Outdoor 🕋Room Type ▪️ Greenhouse 🎂Release Year ▪️ 2020 ____________________________________________________________________________________ 👀📷 Follow the best photos on instagram 📷👀 https://www.instagram.com/dreamit420/ 🔻Leave a comment with your opinions if you pass by here🔻 🤟🤗💚Thanks and Enjoy growth 💚🤗🤟
Likes
6
Share
Que pasa familia, vamos con la quinta semana de vida de estas Papaya sherbet feminizadas de fastbuds. Vamos al lío, de las 3 plantas, me quede con 2 por espacio, siempre pongo alguna semilla de más por si no abriese alguna por no perder ese hueco del indoor. También se trasplantaron a su maceta definitiva, en este caso de 7 litros, que el mismo trasplante provocó un shock, que también fue solucionado inmediatamente. El ph se controla en 6.2 , la temperatura la tenemos entre 20/22 grados y la humedad ronda el 50%. Hasta aquí todo, Buenos humos 💨💨💨
Likes
22
Share
@Gorey
Follow
passagz in 25 liters. I sprayed nettle manure, it's just a horror, it stinks so much! So I made banana manure. I leave another week before going to 12 12, I think I can do a mid-week LST. today I added a natural, economical and reliable system to distribute CO2, it's sweet jelly with water and baker's yeast, the distribution of CO2 is done gradually. With my container I am quiet for 90 days
Likes
13
Share
Seed production was a great success grow this stain was awesome didn't run into any major prob and the scent is off the chain can't wait to see how the new wave come out( follow the vaccine diary if ur interested to see the out come) #happy growing
Likes
99
Share
@DevilsBud
Follow
Anesia blackberry moonrock and imperium X will be put in the 100X100X180 with the TS-1000 so they can veg some more the black berry moonrock is looking very short stocky and bushy lest how she developed try the week Happy growings visit www.marshydro.eu for your best gear and use the PROMO CODE: DEVILSBUD 27/10/21 Transplant the black berry moonrock in 11L fabric pots added 5gram Easy Roots - Mycorrhiza Mix to soil Some info about the Marshydro FC-4800 Superb Quality LED Chips: The whole light is composed of 1206 pcs Samsung lm301b and Osram 660nm chips. More than two times as many LEDs are used to drive the grow lights at low currents and to avoid overdrive. Quality is guaranteed and efficiency is up to 2.8 μmol/j. Even PAR Distribution and High PPFD Output: The multi-light bar design and the densely distributed light chips enable the LED grow lights to achieve the optimum PPFD required for plant growth over the entire effective coverage area. Specifically Designed Spectrum: To ensure even plant growth, blue and red light are enhanced on the basis of a full spectrum combination. Not only does this accelerate plant growth, but it also improves the yield and quality of the plants at the same time. Dimming Daisy Chain Function: The dimming function saves on electricity costs and enables brightness from 10% to 100% for the different stages of plant growth. A single master light can connect up to 30 lights in a daisy-chain system. Business LED Grow Light: The light's wavy heat sink dissipates heat quickly and the IP65 waterproof allows the light to operate in humid conditions. 180° collapsible feature for easier installation. All these features provide favorable assistance for commercial cultivation. And some tent info ●【Lock All Light Insid】MARS HYDRO Grow Tent Interior is made of diamond mylar. Non-toxic to the environment, no harm to plants. High-quality 1680D canvas being double stitched, (ALL OTHERS BRAND grow tent is 601D canvas) which is tear-proof for perfect light locking, No light leaks or rips at all. ●【Durability Grow Tent】Stable Metal corner adapters and poles are the trustful supporters of the tent. No rusting nor paint-falling. Quick easy tool-free installation. Carries strong heavy-duty SBS zippers, double layer lining to create a light-proof seal. ●【Easy Observation of your Plants】Special peeks window made by double layers of cloths. Observe the growing conditions of your plants without opening the tent and avoid disturbing plants. The peek window also serves to dissipate heat and ventilate air. ●【Removable Tray Keep Clean】The package includes a removable waterproof floor tray to hold soil and fallen leaves. The tray can be taken out easily to wash. Removable and water-proof makes cleaning easy. ●【Good Ventilation&Fast Assembly】 Circular double-sleeved vent holes with adjustable nylon strap for air circulation by exhaust fan, ducting, carbon filter, or reflector. Better allows proper light, heat, and airflow. Quick tool-free installation. Reinforced by a sturdy metal frame to ensure security and stability, supports up to 140lb. Perfectly safeguard your plants to thrive even in winter
Likes
5
Share
Última semana magica de cores ! Temperatura baixa = flores roxas! Logo mais colheita dessas flores roxas e cheirosas!ate breve
Likes
4
Share
* Week 6 Veg/Early Flower - She has grown a little over an inch and a half since last night (11.5 inches total ) - Veg nutrients will begin to be fazed out early this week to prep for flower* * End of Week 6 Veg/Flower - 11/4 - She has begun flowering ( 14 Inches ) - Hard defoliation on bottom small budsites as well as bigger fan leaves above.
Likes
7
Share
@Lazuli
Follow
This strain is so potent u can even smoke the fanleaves 😆
Likes
8
Share
Hey Cannafam Happy Monday 😊 Its been a pretty good week for my gal, we started the week with really hot weather for May, with temps of 30c daytime and 18c at night, the tempratures have slowly tapered off daily by a couple of degrees each day and by Thursday - Saturday we were looking at 22c daytime 14c nightime. The days have been solid sunshine with humidity about 55 until today when its been raining all day, current temp is 17c and humidity has shot up to 97. Daylight is currently at 16 hours 7 minutes currently. With all the Sun this week shes had good solid growth and is just starting her 3rd set of true leaves and is looking nice and healthy 😊 No feed again this week just great white with every watering. I have had a slight issue this week when the wind blew the diamatous earth onto a couple of leaves, i've now learnt from this that it actually breaches the leaves cell walls and causes damage, in the picture showing this it looks like nute burn or potassium deficiency but i observed the effect a short time after and gave her a very gentle finger tip wash. Im now thinking of putting the powder around the pot but thats not much good when raining. On the squirrel front the turf pins are working, i know this as both pots were side by side and my little friend tried to dig up my other grow! The weathers looking a bit more unsettled for the next week but with her solid start hopefully she should be ok. Thats all from me for now, thanks for stopping by 😊✌️
Likes
32
Share
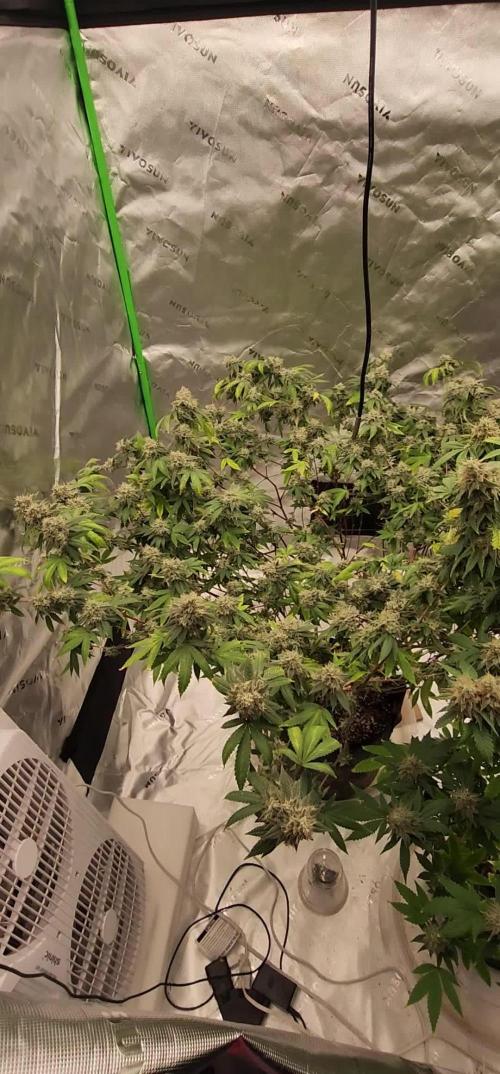
Week 3 of the visible flowering 😃 everything is going well almost automatic pilot End of week 3 i did a little defoliation 🙈 I always hate to pick off al the big light blocking leaves but it's necessary and after a day they bounce back and nothing to worry about 😁👌 i always try to defoliate at the end of week 3 of the visible flowering hopefully the last time 🙏 so the buds are having all the light that they need