


Likes
Comments
Share


@barlobruz
Follow
8/22/2021
- Did some mid-flower defoliation to increase airflow and to prevent mold and mildew.
- Split the top right main from trying to train her down and spread out the canopy, supporting with tape and twist ties.
8/23/2021
- Top right main is still vigorous after split.

Likes
16
Share


@HegauHillsFarmers_M11
Follow
Die Pflanze wurde Mitte letzter Woche an Tag 66 geerntet. Getrocknet wurden die Blüten 6 Tage lang bei einer Luftfeuchtigkeit von 53% bevor sie nun ins Glas kommen.
Getrimmt wurde die Pflanze trocken.

Likes
41
Share


@IAmTheMoravianGrower
Follow
Hi growers, I choose a Humboldt Seed Organization for this season. The final flowerpot will be 25l in the garden. They're behind the window yet. Fertilizers by BioBizz.
1.4.2019 - germination
4.4.2019 - inserted into the soil


Likes
15
Share


@Brickie74
Follow
First time trying this strain and seed company. I have an Altoids box that i lined with sand paper (120 git) i shake my seed(s) for about 30 seconds to a minute in the box. I then soak them in water for about 15-18 hours. When done soaking i put the seeds on a plate with paper towels until i get a tap root that is atleast 1/8" prefer 1/4". Then at that point i put them in a Jiffy Pod until about 1.5 - 2.0 inches.

Likes
120
Share


@StarLorr
Follow
Welcome to my Strawberry Pie diary.🍓🥧
In this Diary:
Seeds: [420 Fast Buds]from my growmie Tropicannibis_Todd 👊🏻😎
Media: Pro~Mix HP Open Top Grow Bag, Connect.
Nutrients: Green Planet Nutrients,
2 Part Dual Fuel starter kit.
RealGrowers: Recharge.
Diablo nutrients: Ripping.
Feeding :
Tue 26Mar: 2L Nutes/Recharge pH'd 6.5
Fri 29Mar: 2L Monster K pH'd 6.5
___________________________
The buds are ripping smelly good😋
Trichomes are white and the amber should be at my satisfaction by next weekend, sorry for the quality of the trichomes video... i know it looks like the same cameraman who captured UFO🛸on a pogo stick... will try harder next time😅😂............ i can see the finish line🏁👀1 more lap😎
___________________________
Thanks for stopping by, likes and comments are appreciated.👊🏻😎
Keep on growin!
Keep on tokin!!!
😙💨💨💨💨💨

Likes
14
Share


@IrishGaelicHighKing
Follow
Amazing progress it terns of growth. Gorilla glue has shown to be very impressive so far it grows so fast, i check many times a day and the growth is very noticeable, it sure loves a good feed i advise to actually feed more nutrients than you usually woukd as it really is a hungry plant


Likes
42
Share


@MrJoint
Follow
🧟♀️My little monster looks very happy.
🌴2th ScrOG net put on.
✂️🍭Defoliation time.
🌳 More substrate to protect roots.
✌️🎃 Thank you for checking my cultivation.

Likes
53
Share


@DogDoctorOfficial
Follow
Harvest Report: The Swift Journey of Blackberry Auto
Greetings, fellow cultivators! The moment we've all been eagerly awaiting has arrived – the harvest of my Blackberry Auto. This beauty has moved through her life cycle with astonishing speed and grace. Let's take a moment to reflect on her incredible journey from seed to harvest and celebrate the fruits of our labor.
Seed to Sprout: It feels like just yesterday when I planted the tiny seed of Blackberry Auto. Nestled in a Root Riot cube, she sprouted with vigor, her first delicate leaves reaching for the light. The conditions were perfect, with temperatures at a steady 28°C and relative humidity at 95%, creating an ideal environment for her early growth.
Transplanting and Early Growth: As she transitioned to a small pot filled with rich soil and Mycor Mix, Blackberry Auto continued to thrive. The Mycor Mix, with its blend of various mycorrhizae species, worked wonders in enlarging her root system and facilitating nutrient uptake. Her early growth was nothing short of spectacular, setting the stage for the robust plant she would become.
Rapid Vegetative Phase: Blackberry Auto quickly outgrew her initial pot and was soon transplanted into her final home – a 16L AutoPot. This setup allowed her to drink as she pleased, supported by the precise hydration of the AutoPot Aquavalve. With a foundation of Aptus All-in-One Pellets and Mycor Mix Soil, she had everything she needed for explosive growth. Her leaves grew enormous and lush, and her branches spread wide with gentle low-stress training.
Swift Flowering and Stunning Development: Entering the flowering phase, Blackberry Auto didn't slow down. Her buds formed quickly, each one a masterpiece of nature. The colors were a sight to behold – deep purples, vibrant magentas, and hints of dark blue. The aromatic symphony filled the grow room, a testament to her potent genetics and the meticulous care provided.
Natural Brilliance and Final Weeks: Observing her rapid progress, I ceased all feedings to let Blackberry Auto showcase her natural brilliance. Her final weeks were marked by a dazzling display of colors and an incredible pace of bud development. Each day brought new marvels, as her buds swelled and her trichomes sparkled like a constellation.
A Heartfelt Reflection: From the moment she sprouted to her final days of flowering, Blackberry Auto has been a true wonder. Her speed and beauty have exceeded all expectations, and it's hard to believe how quickly she reached this point. This journey has been a testament to the magic of cultivation and the resilience of a well-bred strain.
Acknowledgments and Gratitude: As we celebrate this harvest, I extend my deepest gratitude to @fastbuds_official for creating such a remarkable strain. To Aptus Holland, my main sponsor, your support has been invaluable in nurturing this beauty. A special thank you to Grow Diaries for providing a platform to share this journey, and to the community for your shared passion and camaraderie. 🌱💚
As we move forward, I eagerly anticipate the trim and smoke reports, where we'll dive into the sensory delights of Blackberry Auto. For now, let's revel in the joy of a successful harvest and the extraordinary journey that brought us here.
Genetics Blackberry Auto @Fast_Buds
Food - @aptusholland @aptus_world
As always thank you all for stopping by, for the love and for it all , this journey of mine wold just not be the same without you guys, the love and support is very much appreciated and i fell honored and blessed with you all in my life


Likes
12
Share


@sunshinegroww
Follow
This is getting close to flush now and she smells lush very gasy and so sticky lol brilliant genetics



Likes
45
Share


@tresplantes
Follow
Heading into week 4 of Flower everything is budin up really nice
Zake is the frostiest and really has a mint smell to it
Looks like i already can say that breakpad breath will take more than 8 weeks
Pink runtz x Hollywood has a Creazy Sweet smell to it


Likes
Comments
Share

@Lvnsource
Follow
Feed log;
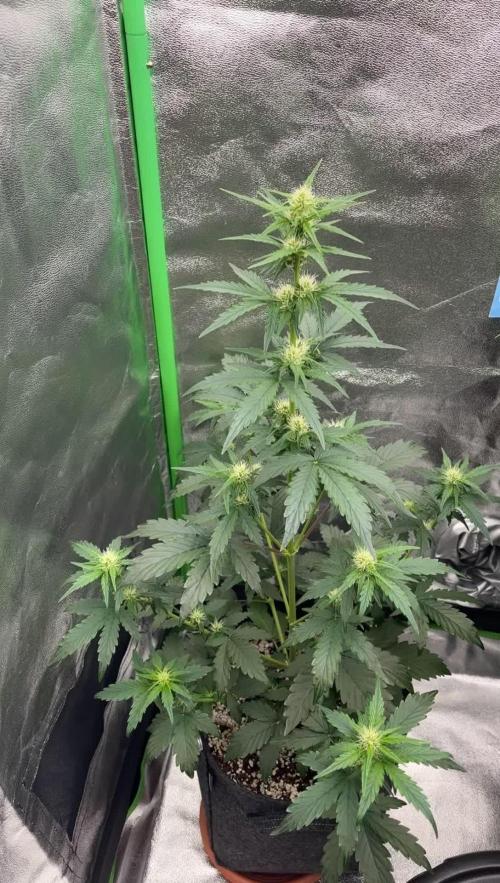
D:30 - 4.0L + 4.0L - [pH 6.8] Si[0.5ml] ,Vega[5ml], Flores[6ml],Ca[0.3g/L/]Mg[0.1g/L] INPUT; [1.1 EC] OUTPUT; 3.6L pH 6.0 [1.74 EC] previous irrigation: D:23
———————————————————————————
This phenotype decided it wanted to be stout as she entered flower early ; the plant is currently still putting on height and has grown 12cm since day 27! 🌱
I’m still keeping the PAR levels around 550-580 ppfd to squeeze out a few more cm of height 🌞
Likes
38
Share


@Suprmoux
Follow
This week I harvested these two Quebec Black Bud, it was really a great experience. Its unique appearance and these colors charm us from start to finish. Calm in vegetation but surprises us in flowering. I can't wait to see the final product 😇
Harvest :
Pheno #1 day 56 flowering 119 total
Pheno #2 day 60 flowering 123 total
Training :
They have received my hand manipulation since day 8 and this every day to force them to grow bigger and stronger until the addition of the scrog. I started my base again on a manifold. For now I'm having fun like that, let's see later 😁
I'll leave you with these beautiful photos and come back to you later.
After drying and curing I realize how the color is an intense purple almost black, The genetics are not called Quebec black bud for nothing. the buds are really compact, I know that with the auto pot system I give myself a chance that they will be denser but I believe that hard training leaves its mark.


Likes
18
Share


@Dunk_Junk
Follow
Wow she went crazy this week!
A big change from last week.
Lets see how long she will keep growing! 💪

Likes
17
Share


@TerrazasBrew
Follow
2 plants showing different results. One has been flowering for 1 week and the other one looks stagnating. The one flowering is 38cms tall and new growth on top looks yellow and leaves on the bottom are stained. The other one has bigger stains at the bottom. Don't know the deficiency. Watering with 1ml Byron Bay Gold stage 2 per litre of RODI water. Am I missing calmag? Water ph?
Likes
5
Share


@Ensign420
Follow
Greetings fellow growers 🖖 and welcome to my first grow ever. This adventure actually started several months ago when I decided to stop buying flower from dispensaries and just grow my own bud. How hard can it be!?
This is actually my second seed of this strain. The first bean sadly died due to over watering (sorry girl, RIP). I was literally watering the cube to the point where water was dripping from the bottom, then heavily sprayed the humidity dome and tray with the vents completely closed. Everyday. Multiple times. I never let the dome or try dry out. So after about 8 days of not sprouting, there was a funky smell of rot. So that was that.
Later I learned that rockwool retains a lot of water and can easily drown seeds. So a wet/dry cycle is best for rockwool germination.
So even after hours of researching and digging through forums and tutorial videos, I was still under prepared for this journey. Did not consider how delicate the germination phase is. Oh well. Lesson learned. Reset and try again!
I hope everyone is safe and stoned during this corona crisis. Just like everyone else in the world, I want this pandemic to be over with. But in the meantime, let's grow some weed! 🖖
[START OF WEEK 01]
Day 01 - Monday - 08/03/20 - Total Days: 001
-----------------------------------
- [0830]: Light Schedule: 24Hrs/0
--- Soaked cube in 5.5 PH water for 10 min. Did not shake water out.
--- NO NUTES! Only PH'd down to control the PH levels.
--- Did not use the default hole (way too deep).
--- Flipped cube upside down and made a shallow hole for the seed (less than 0.25" deep).
--- Placed seed in and pinched hole close. No additional water added.
--- Sprayed the tray and dome with straight water (5.5 PH).
--- Vents are cracked opened a for ventilation (about 1/4 opened each).
--- Distance between the light and tray was 53"
--- AC was set to 80 °F
--- Exhaust fan was set to 86 °F
--- Room average temp was at 85 °F
--- Dome humidity was at 85-99% when sprayed.
--- Allowing to completely dry before respraying.
- [2200]: Dome and tray were completely dry! Sprayed only tray and dome with more water.
Day 02 - Tuesday - 08/04/20 - Total Days: 002
-----------------------------------
- [0845]: Sprayed dome and tray in the morning. Everything was dry.
--- Hoping for the best!
- [2130]: Everything was dry again, so sprayed dome and tray at night along with a light spray on the cube.
Day 03 - Wednesday - 08/05/20 - Total Days: 003
-----------------------------------
- [0830]: Everything was dry again. Resprayed dome and tray. Slightly sprayed cube.
- [2125]: Hooo damn!! She popped! Am little stub is visible! Resprayed dome and tray again.
--- Still going 24/0 for lights.
- [+0033]: Just checked up on her and I swear she grew a bit taller! Getting excited!
Day 04 - Thursday - 08/06/20 - Total Days: 004
-----------------------------------
- [0845]: Wow! Went from a little stub to fully sprouted overnight! Everything was pretty dry again so resprayed dome and tray.
- [2200]: Tap root is visible! Over 1" long too! Just resprayed dome and tray again.
-- Going to prep for hydroton transplant tomorrow!
Day 05 - Friday - 08/07/20 - Total Days: 005
-----------------------------------
- [0930]: She keeps growing!
-- Added a bit of CalMag to the spray bottle (8 drops to 650ml of distilled water). Resprayed dome and tray. Water was at a 5.4 PH with 141 PPM.
- [1045]: Prepped the bubble bucket with 4.5gal of water. Water is high enough to reach about 0.25" above the bottom of the net pot.
--- Added 3 drops of Superthrive
--- Added 3.5ml of CaliMagic
--- Added 2ml Hydroguard
--- Then PH'd down to 5.6
--- Solution Strengh: 120 PPM
--- Water chiller is set to 20 °C
- [1100]: Transplant time!
--- Filled the net basket 1/3 with hydroton. When placed in the bucket, air bubbles are not visible, but are slightly below the surface (slight digging will reveal the water/bubbles below).
--- Removed plastic on rockwool cube and placed in basket, then filled around and covered with hydroton. Making sure to block any light from passing through the net pot and into the nutrient solution.
--- Covered with a half-bottle dome sprayed with the CalMag water from earlier.
--- Hoping for the best!
- [1300]: Raised Bucket 5" higher. Now light distance is 48" to top of bucket.
- [1820]: Lowered tent exhaust temp to 76 °F
--- Lowered AC to 75 °F
--- Raised bucket even higher so light distance is 30" to top of bucket.
- [2300]: Looking good!
--- Sprayed dome and surrounding hydroton with more CalMag water.
--- Attached timer to light! So new 18 Hrs On/6 Hrs Off light schedule.
--- Lights On: [1600] (4pm)
--- Lights Off: [+1000] (10am the next day)
--- Decided to go with lights on during the evening/night and off during the later mornings/afternoon (the hottest part of the day) to see if temps can be controlled better.
--- Please survive girl!
Day 06 - Saturday - 08/08/20 - Total Days: 006
-----------------------------------
- [0800]: Everything was dry. Resprayed hydroton and dome.
- [2000]: Here first night cycle seemed to go well! Get'n taller!
--- Dry again. Removed the dome.
--- PH went up to 6.5 so PH'd down to 5.7
--- Ran the top feed drip ring for a bout a minute to wet the hydroton and rockwool with the nutient solution.
---Too scared to leave the top feed on 24hrs (I don't want over water her and cause dampening-off). Will let dry before re-watering.
- [2100]: After closer inspection, I think she's looking a bit yellow.
--- Decided to add a bit of grow nutes to the bubbler solution.
--- Added 2ml of Sensi Grow A
--- Added 2ml of Sensi Grow B
--- Solution strength after adding more nutes: 176 PPM
--- PH went up to 6
--- I hope that the extra chelating properties of the 'PH Perfect' solution is enough of a buffer for proper nutrient uptake.
Day 07 - Sunday - 08/09/20 - Total Days: 007
-----------------------------------
- [0800]: Water dropped a bit (mostly due to evaporation) so solution strength was at 190.
--- Checked PH again. Was still at 6, so PH'd down to 5.4
--- Ran the top feed for a minute to wet the hydroton a bit.
- [0915]: Since she's looking perky but still a bit yellow. So decided to up the nutrient concentration even more before lights out.
--- Added 2ml more of Sensi Grow A
--- Added 2ml more of Sensi Grow B
--- Solution strength after adding more nutes: 199 PPM
--- PH went up to 5.8
- [1700]: Checked nutrients.
--- PH: 5.9
--- Solution strength: 202 PPM
--- Added 4ml of Voodoo Juice
--- Added 4ml of B-52
--- PH after adding more nutes: 5.9
--- Solution strength after adding more nutes: 238 PPM
- [2130]: Decided to make a new foliar spray to address the continued yellowing.
--- Started with 500ml of distilled water.
--- Added 3 drops of CaliMagic
--- Added 3 drops of Sensi Grow A
--- Added 3 drops of Sensi Grow B
--- Added 3 drops of B-52
--- Added 1 drop of Superthrive
--- Solution strength: 164 PPM
--- PH was at 5.9 and did not adjust.
--- Gave her one spray.
--- Also sprayed the surrounding hydroton.
[END OF WEEK 01]


