


Likes
Comments
Share


@w33dhawk
Follow
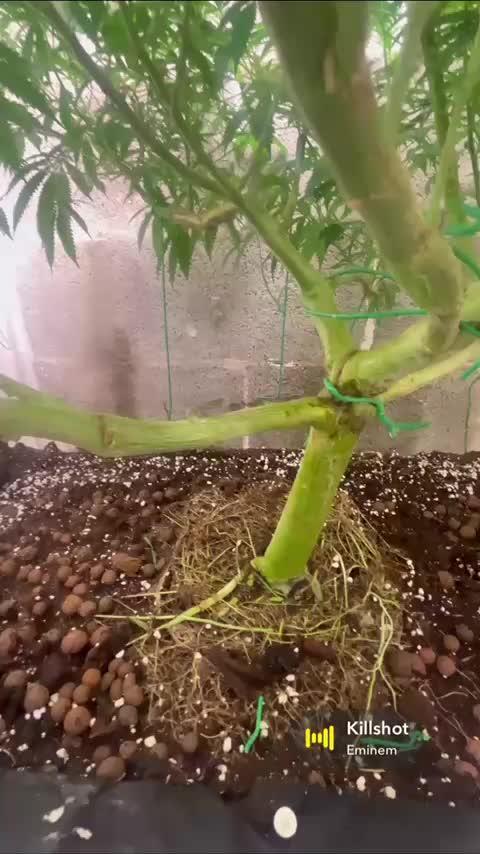
18.08.21 Moin liebe growmies habe diese woche (14.08.21)mit der Umstellung auf 12/12 begonnen und gestern nochmal Nach justiert um die Höhe gleichmäßig zu halten und dabei ist mir eine unfreiwillige Stamm-Spaltung passiert aufgefallen ist mir das ganze erst heut morgen die Blätter hängen nicht und sie wächst unaufhaltsam weiter 👌👌👌👌 was für ein Glück für mich als ich es heute morgen entdeckt habe hätte ich weinen können habe darauf hin die Pflanze begutachtet und mir ist aufgefallen das sie sich nicht daran stört das ganze habe ich jetzt mit Pflanzen Draht stabilisiert und leicht wieder zurück gedrückt, bekomme die wunde aber nicht dicht. da sie schon ab getrocknet war zu dem Zeitpunkt. werde heut abend mal ein Bild machen ohne das die Lampe an ist sie zeigt nämlich schon die ersten Anzeichen von vorblüte und das nach 4 Tagen 12/12 bin begeistert. Die steckies die ich raus gestellt habe wachsen prächtig und wirken insgesamt gesund
bin mehr als zufrieden bis jetzt bis auf den kleinen Schock heut morgen.......
19.08.21 habe gestern ewig drüber nach gedacht wie ich das besser fixieren kann und die Stamm-Spaltung besser geschlossen bekomme habe mir was neues überlegt und gleich in die Tat umgesetzt habe breites nylon Band genommen und um die 2 arme jeder Seite gebunden und das ganze Dann gegenüber liegend mit einem Kabelbinder zusammen gebunden und die Spalt stelle so gut es ging wieder geschlossen dabei ist mir dann heute aufgefallen das og purps Nr. 3(gestern Abend noch komplett unversehrt gewesen) heute morgen ebenfalls eine Stamm-Spaltung erlitten hat😭😭😭😵😵😵 also das gleiche mit der Kombination aus breitem nylon Seil und Kabelbinder zur Fixierung jetzt muss ich mir wieder was für die hohe einfallen lassen da die Ladys jetzt wieder höher stehen als die anderen ca 3 bis 4cm 😩😩😩werde dann wohl um das Problem zu lösen mit nylon band an den Zelt Stangen entlang gehen und dann die Äste daran nach aussen ziehen denke mal das ich dann wieder auf Höhe kommen werde (hoffe ich zumindest)........

Likes
9
Share


@Tobecobe
Follow
24/09 - D17 since pistills. Busy day today. Full res change, with nutes modified to transition to bloom for the next couple of days before I bump her to full dose bloom 3 weeks from pistills showing. Also did some heavy defoliation. Started chopping with the intent of taking a few, but concerns around humidty levels have been in the back of my mind for awhile and given I was all geared up in the tent anyway I went to town. Removed a couple of weaker branches that were interfering with other sites, and took a large amount of lengthy and inward facing leaves. Walked away and came back and the difference was quite shocking (first grow!), but she looks better for it. Flowers are now exposed to light, and areas where moisture can get trapped have been dramatically reduced if not eliminated. Hopefully she responds well to her new haircut.
Also came across my guard spider while sweeping out some leaves that fell behind the res, not sure what hes eating in there, maybe he just likes the smell!
EC: 1.27, PH 5.8.
25/09 - Managed to get humidity down to 55 after the defoiation and leaving the door of the tent open. She seems to be happy after her haircut. PH dropping slowly at 5.7, EC stable at 1.27, water dropping.
26/09 - Small spot of PM on one sugar and one fan leaf. Wiped clean with a wet tissue and trimmed off. Will spray with diluted milk mixture at lights out and keep my eyes open for further infection. Modified setup a bit to try and bring the humidty down further and increase air flow, but struggling to get it below 55% even with a humidifer in the tent and the fan ramped up to max. Going to do a res change with full bloom nutes tomorrow so as not to prolong this grow longer than needs be.
27/09 - Full Res change to bloom nutes. 35ml Micr, 6ml Grow, 45ml Bloom. No new spots of PM seen, continuing with minor trimming when I spot any touching leaves as a preventative. RH finally pulled down into the 40's, and then my fan broke. Time to buy a new one.
28/09 - PH stable at 5.8, EC at 1.27. Going to try and leave well alone from this point forward unless issues arise or I see damp spots forming. Humidty finally down to 40%.
29/09 - PH and EC dropping. Topped off res with 8l of water at 50%. 13ml Micro, 3ml Grow, 20ml Bloom. PH 6.0, EC 1.3ish.
30/09 - PH 5.8, EC 1.17. Continuing to trim a couple of leaves here and there when I spot an overlap or blockage and pinch off tiny bud shoots below the canopy.
Likes
12
Share


@Coman
Follow
Harvest time has come for my first lady which was a little faster, and had a completely other aspect than ther other 2. A little purple color and shorter. Also got some issues during veg phase with her. Anyway got 428g nice good smelling wet buds from her an they are drying now. Will post pictures from harvest next week. All of them are cherry cola.
The remaining 2 ladies look very promising and will be harvested and of this week.
Today 70 days from seed.

Processing
Likes
21
Share


@Siriuz
Follow
Starting week 10
Day 77
Ladie is getting some nutes plus water
Day 78
Whoa she's growing a lot
Day 79
Gonna start scrog soon
Day 80
Root its thriving like crazy, uploaded new video, check it out!
Day 81
Time to feed the lady again plus added more ffof soil with perlite and clay peebles
Day 82
All good, no nutrient burnt @ 1810ppm
Day 83
Had to expand the net, added scrog plus some other features, she's a monster it's Giving me a lot of work to do but I'm really happy with this huge lady growing up!!
End of week 10 with some videos to show progress!

Likes
51
Share


@eldruida_lamota
Follow
Vamos actualizamos otra vez las cookies gelato , están increíbles, vaya color y que ritmo.
No hay vídeos ya que grow diaries tiene errores.
.
La humedad anda entre 60/70% la temperatura está entre 23/26 grados, el led es increíble , y como siempre el ph , ya que es de lo más importante,está en 5,8/6,0.
.
AgroBeta:
0,8 ml x L Growth black line , vía radicular.
0,2 ml x L Tucán , vía radicular.
0,15 ml x L Flash Root , vía radicular.
0,05 ml x L Gold Joker, vía radicular.
.
Esto es todo fumetillas, muy pronto las veremos echando flores 💨💨💨 buenos humos.



Likes
1
Share

@Oneman
Follow
The two Easter Egg strains have not developed and are stunted and deformed. I dropped the seeds before germination in the carpet. I found them but they must have picked up some bacteria or something. they are the only two that are weird and slow. I pulled them. I'm thier place went Speedrun Seeds Final Boss F2 and Terprantula Autoflowers Midnight Comet. Sowed directly in pots. Midnight Comet is in Gia Green amended coco cori and perlite 5 gallon fabric. Final Boss will be in Autopot 5 gallon fabric fed with the others.

Processing
Likes
2
Share


@Cannatech
Follow
First week of flower not much to do, defoliate few leaves and leave the plant to do its thing. As far as training most of it is already done now so just letting plant stretch up and get some decent height.

Likes
8
Share

@eldruida_lamota
Follow
Bueno familia ya finalizamos con el proyecto de las Blue Spider, son una cepa bestial, me sorprendieron para bien
La verdad que el secado muy bien 7 días en Malla y a los botes, 50% humedad y 23 grados es la temperatura ambiental que han tenido en el secado.
En resumen la cepa es muy fácil de cultivar,
Por lo demás de miedo os la recomiendo.
Gracias a Agrobeta y Mars hydro , sin ellos este proyecto no sería igual 🙏.
Agrobeta:
https://www.agrobeta.com/agrobetatiendaonline/36-abonos-canamo
Mars hydro:
Code discount: EL420
https://www.mars-hydro.com/
Buenos humos 💨

Likes
25
Share

@George_T
Follow
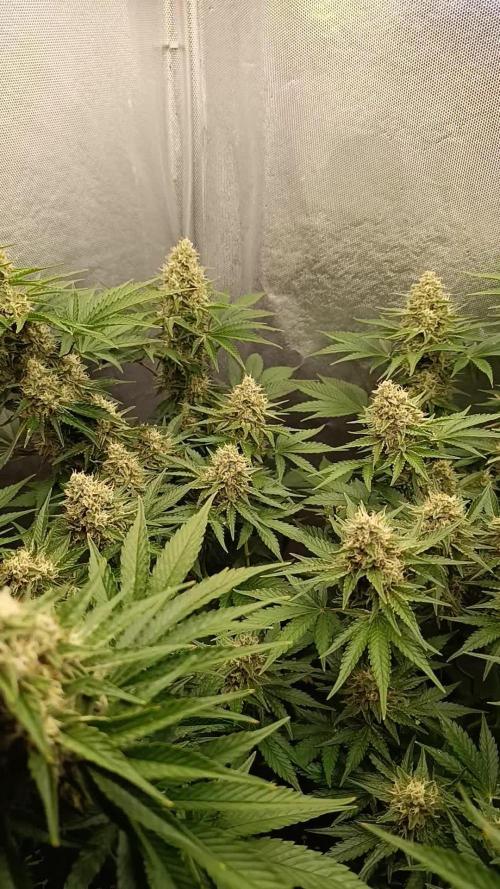
I love this plant. Thrives, grows fast and smells amazing!!!
Day 63 from seed.
I watered with cannazym 2,5ml/l + NRG flavor 1ml/l. I will continue with cannazym only for 1 week+ 1 week with pHed water. Mimosa x Orange punch will be ready for harvest in just 77 days from sprouting!!! One of my best grows ever... Great genetics, high quality rock hard buds! Zero issues... Thank you buddies!
With Lumatek, you smoke dense flowers, not leaves. It is time to open our eyes and start recognizing truly high-quality cultivation LEDs. I always try to protect myself from becoming a victim of marketing hype.
The flower-to-leaf ratio should matter to all of us who grow for personal use and want the best possible final product in the jar, as well as an excellent smoking experience. A high number of trimmed sugar leaves mixed in with the flowers can negatively affect quality, flavor, and cannabinoid concentration, while also increasing the amount of unnecessary burnt plant material. This extra biomass may make the smoke harsher on the throat and lungs over time, and overall it can reduce the quality of the experience!

Likes
101
Share


@DogDoctorOfficial
Follow
Week 7 here we go
They starting to show some colors as they are getting frostier and frostier 😇
tricomes still all very young and clear but getting there 🤫😈
Day 46 update : selective defoliation, they needed more air and light going around. It smells like candy’s store mixed with pine trees and the minty fruit salad that as all that exotic and exquisite aroma in it I’m loving this round and loving all the new learning that came with it 🙏❤️😈🤫🤓😇
As for the geek department 🤓 I’m currently:
- VPD - 1.03 kPa
-PPFD - 725.38 umol/s/m2
-DLI - 28.71
Loving this LED Tec 😍
Girls:
1-BlueBerry
2-Alaskan Purple
3-Poyote Gorilla
4-Hindu Kush
5-Whitw Mango
6-Super Glue
7-Badazz Cookies
8-S.A.D.
tent -8x8 / 2.4x2.4 but i'm only using 1/2 so 4x4 / 1.2x1.2
Led - Lumatek 465w Compact Pro at 75%
All i Grow is medicine for myself,
Stay safe, stay tuned and B Happy
Peace out
D


Likes
39
Share


@Mastr
Follow
Only 1 plant is flowering while other 2 still on veg witch is good
Day 23 come along and I just start using bloom and topmax and try my best on lst training want to get max yield off each Plant finger crossed 🤞
Day 24 still not flowering for other 2plant witch it very good I'm not rush and I glad they can grow up to max yield
Today i have mate around and he couldn't believe they only 24days from seed next week they will be double in size or even bigger will keep pic and video daily on this stage due very fast grow in preflowering
Day 25 come along and she grow so fast guys when I wake up I check them I see alot different I feed them with silica on every watering till day 35 (when stop grow in size )this run be come very very big size of autoflower let see guys
Day 26 I start bring down grow nuts and add more bloom I feed
1ml silica
.5 calmag
2.5 bio grow
2ml bio heaven
2ml acti vera
1 alg amic
1ml bio bloom
.5 top max
I just use silica every other watering also I feed with the 1.5 L nut everyday
Will reduce bio grow and then day 35 I'm going to stop feeling with grow
Likes
3
Share


@CanarianGrow92
Follow
Week 5 already, thats why they call it fastbuds... In no time its harvest time! We had some bugs (trips) running around, i think i took them from outside as i was working on my garden, my outdoor plant is also affected, that happens for being a dirty old man 🤦🤷 but not much we can do now, i tried to clean the leaves a bit and remove some, but i think its better to harvest and clean the room as i dont eant any pesticides on the buds, but for the rest quite ok, we gave aome extra pk and bloom this week so lets see how the plants do next weeks 😁
Likes
10
Share


@StickyFingah420
Follow
Extrema producción de tricomas de esta variedad! Gran parte de los frutos lo usaré para extraer rosin, su resina se ve ideal para este propósito.
Fragancia exquisita a ponche de fruta dulce, con notas ácidas y un fondo de especias.
Como mencioné anteriormente dejaré la parte de la reseña de efectos, sabores y sensaciones para cuando los cogollos estén secos y curados, por ahora solo puedo apreciar lo que mi vista y olfato me permiten captar.
Totalmente conforme por la calidad de estas flores y agradecido de los amigos de Sweet Seeds por la confianza.
Será hasta la cata entonces, buenos humos!
Likes
78
Share


@Roberts
Follow
Pure Ice cream great really well under the Spider Farmer lights in the Athena nutrition. She did get too close to the light. I should of hst her. My mistake, they will still smoke. Smells great, and is loaded in trichromes. Has a sweet creamy. Pine smell. Everything looks great. I only had minor ph issues during grow. She was thriving for a lot of it. Thank you Spider Farmer, Athena, and Pure Instinto Seeds. 🤜🏻🤛🏻🌱🌱🌱
Happy new year.
Thank you grow diaries community for the 👇likes👇, follows, comments, and subscriptions on my YouTube channel👇. ❄️🌱🍻
Happy Growing 🌱🌱🌱
https://youtube.com/channel/UCAhN7yRzWLpcaRHhMIQ7X4g
Spider Farmer Official Website Links:
US&Worldwide: https://www.spider-farmer.com
CA: https://spiderfarmer.ca
UK: https://spiderfarmer.co.uk
EU: https://spiderfarmer.eu
AU: https://spiderfarmer.com.au
G5000 Light Amazon Link:
amzn.to/4643esa
UVR 40:
https://www.amazon.com/dp/B0BR7SGTHS
Discount code: saveurcash (Stackable)

Likes
24
Share


@Alpha_Green
Follow
In the video you can see quite well how much work the defoliation of Mrs. Jealousy has been. I had to graze so many nodes and internodes, really gigantic, these genetics.
We'll see how it goes. I can already imagine it.
What do you mean?!
So, I'm going to call it a day for today. Food is waiting.
Take care & bee 🐝 positive!
Yours
Alpha_Green
Hello dear garden friends,
I hope you are doing well and everyone is high in the sky.
Finally, the American election campaign has come to an end. I can't hear all this anymore. So let's start right away with new photos from this morning and of course a few suggestions from me.
The profile of my beloved Sour Jealousy now resembles that of a closed tulip.
It will soon reach its full potential and bloom as if there were no tomorrow.
Last night I personalized the conditions a little more precisely and adapted them to the respective growth. Since Lady Jealousy is still withering a bit, I keep the humidity just about at the reasonable limit of tolerability for both fully flowering Sweet Seeds ladies. I think temperature and humidity is a good but necessary compromise here.
Different strains require different conditions.
Especially when growth is so different.
I also find the tribes of the three protagonists interesting... In my opinion, it tells us a lot about the selection of phenotypes in breeding.
So my dears, the day takes its toll. Time to sleep.
Thank you all for being out there.
Like-minded and motivated to share our efforts around the cultivation of these enchanting plants. Thank you for this wonderful gift of being able to grow. Nothing can be taken for granted in this world.
Not even happiness and peace.
Take care and bee 🐝 positive!
Yours Alpha_Green
Hello again…. 👋
This morning the buds of the Dark Devil lady, which was harvested a little too early, came out to dry.
I tried a little in the vaporizer. And I would like to take this opportunity to express great praise. The effect and taste are really very pleasant, although it was not quite there yet. And a berry-scented taste - very pleasant. I'm already looking forward to the perfectly matured lady then even more... 🤩
Yes, everything is going great at the moment. I'm really happy and satisfied with all the girls.
Tomorrow my Sweed Seeds Jealousy package will be delivered from Spain.
Despite the circumstances there with so much suffering due to storm disasters, super punctual. I'm already mega excited about it. Sweed Seed also presents a brand new hybrid strain. It hides or unfolds 55% indica and 45% sativa parts. Can't wait:
Jealousy Z XL Auto
Sweed Seeds
I think this will be my first run of the Homebox! Yes!!!
Oh, I almost forgot to mention that from today on the 8 side radiators are active for 12 hours each during a daily cycle.
Predominantly
640 – 780 nm.
Dark Devil is definitely really poisonous, wow - awesome turn...
I had a 3-month break, that's noticeable...
;-))
A little mental excursion at the end of week 7: "Freedom"...
We cause ourselves the most stress, because we have a completely distorted conception of freedom.
Freedom does not mean being able to do everything you feel like doing.
The assumption of having to do something all the time, is the main reason for stress.
Only, when we have internalized, that we don't have to do, what we don't want to do:
Only then, we are free.
Likes
26
Share


@PedroAndHisPlants
Follow
Day 64 (First Grow, Flowering Phase):
Hey everyone!
We’re on day 64, and the flowering phase is in full swing. The buds are forming beautifully, and the plants have grown 5-10 cm above the SCROG net, creating a lush canopy. The humidity is steady at around 50% or lower, which is ideal for this stage.
To recap, we've been maintaining an even canopy with the SCROG net and our Timor shield mantis continues to keep pests at bay naturally. Our plants are thriving, thanks to the even light distribution and careful humidity control.
We're considering installing a second fan in a few weeks to improve airflow and potentially adding a second SCROG net to support the plants as they continue to stretch during flowering. This should help stabilize the plants and ensure they get the support they need as the buds get heavier.
Any tips or advice for the next steps? Let us know in the comments!
Likes
68
Share


@715creeks
Follow
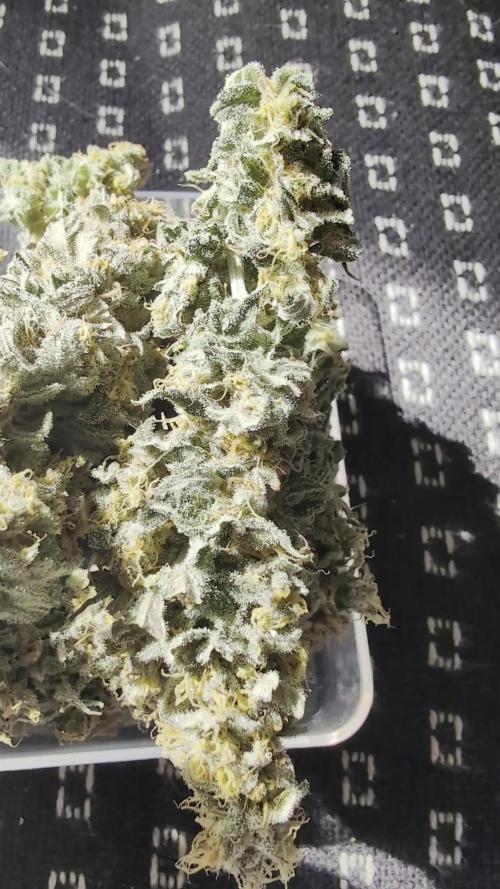
looking really good now. i removed some of the larger fan leaves at the top and trimmed the bottom to tidy up :)
still loads of white hairs, a few have turned brown but not too many.

Likes
15
Share


Likes
7
Share


@russrahl
Follow
Alien tech is coming along nicely, she is scrog’d with 3 other Ayahuasca Purple and seems to be doing beautifully. She didn’t stretch as much as the Ayahuasca, but I was able to keep the Ayahuasca lower by spreading it more then the Alien Technology. Screen is not perfectly even, but there all within the sweet spot for my 1000w HPS so things should start ramping up soon! Not much else to say this week, just been checking the ph levels and adding 8 gals or so of water/nutrients every 2-3 days to the main reservoir feeding all 4 plants. So far they are good with the same nutrients so that is good! Lol cheers 💨
Likes
55
Share


@IstrGrow
Follow
Hi, I'm Istr, an indoor cannabis grower. I currently cultivate Gorilla Punch Autoflower using GardensGarage lights and Advanced Nutrients.👻
(Merhaba, ben İstr, iç mekanda kenevir yetiştiricisiyim. Şu anda GardensGarage ışıklarını ve Advanced Nutrients kullanarak Gorilla Punch Autoflower'ı yetiştiriyorum.)
I love autoflowers for their quick lifecycle and suitability for indoor growing. I share my growing techniques through workshops and online forums, helping others improve their cultivation skills.👹
(Otomatik çiçekleri hızlı yaşam döngüleri ve iç mekan yetiştiriciliğine uygunlukları nedeniyle seviyorum. Büyüme tekniklerimi çevrimiçi forumlar aracılığıyla paylaşarak başkalarının uygulama becerilerini geliştirmelerine yardımcı oluyorum.)
Feel free to follow my journey and share your thoughts on my progress. You can ask if have any questions or need advice on indoor growing.👍👍
(Yolculuğumu takip etmekten ve ilerlemem hakkındaki düşüncelerinizi paylaşmaktan çekinmeyin. İç mekan yetiştirme konusunda sorularınız varsa veya tavsiyeye ihtiyacınız varsa sorabilirsiniz)
During the germination process; (çimlenme süreci)
I planted the plants after soaking them in water for 24 hours and in a napkin for 24 hours, and they emerged from the soil within a day.👽
(Bitkileri 24 saat suda, 24 saat de peçetede beklettikten sonra diktim ve bir gün içinde topraktan çıktılar.)
👉Week 1: On the third day, the leaves began to show. I continue to keep my girls in the humidity dome.🙏
Day 7: The water grains on the leaves warped the leaves a little, so I continue with the humidity machine.
(Üçüncü gün yapraklar çıkmaya başladı. kızları nem kubbesinde tutmaya devam ediyorum. 7. günde kubbeleri yapraklar çirkinleştiği için çıkardım. Nem makinasıyla nem veriyorum.)
👉Week2: we are on day 12 I continue the same routine by just adjusting the light, I will do a transpalant on the 15th day.
I did a transpalant to 15lt pots on the 14th day and used revive to relieve stress.
(12. gündeyiz, aynı rutinle devam ediyorum, 15. günde bitkilere transpalant yapıcam. 20. günde de belki topping.
14. günde 15 litre saksılara ekim yaptım, stresi azaltmalası için revive kullandım)
👉Week3: They seem to be developing well after the transpalant on the 18th day! Everything is fine
On the 20th day, I topping one of the plants, but I did not touch the other plant because I saw the pistil nests.
(18. günde yapılan transpalanttan sonra iyi bir gelişme gösteriyorlar! Herşey yolunda
20. günde bir bitkiye topping yaptım, diğerinde pistil yuvası gördüğüm için yapmadım)
👉Week4: I did low stress training on the 21st day on the plant that I did not top.
I continue LST on the 24th day, the condition of the plants is very good, one of them is considered to be in bloom.
(21. günde topping yapmadığım bitkiye lst yaptım.
24. günde LST yi devam ettiriyorum, bitkilerin durumu gayet iyi, bir tanesi çiçeklenmeye girdi sayılır)
Bloom
👉Week5: Everything is going well, the pistils are starting to form, I see bruises on the inside of the buds of the plant on the right, I hope I have purple buds 😻😻
(her şey yolunda ilerliyor, sağdaki bitkinin tomurcuklarında morlaşmalar görüyorum, sanırım mor sömekli olacak 😻 )
👉Week6: Standart week