
Likes
Comments
Share


@Boilly
Follow
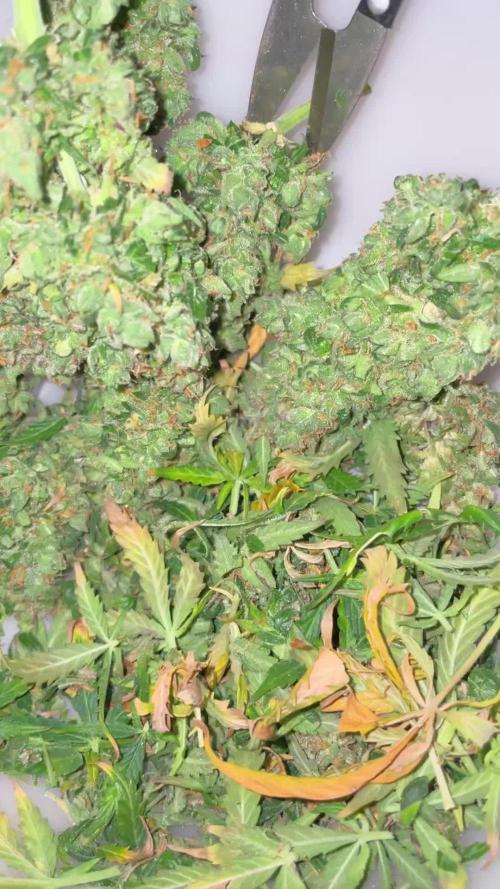
Considering the weather was fairly cooperate but cool at first and doing lst and not always being around my plants I'm happy with the results. Easy to grow fairly bug resistant. Disease free. Did get some bud rot maybe a total of 10 grams. Drying time was 2 weeks trimmed and curing in jars now. I am disappointed in crop king as I've herd bad things about them this year and disappointed with what I got from them as in almost all 4 plants were different and I mean strain wise not phenotype.


Likes
17
Share


@Gardengobblin
Follow
Un de mes 3 girl scout cookies est prèt pour le séchage les autre continue le développement leur structure des tête.
Un des 2 strawberry pie a de la peine a se remplir les tête elle sera plus flufy un peut mais tout de même très belle .

Likes
5
Share

@Ninjabuds
Follow
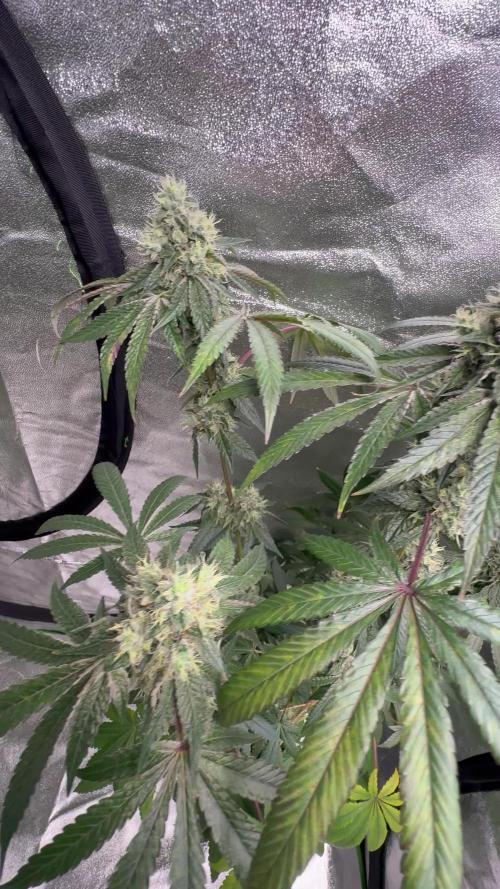
Black Cherry Gushers from Barney's Farm was a big plant with some seriously chunky nugs. The pistils stayed pretty light, but the trichomes were still on point. It's got that classic Barney's Farm quality – big yields and a unique look. Definitely a fun one to grow!
I recently upgraded to the GrowPro Solutions Under Canopy lights, and wow, what a difference! The colors on my plants are seriously popping – they look so vibrant. Plus, I think it really helped them finish strong. If you're looking to boost your grow, I'd definitely recommend checking these out.

Processing
Likes
14
Share

@patatesspor
Follow
Last week I didn't have time to make an entry. But this week here I am, and with a video!
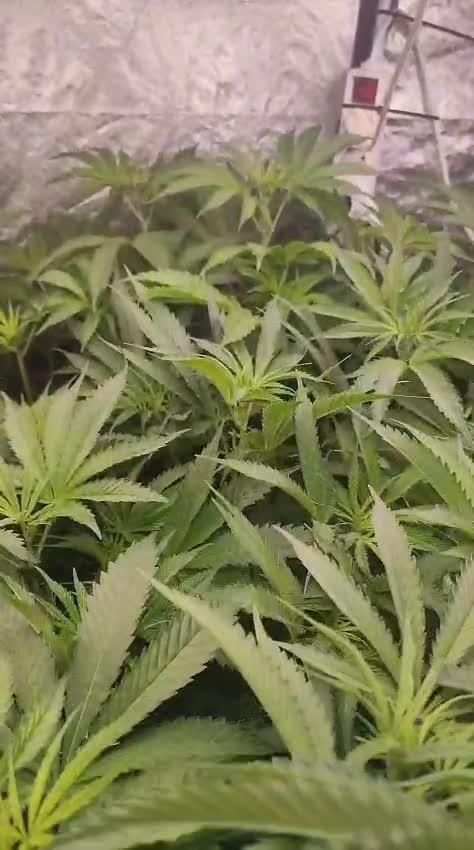
The main stem and primaries are thick as f***. The bush has become monstrous but I manage to get airflow underneath the plant as well. Tied some of the main branches in the last week, but no more tying as it gets much bushy. As the fan leaves are huge and leaning down around the pot, added some side support to raise the sides so the air can go underneath the canopy.
I'm tucking less as I think of switching to 12/12 in a week. I raised the lights but got less increase in height than the raised amount.
I am not thinking on defoliation of any kind as I do not like taking living leaves away from the plant. But if it is too important and I am missing A LOT by not defoliating the lower leaves, please comment with detailed suggestions so I can apply them. But the leaves are very healthy, so I don't want to take any of them away.
Now I have 6 white, 4 yellow bulbs and a 45w white cfl. But during flower, I plant on changing the white cfl to 32w yellow, and ad 2 more yellow bulbs. In total it will add up to 180w (18000 Lumens from the leds, 6 white 6 yellow) and 2250 lumens from the yelllow CFL. Maybe ı will add a second 32w yellow cfl mid flower.
Thanks for reading, and may all plants on earth thrive at least as this guy!
Likes
26
Share


@TheWeedaltor
Follow
3 girls of the same family, eating same food, sleeping under same roof but running at different speeds 💚💚💚

Likes
42
Share


@TheCannaProphet
Follow
~Humboldt Seed Co. AMHERST SOUR DIESEL~
???Secret origins???
The mystery of the unknown🧐
Amherst Sour Diesel is a cannabis seed whose origins are kept a secret. This wonderful vigorous marijuana plant will reward your work with large, elongated, compact buds complemented by a rich complex aroma. Indoors it performs best with a short growth and outdoors, in temperate, warm, dry and Mediterranean climates or in a greenhouse. A marijuana plant that boasts balanced properties.
-Top-notch flavor and effect
-Idyllic feelings to treat the senses
-The aroma of this cannabis hybrid is a pleasant combination of ripe fruit and oil. The flavor is rich and complex, with hints of tropical fruit, oil and exotic wood.
-The effect, typically Sativa, is euphoric, uplifting, powerful and long-lasting. A cannabis strain Sativa lovers will know how to appreciate.
________________________________________________________________________________________________________________________________________________________________________________________________________________________________________________________________________________________________________________________________________________________________________________________________________________________________________________________
Tech Specs:
~Amherst Sour Diesel~
Feminized
Genotype: 20% Indica / 80% Sativa
Cross: Chemdawg x Amherst Super Skunk
Suitable for: Indoors and outdoors
Indoor flowering: 65-70 days
Indoor yield: 400-600 g/m2
Outdoor harvest time: Late October
Outdoor yield: 2000-3000 g/plant
Outdoor height: 2-3 m
THC: 27%
CBD: 0.1%
________________________________________________________________________________________________________________________________________________________________________________________________________________________________________________________________________________________________________________________________________________________________________________________________________________________________________________________
THE SETUP:
~Planted into Jiffy Peat Pellets that were hydrated with de-chlorinated water with SuperThrive added then ph'd to 6.0 @ 80℉
~Grown 100% organic in 10g fabric pots with Mother Earth 70/30 Coco/Perlite medium amended with 2tbs/g of Down To Earth 4-4-4 / 2 cups/g of Earthworm Castings / 1tbs/g of Dr. Earth Flower Girl 3-9-4, 1tbs/g of Dr. Earth Bat Guano, 3/4 cup of Down To Earth Azomite and 1 tsp/g Down To Earth Fish Bone Meal.
~24hr light cycle during Germination / 19/5 light cycle for Vegetation and 12/12 for Flower
~Straight water ph'd @ 6.2-6.8 when needed and weekly Compost Tea's.
________________________________________________________________________________________________________________________________________________________________________________________________________________________________________________________________________________________________________________________________________________________________________________________________________________________________________________________
WEEKLY UPDATES:
9/13- With approx. 9 weeks of growth behind her now she's going into her 4th week of flower now and let me tell you the pictures don't do her justice... She has really come along well! 😍
She was given Compost Tea yesterday and today was still fairly heavy so I skipped watering and just removed a few leaves to maintain light penetration, turned her pot and sat and chatted with her awhile!
9/15- Well she really must have liked that last batch of Compost Tea as she looks exceptionally vibrant today!
She's continuing on her mission of stacking her flowers, which are developing beautifully and have a delicious sweet fruity aroma to them right now.
I did not water yesterday, so today I watered with 0.75g of straight de-chlorinated water that was ph'd to 6.5 @ 72℉ and rotated her pot... Damn she is looking great! 🤩💖
9/17- Yesterday I top dressed her with 1/4 cup of Down To Earth Bio-Fish then watered it in with 0.75g of straight de-chlorinated water that was ph'd to 6.5 @ 72℉.
Her flowering is continuing beautifully and she's smelling stronger every day it seems! I'm staying on top of tucking leaves blocking light and turning her pot daily as well.
9/19- Four weeks of flower on the books! We're almost halfway there now, she's stacking her flowers tightly going into Week Five and she's looking phenomenal! 🤩
When I watered her today I added 1 tbsp/g each of Kelp Extract and Fish Emulsion (both liquid) to the 0.75g of straight de-chlorinated water she received, which was ph'd to 6.2 @ 74℉.
~Thanks for stopping in! Things should be getting a lot more interesting in the coming weeks...Stay lifted and be Blessed! 😎🙏~

Likes
16
Share


@HowtoBubatz
Follow
As the plant enters the fifth week of flowering, the first trichomes have begun to form.
The buds have started to thicken considerably during this week. They are becoming denser and more robust, which indicates that the plant is channeling its energy into producing larger, more resinous flowers.
Throughout the growth process, the cannabis plant has shown no signs of health issues.
It has remained vigorous and resilient, with no observable deficiencies or diseases.
To ensure optimal light penetration and airflow, the plant was lightly defoliated this week.
The cannabis plant is progressing well in its fifth week of flowering.
The formation of trichomes, the thickening of buds, and the plant's overall health are all promising indicators of a successful flowering phase.

Likes
6
Share


@GreenMunchkin
Follow
Day 45 - 26/11 - She is looking very good, leaves a perky and buds are growing.
Day 47 - 28/11 - The trichome production is really starting nicely, I can start smelling her.
Day 49 - 30/11 - She was top dressed with fresh vermicast and a few teaspoon of a top dress mix (at the bottom), all of that was mulched with a layer of erograstus grass.
---------
Top dress mix :
Equal parts Alfalfa meal, Rock dust, Kelp meal, Insect frass.


Likes
49
Share


@masterofsmeagol
Follow
8/15 Yesterday the girls finally got some sun. They're flowering. Like crazy. I do need to do an application of BT once this rain stops. It just started up again. Went back over and things were dry. I decided to hold off watering until tomorrow when I feed.
8/16 Watered the 50 2 gallons, 10 1 gallon, and the rest about 1.5 gallons. I fed a pint to the ten, 2.5 pints to the 30 and 2.5 pints to the FIMMed bluecheese that looked hungry. This way I can tell if they can handle larger doses. I'd like to keep it as small and simple as possible. Gave me a fright this morning when a sheriff pulled in while I was feeding. He was on his way to a neighbors but it looked like he was just admiring things lol. I'm all legals there's no problem there. I put off spraying BT last night because dad had a couple ppl drinking and I didnt want to interact with them. Plus it was to early. The sun hadn't crested the barn yet. At least now u know what time to go spray. I'm finding some lady bugs and I killed my FIRST aphid of the season. I still have caterpillar holes in some leaves though so I might as well hit them with the BT (even though I actively hunt them). No one ever said growing cannabis is easy. Oh and my soil must be BANGING because I found some mushrooms growing in it and like a mycelium web which is awesome.
8/17 This was a quick morning due to an upcoming doctor's appointment. Removed some grass that had grown on the tar from spilt soil as it had diseases on it. I don't want that spreading to my plants. I have one blueberry cheese that I FIMed with four cola's that doesn't have as many leaves and has dropped a few leaves but looking at ot from the other side it doesnt look as open. I know that these girls are transitioning and this is the time I lose leaves. However some plants still seem totally green with no problems despite flowering. I'm wondering if it's a specific phenome thing. I also noticed that the caterpillars are still there and this morning would've been a great time to apply BT but I didn't have time and since I upped the feed I didnt want to do two things at once and have a problem and not know what it is.
8/18 Rained overnight. Plants were soaked. It's not raining now. Plants are definitely overwatered. I'm losing a few more leaves that are yellowing on the bottom interior of a couple plants. Some of it could be from the transition to flower ir the large amount of rain we've been getting. At least my drainage is really good. I need to pull the fence out and co soder cutting a pallet I. Half to better utilize space. I know I say this stuff all the time and I'm not sure it NEEDS to be done. What DOES need to be done sooner rather than later is to apply BT. I can see the damage from them. It's not bad but I want to avoid botrytis as much as possible so those pillars have got to go. Otherwise I've never had plants this healthy and it's been a real ahotty season. Boy those 10th planet's are all mice and green and healthy looking. I'm really looking forward to flowering these strains and see what they can do. I'm already greatly impressed with what I've experienced so far. UPDATE: Wasn't raining earlier then it Rained off and on but just a light steady rain that plants love but it's 3:30 now and it's pouring. Guess I won't be applying BT tonight. We need some sunshine but unfortunately I can't control the weather. Just sitting here thinking I was wondering about using Plant Doctor preventatively just due to the steady rain but I noticed mushrooms growing in my soil and since I haven't not9ced any type of fungal problem I'll revisit that idea another time. Polycarbonate roof or even some form clear plastic and a rough frame of pvc or extra lumber. Theoretically I believe I could move them all indoors for a little bit if need be but that would he a huge pain in the ass. Honestly I've got great drainage and my watering seems pretty good so I might be alright doing nothing. We shall see knock on wood.
8/19 Plants were soaked this A.M. I took a video and uploaded it (which takes forever). It's sunny though today and after the sun comes out after a period of rain the plants grow like crazy. Everything is flowering nicely. I think I can go to the end of October. I talked to a lady today that said she'd already harvested some of her peanut butter breath clones. It's my buddies mom and if you look back at one of my diaries NY mendo breath was done in September. These girls have a ways to go but the are explosively flowering which is good. It's easy to tell which strain is which. Pheno's vary but the flowers on the plants are easy to distinguish from one another. I've also never had plants stay this healthy green this long! Previously I'd have multiple pests, wpm and maybe septoria at this point. I think I've upped my game. Knock on wood. My worst problem now is worrying when to spray BT for the miner caterpillar problem. I have wasps, lady bugs and a shit ton of birds from the 3 bird feeders. I see them dart in and out of my cage. Chances are I'll spray BT tonight and take some pictures if it's nice out.
8/20 The sun is finally out. Bags are still heavy. Looks like it Rained again. I found caterpillar shit so I REALLY need to get that BT applied. I also saw minor damage to a budsite on a low hanging branch. Looks like those fucking earwigs bur I'm probably being paranoid. I also had to remove the rope that I was using to support "the big cheese" because with all this wind and rain it "rubbed" against the stem and caused an injury. I don't need that now anyway with the trellis up. Bids are developing rapidly and stacking up nicely. I have a couple plants that aren't as green as the others bit it may be do to all the rain we've been getting. I think I need to increase the volume of liquid i give my plants when I feed. Next feed I'll be doing at LEAST a quart. Due to my w8fes illness I haven't been able to spend as much time there as I should. No fungal stuff "YET". I have seen some leaves that show the plants have been over watered. Drainage is good though. I forgot to upload the video from this morning and it's uploading super slow so I'm gonna have to upload it tomorrow
8/21 Awesome. Went to town and left without going to my doctors appointment. Good job man. 👏 ANYWAY....My phone was dead when I went to town so I coukd only upload one video. I'll have to do the others later. I mixed up a batch of bt 1 tablespoon with half gallon of water (as that's what this hand mister holds. I went around the cage and sprayed every angle. Then I went to each individual plant and sprayed while spreaking the branches to make sure I got the interior. I used almost the entire half gallon so I'm hoping this will help. Bags were heavy but doesn't take them long to dry out. I'm wondering if the yellowing that is moving up (on the small purple punch and the one in the tote) is because they need more nutes, they're transitioning to flower and really stacking up or because they've been over watered with all this rain. Opinions are more than welcome. I'll check the girls tonight and if the are wet enough I'll feed and at a higher volume. If they aren't ill wait till they get their full water.
MY WIFE WAS HAVING AN "MEDICAL PROBLEM AND SO ON THE WAY TO THE DOCTORS I CHECKED THE PLANTS. THE 10TH PKAMETS WRRE DROOPING. I QUICKLY MIXED UP ENOUGH TO FEED EVERYTHING AT LEAST A GALLON AND THEN GAVE THE ONES THAT WERE THE WORST LIKE AN EXTRA HALF GALLON. JUST ENOUGH TILL WE GET OUT OF THE ER THEN I'LL GIVE THEM THE OTHER HALF OF WATER AND ILL FEED THEM. AT LEAST MY WIFE IS OK. UPDATE: Took my wife to the hospital. They did a shit ton of nothing which is par for the course. However, luckily for me (yeah right) I got back early enough to give the plants another half gallon of water each and then I fed increasing the volume to 2.5 pints (upping the big bloom to 3 tsps per gallon) but I ran out of feed on the last plant. I only mixed up two gallons and it was super dark so thar one container plant will need to be fed tomorrow I guess. This is masterofsmeagal signing off to fucking FINALLY get stoned!


Likes
26
Share


@pifflestikkz
Follow
Day 29
29/07/24 Monday
Nice feeding today with De-chlorinated tap water pH 6.
Gave her 300 ml and she had a small run off.
Getting chunky in the stem now 💪💚
Day 31
31/07/24 Wednesday
De-chlorinated water pH 6 today with Plagron pk13-14 5ml to 5L
Plagron power buds 5ml to 5L
Used 300ml of the 5L solution.
I will be using these on water days from now on as they are advised to be used every irrigation.
We'll see how they perform 💪💚
Day 32
01/08/24 Thursday
Another feed today using de-chlorinated tap water pH 6, there now taking 300ml every evening.
Day 35
04/08/24 Sunday
END OF WEEK 😁
De-chlorinated tap water pH 6 today with Plagron products. 300ml each.
Had a issue with leaf invaders this week, I have treated and am checking every 48 hrs so far seems ok and not progressive.
All plants look great, very healthy, one of the Overdose is way behind and due to space maybe culled at flower I'll see how she gets on.


Likes
5
Share


@privateerjosh
Follow
OK so I nearly kill my plants and these were stunted and bonsai like.. Only got 30grams dry weight but were not all cbd and definitely contained thc.. Not so good for what the intended use..
But it's like opium...


Likes
5
Share


@Ninjabuds
Follow
It's amazing how quickly the weather can change. Just a few weeks ago we were bundled up in our warmest coats, and now it's finally starting to feel like springtime. With temps in the 40s and 50s, it's the perfect time to get outside and enjoy the sunshine.
My pound cake plant is finally getting somewhere. It's totally weird, because the stems turned this super cool purple color. Soon it's going to be covered in pound cake buds that'll be ready to eat. I'm thinking fancy frosting might be the way to go, but I'm also considering something fruity on top.
Likes
48
Share


@xbrico
Follow
Evening all...back on it AGAIN!!!! Worst is, in the middle of a heat wave (Hottest day every recorded in this part of the world a couple of days in a row!!!)...still need to finish trimming my last crop!!! 😰 Will get that done over the next couple of days as these girls need rehoused!!!
So, got a cloner at the start of the year...was planning on clone a spare wedding cake I had but that sort of went to pot and life got in the way and that didn't happen. As I also got a hold of an Ultrasonic Mist Generator, I thought I'd give this "Fogponics" Germination thing a go!!! Seeing as @Sweet_Seeds donated a few Magical Beans to my cause, I thought I'd give their genetics a whirl. The Red Hot cookies looked too cool to pass up on!!!
So, got the beans popped on the 12th of July and by the Thursday, they were showing their wee heads. These are strong wee plants!!! Vigorous as you like!!!
Got them into the 'fogponics' machine and let them rip (Under 2x11W T5 Sunblaster 6400K's and a Amazon Special LED light for extra Spectrum) and they seem to be coming on grand. Noticed some yellow spots on the leaves and in 2 minds if it was:
A. calcium (As starter plugs are Coir and I didn't put calmag in the plug hydration mix - Jiffy Original plugs are supposed to be buffered for this!!!);
B. if I should have broken and washed them out of the Coir and put them into straight Hydroton (The fog could have been saturating the Coir and choking the internal roots a bit) or
C. if its just the abusive heat we've been having here (In a country where A/C is basically unheard off as heat doesn't exist outside!!! 😋).
Roots are ripping out of the net pots now so they're about as ready for transplant as can be...just wanna give a day or 2 more to see if the heat here settles as I can't adequately cool the area they're going too - but then again, under LED so heat may be good as it doesn't heat the leaf surface up as much! Plus I have a couple of plants to trim...still hanging in their humidor tent when is needed again for growing!
Think this will also be the retirement party for the Wilma. Going to build an Undercurrent Fallponics system when this run is done (Wont have time to get it setup before these girls need forever homes!!!). Have the crates bought and a bit of research done on how to DIY a build so hopefully this turns out to be a decent run. Also have a few people with building experience on hand to give advice.
Since last grow:
Lights have been upgraded to a Geekbeast 630W Pro LED (3500K Spectrum - UV 385nm and Far Red 730nm built in [won't use the 730's as they can't be run independent of the Main Lights...be wary of this if you buy one off Alibaba for the 730's built in!!!] - Will run the 385UV's though throughout the grow for more blue...will run then 3 hours after lights on to until 3hours before lights off).
Also procured an InvisibleSun LED 730nm Flower Initiator (Will use this for EOD Far Red treatment to try a 13/11 flower cycle) and a Migro UVB310 fixture - For the Trikes!!! 😝.
Have a Haliea 300A winging its way to me as we speak.
Have some Non-Stick Micro-tips flying in from the Grand old US of A
a will to get a better, more consistent yield.
Think that's about all I have for now...Happy Growing all!!! 💪


Likes
Comments
Share

@GrowVater
Follow
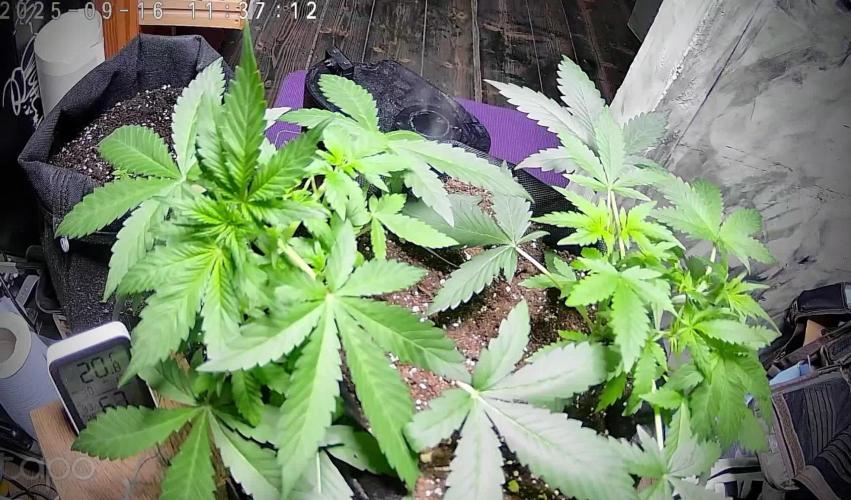
Ein bisschen Training für einen gleichmäßigen wuchs. Störende Blätter wurden entfernt.

