Likes
Comments
Share


@KingCatfish
Follow
This is my first grow. And as a first timer I have many question on whether anything I'm doing is going to be the right things. So I got these seeds of a guy on Facebook and when they came in the mail I already had question in the origin of the seeds but nonetheless I got some seeds of super lemons haze and girl scout cookies and had them going in soil within a week or so. I used a mix of regular soil and supersoil as my soil mix as well as some Coco husk hairs mix in lightly. I water every 2-3 days as the soil dry almost completely within 3 days


Likes
181
Share


@GODSGIFT_2005_JM
Follow
🍼Greenhouse Feeding BioGrow & Bio Bloom
🌱GARDEN OF GREEN SEEDS
⛺️MARSHYDRO
The ⛺️ has a small door 🚪 on the sides which is useful for mid section groom room work. 🤩
☀️ by VIPARSPECTRA (models: P2000 & XS 2000)

Likes
27
Share


@RDWCGrowing
Follow
1/20/2023- So much to do pre grow and over the next 16 days, absolute first order of business is that I have to take down my current Grow---TIMBER-- Then I have a list of things I have to get done in order to be ready to start this grow 1 Feb.
With that said
T - 2 days until start 48 hour Flush
T - 2 days until Start 48 hours of Light
T - 4 days until TIMBER!!!
Items that need to be done before 1 Feb 2023
1. I need to clean the tent out
2. I need to clean the equipment- Proper Sanitization between grows in Hydro is a must!!!
3. I need to get the hole in the ceiling above my tent repaired- For my last grow I had a deep sink installed in my grow room, to make Hydroponics a little bit easier and have a water source in the same room. The seals on the pipes they were installing broke and leaked through the ceiling causing some damage all the way across my grow room, I was already weeks into my grow and couldn't risk them working above my tent and it would have been very awkward positon for them to be working in as well, so have to get this done quickly between chop and germination.
4. I have to install my new light- I was using a Vivosun 4000 and for this grow I am switching up to a Spider-farmer SF 7000.
1/20/23- For this upcoming grow I am working with M/F photo seeds so I ordered 4 Sex determination kits. I recieved my my 4 Sex determination testing kits from Rimrock Analytics today. I will be using these to test my plants at week 2 of Veg so that when/if I take clones I know I am taking them off females. As well as I don't want to accidently pollinate my tent during this grow I am looking for big beautiful buds not seeded buds. :-)
1/24/2023- Harvest of current grow- Started at 2:00pm and finshed wet trim and firt batch into the freeze dryer.
1/25/2023- Next batch into the freeze dryer and cleaning all my equipment for this Grow.
T-1 Day until the workers are supposed to be here to fix the hole in the Grow Room.
T-3 days until I instll my new Gorilla Grow Tent and my New Light Spider Farmer SE-7000 for this grow.
T-7 Days until Start of Germination
1/26/2023- Harvest is done ran through the Freeze dryer and dry tim completed.
1/27/2023- Grow Room repairs completed. Hole is gone Letting the paint dry before I install the new tent.
T-2 days until Install the New Gorilla Grow tent and the new Light
T-3 days until I put the hydro equipment in the new tent
T-5 days until Germination
1/29/2023- Day 0- Final Pre Germination activities
Germination Start T-3 days
The paint on the ceiling was dry and it was time to finish prepping for Germination. I got the following items knocked off my list.
New 4X4 Gorilla Grow Tent is up and ready
New Spider Farmer SE-7000 Light is installed- Thanks Moony Grows for the suggestion and for the Code that got me some money off and free shipping (Moonygrows)!! I turned the lights all the way up to max and set the timer to 18/6 0600-0000. I will keep an eye on the temperature and humidity without my plants and see how hot it gets with the new light.
I put my Hydro system back together and put in 40 gallons of water into it, time to monitor for leaks the next few days.
I Setup my cloning machine for Germination Days 3-11
1/30/2023
let me break down the situation, ROOM in the TENT.. Enough said.. No really I tried putting my exhaust system up in the new tent with my new light, The light is so big corner to corner that it really didn't give me enough room for the lights be be raised, with the exahust hanging the buckets my plants are Starting in are 2 and 1/2 feet off the ground, great for plenty of room for roots but not so great for upwards space for the plant to grow. In a 6' 11 tent with the exauhst in side and hanging that only gave me a little over 4 feet of grow room to play with. My last grow if you saw my diary, anyone could tell I was struggling to keep the buds off the lights. No good, Since space was such an issue I was running my carbon filter inside on the ground but It really needed to be up sucking the heat out not shooting the cool out. With that setup I was sucking air through the filter and pushing it out the tent at a bottom exhaust hole cold out. Wasn't doing me any good for my heat. I was hitting temps of up to 85 degrees. I bought a portable AC unit and have been running it in the grow room to try and keep temps below 85 and I have had to lower the power on my lights during grow also not ideal.. With that said a friend of mine MoonyGrows (Check out his diary) took the time to look at my issue send me a picture of my grow tent setup with detailed instructions on how to suck the air out from the top but putting my filter and fan on top of my tent so no room issue and I am sucking the air out from the top where the heat is instead of pushing the air out from the bottom where the cool is... THANK YOU MoonyGrows For taking the time to help me get this straightened out.. Now I have room and I have the exhausts working right and now my temps with everything at 100% are topping out at 80 this dropped the temp by 5 + degrees at 100% max.
T-2 days until Start of Germination
Prepped my seed tray with humidity dome
Prepped my Rapid Rooter plugs. I Used RO water, and I added a few drops of Hydrogen peroxide to Oxygenate the water. I then PH balanced between 5.7-6.0 the same that they will be getting in the Cloning Machine and when they get to thier final grow pod. I perfere the 5.8x range and I hit 5.84 for these rapid rooters. If you want to see a complete video on the process HowWeedGrow has an amzing video that shows step by step how to do it and explains it better than I ever could including how to plant the seeds. Which I will cover when I get to that step on Wed. https://www.howweedgrow.com/how-germinate-weed-seeds-cannabis-rapid-rooters/
1/31/2023
T-1 day until Germination Start
All set and ready have my Rapid Rooter plugs ready to go have my seeds out.. Have my seed tray warming up tonight. Tomorrow morning right into the Rapid Rooter then strait into the tray. I will spray the dome to start the humidity in there.
2/1/2023
Germination Day!!
Let the games begin!
0600am Put the seeds into the Root Riots. And then put the seeded Root Riots into their first home the Seed tray. I have them under the light 24/7. Sprayed the dome
7:30pm Sprayed the Dome to keep humidity going on the dome.
2/2/2023
Day 1 of Germination
Sprayed the Dome in the morning
Sprayed the Dome in the evening
2/3/2023
Day 2 of Germination
Roots are starting to come out the bottom of the root riot plugs and the heads are slowly popping out of Number 4 just below the surface.
Afternoon- Number 4 has popped up
Evening- Number 3 has popped up as well. Happy Dance!!
2/4/2023
Day 3 - Germination
Surprise Surprise Surprise- all 4 have now poked their heads up.. Happy day!! 100% Germination succeeded.
Now major milestone to track is how many are female and how many are male.
I will take look at the roots this afternoon/evening and see if they have enough root to go into the cloning machine for the next 7 days before they go into their Hydro Pods.
Day 3 - Germination - Evening..
Roots looked good and they were tall enough to make it into the cloning machine.
Now that they are all in the cloning machine I have switched the lighting to veg state 18 on 6 off.
2/5/2023
Day 4 - Germination - Morning
All the Ladies (fingers crossed) looking great stretching nicely and look nice and green, Photo synthesis underway....
UPDATE!! After a very interesting POD cast on FSTS by Dr. Bruce Bugsbee from Utah University, I have shifted my lighting to 24 hours on through seedling and then I am going to shift to 20 hours on the rest of Veg.
2/6/2023
Day 5 - Germination
While Checking on my conditions inside the new tent last night, I found that the Humidity was down to 39 Percent. I added an AquaOasis Cool Mist Humidifier, the reason I selected this humidifier is that I needed one that could be turned on and off utilizing my Inkbird Humidity Controller IHC200 that I have my Pro Breeze Dehumidifier currently running with.
Root structures are starting to get there about 1/4 of an inch.
2/7/2023
Day 6 - Germination
Everything seems on track more roots poking out of each today. They are each getting a little taller as well.
Checked in the evening and number 3 was drooping the Root riot plug on the bottome was dry and the roots were not in the water yet. I raised the water just enough that the longest root that was sticking out is now hitting the water.
2/8/2023
Day 7 - Germination
Everything looked good while checking in on them this morning number 3 is now full up and no droop again.
2/9/2023
Day 8 - Germination
T-2 days until Plant into Forever Pods and we start week 1 of Veg .. :-)
Surprising thing to me is that number 1 and 2 were later in popping then 3 and 4 but the roots are growing longer in 1 and 2.
2/10/2023
Day 9 - Germination
Number 1 and Number 2 are definitely ready for transplant today.. Based on how they were yesterday and where they are today I am hoping by tomorrow 3 and 4 are ready. Today they look to me where 1 and 2 did yesterday.. I really hope 3 and 4 catch up by tomorrow since..
T-1 day until transplant to new/ final home for grow.
Need the roots long enough to have some clay down in the basket to keep the root riot out of the water and only roots in the water..
2/11/2023
Day 10 - Germination
Today they got placed in thier forever Home, 7 days from Sprout and 7 days until Week 1 Start.
PPM- 180 this is water out of the Tap
Temp Water: 70.7
Temp Tent: 77
Humidity: 40% I have a humidifier going 24/7 to try and bring this up.. I also have Humidity Domes on each plant.
2/12/2023
Day 11 - Germination
Sprayed the domes, all are looking good.. Nothing much to do at this phase but Keep monitoring the PH level in the system and making sure they have a comfortable home.
T-6 days until Week 1 start
2/13/2023
Day 12 - Germination
Sprayed the domes, They were looking a little yellow today so I moved the light down to assist. Nothing much to do at this phase but Keep monitoring the PH level in the system and making sure they have a comfortable home.
T-5 days until Week 1 start
2/14/2023
Day 13 - Germination
Sprayed the domes, They were looking a little Florissant yellow today, with what looks like slight burn on the tips, I talked with a fellow grower and we agreed that It was probably that I was drowning them, Yes you can drown you plants even in Hydro, but only early on.. :-) It usually happens with the water being too high, which soaks not only the roots but the medium (root Riot plug in this case). I lowered the water from touching the bottom of the pot to about 1" away. This will probably take 3-4 days to resolve. I will continue my daily monitoring.
T-4 days until Week 1 start
2/15/2023
Day 14 - Germination
Sprayed the domes, continue my daily monitoring they look a little darker green instead of lime green now that I lowered the water levels in the system, so I think that I might have resolved the issue but it will take a few days for recovery to happen.
T-3 days until Week 1 start
2/16/2023
Day 15 - Germination
I looked in on them this morning, 3 and 4 look like they are doing well and recovering nicely. Number 1 not so much it has brown spots on the leaves, this very well can still be a side effect of the overwatering but I decide to go ahead and add Nutes earlier than I was planning just incase. I was going to wait until Saturday but I think intervention is necessary now especially after drowning them early on.
I added 1/2 what I am planning on adding for week 1 start. I also think I am going to adjust my chart to add 1/2 2 days after plant from now on. I don't think it would hurt it to have some Nutes to pull from.
.25ml/Gal Calmag = 12.5ml
1ml/gal GH FloraMicro= 50ml
1ml/gal GH FloraGro = 50ml
1ml/gal GH FloraBloom = 50ml
T-2 days until Week 1 start = I will drain the system and start it over on Saturday with Week 1 Nutes.
2/17/2023
Day 16- Germination
I didn't even want to post today after looking in on them this morning, 3 of the 4 are now showing signs of dronwing.. Brown spots on the leaves, the water levels were still too high.. I drained about another inch out of the tanks.. Will see how quick they recover.. I start week 1 tomorrow and will have to ensure my water levels are at least 1" away from the basket on this round.

Likes
226
Share


@Kitties_and_Colas
Follow
~_~_~_~_~_~_~_~_~_~_~_~_~_~_~_~_~_~_~_~_~_~_~_~_~_~_~_~_~_~_~_~_~_~_~_~_~_~_~_~_~_~_~_~_~_~_~_~_~_~_~_~_~_~_~_~_~_~_~_~_~_~_~_~_~_~_~_~_~_~_~_~_~_~
10/16/21
😼 we upload the good, the bad and the ugly, the end of this run definitely falls in that last category lol 😹.. despite the mess, it should still be a decent harvest ❤️..Trichs are getting cloudy, maybe 1-2 more weeks before they're done..the color is really starting to fade, the finish line is in sight! Happy harvests everyone!!
💡🌱😽💨
~_~_~_~_~_~_~_~_~_~_~_~_~_~_~_~_~_~_~_~_~_~_~_~_~_~_~_~_~_~_~_~_~_~_~_~_~_~_~_~_~_~_~_~_~_~_~_~_~_~_~_~_~_~_~_~_~_~_~_~_~_~_~_~_~_~_~_~_~_~_~_~_~_~

Likes
30
Share


@valiotoro
Follow
Hello everyone, all good for this week 😎
They grow fast and with a beautiful green colour on the leaves!
In this grow i will be testing out Plagron Nutrients and Mars Hydro SP 6500

Likes
15
Share

@DogDoctorOfficial
Follow
🌿 Super Silver Haze – Harvest Report (Zamnesia Seeds)
Grower: Dog Doctor
Strain: Super Silver Haze
Breeder: Zamnesia Seeds
Lights: Future of Grow Black Series 600W | ThinkGrow ICL-300 | Lumatek Zeus 465 Compact Pro
Control System: TrolMaster Hydro-X Ecosystem
Medium: Custom Super Soil Mix with Aptus Holland Amendments
Environment: 8x8 Shared Tent | Day Temp 29.6°C | RH 67% | CO₂ 700 ppm
✨ From Seed to Soul – A Legendary Journey
What a ride this one was. From the first spark of life in the Cannakan to the final aromatic breath from the Groove Bags, this Super Silver Haze journey was everything—a perfect reflection of the plant herself: bright, strong, unpredictable, and utterly timeless.
Three seeds were germinated — all three came out strong, though one was shy. From there, two phenos took the lead, both with stunning vigor, hybrid leaves, and perfectly compact growth. Throughout veg and flower, they mirrored each other so closely it felt like growing twins.
There were highs — lush foliage, incredible root growth, and perfect structure — and there were lows — a bout of bud rot, handled quickly and carefully. But like in life, every setback was a lesson. The environment taught us, the plants guided us, and we adapted.
💧 Feeding & Soil
The foundation of this run was a custom super soil charged with Aptus Holland amendments — Mycor-Mix, Micro-Mix, and Substrate Buffer Powder.
Throughout veg and early flower, the girls enjoyed a balanced routine of:
Aptus Regulator – For strength & stress control
Aptus CalMag Boost – Supporting cell structure
Plagron Power Buds, Sugar Royal & Green Sensation – Enhancing bloom, resin & sweetness
Aptus All-in-One Liquid & Top Booster – Brought in at key stages for balance and final push
By the final weeks, we tapered down to pure water — a gentle flush that allowed the plant to use her own reserves. This stage is vital; it purifies the flavor, softens the smoke, and reveals the true essence of the strain.
🌬️ The Harvest
The girls were harvested whole and dried for about 14 days at 60°F (15.5°C) and 60% RH, the perfect “60/60” for slow, even drying.
Branches were ready when they snapped cleanly — a satisfying sound of readiness.
Trimming was done entirely by hand on a Trim Bin, using Zamnesia curved blade scissors — slow, patient, and meditative. Frost everywhere. The gloves were covered in resin, leaving behind sticky charas that smelled like pure nostalgia.
Yields:
🌿 Pheno #1: 153.15 g of dry, dense, frosted flowers
🌿 Pheno #2: 126 g of equally beautiful, slightly sweeter buds
🍋 Aroma, Flavor & Smoke
Open a Groove Bag and you’re met with a wave — sweet citrus, ripe fruit, and that unmistakable Haze spice.
Both phenos share the same terpene fingerprint, but #1 carries a deeper, earthier tone while #2 shines with fruity brightness.
The smoke itself is smooth, creamy, and elegant — full-bodied yet gentle.
Inhale: Fruity citrus sweetness
Exhale: Earthy, classic Haze with a spicy afterglow
It’s like smoking sunshine filtered through memory.
🌀 Curing – Glass & Groove Bags
Curing took place in Groove Bags and glass jars — both excellent, but different in spirit.
Glass jars (Pheno #2): require daily “burping,” opening to let moisture escape.
Groove Bags (Pheno #1): a modern evolution — engineered with breathable film that automatically balances RH. No burping, no fuss, just perfection.
The result? Two styles of cure, both producing world-class aroma and velvet texture.
⚙️ Gear That Shaped the Legend
Zamnesia Seeds – For the timeless Super Silver Haze genetics
Aptus Holland – For balanced, bioavailable nutrition
Plagron – For the bloom magic and resin push
Future of Grow, ThinkGrow, Lumatek – For perfect full-spectrum lighting
TrolMaster Hydro-X System – The digital brain of the grow
Grove Bags – For preserving freshness and flavor
Each piece of gear played a part in writing this chapter.
🌈 Reflections & Gratitude
This run was a story of resilience — of learning, adapting, and never losing faith.
Bud rot appeared, but so did strength. Mistakes came, but so did lessons. And in the end, she rewarded us with medicine so beautiful it transcends the difficulties.
To everyone following the journey — the growers, lovers, haters, dreamers, sponsors, and the Zamnesia family — thank you. This wouldn’t be possible without you.
For the full visual story — from seed to harvest, from green to gold —
🎥 Watch the complete Super Silver Haze grow in 4K on YouTube:
👉 @DogDoctorOfficial
And for more behind-the-scenes magic:
📸 Instagram: @DogDoctorOfficial
📓 GrowDiaries: DogDoctorOfficial
“Every grow, like life, is a cycle.
Some days bring storms, others bring sunlight —
but in the end, what matters is how we grow through them.” 🌿💚
📲 Don’t forget to Subscribe and follow me on Instagram and YouTube @DogDoctorOfficial for exclusive content, real-time updates, and behind-the-scenes magic. You won’t want to miss it.
• GrowDiaries Journal: https://growdiaries.com/grower/dogdoctorofficial
• Instagram: https://www.instagram.com/dogdoctorofficial/
• YouTube: https://www.youtube.com/@dogdoctorofficial
There’s a new series blooming and it’s more than just plants. It’s about process, patience, and paying attention.
⸻
Explore the Gear that Powers My Grow
If you’re curious about the tech I’m using, check out these links:
• Genetics, gear, nutrients, and more – Zamnesia: https://www.zamnesia.com/
• Environmental control & automation – TrolMaster: https://www.trolmaster.eu/
• Advanced LED lighting – Future of Grow: https://www.futureofgrow.com/
• Root and growth nutrition – Aptus Holland: https://aptus-holland.com/
• Nutrient systems & boosters – Plagron: https://plagron.com/en/
• Soil & substrate excellence – PRO-MIX BX: https://www.pthorticulture.com/en-us/products/pro-mix-bx-mycorrhizae
• Curing and storage – Grove Bags: https://grovebags.com/
⸻
As always, this is shared for educational purposes, aiming to spread understanding and appreciation for this plant. Let’s celebrate it responsibly and continue to learn and grow together.
With true love comes happiness. Always believe in yourself, and always do things expecting nothing and with an open heart. Be a giver, and the universe will give back in ways you could never imagine.
💚 Growers love to all 💚
P.S.
Due to the new GrowDiaries upload restrictions, I wasn’t able to include all the photos I wanted for this final week. 🌱✨
If you’d like to see the complete visual story — from seed to harvest — many of the missing shots are shared in the previous weeks’ updates. Please take a look there to enjoy the full evolution of these beautiful Super Silver Haze queens. 🌿💚

Likes
1
Share


@Huckleberry39
Follow
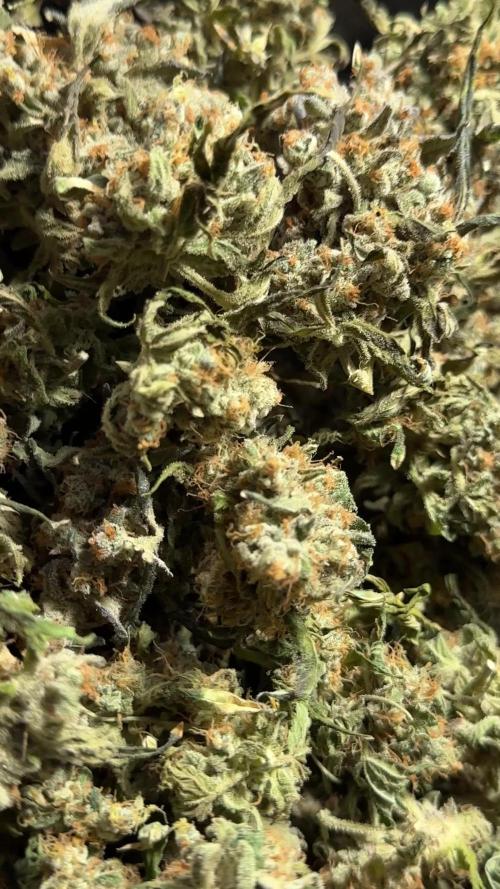
Great grow!! Should end up with over a half a pound off of these 2 and the little I harvested about 2 weeks ago. I got 2 oounces dry off of her. They smell amazing and are covered with trichomes
Likes
3
Share





Processing
Likes
12
Share


@eldruida_lamota
Follow
Power plant xl, una variedad sativa, es de temprana floración.
3/3 unidades, algo tardías en cuanto al desprendimiento del caparazón de la semilla.
Lo demás todo correcto.


Likes
3
Share


@DANNYBLUE1
Follow
Really really happy how these 2 lady’s are turning out. Can’t wait for harvest day!!

Likes
6
Share


@JackSkellington
Follow
le vedo lente oggi e una settimana buona di fioritura e non vedo ancora quasi niente...volevo dargli qualche stimolatore...ma ho paura di mandarle in overfert perche presentano sempre un verde abbastanza scuro solo su altri esemplari sono più chiare...una sembra aver sviluppato una carenza da come si vede in foto...
l esemplare a cui avevo dato il bio grow a reagito bene ora vedro se darglielo ancora +bio bloom vedremo

Likes
57
Share


@nonick123
Follow
Día 13 (06/05) Nos acercamos al final de la fase plántula. A ver si ahora empiezan a crecer de forma explosiva!
He sido muy estricto con los riegos, dejando que el top hasta el nudillo se seque completamente!
Día 14 (07/05) Hago una mejora en la tienda. Hasta ahora tenia intracción pasiva, pero ahora he instalado una turbina para que impulse aire fresco dentro de la tienda
Día 15 (08/05) Con el calor que hace me sorprende que las macetas sigan aguantando la humedad, pero al hundir el nudillo sigue húmeda. Mañana haré un riego de nuevo
Día 16 (09/05) Relleno el top con sustrato para compensar la compactación y dar mas soporte a las plantas
Riego con 300 ml solo H20 - pH 6,2
Día 17 (10/05) Baño de sol de dos horas.
Día 18 (11/05) Baño de sol de dos horas
Día 19 (12/05) Riego 750 ml H2O + Regulator 0,15 ml/l + CaMg-Boost 0,25 ml/l + Startbooster 0,25 ml/l - pH 6.2
💦Nutrients by Aptus Holland - www.aptus-holland.com
🌱Substrate PRO-MIX HP BACILLUS + MYCORRHIZAE - www.pthorticulture.com/en/products/pro-mix-hp-biostimulant-plus-mycorrhizae

Likes
1
Share

@HUMO_Cultiva
Follow
Empezamos la semana 3 de crecimiento desde que brotaron sus primeros cotiledones, su crecimiento es explosivo!!
Pronto empezaremos hacer cortes apicales para empezar a entrenar y luego poner el Scrogg!!!!


Likes
253
Share


@Ju_Bps
Follow
Hello growmies 👩🌾👨🌾🌲🌲,
👋 Girls have a great stretch and coming along nicely with hedgehogs 🦔🦔
Weather is better 👍
💪 Continue training, Working on the scrog.
💧 Give water each 2/3 day
2 l Water + Roots + Bloom + Zym + Sugar Royal (1 + 3 + 1 + 1 ml/l)
2 l Water + Roots + Bloom + Zym + Sugar Royal (1 + 3 + 1 + 1 ml/l)
PH @6
💡Mars Hydro - FC 3000
50% - 40 cm
Mars Hydro Fan kit
Setting 7
Have a good week and see you next week 👋
Thanks community for follow, likes, comments, always a pleasure 👩🌾👨🌾❤️🌲
Mars Hydro - Smart FC3000 300W Samsung LM301B LED Grow Light💡💡
https://www.mars-hydro.com/fc-3000-samsung-lm301b-led-grow-light
Mars Hydro - 6 Inch Inline Fan And Carbon Filter Combo With Thermostat Controller 💨💨
https://www.mars-hydro.com/6-inch-inline-duct-fan-and-carbon-filter-combo-with-thermostat-controller
Fast Buds - GG4 Sherbet FF🌲🌲
https://2fast4buds.com/us/seeds/gg4-sherbet-fast-flowering
Likes
8
Share


@Growyourownathome2x2
Follow
Blue cheese auto day 77 couple of mistakes made first off my two middle shoots stretched out too much during the stretch phase and didn’t seem to be developing at the same rate of the rest of the plant I bent the two tallest tops over breaking one and then not keeping them down they where back up the next day I didn’t want to stress the plant anymore so I left it I then got a light meter and noticed the light was too intense so I have turned the light down now, still some decant looking buds on it and the tops are starting to mature started flushing on Monday the 18th july 90 litres of water ph to 6.5 through my 40litre pot until my ppm runoff was down to 198ppm I will be harvesting in the next two weeks, swipe to the end for video


Likes
6
Share


@organicman
Follow
1 seed dead:
1 strawberry pie
seeded 1 new:
1 strawberry pie
2 seeds dead:
2 euphorias
seeded 1 new:
1 white widow x big bud
___________________________________________
light- and watering schedule: see photos
now:
16 plants
3 x Auto Orange Bud > Dutch Passion (early80's)
3 x Haze Berry Automatic > Royal Queen Seeds (2018)
2 x Auto Euforia > Dutch Passion (late 90's)
2 x Auto Bubblegum > TH Seeds (late 80's)
2 x Original Auto BubbleGum > Fast Buds Company (late 80's)
1 x Strawberry Pie Auto > Fast Buds Company
1 x Gorilla Cookies Auto Seed Stockers (2015)
2 x Auto White Widow x Big Bud > Female Seeds
setup + strategy:
18 seeds
3 x Auto Orange Bud > Dutch Passion (early80's)
3 x Haze Berry Automatic > Royal Queen Seeds (2018)
3 x Auto Euforia > Dutch Passion (late 90's)
2 x Auto Bubblegum > TH Seeds (late 80's)
2 x Original Auto BubbleGum > Fast Buds Company (late 80's)
2 x Strawberry Pie Auto > Fast Buds Company
1 x Gorilla Cookies Auto Seed Stockers (2015)
2 x Auto White Widow x Big Bud > Female Seeds
setup:
18 x gronest 2 liter
60 cm x 120 cm x 180 cm (2 x 4) growtent
4 l humidifier
25 watt axial fan
15 watt clip fan
ro-filter
bath room with a 50 watts room fan (-> carbon filter not necessary)
...and a lot of odds and ends.
grow strategy:
max yield by stressing with:
1. tiny shoes (2 l fabric pots standing on 3 plastic rings (4 cm) for max oxygen)
2. tiny growspace (17 plants on 0.72 sqm)
3. many strains (8 strains)
4. annoying neighbourhood (mixing old - i.e. bubblegum (late 80's) - with young- i.e. hazeberry (2018) - genetics)
5. no stress by light or food or water
plus:
- no lst - no hst - just leaf tucking
- positioning bigger strains (euphoria, orange bud, haze berry) or just bigger phenos on less intense light spots (end of tent + edges)
- music-rotation: 24 hrs reggae (for sativas) - 24 hrs classicals (because it's scientifically proofed) - 24 hrs traditionals from the hindukush region (for the indicas)
max efficiency (min electricity - max yield):
- light: 23 h on - 1 h off
- keeping the distance of 18" (45 cm) and dimming to the right par (lux) - value depending on growing stages (see sheet: beginning 185 par ( 10000 lux/100 watt )/end 340 par ( 18000 lux/175 watt )) => ends up in approx. 150 watts in average over max 12 weeks
temperatur management:
- using approx. max. half of what the lamp can do keeps temperature low:
my tsl 2000 is pulling max. 360 watts of the wall - i need only 175 watts, results in less temperature than using a 175 watts lamp
- adjusting the temperature by using a humidifier outside of tent:
blown in humidity is soaking degrees and is transported out by fan, works much better than doing the same with pure air
summer extreme: no humidifier: 36°C / 35 rh - with humidifier: 29°C / 65 rh
works for 1-2 weeks of real hot summer days, no mould, no signs of stress in two summers
germination:
seeding in soil
spraying "basic"-water: ro-water (22 ppm) + calmag to 180 ppm every 4 - 8 hours
man versus fungus gnat:
5 days before seeding i'm running the tent with "basic"-watered pots as if there were plants inside - led on, fans on, humidifier on. Fungus gnats coming with the soil might take the chance to come out now for breeding. i'm waiting with a 9 mm rifle. in the past i found 6 gnats in 2 of 8 x 50 l biobizz lightmix bags coming out of the soil. i could eliminate every single gnat successfully ;)
rotating harvest:
the little ones will be harvested completely when ready. at this point only the top branches of the big ones will be cut...and the new (basic-watered) pots of the new grow will move into the tent. 2-3 weeks later the second half of the big ones will be cut and the second half of the new grow will move in...
nutes:
individual feeding schedule/once a week:
bloom,grow,topmax,activera,algamic
+ aminopower instead of bio heaven (too expensive)
individual feeding schedule:
veg: 200 - 600 ppm
bloom: 600 - 900 ppm
water:
ro-water with:
veg: 100-150 ppm calmag
bloom: 150 ppm calmag