


Likes
Comments
Share


@StonedandSteady
Follow
AutoBlueberry 9th w/ 4th W/ Flower breed by #DivineSeeds #DivineSeedsSquad #DivineSeedsBreedingCompany
Flowering out and her Smells are already getting Stronger of Gasy and Candied Blueberries! I recently Trained down her branches to expose more Bud sites and Removed the Biggest fan leaves to expose the Bud site's to this Glorious #OsreeQB1000w Full Spectrum Grow Light! I've also Super Cropped, Topped um, Defoliated, Leaf tucked, and Implement the 3D's method like my Broski #TigerfishOrganics to remove the Dead, Dying and Diseased leaves!
Origin:Afghani/Thai
Type:50% Indica/ 40% Sativa/ 10% Ruderalis
Flowering:56 days
THC:22%
Harvest:400-550 g/m2
Height:110-150 cm
They were Growing under the #Growatt600w and in my #TopoLite 24×24×48 Grow Tent but I've Upgraded and Updated it to my #OsreeQB100W I'm also using #TNBNaturals #TheEnhancer Co2 Despersal Canister and using thier Ph⬆️⬇️ for my Decolinated Tap Water!
Green and Growing Up Great! She's Growing into her 4th week of Flower! She's Growing in my special blend of ProMix potting mix, a 1/2 bag of Earthworm castings and 2 light handfuls of Diatomaceous Earth mixed Up well for before transplanted! Diatomaceous Earth: Diatomaceous earth is made from the fossilized remains of tiny, aquatic organisms called diatoms. Their skeletons are made of a natural substance called silica. WHAT IS DIATOMACEOUS EARTH?
In a nutshell, DE comes from the fossilised remains of small marine organisms called diatoms. Over a 30 million year period, these hard-shelled algae collected on the bottom of bodies of water, eventually forming into a type of sedimentary rock. Fast forwarding, it wasn’t until around 1836 that a German peasant Peter Kasten discovered the ivory-coloured, powdery substance while drilling a well in northern Germany. Ever since, the usefulness of DE for multiple purposes, including industrial and horticultural applications, has been well-reported. Just sprinkle some diatomaceous earth on top of your soil and watch mother nature's secret weapon work its magic.CONDITIONS THE SOIL
When it comes to growing cannabis, everyone strives to provide the best soil to grow the best plants—but there’s always a way to make it even better. Making the soil a better medium is called soil conditioning, which is exactly what diatomaceous earth does. It works by improving the retention of moisture in your potting soil, holding a large amount of fluid and drying at a rate that’s much slower. This natural soil additive also helps to retain nutrients and allows for better oxygenation of the substrate. NATURALLY CONTROLS PESTS
DE is an all-natural, safe-to-use substance that doesn’t harm the cannabis plant with toxic chemicals. The nature of diatomaceous earth makes it useful against most types of insect infestation you might be experiencing; and unlike chemical insecticides, insects can’t develop a resistance to the effects of DE. So once they’re gone, they’re gone for good. DE is an abrasive. and when used as an insecticide, it gradually scrapes away an insect’s exoskeleton, absorbs the fluids, and dehydrates insects and other critters to eventual death. IMPROVES PLANT STABILITY
When using DE in your soil, it can be especially beneficial as it frees up nutrients so that they are made available to the plants as needed. This works via the silica content of DE being absorbed into the plant tissue, which helps improve the plant’s ability to respond and receive more nutrients as DE activates. This in turn results in greater yields and better stability under small pH fluctuations!
https://divineseeds.net/
https://instagram.com/divine.seeds?igshid=osxe2v7en33v https://divineseeds.net/
Thanks Again to All my Friends, Family's, Teams, Sponsors, Followers and Subscribers!!! Your Genetics are Merry Magnificent, Mega Marvelous and Mighty Medical! Love um!!! I really Can't stress enough how Thankful and Grateful I am of All of you and what you've Shared with Us! Means the World!!! It's definitely a Pleasure being able to Grow with these Phenomenal Grow Lights! Please Enjoy! BudBrothers4-Life! Cheers Famz!!! Much Props and Much Topz!💯🔥 #Osree #GrowStarStore #Growatt #TNBNaturals #TNBTeam #GrowYourOwn #Bliss
https://instagram.com/osree.light?utm_medium=copy_link
https://instagram.com/as420.ca?igshid=1f116alw054wp
The Grow Bags: https://www.as420
https://instagram.com/tigerfish_organics?utm_medium=copy_link
https://www.facebook.com/Tigerfishorganic/
#TigerfishOrganics YouTube Channel Link: https://youtube.com/channel/UC6OSXTda1JYaVNoCxdcYqIg

Likes
57
Share


@BigDaddyK
Follow
Ok, lets think about this logically - why are the leaves turning brown? it looks like a Calcium/Phosphorus issue, A LOT OF PEOPLE HAVE THIS ,
is it a deficiency??? Unlikely in Hydro as the solution is more effective as there are no contaminants, so this leads me to believe its a lockout, what can cause this ? 2 things = A) Too Much Nutrient Potassium or B) ph is too low - SO to rectify this, i have added more water to the reservoir and raised the ph to 6.3
As i am using more water in the reservoir its entirely possible that when the water goes down,even though the EC stays the same the proportional concentrations of each nutrient can change - for example EC pen says 2.0 when i first fill with 20 litres, the plant drinks 4 litres of water and consumes lots of bloom A+B so when i put my pen in two days later the 16 litres of solution still reads 2.0 but there is a higher proportion of PK.
Of course it could always be option C) these plants eat phosphorus for breakfast and need more ..😜
I have checked roots they all ok
Wednesday- changed solution , made it slightly weaker EC 1.7 ph 6.2-3
Thursday I had a little chat on Instagram with mammoth , i think they might need less than usual
Saturday - noticed some yellowing on the little plant , it’s a confusing as th3 other plants are all using the same nutrients and they are loving life , it might be the buckets , I am much preferring the size of the 35 litre ones , and the root structure is perfect , because the 45 litre boxes are more rectangular than square the roots are sort of sideways .
Still waiting for some purple on the tall one 🤔
ITS VERY IMPORTANT IN DWC - Do not automatically think you need to add nutrients , in DWC it’s so much more efficient that less is more , 99% of the time it’s overdone it , normally the tips go brown first , but it’s some circumstance s The concentration can increase without you knowing , FIRST change solution with a little bit less , I usually go to 1.6-1.7 EC TOTAL and 6.3 ph that is a universal solution that provides enough without overdoing it .
Updated DAILY

Processing
Likes
3
Share


@Kushizlez
Follow
Day 56-63 (Day 5F-12F)
(Day 6) Water retention is still a big issue in this soil, even with the reduced amendments, loose compaction and added perlite. Pots just aren’t drying out fast enough and I still need to water in enough to reach the bottom. I wish I had some flood trays for this exact reason so I could bottom water instead.
(Day 9) I’m going to try running 2 liters of water through each pot until I see a good amount of runoff on each plant. Maybe the nutrient content of the soil is just too high. If this doesn’t work, I got nothing.
Plants are drooping like crazy but that’s not surprising as I just flooded them. I’m going to turn on the carbon filter to clear out the humidity a lot faster. Over the next few days I’m going to let the filter suck the life out of this tent until it’s bone dry.
If I start seeing deficiencies arise from my minor flush, I will foliar feed some 1-1-1 kelp and some 3-0-0 calmag. I highly doubt I will see any deficiencies but it doesn’t hurt to plan ahead.
(Day 11) Ladies responded well to that heavy watering which is a little surprising honestly. The pots are still soaked and super heavy but they seem to be happy.
(Day 12) I’m really not seeing any well defined bud sites which is not a good sign at this point. I have never grown under HPS and have never flowered a true 10 week strain so it could just take a little longer in early flower. So far I’m unimpressed


Likes
30
Share

@DogDoctorOfficial
Follow
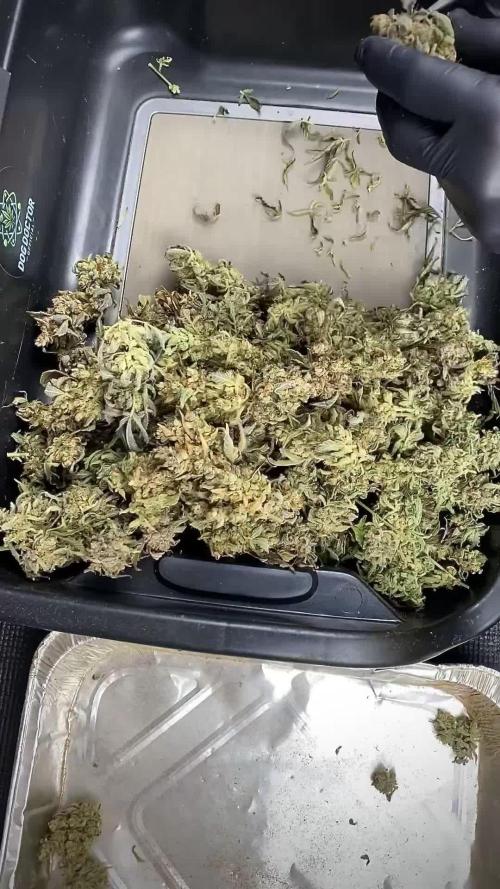
✂️🍯 Tical x Zamnesia — Nectar Drip | Drying & Trimming Report 🍯✂️
And… we are back again 😄
Yes — we are dividing the reports once more.
At this point it is probably becoming part of the diary itself, but honestly, there is simply too much happening during these runs to compress everything into one giant update without losing important moments along the way.
So thank you for the patience.
And welcome back to the next chapter of our Nectar Drip journey:
the drying,
the trimming,
the resin collecting,
the temple balls,
and the beginning of the cure.
🌱 Quick Recap
For anyone arriving only now:
This run was grown from seed under 12/12 lighting from the beginning.
No long vegetative phase.
No giant training sessions.
No massive shaping.
Just letting the genetics express themselves naturally while observing:
- structure,
- morphology,
- resin production,
- flower behavior,
- and overall cultivar personality.
Last week reflected the harvest itself:
- trichome maturity,
- fading colors,
- hanging branches,
- macro photography,
- stem structure,
- and final harvest observations.
One of the smaller plants was frozen immediately after harvest for future washing and extraction work, which we will still cover in a dedicated future update once we complete the washing process properly.
But this week?
This week belongs to the dry flowers.
And honestly…
these girls became something beautiful.
Drying Process
The flowers dried for roughly 10 days under controlled conditions:
- approximately 18–20°C
- around 60% RH
- with the first couple of days closer to 45% RH to help release initial surface moisture safely
This part matters far more than many people realize.
Drying is not simply:
“waiting until the plant becomes dry.”
It is controlled moisture migration.
The outside of the flower always dries first.
The inside stays wetter longer.
And the goal is slowing that process down enough for:
- chlorophyll breakdown,
- smoother smoke,
- terpene preservation,
- proper moisture redistribution,
- and stable curing afterward.
Dry too fast?
The outside crisps while the inside traps moisture.
Dry too slowly?
Risk increases:
- mold,
- anaerobic conditions,
- terpene degradation,
- unstable cure.
These Nectar Drip girls dried beautifully.
Dense flowers.
Excellent structure.
No rushed drying.
No hay smell.
No collapse.
Just slow clean progression.
And when the branches finally gave that satisfying “click” instead of bending…
we knew it was time 😄
✂️ Trimming Time
So:
gloves on,
trim bin ready,
studio lights running,
music playing quietly in the background,
Mr. Baggy supervising operations as always 😄
…and branch by branch, the process began.
We trimmed entirely by hand using Zamnesia curved-point scissors.
And honestly, these scissors became one of our favorite trimming tools.
The pointed curved tip allows:
- deeper precision,
- cleaner access between calyxes,
- easier sugar leaf removal,
- less accidental flower damage,
- and better control overall on dense compact flowers.
Especially important on cultivars like this one.
Because Nectar Drip became DENSE.
Not airy.
Not fluffy.
Proper compact greasy flowers.
The kind that fight back while trimming 😄
Every branch had to be broken down carefully:
- separating buds individually,
- removing excess leaf material,
- preserving flower shape,
- protecting trichome coverage,
- and trying not to spend half the trimming session glued to the scissors.
And yes…
the resin production here was honestly ridiculous.
🖤 Resin Everywhere
This cultivar is oily.
Not just frosty visually.
Oily physically.
The gloves became coated quickly.
The scissors accumulated thick dark resin constantly.
The trim bin slowly filled with golden material underneath.
And every few minutes we found ourselves scraping resin from:
- gloves,
- scissors,
- fingers,
- and tools.
That sticky dark material eventually became beautiful little temple balls.
And honestly?
The way this resin behaved says a lot about the quality of the cultivar.
Some resin stays dry and crumbly.
This one softened almost instantly with minimal heat.
Just body temperature alone was enough to:
- soften,
- bind,
- darken,
- and become workable.
Extremely greasy resin.
Extremely rich trichome expression.
The little temple balls became:
dark,
soft,
sticky,
shiny,
and incredibly aromatic.
Beautiful medicine already before even curing properly.
🏆 Final Dry Numbers
And now the final flower numbers for the dried plants:
🌱 337.3 grams dry flower
Plus:
the frozen material resting in the freezer for future washing and extraction work.
And honestly?
Very happy with these numbers.
Especially considering:
- the quality,
- density,
- resin production,
- flower structure,
- and the overall level of expression these girls delivered.
This was not “big yield but average flower.”
This was genuinely high-quality medicine.
📦 Storage & Beginning The Cure
After trimming:
the flowers were placed into glass jars for curing.
The temple balls also rest curing slowly inside glass.
And now another important phase begins:
time.
Because curing changes everything.
Terpenes settle.
Moisture equalizes.
Harshness fades.
Aromas deepen.
Smoke smooths out.
The cultivar slowly reveals its final personality.
And honestly?
This Nectar Drip already smells incredible.
Sweet.
Creamy.
Fruity.
Almonds.Dark.
Warm.
Slightly candy-like.
With this deep resinous backend that keeps evolving every day.
The room smelled unbelievable during trimming.
At some moments it genuinely felt like opening:
fruit candy,
fuel,
cream,
and warm resin all at once.
Very unique profile.
Very memorable.
📸 Documentation & Studio Sessions
Of course, we documented almost everything:
- trimming time-lapses,
- resin collection,
- temple ball formation,
- close-up flower shots,
- drying branches,
- sticky gloves,
- macro details,
- cinematic studio moments,
- and behind-the-scenes chaos 😄
Because honestly…
these moments matter too.
A grow diary becomes more than just showing finished buds after enough weeks.
It becomes documentation:
- of process,
- mistakes,
- lessons,
- atmosphere,
- obsession,
- patience,
- and passion.
And this run definitely carried all of that.
⏳ What Comes Next?
Next update will probably become the final chapter:
- curing review,
- smoke report,
- terpene evolution,
- effect profile,
- overall strain impressions,
- and our honest final thoughts about this Tical x Zamnesia collaboration after living with the medicine properly.
And honestly…
we are extremely excited for that one.
Because this cultivar already feels very special.
🙏 Final Thanks
And as always…
thank you.
To Zamnesia.
To Tical.
To Plagron.
To F.O.G.
To Lumiflora.
To the gear.
To the platform.
To the supporters.
To the silent followers.
To the OGs still here since day one.
To the curious new visitors.
To the people learning quietly in the background.
To the skeptics.
To the lovers.
To the haters too 😄
And to everybody who stopped scrolling long enough to spend even a few moments here with us.
That alone deserves gratitude.
This collaboration genuinely feels special.
And honestly…
I still feel like Nectar Drip has one more beautiful chapter left before this journey fully ends.
📡 DELETED @ 1K Please stay tuned.we never quit https://www.youtube.com/@TheDogDoctorOfficial NEW 🙏 Thank you for your patience and continued support.
FOR DISCOUNT CODES AND MORE JUST FOLLOW THE LINK https://website.beacons.ai/dogdoctorofficial
📲 Don’t forget to Subscribe and follow me on Instagram and YouTube @DogDoctorOfficial for exclusive content, real-time updates, and behind-the-scenes magic. We’ve got so much more coming, including transplanting and all the amazing techniques that go along with it. You won’t want to miss it.
GrowDiaries Journal: https://growdiaries.com/grower/dogdoctorofficial
Instagram: https://www.instagram.com/dogdoctorofficial/
YouTube: https://www.youtube.com/@dogdoctorofficial Deleted by Youtube - https://www.youtube.com/@TheDogDoctorOfficial NEW
Vimeo : https://vimeo.com/dogdoctorofficial Under construction stay tuned ⸻
Explore the Gear that Powers My Grow
If you’re curious about the tech I’m using, check out these links:
🔆 Lighting & Environmental Control
• Future of Grow — Advanced LED lighting technology
https://www.futureofgrow.com/
DISCOUNT CODE: DOG20
• Lumiflora — Under-canopy LED lighting
https://lumiflorade.com/
• TrollMaster — Environmental controllers and automation gear (past collaboration)
⸻
Genetics
• Zamnesia Seeds — Genetics used in this project
https://www.zamnesia.com/
⸻
🌱 Soil, Substrates, Boosters & Root Support
• Plagron — Substrates, bio mixes, and supportive products
https://plagron.com/en/
⸻
🎒 Storage, Curing & Preservation
• Grove Bags — Curing and storage solutions
https://grovebags.com/
⸻
📸 Photography Equipment & Tools
(Not sponsors, but part of my creative toolkit)
• Sony A6700
• Sony full-frame macro lens + few more
• Stacking photography workflow - learning
• iPhone (for behind-the-scenes shots)
We’ve got much more coming as we move through the grow cycles. Trust me, you won’t want to miss the next steps, let’s push the boundaries of indoor horticulture together!
As always, this is shared for educational purposes, aiming to spread understanding and appreciation for this plant. Let’s celebrate it responsibly and continue to learn and grow together.
With true love comes happiness. Always believe in yourself, and always do things expecting nothing and with an open heart. Be a giver, and the universe will give back in ways you could never imagine.
💚 Growers love to all 💚
📸 P.S. – The Eye Behind the Lens
All photos in this diary (for now — except for the ones showing the camera, which I took with an iPhone) are taken with a Sony A6700 paired with a Sony full-frame macro lens and a few more.
Photography is part of the story — it’s how we share the fine textures, the glow, and the quiet details that words can’t always capture.
I’ve also started experimenting with photo stacking — a technique where multiple images, each taken at a slightly different focus point, are layered together to create one perfectly sharp image from front to back.
It’s not digital enhancement or AI; it’s pure photography — a way to reveal the plant’s beauty in microscopic depth, from trichome to petal.
You’ll even see a few shots of "ghost me" capturing the shots — camera, lens, setup — because every grow deserves not just to be cultivated, but documented like art.
FOR DISCOUNT CODES AND MORE JUST FOLLOW THE LINK https://website.beacons.ai/dogdoctorofficial
NEW DISCORD - Official Server Invite Link : https://discord.gg/ksjAkA5T74

Likes
1
Share

@A-C-H
Follow
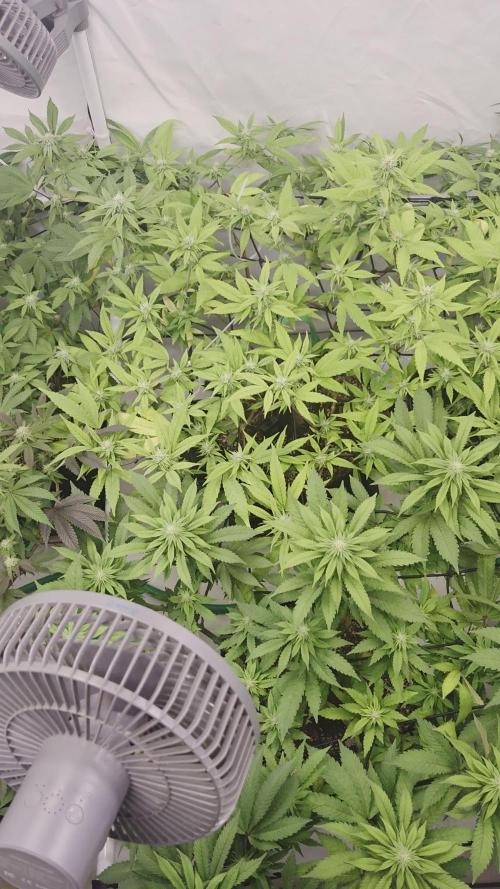
Die Blüte schreitet gut voran, auch wenn ich bei einer meine wild cherries einen Mangel festgestellt habe.
Eine ice rink hat begonnen, ihre Farbe zu verändern .
Likes
34
Share


@CanadianFillmore
Follow
Start of week 5. Week 4 went well, bud site development is going great, she's gaining size and weight. She's growing very densely, I've trimmed many inner leaves and small branches, she's the stickiest of all 4 plants I'm currently growing and her smell is strong and dank!

Likes
2
Share


Likes
17
Share


@Naujas
Follow
She is much prettier than she was a week ago :) I remembered that I have my first grow light, which is more compact and it will give me more space, so I changed my light, now the girl's side branches get light too:) I add a lot of video memes, because I really want to win Iphone16 pro ;) and those who don't take risks don't drink champagne:) good luck to everyone.
Likes
13
Share


@Alpha_Green
Follow
Some of you may have wondered:
Why do I use CO2 at average 950 ppfd μmol/m2/s (moral flow)?
The answer is quite simple. Because of lack of space in some regions of my cultivation area, I simply cannot keep the ideal distance to my Sanlight high-performance lamp, due to some height growth of various strains. And so some of the main colas have ppfd values of 1250 μmol/m2/s and even more...
So this is how I manage to achieve and compensate for such high radiation levels even with a CO 2 balance. And I have to say, my strategy to avoid various light stress symptoms works just fabulously. In combination with CO 2 implementation, my babies are simply unbeatably insensitive to light. Thats it!
Beginning of 3rd week flowering:
Again feeding my babies by 36 hours fermented potions of Bio Tabs Kompost Tea PK-Booster (15 g pro Liter) and added:
5ml Orgatrex/Liter
1 Spoon of Bactrex
1 Spoon of Mycotrex
1 Spoon of Mycco-Vital
1 Spoon of Dynomyco
A little tip for those who are interested in small modifications that have a big difference or influence - on the result - effect - beauty - health - taste! Before adding microorganisms or beneficial bacteria or Mycorrizae and Trichodermas, please use oxygen-saturated water. On the one hand, unwanted chlorine gases evaporate and the small world of the microbiome becomes even faster and more rewarding in compost tea to sprout.
Last but not least for this week, I would like to introduce my reasons, why I prefer growing biologically and sustainably.
First of all, it’s something which suits very well in these times/days we are living now. Sustainability is a big need and task for our planet. 🌎 Nature means life. Our home, the air we breathe and everything that surrounds us. Not just today. Hopefully tomorrow as well.
Maybe I'm starting to protect our environment on a small scale, but maybe I can also make a big difference at all.
If you change the way you look at things, the things you look at change...
I thought about what’s the difference, between Mineral Feeding and Super Soil Feeding.
It’s very easy. Biologically Growing is a similar process than the natural soil activities out there in the lap of nature’s. So plants has to work and interact with the microorganisms and microbiomic communities in the soil. So the plants will never get lazy like the lazy ones of mineral feeding growers.
If you grow biologically, you will feed the soil first and the microorganisms will support every parameter next to your plant conditions. And that will generate an unbelievable spectrum of Terpenes and Trichomes you will never forget.
It’s the same comparison, when you daily visit McDonalds and you eat only fast food. How does your body and mind react on this shit for money?!?!
May I invite you to think about it…
See you next week dear Growmies! Have a nice Weekend and take care…
Peace out!
Addendum for Day 53:
At the moment we unfortunately have another winter onset here in Germany. This means that I am forced to take additional heating measures due to structural facts in order to be able to keep the temperatures constant. After all, just tonight the thermometer climbs again to -1 degree Celsius.
In addition, my exhaust air system runs out of my bedroom terrace and I therefore grow winter and summer with the patio door open. Well, sometimes I experience real weather-related challenges. But all in all, no problem...
"Where there's a will, there's a way."
Addendum to pouring out the fermented PK tea: I always administer half a liter of lukewarm aerated water with 3.5 ml of cannazyme per liter to each plant. This means that the "root machine" is not supplied with supplies unprepared and the nutrient solution can thus also be better distributed in the soil. Since I also work with cloth shoes, I spray them evenly moistened everywhere with water that is also warm before pouring them out from the outside. This has the advantage that the moisture stays where it should: in the pot!
... I did the math today ;-) We are still in week 7 until this Friday. And week 8 starts on Friday! OMG... still so much time yeahh!
Today my Fast Buds Sour Jealousy and Sweet Seeds Big Devil and Dark Devil Automatics arrived. I'm looking forward to it.
This time Fast Buds next Time Sweet Seeds. Love them too. Very beautiful genetics.
Today a review video of the beginning of week 3.
At the time of the pictures, I had minor signs of nitrogen excess. (Light peaks first at the crown of the roof and then slightly continuing to the middle section.) I then painstakingly racked my brains as to why this could be. I found that very slight dry spots had formed and therefore the root found small accumulations of nitrogen that caused its problems. But then, when I carefully homogeneously checked the moisture content in the substrate, the problem evaporated again. However, they had not shown any loss of growth rate during this time. Nevertheless, they developed as expected.
They Strawnanas had no problem with that.
In the end, I always have a hard time killing them. But I guess that's the way things go.
We live and die.
We come and go.
But it's not there yet. ;-)
Tomorrow is day 56.
Tomorrow’s updating day!
Can't wait to see their progress.
Have a good time and see you tomorrow… 🏽🕊️
🏽 ☮️🕊️


Likes
1
Share

@Klyaksa
Follow
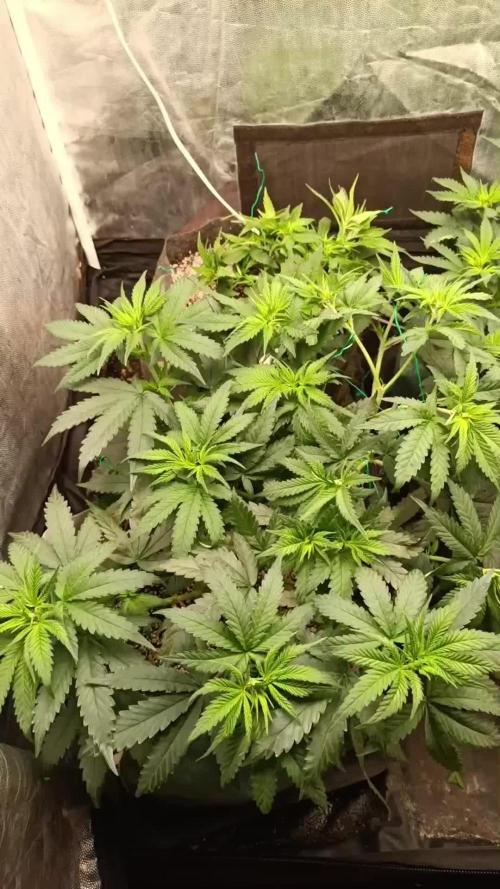
На видео 37 день от каски и 2 день с перевода 12/12
NLB очень резво растут,по несколько см в день кажется,мощные и крепкие растения.
Mazar поменьше,но очень коренастый и сбитый/плотный,толстый ствол,ветки
Давал уже feeding hybrid как базу,500ppm(с учётом воды с крана 245ppm)
На фото им по 40 дней от каски и 5 с перевода 12/12,NLB растут очень энергично,подгибаю, переживаю что бы хватило места в тенте
Mazar только подгибал и иногда срывал листики,что мешают,он самый маленький
Слева внизу автомат,он не идёт в репорт)


Likes
13
Share


@HowtoBubatz
Follow
Lemon Haze is just doing her thing quietly in the background, slowly getting overshadowed by the booming Ztrawberriez ladies. 😅
She's started to give off a nice lemony haze scent, which is really pleasant, but she still looks like a small sword, tall and thin with not much going on on the sides. I don't expect much more stretch or branching at this point, but maybe the buds will fatten up a bit. Let's see what she has in store! 🍋

Likes
20
Share


@NONSENSE
Follow
Hello everyone!
Congratulations to our beautiful community, Wishing you a very Merry Christmas!!!
Good luck in the coming 2021!
This week is the last stage of the VEG.
After December 31st, I will change the growth to light 12/12.
I still use the Easy Combo and boost I got from RQS team. The plants looks great and healthy.
I added extra fertilizer from GNE : Flora Micro 2ml for each L of water.
The PH level I try to keep is between 6.4-6.0- lower, then higher, then lower again.
I bend down the branches every night.
every third day I do defoliation.
A pleasant, noticeable smell is already felt.
I hope that I achieve the harvest after 2 month and wish everyone the best of luck
Likes
8
Share


@Oldwied
Follow
4 days of flower.
Everything looks great.
The screen of Kush is 2cm lower, based on the slow grow.
80% light power

Likes
157
Share


@Qutro
Follow
Hi Growmies,
This was her last week, as she was cut down at the end of the week;) I fed her Final Part another 3 days and then changed the reservoir to PH-ed tap water with Flash Clean for 5 days. Dimmed back the light to 50%.
I took out her from the tent for an inspection and I saw more and more milky trichomes turning to amber. This is a clear sign of her maturing beautifully.
After she went with another girl from for 48 hours of darkness before she was chopped.🌱⚔️
Her root ball was looking healthy and much better after the flushing process so next time, I'm sure I won't be using powder silicate because it only made the roots tangled.
The total number of flowering days was 65 since we changed the light cycle to 12/12.
I moved her to the drying tent with 55% RH. She is sharing it with the Dos-si-dos’33 girls. They will remain there as long as needed.
Will come with a longer report next week as I have a lot of thoughts in my mind about this journey to Japan with her.💚🇯🇵
Have a lovely weekend fellow cultivators!
Peace🏻


Likes
4
Share


@SaFiyaFarms
Follow
Planted directly in soil came out of the dirt in 2 days, The picture is week 1 out the dirt

Likes
6
Share

@Sobreruedas
Follow
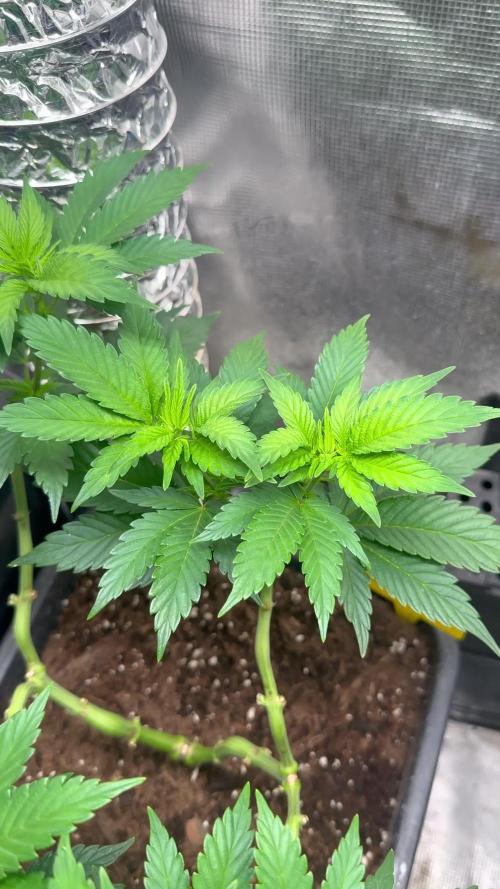
This week the focus was mainly on LST.
I continued guiding and adjusting the branches to keep everything level and well structured, helping the plant maintain a clean and symmetrical shape.
Apart from that, everything remains the same with no major changes. The plant is responding well and recovering nicely from the previous training, so I’m just letting her grow and settle in 🌿💪

Likes
5
Share


@GarciasGarden
Follow
Took a while for these plants to get to size .. I had like 20 plants in a 4x4 closet so I had to keep all these in a shot glass for literally 3 weeks they were dying for a bigger pot!
