




Likes
3
Share


@Dysons12
Follow
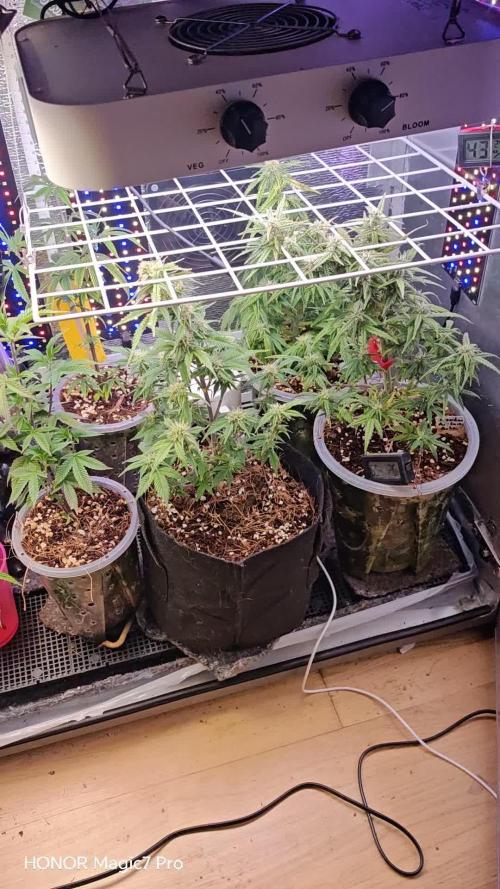
Day 7 i I transplanted the seedlings in jiffy’s to the DWC basket water level was “just” touching the bottom of the basket which meant there was 1mm- 2mm air gap between the water level and the jiffy’s. The high pressured air in the water to spit when air was released at the top which kept the bottom of the jiffy moist which had minimal roots showing to the exterior of it.
Day 7-13 I originally had 7.5 litres of water that was to the bottom of the basket. I replaced the water on the 13th which meant the water was changed after 6 days at such an early stage I will regularly change the water in the buckets. You can change every 7-14days but I am taking no chances.
I refilled and added nutrients on Day 13 which was yesterday. And the plants are doing really well and are a nice VEG green colour. Hard to tell on the pictures with the light colour but you can see their progress.
When I replaced the water this week I put 6.5L of water in each bucket With nutrients PH’d as close to 5.8 as possible. Some varied from 5.72 - 5.9. I have noted these on each bucket so that I can check if one does better than the others or shows deformities or stress I can amend it to match the others but hopefully not in such a close proximity of 5.8ph with an EC of 700+-
The roots are now showing in every pot with the longest being some 6inches.
The new Wakyme grow light is top notch so far with VEG button on only. Anyone contemplating buying one it cost me £99.00 from amazon and so far is performing just how I would like.
Humidity has been taken care of with a cold air intake fan which is pulled from another area of the building of a cooler environment.
Temperatures are spot on where I want them but I do allow a 2degree +- allowance but it does change back to its original temperature quickly enough.
5 more speed bud germinated and 2peyote critical feminised photoperiod germinated.
Crystal candy XL auto ordered x10
Gorilla glue, Pineapple Express and Cali Kush waiting in the wings. I have these already
If I can be anymore help to anyone let me know. Your diaries are helping me and hopefully I can provide the same to you



Likes
55
Share


@Max1973
Follow
Day 93 - Fattened up good, getting really heavy....posted pic of test bud.... vid of the led uv globe i got on ebay...
works awesome.... highly recommend...... 😎
maybe 1 more week.... they smell delicious, not very strong smell....
just normal water in bottom drip tray, dutch master one gold ....next week, flush em and next sunday pull em..... idk....
Day 95 - had a good look at both girls and worked out a harvest plan...... i've started flushing/watering on the smaller one,
and sunday (day 100) will be her last. i'll leave the larger one (she's still quiet white) for another week and re evaluate her fate next week.
Day 97 - 4 vids .... looks good 😎
getting a 1600x Camera Endoscope USB Digital Microscope from ebay, see if it will help with harvest........ 😎
Likes
5
Share


@SgtDoofy
Follow
Mar 14
Looking okay. Flowering started this week! Some leaves are looking like they are being sacrificed by the plant. The top leaves being so thin makes me wonder if the lights are too intense. I've lowered them from 80% to about 60%.
Fed 3/4 gallon of RAW GROW 6 days ago. Seems to have taken it well. Getting close to needing another drink.


Likes
4
Share


@Wenz004
Follow
Lets start new experiment
Try to minimize effort and No1 will get Bionova...only 2 different bottles...at veg only one
No2 will get the full range from CANNA
Of course both will get some calmag, too.
Nutrients support will start at week one...with low ec 0.7 -0.8...will need destiled water as well


Likes
52
Share


@Rangaku
Follow
Cherry cola 1 came out today and cherry cola 2 comes out later this week so just flushing with crystal clear .


Likes
253
Share


@Ju_Bps
Follow
Hello growmies 👩🌾👨🌾🌲🌲,
👋 Girls have a great stretch and coming along nicely with hedgehogs 🦔🦔
Weather is better 👍
💪 Continue training, Working on the scrog.
💧 Give water each 2/3 day
2 l Water + Roots + Bloom + Zym + Sugar Royal (1 + 3 + 1 + 1 ml/l)
2 l Water + Roots + Bloom + Zym + Sugar Royal (1 + 3 + 1 + 1 ml/l)
PH @6
💡Mars Hydro - FC 3000
50% - 40 cm
Mars Hydro Fan kit
Setting 7
Have a good week and see you next week 👋
Thanks community for follow, likes, comments, always a pleasure 👩🌾👨🌾❤️🌲
Mars Hydro - Smart FC3000 300W Samsung LM301B LED Grow Light💡💡
https://www.mars-hydro.com/fc-3000-samsung-lm301b-led-grow-light
Mars Hydro - 6 Inch Inline Fan And Carbon Filter Combo With Thermostat Controller 💨💨
https://www.mars-hydro.com/6-inch-inline-duct-fan-and-carbon-filter-combo-with-thermostat-controller
Fast Buds - GG4 Sherbet FF🌲🌲
https://2fast4buds.com/us/seeds/gg4-sherbet-fast-flowering
Likes
16
Share

@Rhah420
Follow
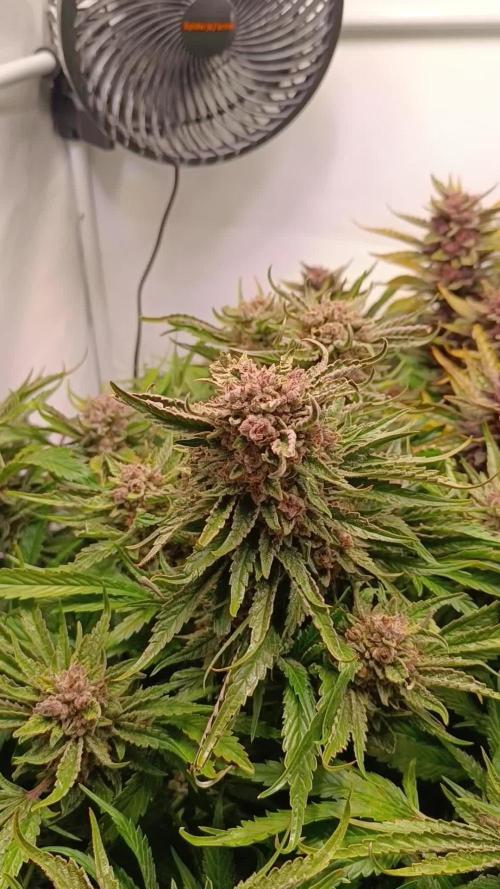
Die Damen bekommen seit einer Woche nur noch pH angepasstes Wasser. Der Herbst ist deutlich vorangeschritten und wir haben nun ca. 75% milchige trichome, vereinzelt ein paar Bernstein farbene. Die Ernte wird nächstes Wochenende vollzogen, es duftet bereits herrlich. Die Pflanzen werden ihren jeweiligen Namen gerecht.
Likes
2
Share


@Ninjabuds
Follow
Bubble og I still have 4 of these guys going. A few of them are still dark green and pretty decent growers they have thiner leaves. I'm sure a few of these will be on the chopping block later down a few of them just have crappy start growth and they need the humidity at 75% or above 100% the time with the light lower than normal or they start to shrivel up. That's not all of them just a couple. Also I am only going to flower 8 plants out if the 12 seedling and I have 5 strains going so can't have half my plants bubble og (wish I had room to grow the full 12 plants at a time)
It's looking like a good start to a week the plants are strong they are getting to the point I can let the dried dry out completely. I'm thinking by the end of this week the plants will be starting to be sold.
Last week I put all the plants into my bigger 2x4 tent with my medicgrow mini sun 2 the 500w version. Only a few of the plants were ready for that light. Seems like the only plants that really have good resistance and have a strong start are the weedseedsexpress.com seeds. Shout out to weedseedsexpress.com for the strong plants.
I ended up putting all the plants back into my 2x2 tent with the 55w amazon light it has alot more blue light in its spectrum. It's kinda weird b4 I switched the plants to the 2x4 tent they were getting 220umol under my amazon 55w led then when I put them under the 500w light 25% strength about 50in from plants and they were getting only about 195umol in that tent but it was stressing most the plants. I assume a larger light has more side lighting hitting the plants. I think when useing larger lights it's good to measure umols from the top but also coming from the sides. I think durring seedling stage they only need about 50% the umols coming from the side the plants as the top is receiving.
When I put the plants back in the small tent about the same umols as they were getting b4 the switch and they were still a little stressed. So for a few days I put the small light at the top the tent giving them 100umols for a few hrs then 130umols the rest the day.


Processing
Likes
44
Share


@MissFlowerPower420
Follow
Marge is literally romping away now . She looks healthy n very bushy . Have high hopes for this lil beauty

Likes
6
Share


Likes
37
Share


@Aedaone
Follow
The temperatures, humidity, and watering volume(if measured) in grow conditions are all averaged for the week. The pH is soil pH. Any watering done by me is well water which is 7.6 pH and 50° F. Any listed nutrients are topdressed @ ml/gallon of soil.
Day 1 We missed the scattered showers but it's been 80-90% humidity all day. It's been real sunny but the pots are very wet.
Day 2 we had sunshine and temperatures above 80° F. The soil dried out a little today. 🙏
Day 3 we have clear skies and temperatures hitting mid 80's F. Pots dried out enough that I watered 1.5-2 gallons from the hose. Well water is 7.6 pH and 50°F.
Day 4 we had thunderstorms and rain in the morning. There was lots of sunshine that afternoon, then rain and severe thunderstorm overnight.
Day 5 we had lots of sunshine, temps in the mid 80's and thunderstorms and rain in the evening. The thunderstorms became severe overnight.
Day 6 we had rain in the morning followed by rain and thunderstorms intermittently into the night.
Day 7 we had rains early morning and then cloudy most of the day. We have sunshine in the forecast for next week. 🙏🙏🙏.
This week was a very wet success. The plants doubled in height and began to grow their side branches. The rain has been constant and nearly eliminating the need to water. It's a concern to have constant rain and high humidity. I've seen fungus gnats but these plants haven't shown any signs of stress. Once again fastbuds can thrive in a challenging environment.
Likes
49
Share


@masterofsmeagol
Follow
5/10 Got up super early for wife's appointment at 7 came home and transplanted 4 of the purple punches. Transplants went good. Soil was too dry and a couple fell right in the hole but I was messing around showing my dad. It just got dropped in the hole a little harder lol. The other that happened to is fine though. Definitely make sure your soil is moist enough before transplanting. My transplanting technique for 3 gallon is to put soil on bottom. Set cup in at appropriate distance then replace cup with plant with soil filled cup and fill around it. Leaves the perfect hole. Then you just snip the cups twice on each side, peel it down and fold the cup down and cradle the bottom and in the hole it goes! Holes have mykoscand a little like water. I water a little after transplant. I misted soil whole mixing it up.
5/11 Dad left the windows open last night "because the soil smell was bothering Lynda." I couldn't ficking believe it. They were all fine when I got back but still. Everything is transplanted into 3 gallon containers bit that 1 purple punch that is a little bit dwarfed. I looked at the bottom of the cup and drainage wasn't as good. Must've been the last cup and the jail didn't go all the way through in a couple places. I increased the drainage on that little dwarf and I'll transplant it when I get time. We are going to have some good weather coming up. I need to get my cage moved, my bags sanitized and get on a good watering routine.
UPDATE: Went back over at four and everything's dry as fuck but the leaves are uo and every one of them looks happy so I'm holding off watering. I'll start with a quart probably tomorrow. Also cleaned out tge cage and secured the handles to move it. Only thing left is cleaning and sanitizing. These girls have a south facing window and they LOVE it. It was 80 today. I hope we have an early season.
5/12 Transplanted the last purple punch today. I could easily tell the problem was drainage. It was the last cup I had stacked when I drove the nail threw so it didn't pierce all the way the the other slips and tac holes apparently weren't enough. Used mykos and same soil mixture. Soil was extremely dry. I lifted a pot with dry soil and these were heavier. Commercial buddy said to start with a quart a pliant and see how it goes but I kind pussed out and only gave them 24fl 0z a plant. Half the quart. I asked if I should water more and he said to just wait and see how they like this water and up it to a quart next time maybe quart and a half. Im just leery of overwatering. When i watered SOME of them the water literally just sat there and took forever to absorb. Plants werent wilting though. Soon theyll be going outside during the day and in mdoors at night.
UPDATE: Went back over at two and everything looks AMAZING. Healthiest looking plants I've grown. Leaves all pointed up. I'm taking my commercial dudes advice and hoping the water next watering. For now, they're doing amazing.
5/13 Everything is doing greatcso far. Gotta figure out when to start nutes. Considering adding silica but don't want to raise ph to much. I'll consult with others but my the soil blend I'm using is full of nutes.
5/14 Rushed morning and I wanted to water bit the plants looked great still. Sticking my hands deeper I can feel a little moisture deeper down or in the drain holes so I decided to give the blueberry cheese and the 10th planet a "touch of kindness" which was a small circle of water from a small watering can around the outside edge of whete the rootball should lid be. I'm working on getting a watering g schedule down.
UPDATE: Went back over at five and everything was looking good with leaves praying. Maybe my half measure helped. Doubtful but still. Tomorrow I plan to water. Since the soil has tons of nites ill probably hold off a little while longer before starting the nutrient schedule. I want to make sure I've got the watering down first. One thing at a time.
5/15 The 10th planet and Blueberry Cheesecgot their first REAL watering since transplant. Still being cautious I watered 28fl Oz a plant. I phed the water with an indicator solution and ph down. I gave the purple punches a "cup of kindness" which was a circle of water around the transplant hole. Can't waif to get a watering schedule down. I wanted to start nutes but my soil is full of them and i believe it's too early. I didn't see ANY run off from this watering. I think that's good as I'm not looking to wash away the nutes in the expensive soil I use. I need to start HST as well but I'm doing things proper and "one at a time". That way if I run into a problem I'll know what I did and how to rectify it. At least I hope.
UPDATE: Went back over at 3 leary that I may have "overwatered" but the plants ALL looked AMAZING and had shot up like an inch! Looking into hst and will probable fim a few. Top a few and leave one to grow naturally. Can't wait to see how these girls do outside.
5/16 Wow. Just wow. Plants are doing phenomenal! Since the watering went really well I watered the purple punch bit I only used about 16fl Oz as the plants were a little smaller than the others. I'll up it to a quart next time like I did with the others. I want to USE the nutes in my soil so im not washing them all away by watering to run off. I topped 2 10th planet's and FIMed one of them. I want to see how the respond then I'll begin training the others. Off to a Great Start!
5/17 Glad I held off watering. It's raining today. Just showers. We haven't gotten any of that extreme wind we usually do. I have the plants supported but I still worry. Definitely more than I should. Plants are still doing good and acclikatimg to their new homes.

Likes
13
Share


@420DeepGrow
Follow
📆 Semana 0
🍁💐💐Mimosa Auto:
Ya está la semilla en servilleta de papel, vamos a ver qué tal responde esta Mimosa Auto de RQS.
Dicen que tira cogollos resinosos y con aroma a cítricos, así que hay ganas de ver cómo se comporta la germinación.
De momento a dejarla tranquila, que se pille bien al sustrato, luz suave y agua cuando lo pida, nada de fliparse que no queremos estresarla demasiado. Esta semana es todo paciencia y mimo para que se asiente bien; en cuanto coja ritmo, vamos metiendo caña.
💡 Para darle un empujón en estas primeras etapas, he añadido el Seed Booster de RQS, perfecto para fortalecer raíces y asegurar una germinación rápida y segura.
Seguimos creciendo fuerte! 💪
CUPON RQSCREW: 15% DESCUENTO en Royal Queen Seeds