
Likes
Comments
Share


@Chucky324
Follow
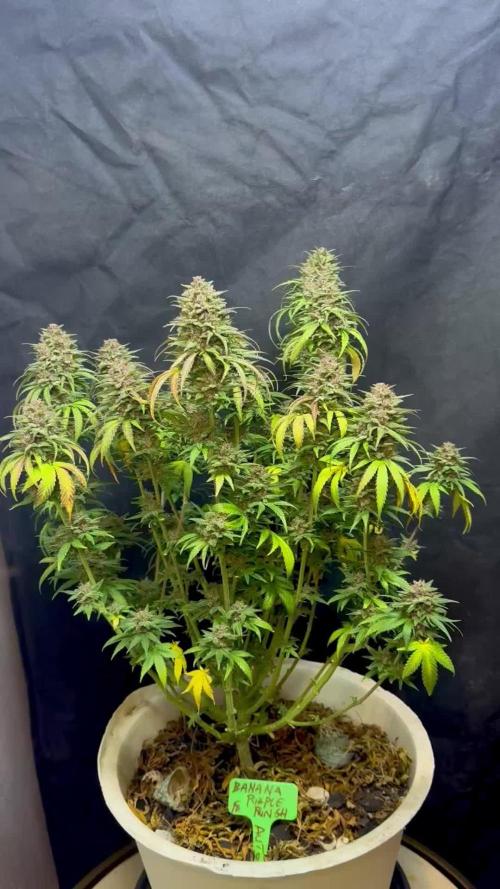
Hello. Please read week 1 for the plant description
It's been a quite week round here.. Just the normal type of cannabis growing week. I noticed that some of the leaves are going yellow a little earlier than I would like so I gave each plant about an 1/8 of a cup of Blood/Bone meal 7/7/0 and watered it in. I didn't want to give too much nitrogen at this point in flowering, but just a little so the plant will stop feeding on itself and turning it's leave's yellow to soon.
I came across some very aggressive white powdery fungus/mold on one bud of plant #1. As I examined it I saw that it wasn't the normal powdery mildew that I had been battling here for years. This had a white circle and was domed. One on the domes had dislodged a few mm and stuck there. Another had a small tendril growing out of it across the leaf and off the edge a bit. I just happened to have experience with this one. About 6 years ago I was over at a buddy's and he had a Super Kush by B.C.S.C. growing a few feet away from his humming bird feeder. He said I could take a few clippings. I put them in water overnight and was going to clone in the morning. In the morning I found this white fungus/mold on several leaves. I cut the leaves off and worried over the next few weeks as the plant was forming roots that the fungus would return. It never did return and the white stuff I found this week has not returned yet either. The bud that was affected was right under the roof vent and I have lots of hummingbird flowering plants and shrubs around the house and one probably pooped as it flew over the greenhouse. Seeing how they eat sweet sugar water and nectar with some insect proteins thrown in, they must have some powerful stomach bacteria in their tummies.
I plan to flush the first 2 weeks of August and harvest around the 15.
Till then. Chuck.

Likes
10
Share


@HideAndFly420
Follow
First week is goin really rapid, blue dream is growng large and healthy.
i didn t add any radicant or nutrients i just use all mix soil that give all i need to first period.
Let's go!

Likes
41
Share


@TerpTurtle
Follow
15 Day dry then trimmed using the Trim Bin.
Curing with Grove bags, first harvest filled 3, 1/4lb grove bags.
*Updating with clone pictures of this pheno in late flower labeled in diary as you look through, If I pop a new seed of this strain Ill start another diary

Likes
15
Share


@MrJones
Follow
MrJones Ztrawberriez Auto
🍓╰⊰🍓´🍓⊱╮🍓╰⊰🍓´🍓⊱╮🍓╰⊰🍓´🍓⊱╮🍓╰⊰🍓´🍓⊱╮🍓
💧 Feeding - Using Gaia Green Grow / Bloom and Compost Teas
🍃Training / LST-Defoliation-Topping TBA
🕷️ IPM - Will be using Green Cleaner" 1 OZ per Gallon, and CannControl from Mammoth alternating between products each month for Integrated Pest
🍓╰⊰🍓´🍓⊱╮🍓╰⊰🍓´🍓⊱╮🍓╰⊰🍓´🍓⊱╮🍓╰⊰🍓´🍓⊱╮🍓
▶️Sunday 10.29.23 - Going to leave the light cycle alone for another week, these ladies are blowing up pretty well, don't want to mess with the MoJo :)
🍓╰⊰🍓´🍓⊱╮🍓╰⊰🍓´🍓⊱╮🍓╰⊰🍓´🍓⊱╮🍓╰⊰🍓´🍓⊱╮🍓
▶️Bud Description Ztrawberriez Auto produces long and fat buds with a beautiful light green shade with oftentimes purplish hues and a thick layer of resin that starts at the top of the flowers and continues all the way to the tip of the sugar leaves. It’s the typical bud structure you would expect from hybrid varieties topped with an explosion of fruity terps that’ll hit you in the face with a blend of creamy, fruity, and sweet aromas as soon as you break the buds open. Definitely a must for terp heads and extractors looking for exaggerated flavors and aromas
🍓╰⊰🍓´🍓⊱╮🍓╰⊰🍓´🍓⊱╮🍓╰⊰🍓´🍓⊱╮🍓╰⊰🍓´🍓⊱╮🍓
▶️SOIL MIX
40% ProMix HP
40% Coco Coir 70/30
15% Worm Castings
05% Malibu Compost
🍓╰⊰🍓´🍓⊱╮🍓╰⊰🍓´🍓⊱╮🍓╰⊰🍓´🍓⊱╮🍓╰⊰🍓´🍓⊱╮🍓
Likes
52
Share


@MadeInGermany
Follow
Flowering day 68
since clock change
to 12/12
Hey guys :-) .
It's so far, the lady is ripe and will be cut at the bottom end in the coming days and hung upside down in the drying tent :-) .
Next week there will be an extra update on how they are hanging.
Watering would be done twice this week with 1 l each (nutrients see table above)
Otherwise it was checked and everything was cleaned.
Have fun and stay healthy 💚🙏🏻
👇🏼👇🏼👇🏼👇🏼👇🏼👇🏼👇🏼👇🏼👇🏼👇🏼👇🏼👇🏼
You can buy this Nutrients at :
https://greenbuzzliquids.com/en/shop/
With the discount code: Made_in_Germany you get a discount of 15% on all products from an order value of 100 euros.
👇🏼👇🏼👇🏼👇🏼👇🏼👇🏼👇🏼👇🏼👇🏼👇🏼👇🏼👇🏼
You can buy this strain at :
https://www.ripperseeds.com/en/feminized/kmintz-feminized-cannabis-seeds
Water 💧 💧💧
Osmosis water mixed with normal water (24 hours stale that the chlorine evaporates) to 0.2 EC. Add Cal / Mag to 0.4 Ec Ph with Organic Ph - to 5.8 - 6.5
MadeInGermany


Likes
7
Share


@Ctrellis90
Follow
Everything is going well for the ladies so far.
Really can't complain. Plenty of stretching for the durban kinda put me in a situation like this strain usually does to me lol. Looks like I'll be tieing her down around the tent supports again to keep her from kissing the lights.
No,I think we're all done stretching and we should be able to kick back and watch the buds stack!
Likes
24
Share


@Samsemilla
Follow
Die fünfte Blütewoche hat begonnen.
Das Höhenwachstum scheint nun endlich vorbei zu sein und die Pflanzen konzentrieren ihre Energie auf die Blüten.
Ich hoffe sie kommen mit dem Abstand zur Lampe einigermaßen zurecht und bekommen keinen zu starken Lichtstress.

Likes
120
Share


@NugLife420
Follow
Well, I got the ladies transplanted. They seem to be doing fine and enjoying the new setup. I will as always be updating throughout the week. Thank you for your support. ✌️😎


Likes
3
Share


@mquintero7
Follow
I believe there might be a problem with the plant. Leaves are turning yellow way too early. The pistils are oxidizing very early too. Maybe she got stressed for some reason and decided to accelerate the whole process.

Likes
12
Share


@Sativagrad
Follow
In general, I liked growing this variety, the only thing is a lot of small leaves, it is not very convenient to cut, but the colas are very dense and weigh well, there are also many small stepsons, although I cleaned up during unnecessary time, powdery mildew appeared after the rain, which is difficult get rid of the large number of leaves on the plant, and it's very good)

Likes
10
Share

@Simba732
Follow
Almost Chop Day for wa girl MS PURPLE! ✂️
The last few days were all about that flush life runoff nice and low, just how we like it ✅
She’s been an absolute tank from day one, taking almost everything thrown her way like a champ 💪🏾🔥
By the end of the week, most of the buds turned purple, most of her fan leaves faded to yellow, and after a solid trichome check..mostly milky with just the right touch of amber. Nailed it 🎯
And the smell? Straight adorable 🤗😍
I’ve got other strains on their own journeys, posted weekly in my diary feel free to take a little tour
Thanks for riding along with me on this one 🙏🏾
Right after this photo session she’s off the a better world
Happy growing 💚
Likes
27
Share


@GrammaGriller
Follow
Делали маникюр 5 часов в 6 рук, все липкое
Вкусно пахнет, много фиолетовых оттенков
Много листвы сахарной и вторичного продукта
Likes
8
Share

@Growfather1
Follow
Hello everyone,
My water chiller finally arrived so i can run higher temperatures in the tent and start adding co2 again.
I topped her 4 times and removed leaves and internodes and broke one branch.
Let's see how she will look next week.
Thanks for stopping by and have a nice week.
Regards,
Growfather.


Likes
12
Share


@Jays_Not_Here_Man
Follow
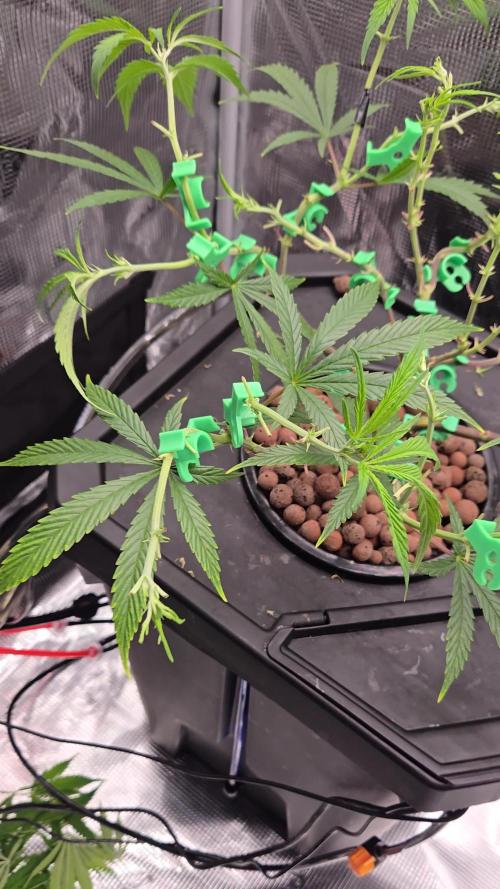
The girls have performed very well this week! The LST began, and there was some great growth in side branching. I also started this week off with introducing them to some nutrients ❤️
Start of week 4, the girls had responded well to transplanting, so I decided to start with some LST. My main method is to use soft wire wraps (dollar store purchase!)
I poke one hole in the side of the pot near the top, and then go directly opposite that hole and poke through to make another. The first hole is for a wire wrap to secure the base of the seedling from pulling right out or over too far. The other hole is for the direction you want to bend your plant to.
I start by slowly working the stem between my fingers at the point where I want it to bend. Twisting and pinching slowly so not to snap. *wait a day or two after your last water, or it will be easier to snap* once it’s ready to flop, I use the wire tie to hold down the top of the plant as close as I can to the nearest shoots.
I’ll usually leave the plant like this for a couple of days, adjusting the ties, and then take them off to let them recover .
Watered with a small dose of the full line I will be using for this grow. The girls got about 500 ml at the beginning of the week, but 2 days in I could tell they wanted more. By the end of the week they are taking nearly 1/2 gallon (which will give me 10% runoff)
At the end of the week I increased the intensity of the BP2500 to 190 watts at the wall and the girls did show a few wrinkles as they adjusted, but have quickly recovered.
I haven’t topped these girls, and I’m not sure if I am going to… thoughts? Happy Gardening 🇨🇦❤️🌱😎💨


Likes
16
Share


@BudsBanditUK
Follow
What an absolute stonker. I cant believe how big she has got in just 2 weeks. So many colas and buds. The smell is so good and gettinng some nice colour. Still a long way to go, she is going to be a good one.
Processing
Likes
2
Share


@Pauwela
Follow
7/28 7-days old,, 4 clones survived, on their way at 2.5” a 3.5” tall

Likes
6
Share


@Kendoda
Follow
It’s day 1 of week 7 flower. She’s looking a little hungry today. Last week I reduced the feed as I had a little nute burn, the general appearance of the plant is looking slightly lighter in colour, so this week I’ll add back the extra 0.5 ml of each nute.
Three more feeds of 1.5 l then on to the plain water.
