


Likes
Comments
Share


@Dunk_Junk
Follow
I notice her Ovules are very large in size. Quite unlike any plant I have seen before. I don't know if this is a 'primative' strain but it's quite unusual.
So far: 147g wet
Day 77 - Staggered harvest started. When I see a couple of amber trichomes on a bud I will harvest it and leave the rest.
Day 84 - The other colas are getting there slowly. I don't know if it is the heat stressing her out 30 c in tent. We have a heatwave here right now....
Day 84 - 2.11g dry ground up
Day 89 - 1.72g dry ground up
Day 91 - What is left of her. She looks a mess lol.
Day 94 - Final harvest trimmed up and drying. Final dry total to follow in a few days.
Day 100 - Final weigh up. Well we got 72.46g on the scales today. I never did wet weight after the first harvest so dismiss that. In total I got 74.57g. It is a very small harvest for me but I don't think this plant has the genetics to be a big yielder.000

Likes
12
Share


@mikemobes
Follow
I am pleasantly surprised with this grow. This is my second time growing Cream Cookies and my yields have increased by 400%. Cream Cookies #2 was the heaviest yielder coming in at 224.04 grams wet. Coming in at almost a quarter POUND for one plant just makes me grin from ear to ear. Im so extremely happy with how ive been taking care of them. It seems that proper and methodical defoliation is the key to massive yields. Cutting fan leaves which block out a significant portion of the available light to the lower and developing bud sites proved to be a great choice. The plants look a little 'skinny' after defoliation, but the newly exposed bud sites explode into the canopy. Im just so very happy with how everything went.
Haven't smoked yet its curing now, will update in two weeks!


Likes
24
Share


@ThatoneAKguy
Follow
It’s Aliiiiiiive! Finally built my second matching hybrid NFT hydro system after getting the autos out of the main tent. 6” Rockwool cubes on draining racks in 8 gallon totes with an 8 gallon res. Waiting on some parts from amazon to add the second pump and feeding tubes. Hoping to veg them for 3-4 weeks before I flip the schedule. Haven’t decided if I want to scrog them yet or not.

Likes
435
Share


@Ju_Bps
Follow
Hello my friends 👨🌾👩🌾,
This start week I've topped the plants, saved 3 nodes/plants,
Removed some leaves
Started my training,
I've given 400 ml/plants 2 times.
Start week and middle week.
1x water + tera vega + boost
1x water + cannazym
PH@6
This end week I've topped the plants again, continue my training to prepare my scrog.
I'll probably make a big def and lollipop 🍭 the next week and transplant them in 11l pots for the blooming,
Starting 12 12 till 2 weeks I think.
I've several damages on the leaves, principaly on the #2, after removed several leaves, looking less damaged, but I don't found the 🐛🐛 to kill them...
Thanks community for follow, likes, comments, always a pleasure 👩🌾👨🌾❤️🌲
Also to @marshydrococo2 , @News_SweetSeeds for sponsoring 💕💕.
Mars Hydro TS 1000
https://www.mars-hydro.com/ts-1000-led-grow-light
Gorilla Girl F1 fast version
https://sweetseeds.es/en/photoperiod-dependent-seeds/3065-gorilla-girl-f1-fast-version.html
See you next week my friends
Have a good week end 😁💕

Likes
6
Share


@mikheil007
Follow
Harvested Girl Scout cookies auto from Fast Buds! Very satisfied with result: 200gr. dry buds!. Thank You Fast Buds for consistently such a strong genetics!


Likes
14
Share


@ConspiracyFly
Follow
Week 8 Amnesia
Amnesia 1 (Seedstockers)
With LST
4 weeks of flowering
It has 55 centimeters
14L
LED 25 cm
Lux 60.000
Amnesia 2 (Seedstockers)
Without LST
2 week of flowering
It has 60 centimeters
14L
LED 20 cm
Lux 85.000
Gorilla Cookies Auto (Fast Buds)
(24 days) 3 Week
It has 8 centimeters
16L
LED 56 cm
Lux 23.000
Godzilla Cookies (Herbies)
(14 days) 2 Week
It has 6 centimeters
15L
LED 60 cm
Lux 20.000


Likes
20
Share


@eldruida_lamota
Follow
Que pasa familia, vamos a comenzar con el próximo proyecto, Apple Fritter de RoyalQueenSeeds. Y que ganas tenia de empezarlo.
Agradezco a James por la oportunidad de cultivar variedades así 💪.
Y también agradezco a Agrobeta todos los kits obtenidos de ellos 🙏.
Va pues al lío e germinado 5 semillas y germinaron en 48h, 5 de 5 unidades, un 100% de éxito en el ratio.
Han sido Germinadas con Papel absorbente y un tupper para mantener la humedad, pasadas esas 48 horas, las coloque en macetas de 0.6L directamente en tierra.
Mars hydro:
Code discount: EL420
https://www.mars-hydro.com/
Agrobeta:
https://www.agrobeta.com/agrobetatiendaonline/36-abonos-canamo
Hasta aquí todo, Buenos humos 💨💨💨

Likes
5
Share


@CannaIGrow
Follow
This plant seems to have grown much denser and better than my first plant. I just got the ac infinity ventilation setup with controller 69 for my 2x2, still trying to learn, hopefully grow #3 goes even better. Stay tuned


Likes
5
Share


@Subbe
Follow
I had to defoliate the very Bushy short super critical. She has a ton of Budsight/preflower on her they were all just drowning in leaves . Did that Yesterday. 9/4 .
So far she took it well . And all those budsights are now exposed to beautiful light. But lets see during the week if she Will get any set back the Lil Girl



Likes
56
Share


@Master_weeda
Follow
Bonjour à tous les padawans et les maîtres jedis
Pour cette semaine 3 au jour 19 ma plante fais 21 centimètres et son septième noeud apparaît je décide donc de pratiquer un LST sur ma plante.
Pour ce j'utilise du fil de fer galvanisé que je plante directement dans le substrat en faisant attention de ne pas endommagé les racines car n'oublions pas que ce qui pousse dessus pousse aussi dessous.
Jour 17 je pulvérise du une solution composé d'une cuillère à café de savon noir mou (marque briochin) dilué dans un demi litre d'eau en prévention d'éventuels nuisibles.
Pourquoi le savon noir mou ?
Savon noir : quelle utilisation pour le jardin ?
Le savon noir est un produit naturel dont les propriétés nettoyantes sont connues depuis l'Antiquité. Utilisé pour l'entretien de la maison et pour les soins corporels, ses vertus antibactériennes et insecticides en font un allié précieux pour le jardinier bio.
Le savon noir est fabriqué à partir de potasse et d'un corps gras de type huils végétale comme l'huile d'olive, de lin ou de maïs.
Produit naturel et biodégradable (s'il ne contient pas d'additifs, comme cela peut-être parfois le cas), c'est un très bon produit nettoyant, pour les sols, la cuisine, la vaisselle, le linge, etc... Très polyvalent, il est également économique, comparé aux multiples détergents classiques du commerce.
Le savon noir se trouve sous forme de pâte molle et brune ou sous forme liquide, dilué avec de l'eau. C'est du savon noir liquide dont on se sert généralement au jardin, car son utilisation est plus simple. Il s'achète dans les magasins bio ainsi qu'en grandes surfaces ou jardineries.
Attention : la recette du savon noir de ménage et celle du savon noir utilisé en cosmétique ne sont pas forcément les mêmes ; les savons noir de ménage (multi-usages) peuvent contenir davantage de potasse afin d'améliorer le pouvoir dégraissant (irritant ou desséchant pour la peau), voire même certains additifs chimiques.
Au jardin, ce sont en priorité les propriétés antiseptiques et insecticides du savon noir qui sont utilisées.
Le savon noir liquide est utilisé pour lutter contre les pucerons, les cochenilles, les araignées rouges, les aleurodes, les psylles et autres thrips. C'est un insecticide de contact ; il tue les larves et nettoie le miellat qui englue les feuilles.
La recette de l'insecticide à base de savon noir (mou pour ma par marque briochin) est simple à réaliser : une ou deux cuillères à café de savon noir mou (briochin) diluées dans 1 demi litre d'eau tiède (dilution à 5 %) ; une fois la préparation refroidie, pulvérisez-la sur les plantes atteintes, en prenant soin de ne pas oublier l'envers des feuilles. À renouveler 1 à 2 fois si nécessaire, pour être totalement débarrassé des indésirables.
Comme il est de mise pour la plupart des traitements, ne pulvérisez pas la solution à base de savon noir en pleine journée, sous le soleil (ni sous la pluie !) ; procédez le matin de bonne heure ou patientez jusqu'à la fin de journée, lorsque les températures sont en dessous de 20°C.
Jour 18 Je corrige mon LST suivant la pousse de ma plante ...
Pour ma par c'est la manière dont je procède mais petit rappel de la technique du LST
Quand commencer à appliquer la technique LST ?
De nombreux cultivateurs commencent la manipulation dés que les plantes possèdent entre 3 et 6 nœuds ou une paire de feuilles. Durant cette première étape de la croissance, le tronc encore flexible est pliable sans risque qu’il ne se casse, même si au fur et à mesure du développement de la plante il sera de plus en plus difficile de le plier. Nous pouvons continuer à guider la croissance des branches durant toute la culture, même durant la floraison, ce qui pour cette étape représente un grand avantage face à la taille, qui n’est pas du tout recommandé une fois que la formation des têtes commence, cela stressera en effet la plante, ce qui aura pour effet de retarder la récolte.
Comment appliquer la technique de guidage LST
Si nous sommes prudents, la flexibilité naturelle des fibres du cannabis permet de plier leur tronc et branches avec une relative facilitée, même durant la floraison des plantes.
En utilisant une corde fine, nous pouvons accrocher la pointe de la plante à la base du pot par exemple ou à un tuteur que nous aurons planté dans le substrat. Nous plierons le tronc avec précaution et nous le fixerons avec la corde, à partir de là, nous pouvons augmenter progressivement la tension de la corde, chaque jour un peu plus, jusqu’à obtenir la position souhaitée. Soyez attentif à la réaction de la plante, essayez de ne pas appliquer trop de pression sur la corde et rappelez-vous que la flexibilité des branches peut varier d’une plante à l’autre.
Pour obtenir de meilleurs résultats, il suffit de suivre quelques règles simples. Pour commencer, nous devons choisir une corde fine mais pas trop pour ne pas blesser les troncs au fur et à mesure qu’ils grandissent et qu’ils deviennent plus gros.
Nous pouvons utiliser des crochets en plastique souple ou de n’importe quelle autre matière flexible pour éviter d’endommager les plantes. Spécialement en intérieur, utiliser des cordons en plastique de couleur (voir les diaries de @Silky) est très pratique pour voir facilement les accroches et faciliter le travail au milieu du réseau formés par les cordes, les tuteurs, les mailles ou les supports que nous aurons dans la culture. Bien entendu, en culture extérieure et surtout en guerilla nous ferons juste le contraire et nous utiliserons des matériaux de couleur qui n’attirent pas l’attention pour que notre jardin reste discret.
Pour stresser les plantes au minimum, la mieux est de réaliser ces manipulations le soir ou juste après que les lampes en intérieur s’éteignent, ce qui leur permettra de se remettre durant la nuit. Normalement, le jour suivant nous pourrons observer comme les pointes des branches que nous avons pliées se dressent de nouveau vers le haut à la recherche d’une source de lumière.
Que la force soit avec vous💪

Likes
4
Share


@CalGonJim
Follow
4/22/24 🍓z I was going to take her down after I trimmed off all of the excess leaves and gave her some of the leftover maximum strength food from a space panda in the next tent. She really started taking off again, so I’m gonna keep her going. I’m gonna keep them all going and doing just great really starting to put out a lot of resin. They smell fantastic. I’m having a lot of fun with them so I’m gonna keep them going. I could take them down right now they are ready, but I just wanna grow them a little more. 👍👍👍
4/23/24 Wow they are great. ZStraverriez...hard to type.... is READY! I took the leaves off a couple days ago to see if I would get any growth but nope. So I will use FloraKleen 10ml per gal and do a 2 or 3 gallon flush and put her back in for a day. I harvested the CBD. It smells like berries, just great just the right size in a 2 gallon pot with no training.
I found a seed in the CBD, the others might be seeding as well......that is my oldest tent probably has pollen somewhere. Still everything is good, but im getting a new tent...I also just got a MarsHydro light for 100 it's the light bar one.
4/23/24 Apricot and straw. gorilla are growing good. Zstraberriez....which is a HUGE BITCH TO SPELL....but WOW smells like berries and vanilla and happiness. I let some dry for a few hours and put it in the Arizer X2 and she was great. These are so fast and the colors are beautiful too. It's like a perfect autumn day with all the leave changing color. Except my colors are way better and I can smoke them....
4/24/24 🍓🍓🦍🍑👍💎💎💎 I am seeing lots of resin form. I thought they would be ready to go, but it looks like they just kind of took a little pause and I trimmed off the unnecessary and fading leaves and they got their second wind and now seeing a lot of resin production💎💎💎. they smell great. They look like they’re ready to keep going for another two weeks so I’m gonna do that and I’ll just harvest a little bit along the way I smoke some of all of them this morning and they’re just great. 👍👍👍
4/25/24 I ended up doing a little bit heavier, feeding than usual. I did about 2 mL of all the supplements and now I’m seeing lots of resin. I’m very careful all the other nutrients have burned my plants horribly but I’m very careful in general. Hydroponic seems to do a good job without burning.
Fastbuds has a 25 pack of all their different strains mixed together for 100. I might do that. I’m kind of neurotic. I may need to know what I’m growing I think about this. I really like all of their plants they have a personality all of their own. I like Seedsman and the F1 it’s from Royal queen seeds.
4/25/24 🍑🍓🍓 marsHydro FC-E1500. I just got this delivered today. It cost 100. Although it is a powerful amazing light is no good for me at home. The TS-1000 lights you can move the driver outside the tent and then the top of the light has a little resting tray. This one is totally for commercial use, you cannot remove the driver and its pretty heavy, sold construction all the way, but in my small space I’m gonna have to wrap this up and put it away.
It’s a 10 out of 10 it’s a beautiful light super bright. It’s everything you want in a grow light for a commercial space but it is way too hot for a small 24” x 24” tent that I grow in. I have 3 tents and can't run lights over 90Watts or the room gets too hot, and I can grow 3 or 4 perfectly with the TS-1000 set at about only 90 watts, its just perfect.
This will get far too hot in the small tent, unless I want to set my air conditioner to 72 and get a massive electric bill! so I’m gonna stick with these TS-1000, the most perfect home light for grow tents I have ever used. I’ll give this light away someday but the Mars Hydro TS-1000 is still the absolute best light I’ve ever used. I have 4 of them now.
4/28 🍓🍓🍑👍💦💦💦💎💎💎 I can’t believe the amount of res in that they are all starting to put out. They are really getting their second wind. I am just having a lot of fun with them so I’m gonna keep them going as long, probably for a couple more weeks at least until they are no longer viable, but I should be able to keep them going pretty good for a while. 👍
Likes
18
Share

@DogDoctorOfficial
Follow
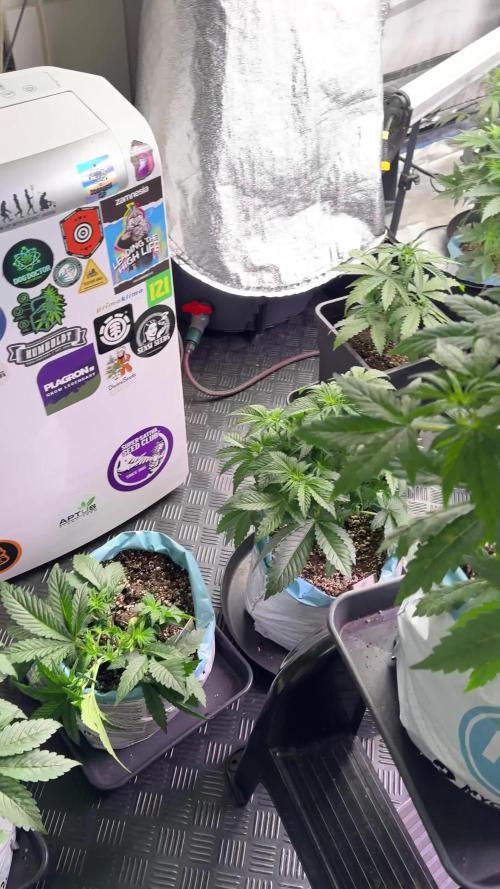
Cosmic Noodles — Week 5 from Seed
Transition Week · Pre-Flower Expression · Two Approaches, One Room
Hello everyone, and welcome to a big Week 5 update 🌱
This one is photo-heavy and detail-heavy, so thank you for bearing with us, there’s a lot happening, and we wanted to document it properly.
This week marks what we consider a transition / pre-flower week, where hormonal shifts are clearly visible, structure is defining itself, and flowering intent is becoming obvious, especially on one of the plants.
⸻
🌱 Quick recap for anyone just joining
• Two autoflowers, same genetics, same room, same environment
• Different early light histories:
• One plant received an initial ~15 days under 18/6, then switched to 12/12
• One plant has been 12/12 from seed
• Both are now growing side by side under 12/12
• No topping, no cutting, no high-stress training
→ Only low-stress techniques
This run intentionally goes against many traditional autoflower “rules”, and that’s part of the learning process.
⸻
🌿 Two Low-Stress Training Approaches (No Cuts, No Stress)
🔧 Plant with initial 18/6 period — Clamp-based LST
This plant is responding extremely well to structural opening using metal clamps.
• Clamps were used early to open the structure horizontally
• Most clamps are now hidden under leaf mass, which is exactly what we want
• Branching is strong, symmetrical, and well distributed
• The plant currently looks like a round, open bush / ball
• Internodes are stacking nicely, with great airflow
She is not very tall yet, but that’s intentional — she has been pushed outward first.
Now that structure is set, we expect vertical growth to accelerate.
By the end of the week, she is clearly more advanced in pre-flower, with visible pistils and early flower formation.
⚠️ Important reminder:
This plant also has ~15 days more life than her sister, which absolutely plays a role in developmental timing.
⸻
🍃 Plant 12/12 from seed — Leaf bending & gentle tucking
The second plant is trained exclusively through:
• Leaf bending
• Leaf tucking
• Gentle redirection
No clamps, no anchors — just guiding light access.
She is:
• Much taller (around ~30 cm by eye)
• Roughly double the size vertically
• Growing very fast, with all branches reaching upward
• Open, dynamic, and beautifully balanced
Her architecture suggests:
• A strong root system still building
• Rapid vertical expression
• A plant preparing itself confidently for flowering
She is slightly behind in visible flower development, which is expected given her age, but she is clearly transitioning.
⸻
🌸 Flower Development & Pistils (White Hairs)
On the plant that had the initial 18/6 period, we are seeing many pistils already.
These white hairs:
• Are the female reproductive organs
• Indicate readiness to receive pollen (even though none will)
• Signal the onset of flowering
The 12/12-from-seed plant will show the same soon — just slightly later, which aligns perfectly with:
• Her age
• Her different early light history
Nothing abnormal here — just biology doing biology.
⸻
🌿 Leaves, Color & Genetics
Both plants are showing:
• Deep, lush green
• Beautiful leaf texture and definition
• No signs of deficiency or stress
This is likely a combination of:
• Strong genetics
• Balanced nutrition
• Correct environment
• Gentle handling
It’s honestly a privilege to watch them grow like this.
⸻
💧 Watering, Nutrition & Why CalMag Comes In Now
Hand-watered plants (the two we’re discussing):
• Water: rainwater + dehumidifier-collected water
• Very low mineral content → requires supplementation
• This week we introduced CalMag Pro at 1 ml/L
Why now?
• Rapid growth + pre-flower = higher demand for Ca & Mg
• Prevents:
• Leaf issues
• Structural weakness
• Uptake problems later in flower
Current hand-watering parameters:
• pH: 5.9
• EC: 1.43
• Nutrition increased because plants are asking for it
⸻
Autopots (other plants in the room):
• Mineral-only approach
• Organics don’t work well in autopots
• EC: 2.29
• pH: 6.1
Different systems → different recipes → same goal: healthy plants.
Photos show measurements clearly for transparency.
⸻
🌡️ Environment Check (Winter Reality)
Outside conditions:
• 4–5°C
• 90–95% humidity
Inside:
• Temps dropped slightly but remain stable
• Day RH ~58% with lights on
• Nothing concerning yet
That said:
• Winter is humid
• Conditions may shift
• We are watching closely and will adapt as needed
For now: all good.
⸻
☀️ Light & PPFD
PPFD is adjusted per plant size, not uniformly:
• Ranges roughly 700–850 PPFD
• Plants are praying constantly
• Clear sign they love the spectrum and intensity
Again: light is tailored, not brute-forced.
⸻
🌱 Daily Handling & Plant Care
• Hand-watered plants are taken out individually
• Weight is checked
• Plants are observed closely
• Positions are adjusted so no one feels crowded
The room is becoming a mini jungle, and that’s exactly the intention 🌿
⸻
Fungus Gnats — Honest & Controlled
Yes, we have some fungus gnats.
• Yellow sticky traps are in place
• Watering is controlled
• Dry-downs are respected
Personally, I see them as:
• A manageable part of organic systems
• A reminder to stay balanced
• Possibly even a mild defense trigger (personal philosophy, not science)
They are under control, and roots are healthy.
⸻
New Team Member: Mr. Baggy
This week also marks the first appearance of Mr. Baggy —
our fluffy blue buddy won in a Grow Diaries contest 🏆
He’s officially part of the crew now, and you’ll be seeing more of him around.
⸻
🌱 Final Thoughts & Encouragement
These two autoflowers are growing beautifully, despite:
• Non-traditional light schedules
• Different early paths
• Ignoring much of the usual “bro-science”
This run is a reminder that:
• Cannabis does not behave linearly
• Each garden is its own ecosystem
• Trying, failing, observing, and learning is how knowledge is built
I strongly encourage everyone to:
• Test things yourself
• Think independently
• Respect the plant more than the rules
Nature often surprises us.
⸻
🔮 What to expect next
• Continued stretch on both plants
• Clear flowering progression on both
• Structural payoff from current training
• Ongoing environmental adjustments as winter continues
Thank you all for following along, for your patience with this big update, and for the love and support.
Growers Love 💚
Hit me up anytime.
DD 💚💚
Week 5 Veg/pre-flower | 8×8 Tent | Master Conditions
🌍 External Environment (Context)
• Outside temperature: ~5 °C
• Outside RH: 92–96% (very high humidity)
• Strong seasonal pressure influencing internal stability
⸻
🌡️ Internal Tent Conditions
• Tent temperature: ~21.8 °C
(noted drop due to cold external temps)
• Tent RH: ~58%
→ Very good considering outside conditions
⸻
💨 Airflow & Circulation
• Primary airflow: Bottom → top → wall return
• Pattern: Full-room vortex circulation
• Additional fans: Central airflow to break blind spots and mix layers
• Goal: No stagnant pockets, uniform VPD across canopy
⸻
💧 Water Source & Rationale
• Water: Dehumidifier water + rainwater
• Base EC: force
• Systems designed to support plant intelligence, not override it
FOR DISCOUNT CODES AND MORE JUST FOLLOW THE LINK https://website.beacons.ai/dogdoctorofficial
📲 Don’t forget to Subscribe and follow me on Instagram and YouTube @DogDoctorOfficial for exclusive content, real-time updates, and behind-the-scenes magic. We’ve got so much more coming, including transplanting and all the amazing techniques that go along with it. You won’t want to miss it.GrowDiaries Journal: https://growdiaries.com/grower/dogdoctorofficial
Instagram: https://www.instagram.com/dogdoctorofficial/
YouTube: https://www.youtube.com/@dogdoctorofficial
⸻
Explore the Gear that Powers My Grow
If you’re curious about the tech I’m using, check out these links:
🔆 Lighting & Environmental Control
• Future of Grow — Advanced LED lighting technology
https://www.futureofgrow.com/
DISCOUNT CODE: DOG20
• Lumiflora — Under-canopy LED lighting
https://lumiflorade.com/
• TrollMaster — Environmental controllers and automation gear (past collaboration)
⸻
Genetics
• Zamnesia Seeds — Genetics used in this project
https://www.zamnesia.com/
⸻
🌱 Soil, Substrates, Boosters & Root Support
• Plagron — Substrates, bio mixes, and supportive products
https://plagron.com/en/
⸻
🎒 Storage, Curing & Preservation
• Grove Bags — Curing and storage solutions
https://grovebags.com/
⸻
📸 Photography Equipment & Tools
(Not sponsors, but part of my creative toolkit)
• Sony A6700
• Sony full-frame macro lens + few more
• Stacking photography workflow - learning
• iPhone (for behind-the-scenes shots)
We’ve got much more coming as we move through the grow cycles. Trust me, you won’t want to miss the next steps, let’s push the boundaries of indoor horticulture together!
As always, this is shared for educational purposes, aiming to spread understanding and appreciation for this plant. Let’s celebrate it responsibly and continue to learn and grow together.
With true love comes happiness. Always believe in yourself, and always do things expecting nothing and with an open heart. Be a giver, and the universe will give back in ways you could never imagine.
💚 Growers love to all 💚
📸 P.S. – The Eye Behind the Lens
All photos in this diary (for now — except for the ones showing the camera, which I took with an iPhone) are taken with a Sony A6700 paired with a Sony full-frame macro lens and a few more.
Photography is part of the story — it’s how we share the fine textures, the glow, and the quiet details that words can’t always capture.
I’ve also started experimenting with photo stacking — a technique where multiple images, each taken at a slightly different focus point, are layered together to create one perfectly sharp image from front to back.
It’s not digital enhancement or AI; it’s pure photography — a way to reveal the plant’s beauty in microscopic depth, from trichome to petal.
You’ll even see a few shots of "ghost me" capturing the shots — camera, lens, setup — because every grow deserves not just to be cultivated, but documented like art.
FOR DISCOUNT CODES AND MORE JUST FOLLOW THE LINK https://website.beacons.ai/dogdoctorofficial
NEW DISCORD - Official Server Invite Link : https://discord.gg/ksjAkA5T74


Likes
26
Share


@LSDMan
Follow
1st Week of Vegetation, one of the Indicas (Hollands Hope) is early than others. Because of the weather and the cold, I preferred to put the seedlings under a 200W CFL bulb.
Likes
5
Share

@For2itous
Follow
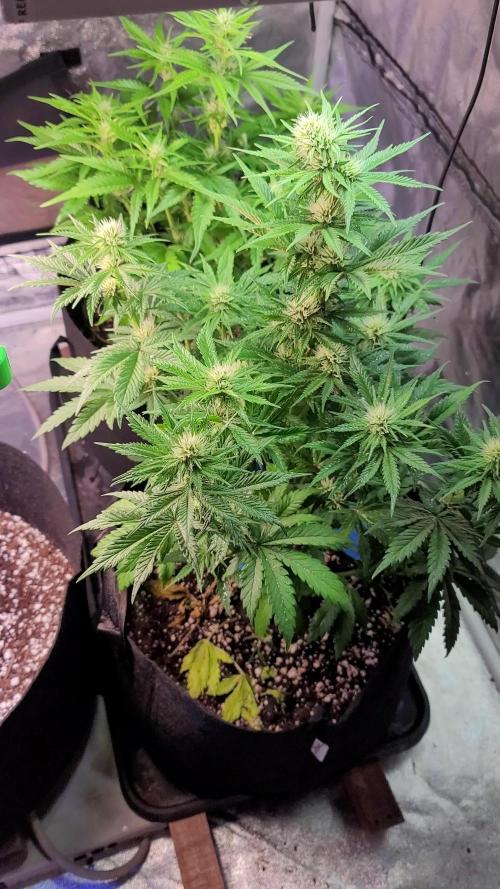
Growing really nice so far but doesn't look it when the plant next to it is booming 😆 It does look good so far it likes the nutes so far just isn't getting tall which isn't an issue at all just have to check ppfd more with the different plant heights. Can't wait till it starts to really flower cuz the stem rub has a really nice smell. Goodluck and happy growing everyone 🌴


Likes
6
Share


