
Likes
Comments
Share


@Bousmeister
Follow
Week 6 of flowering and my ladies are starting to smell quite a bit.
Caramelino has a very funky fruity smell while the northern light has a fruity, musky smell.
Looking forward to what's ahead!
Peace

Processing
Likes
7
Share


@A1420
Follow
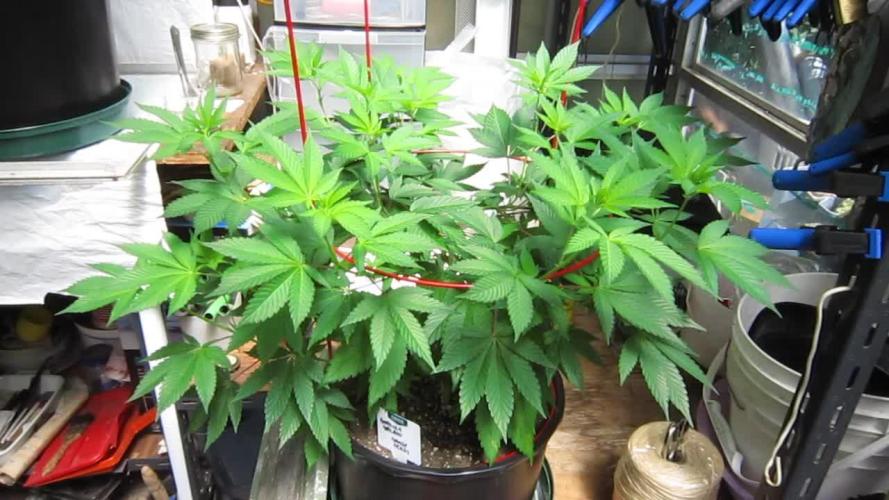
Really bulking out now and look like a lot of these colas will be filled out completely by finish looking at the rate they are growing and the fact they have 4-5 weeks left estimate.
Cheesy smell is getting stronger but only within the tent when working in there and disturbing and moving the buds, once zipped up the filter handles everything fine.
Crazy trichome production going on so early in flower , these are going to be some very frosty nugs.

Likes
2
Share


@Lazuli
Follow
I just water once a day and wait for flowers to bulk
June 10th added big bud

Likes
53
Share


@DogDoctorOfficial
Follow
Hello, my amazing green-thumbed friends! Welcome to the Week 1 flower report for our beloved P.C.R.s. The transition from veg to flower is a magical time, and our plants are already showing signs of their future glory. Let’s dive into the exciting details of this week!
Entering the Flower Stage
Our P.C.R.s have officially entered the flowering stage, and the transformation is already visible. The stretch has begun, and you can see the plants reaching up, preparing to produce those beautiful buds we’re all waiting for. This stage is all about supporting their growth and ensuring they have everything they need to thrive.
NutriSpray Magic
This week, we’ve been diligently spraying Aptus Holland NutriSpray, and the results are phenomenal. NutriSpray is like a spa treatment for our plants, providing essential micronutrients directly to the leaves. It helps with nutrient uptake, reduces stress, and boosts overall plant health. Our P.C.R.s are absolutely loving it, standing tall and proud with their leaves praying to the light.
Nutrient Transition
With the start of the flowering stage, we’ve made some important adjustments to our nutrient regimen. We’ve stopped using StartBooster and replaced it with TopBooster, which promotes flowering and bud formation. Additionally, we’ve introduced P-Boost, a phosphorus booster that enhances root development and flower production.
TopBooster: Encourages larger and more abundant flowers.
P-Boost: Provides essential phosphorus for robust root and flower development.
NutriSpray: Continues to support overall plant health and stress reduction.
Optimal Conditions
Maintaining the perfect environment is crucial as we move into the flowering stage. Our TDS is now at 360, with a pH of 5.9 and a temperature of 21°C for watering. These conditions are optimal for nutrient uptake and overall plant health, ensuring our P.C.R.s have everything they need to produce those beautiful, resinous buds.
Care and Attention
Paying close attention to our plants during this stage is key. Regularly inspecting for any signs of stress or nutrient deficiencies and adjusting care as needed ensures our plants stay happy and healthy. The love and care we put into this process are reflected in the vibrant health of our plants.
In Conclusion
Week 1 of flowering has been all about setting the stage for a bountiful harvest. With the help of Aptus Holland NutriSpray, TopBooster, and P-Boost, along with our careful attention, our P.C.R.s are off to a fantastic start. The excitement is building, and I can’t wait to see how they develop in the coming weeks.
Shout Outs
A huge shout out to @aptusholland, our main sponsor, for their incredible products that keep our plants thriving. Another big thank you to @artgenetix for creating the phenomenal P.C.R. strain. And to the wonderful community at Grow Diaries and all our followers, your support and enthusiasm keep us going. Let's continue to grow together!
Until next time, happy growing, and may your gardens be full with love and green!
Genetics - P.C.R. @Art_Genetix_Team https://artgenetix.world/
Nutricion @aptusholland https://aptus-holland.com/
LED Power @Lumatek and @viparspectra
As always thank you all for stopping by , for the love and for it all, i fell blessed to have you all with me for one more love journey Thank you Thank you Thank you , you guys are great and have been amazing , thank you for everything !
#aptus #aptusplanttech #aptusgang #aptusfamily #aptustrueplantscience #inbalancewithnature #trueplantscience #dogdoctorofficial #growerslove
With true love comes happiness , Always believe in your self and always do things expecting nothing and with an open heart , be a giver and the universe will give back to you in ways you could not even imagine so !
Growers love to you all

Likes
15
Share


@Ronin716
Follow
This weeks update is just basically a photo/video dump! At the start of the week I did some lst and a tiny bit of defoliating and the growth just seemed to burst, I noticed they seemed to began to flower! So I went ahead and introduced the net to the set up and the I’m stoked with the way they filled this tent right out!! These cream manderin are truly fast growing buds. I also started adding Big Buds Liquid to the feeding schedule and so far, so good. At this point I’ll just be uploading photos every Tuesday/Wednesday 🤙🏻🤙🏻

Likes
35
Share


@MrSpooky882
Follow
Ich bin eigentlich sehr zufrieden bisher, nächste Woche kommen sie in das Zelt, wie man sieht wurzeln sie sehr schön außer der genetische "Krüppel" mal sehen was daraus wird, ich habe leider keinen Ersatz gepflanzt 😒😏😅 bis dahin schönen Sonntag noch 😘👌
I am actually very satisfied so far, next week they come into the tent, as you can see roots very nice besides the genetic "crippled" let's see what will become of it, unfortunately I have not planted a replacement 😒😏 until then nice Sunday still 😘👌

Likes
10
Share


@Froggman
Follow
Getting close! Buds are nice and thick. No amber on either but plenty of milky.

Likes
4
Share

@Chucky324
Follow
Hello. This is the end of week 9 and the beginning of week 10 of veg.
The plant is doing good. It's sticky when I work with it.
Sorta a citrus type of smell.
I've been pushing the branches under the rung when they get long enough... training...
OK. Keep Growing Straight.
Chuck.

Likes
11
Share


@StickyFingah420
Follow
La fase de engorde sigue viento en popa y una fragancia dulce inunda cuarto de cultivo junto con unos atractivos colores.
Día 70, Día del último Riego con fertilizantes y desde ahora serán 15 días solo con agua y enzimas para obtener un resultado más limpio.
Likes
13
Share


@XanHalen
Follow
Mar 24:
Watering till runoff now...
runoff ppm was 2500+...
Will be using very mild nutes to flush over 1 - 3 feeds... or until I am near my input.
Mar 26:
Continuing to use 650ppm feed with bloom focus, 2L per plant gives 15% runoff...
Runoff ppm is still very high...
I wanted to check pH of runoff but the color is so vibrant i cant use the pH drops to view color, need to get a pH probe.
Plants are thriving, no issues at all. the extra fan fixed the post-water droop.
One plant is bushy and has the most bud sites,
One is the smallest but has the most uniform structure, this one has the biggest buds and thickest stalk,
One is about in the middle of the 2.
Mar 29:
one of these girls gets droopy early when its time for water, thought the canopy was too high so i tied down some more, no cigar...
gonna try increasing calmag, if that doesent work im going to reposition in the grow box to a side instead of middle, may not need the upper end ppfd...

Likes
4
Share


@Rko41
Follow
Température 14-28 degré stretching de 5 cm cette semaine mais sa doit être la fin ! La Flo commence bien malgré ce manque de soleil! Jolie buisson!

Likes
12
Share


@2Stones1Bird
Follow
Checkout my Instagram @smallbudz to see the Small budget grow setup for indoor use, low watt, low heat, low noise, step by step.
17/11/2019 - Pot feels light and the is bottom dry to the touch time to water, gave her 1,5l of water PH 6.2 with 0.5ml Grow, 1ml, Bloom and 0.5ml Max Biobizz reduced the dosage from last time, watered util some runoff appeared.
18/11/2019 - Mixed another batch of Alg-a-Mic 2ml per liter to spray on lights off PH 6.2

Likes
35
Share


@bioaccessory
Follow
Hello colleagues!
This week I added a lamp with far-red diodes, returned the blue ones, and now I have even brighter colors in my box. 😎
Thin branches begin to bend and break - I tie them up. I'm reaching the finish line.
Thank you for stopping by, and be healthy! 🙏
To be continued... 😶
Likes
2
Share


@Stankmeister
Follow
2 weeks later and Girl crush is throwing out 12's... I will have to top her soon. I took her 1st two liters to prop clones but they failed repeatedly. She isnt a big stretcher and I'm not limited by vertical space at all so I'm not worried [even though my auto's are at the very least 30 and 45 days away from full maturity respectivly.]
The ogreberry is somehow even easier to train than the whiskey zulu at this stage. The canopy is much more even and we'll just have to see if that remains true.
This ogreberry smells fucking wild. The other two plants smell good and unique but the Ogreberry smells like fruit loops, lemon and the strongest note I smell every single time I test it, I can only describe as the "new" smell a baby gives off. I dont know if that's from the sweet cream of baby formula or what because I don't have a much experience with babies, but this is a very baby-like smell. It's shockingly absurd that this plant smells like an infant. This "new" quality reminds me of northern lights.


Likes
15
Share


@ThickFreakness
Follow
I bumped light up to 80% (PPFD 700-400 on edges). Observation weekend
Noticed a bit taco / clawing raised light to 22”.
Coconut oil infusion experiment
Mini crock pot / warm / 2C coconut oil / 24g of Blueberry cupcake / 6hrs stirring once an hour / strained with cheese cloth

Likes
32
Share


Likes
40
Share


@Dingle
Follow
Week 8 flower 🌸
✅Final week before harvest.
Flushing with just ph’d water for the final week.
Everything looking good for harvest at the end of week 12.
Some amber trichomes starting to appear on almost all of the buds on both plants so lights out any day now.
Next update harvest 👨🌾🏻
✌️
Likes
25
Share


@SolitudeCorners
Follow
Rule66 don't be lazy to water your plant.
Can't wait to blazeeee
Feeding💪
10/17 Water30L+Cleanse80ml+calmag@190ppm
Ph6.3
Ebb 10.42/11.32/12.26/13
Clone 11.35/12.21/13.05/14
Average runoff ec1.5
Keeper 300ml per pot
10/18 Water26L+Flawless90ml+calmag@300ppm
Ph6.3
Ebb 11.38/12.24/13.17
Average runoff ec1.2 ph6.5
Clone 12.38/13.56/15.20/16.10
Average runoff ec1.5 ppm750
10/19 Water26L+Cleanse80ml+calmag@200ppm
Ph6.3
Ebb 11.12/11.48/12.24
Average runoff ec1.4
Clone 11.50/12.12/12.37/13.37/14.40
Average runoff ec1.3 ph6.6
10/20 Water30L+Cleanse30ml+Calmag@190ppm
Ph6.4
Ebb11.42/12.22/13.20/14
Clone 12.40/13.20/14.20/14.45/15.15
Average runoff 1.2ec ph6.4-6.7
10/22 last light day
10/23 2 Pm Cut and hang
Plan 21day at 23temp 55rh
Likes
8
Share


Likes
179
Share


@Grow3rPT
Follow
👉 ( Floração ) 👈
📅 Total de Dias 71 (F 41) - 12/10/2021 / 💦 Rega com nutrientes apenas planta 4 ( Plantas 1,2,3 e 5 não foram regadas )
📅 Total de Dias 72 (F 42) - 13/10/2021 / 💦 Rega com nutrientes plantas 1,2,3 e 5 ( Planta 4 não foi regada )
📅 Total de Dias 73 (F 43) - 14/10/2021 / 💦 Rega apenas com agua planta 4
📅 Total de Dias 74 (F 44) - 15/10/2021 / 💦 Rega planta 2 apenas com agua. Plantas 1,2,3 e 5 não foram regadas
📅 Total de Dias 75 (F 45) - 16/10/2021 / 💦 Rega de todas as plantas apenas com agua
📅 Total de Dias 76 (F 46) - 17/10/2021
📅 Total de Dias 77 (F 47) - 18/10/2021 / 💦 Rega apenas com agua (apenas a planta 4) 1,2,3 e 5 não foram regadas
👉 MARSHYDRO
👉 CODIGO PORMOCIONAL : Grow3rPT
👉 Em marshydro.eu 3% de desconto em qualquer produto
