


Likes
Comments
Share


@russrahl
Follow
Going great! Got the second screen on and managed to DIY a bar for my light mover to get my 1000w HPS up as high as possible. One of my main problem always seems to be vertical space! But I imagine a lot of fellow growers know this struggle. Lol still had a few buds reaching up over the 70 DLI threshold directly under the light that I had to hook down to the second screen but for the most part the second screen is just for support. Been watching my ph and ppm and keeping pm between 5.8 and 6.2 and ppm has been giving around the 600-650ppm mark. Because I spread them out in their own 4’x4’ area each plant they had lots of room the grow and I really haven’t had to
Defoliate at all, with the under netting grow exception of course. Starting to smell citrusy and bud set is happening. 2nd week of flowering is going great! Cheers 💨

Likes
5
Share

@Chubbs
Follow
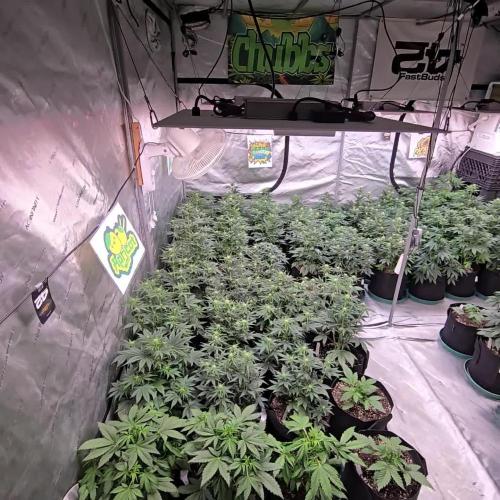
Weekly update:
Crazy how time flies when your having fun. Seems like yesterday I did last week's update. I did some defoliating and lollipoping on them this week and switched from grow nutes to bloom. Wild how fast the preflower sites grow as it looks like they're everywhere. I'm still feeding 16oz per day, some are drinking more then others but overall Happy Growing.

Likes
57
Share


@DogDoctorOfficial
Follow
Si lets talk about my beautiful Medusa F1 from Royal Queen Seeds. This little lady is growing like a champ, and I've been giving her lots of love and care.
One of the techniques I've been using with my Medusa F1 is leaf bending as a form of training. It's been amazing to see how much she's responded to this technique. I gently bend and manipulate the stems and leaves to encourage horizontal growth and create an even canopy. This helps to promote more even light distribution and allows for better nutrient uptake. My Medusa F1 seems to be loving it, as she's growing strong and healthy with lots of new growth popping up all over the place.
In addition to leaf bending, I've been using Aptus Holland Nutri Spray as a foliar spray, and I can't say enough good things about it. This stuff is a game-changer! It's a high-quality nutrient-rich spray that I apply directly to the leaves of my Medusa F1. It's been absorbed quickly and efficiently, and I've noticed a significant improvement in the overall health and vitality of my plant. The leaves are looking lush and green, and the growth has been explosive!
I believe that giving my Medusa F1 the best nutrients and care is crucial for her growth and development, and Aptus Holland Nutri Spray has been a key part of my regimen. It's made with love, just like how I care for my plants, and I can see the results every day. I'm so excited to see what my Medusa F1 will become with continued use of this amazing foliar spray.
I highly recommend trying out leaf bending and incorporating Aptus Holland Nutri Spray into your routine. Your Girls will thank you with lush, vibrant growth, and you'll fall in love with the results, just like I have.
As always thank you all for stopping by and for supporting me on this journey, i am super passion about growing and fell blessed to have you all with me on this new journey <3 <3 <3
Genetics - RQS MEDUSA F1
Ligth - LUMATEK ZEUS 465 COMPACT PRO
Food - APTUS HOLLAND
All info and full product details can be find in can find @
https://www.royalqueenseeds.com
https://aptus-holland.com/
https://autopot.co.uk/
https://lumatek-lighting.com/
With true love comes happiness <3<3<3 Always believe in your self and always do things expecting nothing and with an open heart , be a giver and the universe will give back to you in ways you could not even imagine so <3<3<3
<3 <3 <3 Growers love to you all <3 <3 <3
Medusa F1
Medusa is a true F1 hybrid created from pure, inbred cannabis lines. She boasts uniform grow traits, mouthwatering aromas and flavours, and plenty of potency. If you're looking to bring stable, elongated plants into your room, tent, or garden, look no further. Mouthwatering Aromas, High Potency, and Mid-Size Plants
Though she won't turn you to stone like the mythical goddess after which she's named, Medusa F1 is bound to get you plenty stoned in her own special way. Combining genetics from inbred lines deriving from Sugar Magnolia, a thick and sweet indica, and American Beauty, a fast, fruity hybrid loved for its well-balanced, positive high, the result is an autoflowering F1 variety that produces fresh flavours, a unique cannabinoid profile, and large yields.
A very aromatic cultivar with a vibrant concentration of terpenes bearing notes of fresh mint alongside an upfront peppery kick, backed up by hints of fresh fruit, berries, and tangy fuel. Her thick, frosty flowers consistently produce high levels of THC and CBG, as well as high concentrations of myrcene, ocimene, farnesene, and caryophyllene. As a result, Medusa F1 has strong effects that relax and stone the body from head to toe (brought on by particularly high concentrations of myrcene and farnesene) while motivating the mind with an uplifting, creative, and motivating kick (thanks to high concentrations of ocimene).
Medusa F1 seeds produce elongated autoflowering plants with long, strong branches and well-spaced internodes. Plants regularly grow up to 80–85cm tall and boast a fast flowering time of just 42–45 days (72 days from germination to harvest). Thanks to her genetics, Medusa F1 produces plenty of thick flowers with big, swollen calyxes that make for very easy trimming. Medusa F1 is very stable, handling stress and unfavourable growing conditions with ease, though she is somewhat susceptible to Botrytis, so make sure to keep tabs on the humidity in your grow room/garden.

Likes
Comments
Share

@AestheticGenetix
Follow
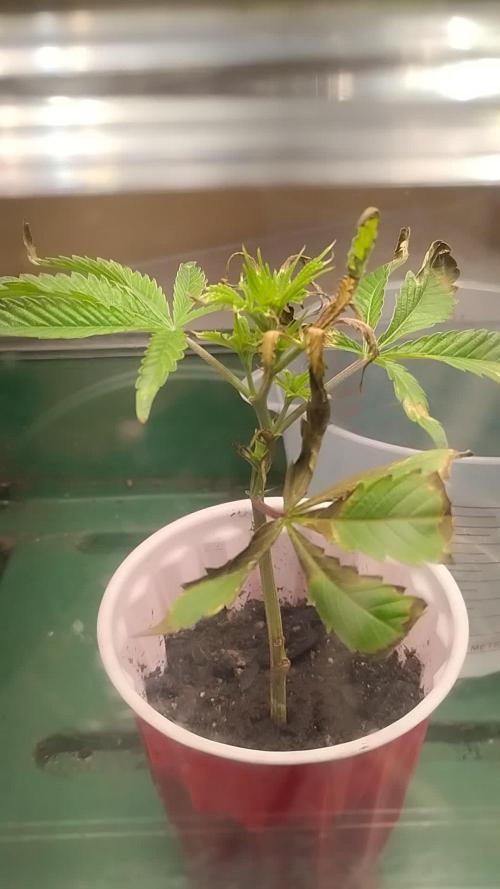
Started getting worried that I might lose this genetic. I didn't take care of her very well and just had her sitting around my house.
I was dealing with aphids in the tent and didn't want to bring her around that yet.
But during this time period she started losing leaves and getting crispy and wasn't showing any new growth.
But after 24 hours under a proper light with proper environment, she's almost instantly growing now. So new growth is good and means I'm not losing her
Check out my YouTube for long form content that I can't post here
https://youtube.com/@aestheticgenetix?si=pSk5e-kvp-nVYccc

Likes
11
Share


@kauilmayel1996
Follow
Me siento muy contento con estás auto...
Fast buds sorprendiendo con unos cogollos hermosos y un olor increíble...
No hice el mejor trabajo pero estoy feliz de haber hecho esto...
estoy enamorado con las ruderalis!
Auto de Fast buds un súper 10!

Likes
3
Share


@Jackalthewolf86
Follow
Donnerstag Woche 5
Bisschen Nährstoffe könnten fehlen könnten aber auch die Wurzeln gewesen sein! Waren heute früh zum Teil trocken! Sagte noch.... Aufpassen!
Hab es wie zuvor gemacht und unterhalb alles entfernt damit sie die Energie besser nutzen kann, weiß nicht ob das fiming geklappt hat aber die Haze hab ich gespreizt und nochmal gescrogt beidseitig!
Auch wieder Bio bizz light und Canna Professional 50/50 und 5 ml rhizotonic!
Lampe ist bei 10 cm internodien auch kurz ziehen! Wenn es klappt! Wasser hab ich raus laufen lassen um einen Brand zu verhindern auch Ph neutral also 5,5
Die Alien schaut ganz gut aus außer das sie meines Erachtens etwas zu hellgrün ist! Wachsen tut sie ohne Probleme!
Ich dumm Dusel hab noch gesagt.... Ey eigentlich Klasse Sache mit den Wurzeln kannst die direkt düngen! Musst nur die Wurzeln feucht halten!!
Dünger haben sie keinen bekommen allerdings ab ich beim Töpfen drauf geachtet das Wurzelwerk nicht zu beschädigen also Topf drücken und langsam seitlich raus Ziehen! Dann sind die Steine auch kein Problem... Normalerweise sind sie eingewachsen!
An den Blättern sieht man es ich hoffe nicht das ich sie geschrottet habe! Wurzeln waren über Nacht ausgetrocknet zumindest fast alles was draußen war! Trotz nach Wässern!
Topfen haben beide gut überstanden allerdings macht mir die Haze sorgen! Schauen wir die nächsten Tage!! Wachsen alle schön weiter und die Technik hat meines Achten nach auch geklappt!
Abstand liegt bei 5 und bei 10 cm
Ich hab da auch mal einen Trick gehört bezüglich der Wurzeln, Blütezeit und zusätzliche Produktion aber wann man es macht und außerdem ist es ein sehr großes Risiko! Gleich zu setzen mit dem spalten des Stammes!!
Man reißt einen Teil der Wurzeln ab um die Produktion zusätzlich anzukurbeln aber reißt du zu viel ab... Dann hasst du dich selber weil du die Pflanze damit umgebracht hast!
Rein theoretisch müsste das ja Reichen wenn du die Pflanze etwas trocknen lässt und dann anheben tust, durch die Steine reißt es auch bedingt!! Nur wann du das machen sollst kann ich nicht genau sagen!!
Egal... Kommt Zeit kommt Rat!!! Erst mal auf das Wesentliche beschränken verfeinern kann man immernoch!! Und bei 3 pflanzen, will ich kein Risiko eingehen!! Nicht unbedingt!!
Wenn man einmal nicht aufpasst macht sich gleich der Hauswächter auf zur vesite! Typisch Schlange!!! Lass bloß die Pflanzen in Ruhe!!
Dienstag
Schauen beide wieder gut aus! Nach dem sie Eisen bekommen hat kann man auch sehen das die Verbrennungen aufgehört haben und sie wieder Farbe bekommen hat.
Die Alien wuchert wie Unkraut!! Aber das Fimen hat nicht geklappt.... Egal! Anderes Mal!
Dachte mir, nachdem er auch schon im grow Room präsent war, zeig ich mal sein Terrarium! Damit auch der letzte Tierfreunde nicht sagen kann es wäre Tierquälerei! Nur er hat das Privileg die obere Etage in Anspruch nehmen zu können, denn die Türen stehen offen!! Und er darf!!!

Likes
5
Share


@Cannibalgardens
Follow
We are on week two of flowering and the ladies are loving it .. we defoliated and pulled some branches around increasing air movement and light penetration.. The cheese has been a little picky .. lighter on the nutes and doesn't like training very well..The team @seedsmen seeds have bomb genetics and I can't wait to stArt my next seedsman diary sooo good ..keep an eye out for week three ..

Likes
18
Share


@JeyGanesha
Follow
Terza settimana di fioritura inoltrata..andiamo più che bene con lo sviluppo.buona genetica anche questa papaia cookie...bravi 👏 fast buds. Continuate così .,💪✌️
Likes
24
Share


@DeepRootsGrowTrees
Follow
SWISS DREAM ROSE 🌹 CBD AUTO
KANNABIA SEEDS
WEEK #11 Overall
Week #8 Flower
This lady is Beautiful she really stands out with her amazing purple buds covered in trichomes she's definitely gonna get your attention and catch your eye!! Stay Growing!!
Kannabia.com
SWISS DREAM ROSE 🌹 CBD AUTO


Likes
Comments
Share


@Phenophilgrow
Follow
In the second Week i started to give them a few nutrients. Maybe a bit too much, as you See in the last 2 Videos.
Since its very cold (-5°C) in Germany i've put a heating cable losely around the pots to Heat Up the soil a bit.

Likes
24
Share


@3lementa1
Follow
This is the 8th week. Thursday will be 9 weeks of 12/12. Some trichs are amber. They just added a good bunch of girth over the past few days, but most of the pistils are red now. The rest of them have been dropping leaves consistenly but the canopy remains full so they must be putting out more leaves.
I just flushed to 80% runoff and found out that I had 1200ppm. I just got an ec meter but my last reading said closer to 600 so idk what happened there.
I flushed until I had runoff ppm of about 150. Now they're back in the grow tent. I don't want to keep assaulting them with my microscope. I think they're ready. Just gonna let them settle another day or two to dry out a bit.
I took one small branch off the small Wedding Cake plant on Thursday and I've just been watching it dry on my counter. It's been 5 days and the stem snaps but still leaves a fiber connecting. I put it into a small jar with a 64RH thing. I just want to try it. It already smells amazing.
The leaves on the big CBD Blue Shark plant are going really yellow and some other colours are starting to come out as well.
The buds all fattened up and got more frosty again. I was worried they were foxtailing but they got more calyxes underneath the peaks and have been making more of a pyramid shape. They're really close to peak. Harvest day will be March 17 or 18.
March 17 1023pm chopped and hung after lights off all day. RH was 65% before I chopped and 50% after I closed the window and cut the plants off the saturated pots. I did a wet trim to prevent mold. The buds are sticky af. Gonna hang them to dry for 7-9 days before curing in jars :)
March 18 : checked the RH when I woke up and it's chilling at 45% 😎
March 19 : just checked to see how they were drying. There are seeds in every plant. RIP
I'll update when I put them in jars and again a few weeks later for final review. Overall it was a good grow despite the rocky start and a good introduction to the mainline technique and my new grow space. Next grow I should have everything pretty well dialed in.
March 23
They were hanging for 3 days. Rh was around 45, then spiked to 65 overnight when I forgot to turn the fans back on. Temp was high at around 26.they felt wet after 2 days, and bone dry after 4 days. The stems still didn't snap but I put them in jars anyway. A day later, jar RH was 50%. I burped all the jars and there was a smell from the new jars. I took all the weed out, washed out the jars, and did a dry trim on the weed.
One of the Wedding Cake plants must have gone hermie. I didn't see any bananas and didn't even realize there were seeds until the very end. The seed pods looked just like calyxes while the plants were growing. Many of the nugs are unusable. Under the sugar leaves are just layers and layers of seeds. Some weren't hit that badly. The CBD Blue Shark is much better off but still has some seeds.
I'm trying to stay positive. It's a bit of a shock though. I'm anxious to try the finished product. If the flowers at least taste good and have a good effect, all is not lost.
Likes
15
Share


@Springbokke
Follow
Доброго всем дня
Сегодня 89 день жизни моей дочки. Ровно 4 недели как перевел на цвет. Рост прекратился в начале этой недели и я решил убрать азот. Но прежде я ее промыл хорошо, вывел все накопившие соли с горшка, и ее корней, думаю мне это удалось. На выходе из горшка вода показала всего 111ppm! Так же на этой недели стали желтеть верхние листья, считаю что это и за недостатка кальция. По этой причине стал добавлять CALiMAGic. Я его всегда использовал когда пользовался линейкой удобрений от General Hydroponics.
Вообще в конце я напишу свое мнение о использованных мной удобрений, может кому то будет полезен мой опыт.
Полил ( 1061ppm )-3л Sensi Bloom Coco A - 4мл/л; Sensi Bloom Coco B - 4мл/л; Big Bud Coco - 2мл/л; Bud Candy - 2мл/л; Влажность 32% - 43%; температура 21c - 28c 8 - й день цвета, Полил ( 1146ppm )-3л Sensi Bloom Coco A - 4мл/л; Sensi Bloom Coco B - 4мл/л; General Hydroponics Kool Bloom -1мл/л; B-52 - 2мл/л; Влажность 26% - 44%; температура 22c - 30c 9 - й день цвета, Промыл 36л Влажность 26% - 41%; температура 20c - 28c 10 - й день цвета, Полил ( 1056ppm )-3л Sensi Bloom Coco A - 2мл/л; Sensi Bloom Coco B - 2мл/л; General Hydroponics Kool Bloom -2мл/л; B-52 - 2мл/л; General Hydroponics CALiMAGic - 2мл/л; Влажность 22% - 38%; температура 20c - 27c 11 - й день цвета, Полил ( 1071ppm )-3л Sensi Bloom Coco A - 2мл/л; Sensi Bloom Coco B - 2мл/л; General Hydroponics Kool Bloom -2мл/л; Big Bud Coco - 2мл/л; Cal-mag Xtra - 0,5мл/л; Влажность 22% - 32%; температура 20c - 27c 12 - й день цвета, Полил ( 596ppm )-3л Sensi Bloom Coco A - 2мл/л; Sensi Bloom Coco B - 2мл/л; General Hydroponics Kool Bloom -2мл/л; Nirvana - 2мл/л; Влажность 23% - 32%; температура 20c - 27c 13 - й день цвета, Полил ( 970ppm )-3л General Hydroponics Kool Bloom -2мл/л; Big Bud Coco - 2мл/л; Cal-mag Xtra - 2мл/л; General Hydroponics CALiMAGic - 1мл/л; Sensizym -2мл/л; Влажность 26% - 35%; температура 19c - 26c 14 - й день цвета
Как видите влажность очень низкая. Конечно хотелось бы чтоб она была чуть выше, но лучше пусть будет ниже нормы чем выше нее.

Likes
2
Share


@Vcashout
Follow
Plants are growing! But so is my mold problem I recently got a hygrometer and noticed that my humidity was ranging from 64-70 percent which I realize is too high and maybe that is where my mold is coming From im starting to see it coming from the drain holes on the bottom of my pot. I’m going to get a dehumidifier and see how that works. Also I attempted lst to both plants . The doc og is a week older and definitely bigger than the apples and bananas but but are coming along nicely.

Likes
13
Share


@madlangs
Follow
Ppfd 300-220.
Hubbabubba haze off to a bad start and so are the lemon haze.
1.11.24
Gave all 1lt apart from lemonade got 500ml recharge
Root juice 4ml/L
Bio heaven 2ml/L
Acti Vera 2mlL


Likes
23
Share


@adam_pawloski87
Follow
This grow was pretty simple ! They went a total of 103 days from seed! Very trichomy dense buds with the smell of Berries vanilla and skunk ! This is a must try for you all Fastbuds has the greats!!!
Likes
2
Share


@eldruida_lamota
Follow
Vamos familia tercera semana de estás Pink Runtz de RoyalQueenSeeds.
Que ganas tengo de ver el progreso de esta variedad, las plantas están sanas, se ven con buen color.
La cantidad de agua cada 48h entre riegos.
Esta tercera semana ya añadimos nutrientes, estas próximas semanas veremos cómo avanzan.
Agrobeta:
https://www.agrobeta.com/agrobetatiendaonline/36-abonos-canamo
Hasta aquí todo, Buenos humos 💨💨💨
Likes
18
Share

@TrickzGrowz
Follow
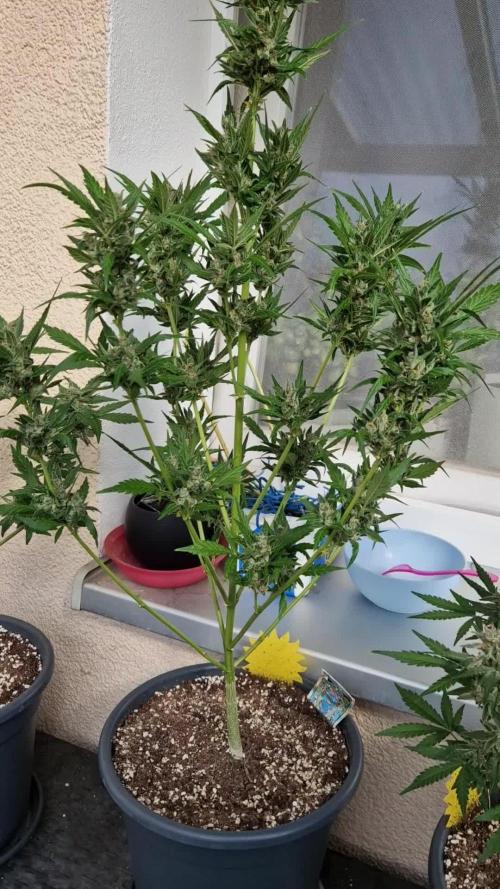
Servus Moin!
Die Pineapple Slush XL macht sich hervorragend. Die Buds riechen allmählich auch sehr fruchtig.


Likes
47
Share


@UKauto
Follow
Steady away for her.
Cut nutes down a touch getting some burn on her.
Hasn't had any sumo boost either.
She's doing good though, hopefully see her fatten up. Done better than I thought as it is anyway 😁


