Likes
Comments
Share
@Herbalize
Follow
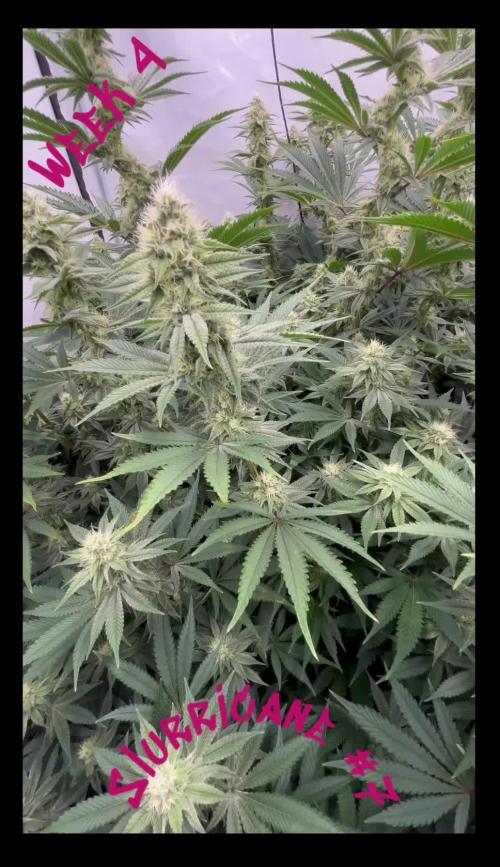
Hello folks Welcome for the first week of flowering 😺 ( 38 days veg ) These Toxic are growing really fast with a lottt of secondary branch ! they responded very well to fimming. Still no nutrients, just rhizotonic and cannazym with aprox 4.5 liters of water every 5/6 days i like CANNA super soil a lot, no need to put fertilizers before bloom, ( good for 6 weeks atleast) and the roots like it 😍 Regarding defoliation, I take off some leaves every day, i dont like removing too many leaves at once I will change the MH for the HPS next week and make a little prayer so that the days are not too hot this summer 😅 I also have 2 another diaries with Rqs/Ripper strains if you want to see Peace Love & Weed GD Fam😍👊
Likes
277
Share
@Ju_Bps
Follow
Hello growmies 👩‍🌾👨‍🌾🌲🌲, 👋 During this first week flowering plant explode 💥, and look really good, grow faster. Started flowering nutes, did a litle defoliation. Already a sweet smeel 😋😋 💡 I up a bit the supply of lamp each days. 💪 I continue the training, but don't need to touch so much now. 💧 Give water each 2/3 day And vaporise plant with water + Plagron Roots (1ml/l) 1 l Water + Roots + Zym ( 1 + 1 ml/l) 1.25 l Water + Roots + Bloom + Sugar Royal (1 + 3 + 1 ml/l) PH @6 💡Mars Hydro - FC 3000 37% 49 cm. Mars Hydro Fan kit Setting 6 Have a good week and see you next week 👋 Thanks community for follow, likes, comments, always a pleasure 👩‍🌾👨‍🌾❤️🌲 Mars Hydro - Smart FC3000 300W Samsung LM301B LED Grow Light💡💡 https://www.mars-hydro.com/fc-3000-samsung-lm301b-led-grow-light Mars Hydro - 6 Inch Inline Fan And Carbon Filter Combo With Thermostat Controller 💨💨 https://www.mars-hydro.com/6-inch-inline-duct-fan-and-carbon-filter-combo-with-thermostat-controller Anesia Seeds - Frozen Black Cherry Auto🌲🌲🍒🍒 https://anesiaseeds.com/product/frozen-black-cherry-auto/
Likes
19
Share
@Aqualung
Follow
WOW these two beauts are really filling out! No complains from me just wish I LST the SBR like i did the Dinafem but at the time the SBR wasn't as bendy as the Dinafem, it is amazing what one bend can do to help produce more bud sites. I'm sure that one big cola from the SBR is going to very nice looking though! My next photoperiod grow I will prob top, LST and trim, but i need to do some research again because I forgot everything lol 😅. My next grow journal is up! Growing two Seedsman Pink Kush CBD 1:30 Autos! 👍
Likes
17
Share
@Lazuli
Follow
Flushing the plant today and then straight after feeding again as the runoff was acidic and ec a bit high (+200 ppm then the water goes in) I think she needs 2 more weeks
Likes
38
Share
Utopia Haze is a rare heavily sativa dominant hybrid (90% sativa/10% indica) strain created through back crossing Brazilian Sativa strains. This tasty little bud took home 1st Place for Best Sativa in the 2008 High Times’ Cannabis Cup and for good reason – with its potent 18-22% average THC level and long lasting cerebral effects, Utopia Haze is one powerhouse smoke. The Utopia Haze high comes on soon after you finish your first toke, hitting you with a strong cerebral lift that infuses you with a sense of hazy relaxation. Type: Feminised/Photoperiod Cultivation: Indoor/Outdoor Flowering Time (days): 70-75 Indoor Yield (g): Up to 650 Feminised Outdoor Harvest Month: October Feminised Outdoor Harvest Month Week: 3rd-4th week Aroma: Citrus, Woody, Pungent, Mint Effect: Cerebral Lift, Hazy Relaxation, Sleepy Welcome Everyone to the Final Entry of my Utopia Haze Grow ! There is so much to discuss ! I have been extremely busy as of late trying to get this Harvest together, but i am happy to have it here for you now ! I Seriously under estimated the amount of time, help from others, and my own necessary skills to pull this off.. and i still kind of screwed it up lol ! But its worth noting i have never actually done this before and trying to document it during....was extremely hard. It is next to impossible to work an iPhone with rubber gloves on ! First I want to discuss everything step by step so before you jump straight into the comments on how the end product is so small in "quantity" Rest assured i am happy with its"quality"...and thats all that matters to me because Life is a journey not a destination! and i have learned so much from this grow that I couldn't be any happy even if i messed some things up :) But at the very least I hope you read through this entry in its entirety with an open mind and focus more on the process, rather than just the outcome! I ran out of Ice & i was only able to wash three times..(normally I've heard you should go sometimes 5-6 washes) Preparation is Key & things will be much better next round :) Photos 1-22 These are pretty self explanatory but for those of you just tuning in now.. this is what happens to a very happy plant when you don't have the necessary tools to monitor key components of growing cannabis.. Ph, as well as EC levels play a very key role in the outcome of your grow lol that being said I was just able to save this plant by purchasing both tools but that doesn't mean the plant didn't suffer because of the prior events.. This was a Huge reason behind me choosing to turn this harvest into what i would consider "Solventless Hash Rosin" from "Ice water extracted Bubble hash". Pictures 23 The idea here is the process of using "fresh Frozen Cannabis" this has been discussed many a time online on such sites as instagram and here on grow diaries as well.. I personally have Never tried the process so i decided to try it out and make a judgement for myself.. Video 24 The Cannabis has now been in the freezer for 72 hours making it very well frozen.. as you can tell i struggled getting it all into the 25u Screen Wash Bag. One thing of note i would do differently is i will de-stem my next batch as i also believe this played a part in the amount of plant matter that escaped through the sieves. Photo/Video's 25-28 The idea here is "ice water Seiving" & especially with the bags that I am using here that are only have screen material on the bottom portion of the bag it is very important to have spaces in-between the screens to allow the water to pass directly through the screens into the bottom bucket with the least amount of resistance.. because the hash is so extremely temperature dependant if it gets warm on the side of the bag.. it will stick there and not make it to the bottom to become use able product.. 29 You do not need to use as much Ice as i used here lol... the idea is to keep everything very cold..i certainly achieved that but at the sacrifice of using so much that i ended up grinding product and producing "contaminants" but in the end they are just plant matter that i would be smoking when i rolled up my joint either way so.. I'm not super disappointed.. But it should be noted that what you want to achieve here is a Layering effect where you have the wash bag between two small layers of ice while the "water current" washes the Trichomes away allowing them to be separated by the screens setup below :) Before Starting the machine you should allow some time (i.e.;10-12minutes pre soak to allow the product to become saturated) before the first cycle. By video 32 I have just ran out of ice lol.. Video 33-34 Here I have a tip for you.. to separate the screens that you sieve through.. cut 5 gallon buckets to stretch them across nice and tight.. it'll make scooping your Bubble that much easier ! i learned this from the many "Frenchy" videos I have watched :) Picture 35 Here in lays the problem for most people.. drying your hash without loosing vast amounts of "Terpenes" whilst also stay ever vigilant against mold ! Thanks to all those videos I've watched on youtube.. id like to think this was one of my most successful parts of this process.. Things to Note; Terpenes start to seriously evaporate at temperatures 68F or 20C you need to stay as cold as possible whilst bringing the Relative Humidity in the space down into the 40-30% to stay away from that nasty mold ! I used my cold storage room in the basement.. with a dehumidifier running to keep the space at 45% RH & staying at a constant 15c. All while spreading the hash as thin as possible across parchment paper, on top of the white screens with a fan moving air across both sides of the paper. Pictures 36-38 These are some macros i took in the middle of my drying session I fell in love with the colour. Yes i know the black spots are plant material but they will get caught when i bag the hash & squish the oil out. Thing to Note; at this stage it is important to ensure you 'micro plane" the hash down as fine as you can whilst staying weary of the temperature... any "chunks" will hold pockets of moisture.. that lead to potential problems..ie; mold ... Picture/Video 39-41 Successfully planed bubble hash ready to be bagged and Squished ! Picture 42 Ive decided to follow Pedro.. from Pedros Grow Room and double bag to be on the safe side so i don't have any blow outs. So thats One 25u bag inside one 160u bag ! :) Pictures 43 This is almost 3 grams of the bubble hash from above, already melting in the bag.. this is where i ran into trouble again lol things started getting to warm in the house and i was only able to get one of the three squish's i did on video :( things started getting sticky. Picture 44 This is basically just a photo of the equipment I'm using; 3x5 LowTemp Cage in the frame I built myself, with a 20Ton bottle jack. Something to note here is this is an older Lowtemp model with only a single heating zone which is which i have it closed here heating Both sides of the press :) As well as the importance of having adequate pressure on your plates.. my rig is very overkill for the size of hash bags..lol Video 45 Here is the lovely press video.. its didn't quite work the way i wanted either lol my directional folding wasn't quite tight enough for a big "drip" :) &the Press was set to 65°c Photo's 46-50 are pretty self explanatory :) I had a blow out.. but still managed to pull an 80% return from the hash once squished...& yes it tasted amazing :) Was it worth it in the end... that could be debated.. for some..i understand..its not your thing, but for those of us that are interested in making our own concentrates.. free from Solvents... I wouldn't make it any other way :) If even ONE of you reading this diary finds it helpful to reference for ANYTHING.....even if its "what not to do" ill consider it a success ! Thanks again for tagging along on this garden adventure.. its been one heck of a journey ! Much Love from B.C. Canada, Until Next time, Cariboo
Likes
Comments
Share
@ORION1_1
Follow
The buds are early in flower but still stretching. Thick white stigmas popping out of all the bud sites. And there's a beautiful purple color that's beginning to show on the early sugar leaves. I defoliated only a couple of the largest fan leaves off the main stem. The were bigger than my hand and blocking nearly all the lower sites, so I felt it was beneficial. The spacing has been good on all the branches and I haven't needed to remove any other foliage besides the big boys. I did also remove the absolute lowest budsites because at this point there wasn't any chance they would ammount to anything
Likes
66
Share
🍼 Greenhouse BIO Feeding Line which are ORGANIC For LIQUIDS ******GREEN BUZZ LIQUIDS***** also ORGANIC MARSHYDRO ⛺️ has large openings on the sides which is useful for mid section groom room work. 🤩 ☀️ MARSHYDRO FC 3000 LED 300W ☀️Also special thanks to VIPERSPECTRA P2000 (200W) & XS2000(240w) LED growlights
Likes
36
Share
@codebase
Follow
For each: Mycotrex > 4 grams ~10cm deep below seed and 1g around seed 4 gallon/ 1 day old not PHed tap water for starters -------------------------------Deutsch---------------------------------------------------- Jeweils: Mycotrex > 4g ca. 10cm unter dem Samen verteilt und 1g direkt darunter 15 Liter Smart Pots 1 Tag abgestandenes Leitungswasser ohne PH Regulierung zum angiessen 2020-11-10: all three seeds show signs of life
Likes
12
Share
@ELPIRATA
Follow
🙏 Ha comenzado la semana Nº7, Se han acentuado mas los olores en el cuarto de cultivo, se logran apreciar diversos botones, Espero logren crecer de manera desmedida y robusta. El día 20/06/2020 se han regado 3 plantas en macetas de 11 litros: X2 Semillas Auto Lemon Kix= 1L [1MlBLOMBASTIC+1.5mlKnactive+5ml/L ATAGrowth-C+5mL ATAFlower-C+1mLAutoTop] PH 6.2(?) / EC= 1.84Tº=23 X1 Semilla Auto Tutankhamon= 1L [1MlBLOMBASTIC+1.5mlKnactive+5ml/L ATAGrowth-C+5mL ATAFlower-C+1mLAutoTop] PH 6.2(?) / EC= 1.84Tº=23 *El día de hoy se han regado 1 planta en macetas de 7 litros: X1 Semillas Auto Lemon Kix#3 = 800 ml [1MlBLOMBASTIC+1.5mlKnactive+5ml/L ATAGrowth-C+5mL ATAFlower-C+1mLAutoTop] PH 6.2(?) / EC= 1.84Tº=23 *Se comienza a usar Bloombastic en semana 6, dia 42 (0.5 ml/Lt) 😈 Buenos humos!
Likes
1
Share
Likes
14
Share
Que pasa familia, vamos con la primera semana de floración de estas Gorilla Zkittlez Auto de FastBuds. La tierra que utilizamos que está en la publicación anterior es top crop all mix, aparte alimentamos nuestras plantas con Agrobeta. Por supuesto el ph se mide en cada riego y se mantiene en 6.2, regando cada 72 horas e intentando mantener la humedad un poco alta al principio. Las 5 empezaron a tirar pelitos, se las ve bien sanas tienen buen color y tamaño bueno, seguirán creciendo estas semanas espero. Las próximas semanas vamos viendo cómo avanzan. Mars hydro: Code discount: EL420 https://www.mars-hydro.com/ Agrobeta: https://www.agrobeta.com/agrobetatiendaonline/36-abonos-canamo Hasta aquí todo, Buenos humos 💨💨💨
Likes
3
Share
25 days in to flowering. The garden is still looking very good and healthy.
Likes
6
Share
Topped & Sun-Kissed ☀️✂️ This week, I finally made the call—she’s been topped! 🌿 After a bit of back and forth, I decided it was time to give her structure a little boost and open things up to more sunlight. The side shoots are now reaching out confidently, soaking up every bit of that warm summer glow. ☀️ She’s had a golden week of sunshine and handled it like a champ—strong, vibrant growth and no signs of stress post-topping. 💪 Here’s what went into her care routine this week: 🔸 Fed with BioBizz Grow, CalMag and Alg-a-Mic 🔸 Followed by some homebrewed compost tea two days later for that microbial boost 🔸 Two days after that, a fresh round of Effective Microorganisms to enrich the soil life 🔸 And every 3 days, a light misting of silica spray to keep her leaves strong and resilient I’m super happy with how she’s shaping up so far—great energy, lush color, and the new growth is coming in fast. Curious to see how she responds to the topping in the next week!
Likes
18
Share
Week 4 and they look amazing • Today (Day 23) I cleaned and calibrated my EC tester (bluelab truncheon) and after mixing the same nutrients as last week the EC was reading 2.8! I was thinking this mixture was coming out at 1.7. Either way the plants are healthy and the EC has not been dropping or rising so I have kept the nutrients the same this week. I will monitor the EC closely through out the week now as 2.8 EC is pretty strong, I might have to dilute the tank, we will see. I will now do tests with the nutrient amounts I used previously and edit the EC leves for the previous weeks. • Second day into week 4 and they have drunk 40L (last week was 35L) of water between them. Thats 4.5L each. The EC level has also dropped to 2.7 from 2.8, so even though it is crazy high they are still taking it. • Midweek and the EC in the tank has risen. I knew it would as it's been set way too high. It was set at 2.8 (by mistake) and it has risen to 3.2. The plants look OK but a little dark. There's no tip burn or anything. I have given them a flush with weak nutrients (1.4 EC). • Midweek and I have noticed a touch of powdery mildew. Caught it really early so I will install a hotbox sulfume. The sulfur will coat the leaves and stop the mildew in its tracks. Watch this space.
Likes
8
Share
@Kirsten
Follow
30.4.25: This worked out very nicely 👌 I just found Ecothrives' new, Trace! I was looking for Cal-Mag with no NPK. I came across this, I'm genuinely so excited to get using this! Ecothrive has the best products, hands down. As fate would have it, the plants are looking pretty dry! I'm going to be watering with the Trace and Biosys. Let's see what happens 😁 6 litres of dechlorinated water PH'd to 6.1 contained: ♡ 3ml of Ecothrive Trace ♡ 1/4 Tsp (2.4ml) Ecothrive Biosys Let's see how we're looking in a few days after the first Ecothrive Trace application! The plants received 3 litres of this feed each. PPM: 475 PH 6.0 1.5.25: I mixed a foliar feed with my new Ecothrive Trace. I filled a 250ml spray bottle with dechlorinated water PH'd to 6.0 with 4ml Ecothrive Trace. I used the entire bottle in 3 plants throughout the course of the day. The fan is very strong, so it didn't take long to dry. However, I did keep the lights dimmer to ensure no leaves were burnt. Additionally, I spent more time than I care to admit massaging the foliar spray into the leaves 😅 I also moved the LED lights up as Northern Lights is still stretching. Par was about 600-700. Which may be too much. I'll keep an eye on it. I also watered with 1.5 litres of dechlorinated water PH'd to 6.0 to Northern Lights. 2.5.25: I watered 1 litre today. With Greenleaf Nutrients Bud Explosion PK booster 1/2 Tsp dissolved in dechlorinated water PH'd to 5.9. PPM came out high at 1300, so I watered another litre through just plain, PH'd to 6.2. 5.5.25: FastBuds Mystery seed #1 is focusing on bud building. There are certainly chunky buds beginning to form here! 😍 She has pretty well stopped stretching, and so she's shorter than Northern Lights, which is still growing vertically, this is a little unfortunate as they're no longer a Sea Of Green. Unless Northern Lights is a tidal wave 😅 So because the canopy is no longer uniform, the lighting is difficult to dial in. Which has never been my strong point. Her leaves are still very dark. I'm going to top dress with Ecothrive Life Cycle, but because of the darkness of leaves, I won't add the Ecothrive Charge. Which is mainly more vegetative growth needs. Which will contain more nitrogen, which we certainly don't need any more of at this stage. Plant top dressed with; ♡ 2 Tbs of Ecothrive Life Cycle ♡ 1 Cup Worm Castings ♡ 1 Cup Canna Coco ♡ 1.25 Cups Perlite I watered in with 2 ltrs of dechlorinated water PH'd to 6.3 containing .25g of Ecothrive Biosys. So far, she's doing great, I've never grown FastBuds without topping them, so maybe they will grow taller without that training technique. We will try that with our next FastBuds strain. I'm not sure when I'll grow another FastBuds as I've got the rest of the year booked up. The tent is in demand! 😅 Nonetheless, they are always sturdy plants, which is great, of course. This next week will just be monitoring of excess/ deficiency of nutrients and probably another foliar spray of the new Ecothrive Trace. I have removed a few fan leaves at the lower canopies. As well as removing all the LST clips. Next week, we might remove all the fabric ties too, I'll see how we're looking. That's pretty much it! Thanks for checking out my diary and hanging out 💚✌️🍃😊🌱
Likes
21
Share
Plants transitioning to bloom .... nutrients switched to bloom.... 280 ml A 280 ml B per reservoir. 10 liters a pot 70 literally per reservoir.
Processing
Likes
229
Share
@DadasGrow
Follow
Well it’s the beginning of week three of flower for my girls. They look and smell magnificent. They all have flowers and the pistoles are bright white. I need to defoliate them again I think. And I was advised I should remove all the lower flowers, all the ones hiding and not getting much light. Will it be ok to just let them grow and just keep removing the larger fan leaves that clog up light getting to the lower parts of the canopy? Regardless of stem size currently my branches each have 5 or more flowers on them. Will the returns from taking away those lower flowers be worth it to the tops ? Will trimming flowers off my girls at this stage in their life hurt them? I feel like I should let them be and just pull the leaves that clog up light dispersion. I need to feed them this week. I really think the girl a like the emerald harvest nutrients, I had followed their portion chart up till the slight burn then cut back on the scale a bit. Instead of feeding for six plant I’ve been feeding for four with the same amount of water. I’m very happy and excited for this grow, this has been quite the learning experience for me. I hope everyone’s grows are goin well and wish you all a great harvest.. Oct 19. Heavy defoliation and small flowers pulled from all of the girls. Hopefully they dont take it hard and recover well. I should be able to let them go and not worry too much about smaller flowers taking away from bigger ones now. My hands smell amazing. I hope these girls turn out best as they can now.
Likes
6
Share
@IQuSX
Follow
A clone is obtained, in infancy constantly surviving the drought. Water were drunk its neighbours. What can I say - this is what you need to report to growdiaries! Of the known, only that genetics ... well, very strong! Likes moderate feeding and plenty of space for their territory-grabbing activities... Well, let's start feeding from the 3rd week of vegetative, transplanting to 25l volume, and...and folding the whole length into an "O" shaped format - something that you can see in the next week's report in the video demonstration!