


Likes
7
Share

@MrLahey
Follow
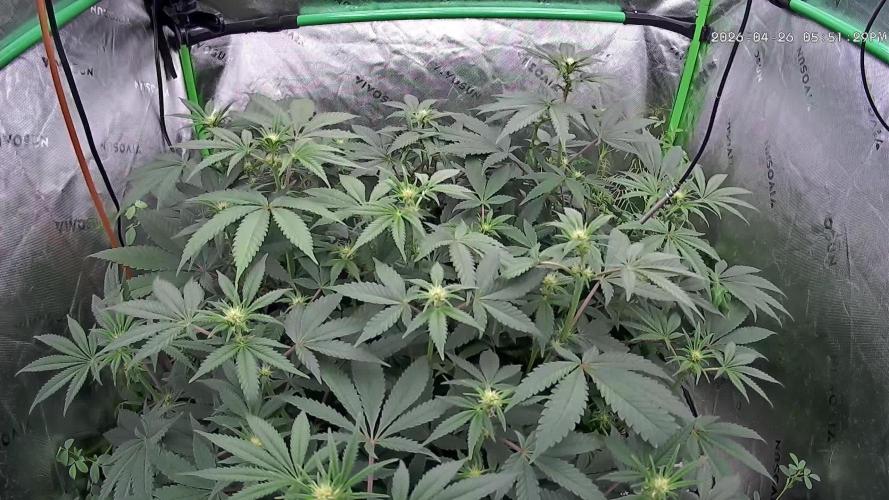
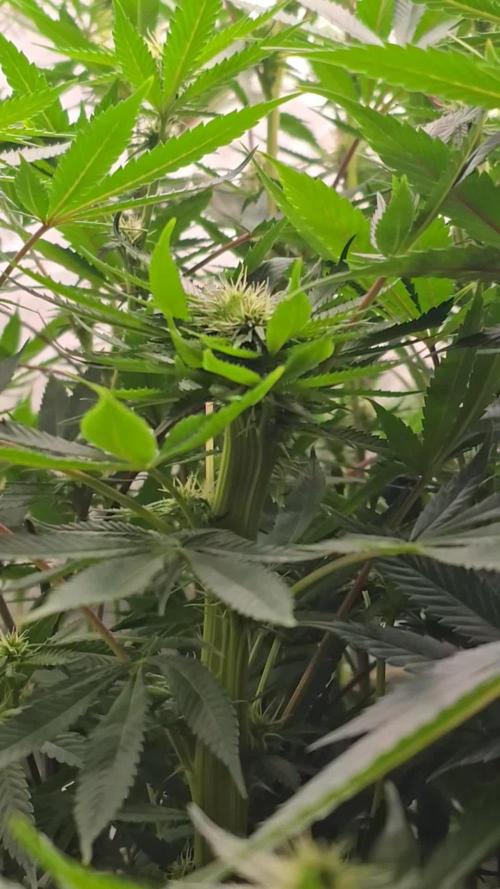
Today is day 23 of flower and she’s still stretching. It seems the one I have is really stretchy which makes me happy I put the lower trellis net where I did. Maybe it’s an act of cannabis defiance for being so stunted at the beginning or perhaps I’m just anthropomorphizing lol.
I did minimal defoliation the first 21 days of flower and since then I’ve done it each day little by little. I’ll probably do one more bigger defoliation tomorrow nightand then I’ll probably step back and let nature take back over.
At day twenty she started to smell rather syrupy. I feel like that’s early for a cultivar to start smelling this noticeably strong considering that it’s estimated to average around 60 days in flower according to HSC. I’m hoping this means she’s gonna have like 4D terpenes and crazy strong cannabinoid profile lol.
The Blumat is keeping her perfectly watered. I think it’s translating to a much heartier and healthier plant than when I was watering by hand. I’m waiting for my typical mid flower nutrient issue to show up any day now and if it doesn’t I’m gonna thank the Blumat for that and assume my previous plants mid flower issues were due to me not meeting the voracious water demands of a plant in early flower.

Likes
2
Share


@fabialien
Follow
Lunes 26 de Agosto 2024, segunda semana de vida de estas preciosas, siguen en giffy, próximamente trasplantar a macetita de cartón, iremos a Walmart a comprar sustratito para ese trasplante.


Likes
10
Share


@Drtomb
Follow
Started the final week of nutrients. Then ill be switching to flawless finish and pure water the last week.
The Inzanes have a pheno that is just oozing thc glands.

Processing
Likes
3
Share


Likes
89
Share

@RockoCalenberg
Follow
Tag 108 | Blütetag 64
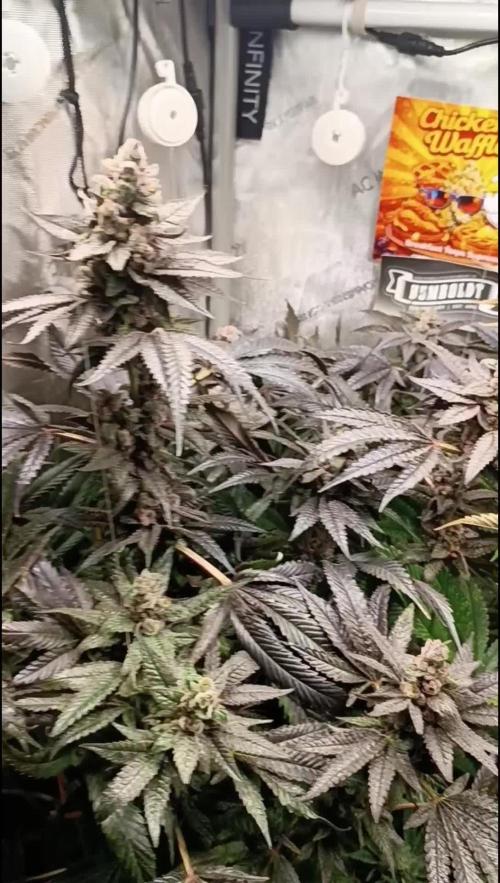
Rocko's Terp Test featuring: Apokalypse Grow ☀️🔥
Das Wetter bleibt momentan der Chef. Um den sommerlichen Temperaturen entgegenzuwirken, wurde der komplette Lichtzyklus in dieser Woche auf die Nachtstunden von 20:00 bis 08:00 Uhr verlegt. Zusätzlich laufen die beiden XS1500 Pro nur noch mit 40 % Leistung. Ich habe sogar kurz überlegt, den Zyklus auf 21:00 bis 09:00 Uhr zu verschieben, um die größte Nachmittagshitze noch weiter zu umgehen. Vorerst bleibt es aber bei 20:00 bis 08:00 Uhr. In dieser Phase geht es nicht mehr darum, den letzten Ertrag herauszupressen, sondern die Pflanzen möglichst schonend ins Ziel zu bringen. Das Ziel bleibt klar: Fruchtbombe statt Hitzebombe.
Das gesamte System läuft aktuell eher in einer warmen Suppe zwischen 26 und 31 °C, statt wie noch vor einigen Wochen zwischen kühl und heiß zu pendeln. Die Klimadaten lesen sich zunächst kritischer, als die Pflanzen tatsächlich aussehen. Trotz der schwülen Wetterlage zeigen die aktuellen Bilder ein erstaunlich stabiles Bild. Die Pflanzen zehren inzwischen sichtbar aus ihren Blattreserven, ohne dass die Blüten selbst deutliche Anzeichen von Hitzestress zeigen. Angesichts der sommerlichen Temperaturen unter dem Dach sind rund 30 bis 31 °C während der Lichtphase derzeit ein durchaus akzeptabler Kompromiss.
Chicken & Waffles liefert in dieser Woche den wohl spektakulärsten Anblick. Die Zuckerblätter präsentieren sich inzwischen in tiefen Violetttönen bis hin zu nahezu Schwarz und zeigen stellenweise bordeauxfarbene Nuancen, die sich auf Fotos nur schwer einfangen lassen. Zusammen mit der massiven Harzschicht wirkt die Pflanze beinahe eingefroren. Die Spitze erinnert an mehrere kleine Zwiebelkirchtürme. Mit ihren organischen, leicht verdrehten Formen wirkt sie fast wie ein Bauwerk, das einem Hundertwasser-Entwurf entsprungen sein könnte. So eine Optik hatte ich bisher noch in keinem Grow.
Fruit Bomb Punch zeigt in dieser Woche eindrucksvoll, welchen Einfluss das Training auf ihren Wuchs hatte. Durch das wiederholte Herunterclipsen während des Stretchs konnte sich keine klassische Hauptcola entwickeln. Stattdessen bildet die Topblüte aus der Draufsicht einen regelrechten Fünfender mit nahezu gleich hohen Spitzen. Von der Seite wirkt derselbe Bereich dagegen wie ein schlanker Turm aus übereinander gestapelten Blütensegmenten. Die übrigen, weniger beeinflussten Seitentriebe zeigen dagegen die sortentypische Blütenstruktur und machen den Einfluss des Trainings besonders deutlich.
Strawberry AK bleibt ihrer Linie treu. Die klassische Kerzenform mit ihrer markanten Hauptcola ist bis heute erhalten geblieben. Gleichzeitig zeigt sie den deutlichsten Herbst-Fade und verwertet konsequent die letzten Reserven aus ihren Fächerblättern.
Auch bei den Trichomen zeigen sich inzwischen Unterschiede. Chicken & Waffles liegt aktuell leicht vorn, Strawberry AK folgt überraschend dicht dahinter. Fruit Bomb Punch beginnt dagegen gerade erst sichtbar einzutrüben. Ob sie in der kommenden Woche aufschließen kann, werden die nächsten Makroaufnahmen zeigen.
Am Ende entscheidet das Glas. 🍯🌱


Likes
Comments
Share


@GrowDiaries
Follow
We are bringing Adam iLL to Spannabis! Want to meet him? Watch this!
Big News, Growers!
We’re beyond excited to announce that the legendary Adam iLL will be hosting the GrowDiaries Awards at Spannabis! But while those awards shine a spotlight on producers and breeders, we haven’t forgotten about the heart of it all—YOU, our amazing community!
We’ve got a special surprise just for you! Let’s come together, connect, and make unforgettable memories. Watch this video and you won’t want to miss this!
See you there!
Yours,
The GrowDiaries T
Likes
10
Share


@Cannabot
Follow
Looking forward to growing my first strain from royal queen seeds.Hopefully it exceeds my expectations.Grown in south africa
Likes
94
Share


@DogDoctorOfficial
Follow
Discount Codes so you can save big on your next check out 💚💚💚
Kannabia - DOGDOCTOR 30% off
SeedsmanSeeds - DOGDOCTOR 10% off
CannaKan- DOGDOCTOR 15% off
terpyz.eu - DOCTOR 15% off
Fast Buds - DOGDOCT 15% off
As always thank you all for stopping by, for the love and for it all , this journey of mine wold just not be the same without you guys, the love and support is very much appreciated and i fell honored and so joyful with you all in my life 🙏
With true love comes happiness 💚🙏 Always believe in your self and always do things expecting nothing and with an open heart , be a giver and the universe will give back to you in ways you could not even imagine so 💚
Friendly reminder all you see here is pure research and for educational purposes only
Growers Love to you all 💚💚💚


Likes
6
Share


@PoshGrow
Follow
Welcome to Auto Alaskan Purple Grow by PoshGrow!
🍀 Week #1 2020 July 23 - 30th.
General Info:
When planted: 2020 July 23th.
Week: 1
Days: 1- 7
Last Update Day: 2020 July 29th.
Plants: 5 Alaskan Purple Auto.
Equipment:
Tent: MarsHydro 1mx1mx2m or 39"x39"x72".
Light: HLG 260w V2 Rspec QB Kit.
Exhaust: 4" 322 CFM fan + Viper Carbon Filter.
Intake: 4" 100 CFM Inline Fan.
Oscillating Fan:
Lower: 4" Ram Fan.
Upper: 16" Oscillating Ram Fan.
Humidifier: Taotronics TT-AH001.
Dehumidifier: Pavlit MD750.
Soil: NPK soil 40% Compost, 50% Peat Moss, 10% Agroperlite.
Pot: 7 gallon Fabric Pot x 5pcs.
Nutriens: Fox Farm Trio.
PH Correcton: Chemoform pH-Minus Granulat.
PH Pen: Cheap Chinese one, I callibrate it every time I use it.
Comment:
Germinated in paper towel, sprouted under 36h.
Planted in 7gallons fabric pots filled with NPK soil under 18h light schedule. Watering with pH corrected water when needed.
Maintained 65% humidity and after 24h we have 5 nice seedlings 😉✌️
Likes
5
Share

@JorgeNitales420
Follow
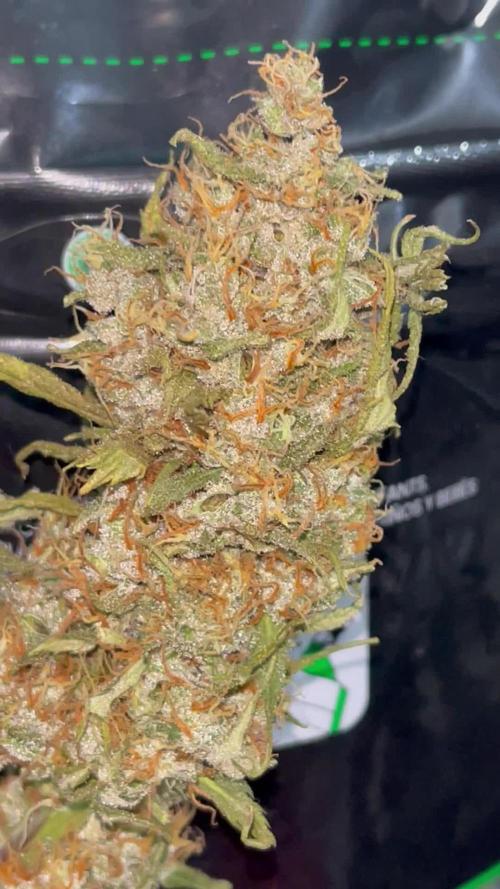
End of the mimosa, 3 plants, didnt measure te exact weight as its not gonna be accurate with the fkin seeds in my buds.
Overall not a bad plant, my thoughts is that the tropicanna polinized this one so this is the best bud of all the canopys
Fkin hermies
Likes
Comments
Share


@Santaclaus
Follow
Día 40 me ha dado carencias de calcio magnesio y posforo y potasio, me he dado cuenta un poco tarde... Las hojas estaban caídas y se me estaban poniendo amarillas con manchas marrones...les puse calmag y empezaron a buscar la luz ... También me di cuenta, que las Lili que no veía se me ponían las hojas moradas, creía que era exceso de nitrógeno, pero no era posforo y potasio... Así, que lo que no quería hacer, lo he hecho he metido a tope de nutrientes y más... Espero no liarla más...

Likes
20
Share


@SensimillaP
Follow
I'm not a big fan of gelato strech, she's a tall girl, had to supercrop a few more tops.


Likes
2
Share


@TheBudWhisperer
Follow
Week 9 in the books and still waiting on ripening. The hardest part about this project is having to do the testing in such small batches due to my space restrictions.
Still no issues with the grow and we’re getting some great pheno variation amongst them all. The consistent quality of them all is the slight pink hue in the buds which is characteristic of the Skywalker parent. The scent is unmistakably sweet like the strawberry parent. All told - we’ve got a good hybrid here that still needs refinement before we try to breed out S1s.
P1 - still staying green, resilient, lower yield but best genetic specimen of the lot.
P2 - winner pheno but needs to be grown out under perfect hydro conditions to be sure we didn’t have any deficiencies baked into the strain genetics. Best combo of the 2 parents and some awesome deep purpling of the fans.
P4 - another winner pheno with prominent strawberry characteristics and heavy yield. A little bit of the purple has bled through to this pheno and it remains a more resilient specimen than P2. Again, worth testing in a better hydro medium like dwc or dutchies.
Well chop and freeze the whole lot for bubble and pressing once the run is complete and trichs have fully matured.
Likes
24
Share

@DivineBuds420
Follow
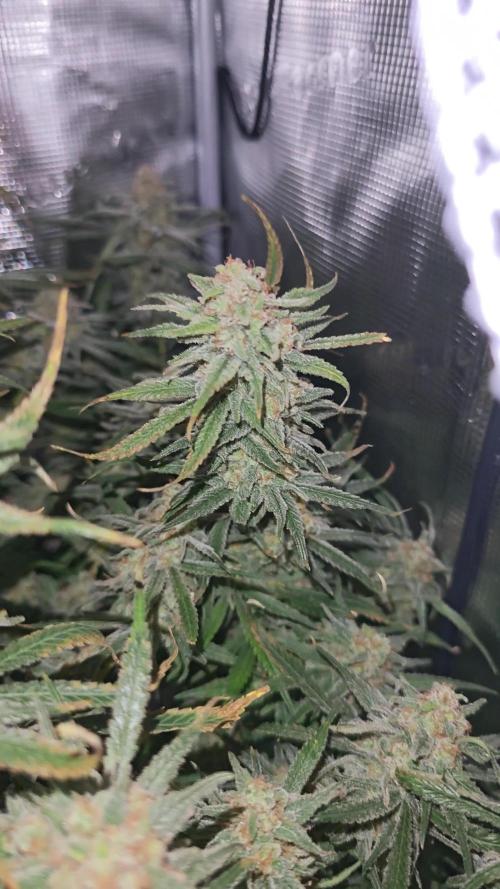
At this stage, there’s not much left to watch except the final ripening process.
The trichomes continue to mature, while the terpene profile becomes richer and more pronounced.
These final weeks always make me a little restless. In previous grows I've had bud rot more than once, so it's constantly in the back of my mind. On one hand I want to avoid taking any unnecessary risks, but on the other I also want to give the plant enough time to reach its full potential.
Finding the right balance between those two is something I'm still learning.

Likes
48
Share


@StarfishSmallBatch
Follow
Raspberry Ripple #1 and #2 (Flowering Plants)- This week, I believe the stretch pre-flower phase is over for both of these Phenos! They are now begining to really stack on those nugs. Number 1 has been on its same purple kick and appears to be purple to it's core! Both Phenos are showing long pistils hairs and have already began to build some trichome shelves! #1 still prays very hard daily, while #2 holds its leaves upright but not over a flat plane ever. I gave another 1/4 cup of build a flower to each plant, and a 1/4 tsp of TM-7 today. Today I went through and defoliated some stray leaves and really underdeveloped branches. The smells while I was doing this, were fantastic; like a smarties or sweet tart candy, but not runtzy it's very hard to describe. Definitely excited for the upcoming weeks! I'll be pushing the lights to 100% this week, pulling 400w from the wall for the stacking/bulking weeks!
Raspberry Ripple #1 and #2 (Clones)-
This week the #2 clones were topped, so now all the clones in the tent have been topped once. The branch growth has improved and they took it well! The weather is getting warmer, so keeping the tent well ventilated is key. I did notice a few springtails walking along the edge of one of my pots today, so I plan to treat this with Wettable Sulfur tonight. I have read these are not the worst pest to have by any means, but you definitely want to keep the population under control at the least! I went ahead and put one of the #1 clones back in the mini tent to make some space in the 55 inch. It was starting to get a little crowded. I'm hoping these clones don't have any genetic drift and I can preserve these genetics for runs to come!
Catch you Next Week, Happy growing and thanks for checking on my grow
-StarFish

Processing
Likes
Comments
Share


@Koaxodil
Follow
retrospective:
they both died of overwatering or lack of oxigen due to an owner thats thought it will be easy. put them under 15min/15min WET/DRY cycle they day they reached the floor of the pot.
once while changing the water they were off for 1+hours, which may have hurt them severly, rootcolor never was the same after that from white to gray around these days..

Likes
3
Share
@Smev1337
Follow
So both plants are in flowering phase now just the first week of it i didn't have footage but for the second i got some so here😁 starting off with the polyploid mutation which looks like an caterpillar with hairs to me haha, really nice to see a mutation with my own eyes in my own grow hehe 😅else the plants are doing really good and being healthy so far 😎 happy growing all 😎✌️💚
