
Likes
Comments
Share


@Nugs_are_us
Follow
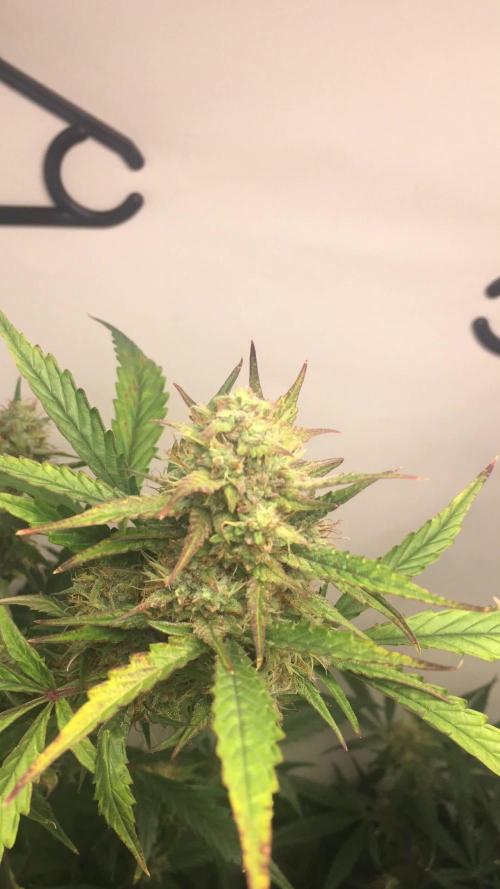
Welcome to week 7 of veg life!
The lady’s took around 4 days after there transplant to find there growth rate as they would have been filling there pots with roots. They have come on strong over the last 5 days really filling out and keeping there nodes really tight as they grow in height.
They have been getting 2ltrs of water every 2 days. This is not giving run off but that will come when we get into flower. We have been feeding the lady nutes twice a week and keeping a eye on there tips as I think out nutes are rather weak. They have shown nothing but love for the larger amounts of nutes so far, see if it bites me on the butt I guess.
We will run them another week in veg and switch them from there and see how we go. Until next week happy growing 🌲

Likes
21
Share


@SupremeTimmy
Follow
the week passed splendidly, the bushes began to bloom and the smell was crackling
the plants develop very well, I continue to water them with clean water and do not use chemicals.
I removed the large leaves that were inside, on the sides I left now the light penetrates better in the middle

Likes
8
Share


@Budhunter
Follow
As I stated before this is my mutant plant hehehhe.. looks like buds are fattening up a bit and more light penetrating in the colas.. she seems to be growing.. happy days
Likes
6
Share


@Mismatas
Follow
PRIMERA SEMANA DE FLORACIÓN, VAMOS PASANDO LAS RAMAS ENTRE LA MALLA, Y AÑADIMOS EL BUD IGNITOR A NUESTRO RIEGO


Likes
44
Share


@Ultraviolet
Follow
144v
Lux in tenebris lucet.
The video on this channel/diary is for inspirational and entertainment purposes only. The ideas shared are not a substitute for professional advice. All materials are used under the principles of fair use, and no copyright infringement is intended. I aim to share timeless wisdom in a respectful manner.
Aristotle said "It is the mark of an educated mind to be able to entertain a thought without accepting it." Those who are able to refrain from judgement long enough to genuinely research and weigh the evidence from all sides of a given subject are those most likely to arrive at the truth. Those who instantly resort to knee-jerk ridicule and continue to believe whatever they were first taught are those most easily deceived.
Raised UVB light to final position. (No more very high intensity UV-B inhibiting hypocotyl elongation, including the regulation of growth-inhibiting hormone gibberellin GA). We want LOTS of gibbereeeeelin!
Very high light intensity can slow vertical growth, which I call releasing the kraken. She just doesn't want to grow vertically for 18 hours any longer; once the flower is initiated, that goes right out the window. Apical dominance is shattered; you now have every single stem fighting for survival against each other, with none given particular precedence. That is some stretch for a week, explosion. Doesn't matter if they are crowded now; there is space up ahead, and plant perception will fill every inch of available space. The divine intelligence that drives plant growth is far more efficient than any canopy I could make or spread myself. No defoliation. Sometimes you just need to give her what she needs to fill the space herself. All I do is guide the initial framework into the desired outcome, keep everything else flowing and in optimal parameters.
Fast-growing leaves to have a lighter green color, sometimes appearing almost yellowish-green, because they haven't had time to produce much chlorophyll yet. New leaves are soft and pale, but they will gradually darken and become a deeper green as they mature and are exposed to light. Every morning, new lime green, with the micros supercharged, may be immobilizing nitrogen in the medium, magnesium was creeping in earlier, so I'll try to hold the line and see what progresses.
The ratio of sugar leaves to buds is determined by a combination of hormonal signaling, nutrient availability, and genetics. Sugar levels act as a key signaling molecule, with high sugar availability influencing hormones like auxins and cytokinins to promote bud outgrowth, while nutrient deficiencies can limit development. Specific genes also play a critical role in leaf and bud initiation, expansion, and the overall balance of growth.
Buds are like balloons! Need lots of pressure to blow up lots of balloons! Sugar balloons! Plant transpiration and turgor pressure are crucial for bud development because turgor pressure provides the cell expansion needed for growth, while transpiration creates a "pull" that draws water and nutrients up through the plant to fuel this process. High turgor pressure is essential for cells to grow and expand, allowing buds to open and young leaves to unfurl. Transpiration maintains this necessary turgor by driving a continuous flow of water from the soil up to the leaves, where it evaporates. No holding back, this is it, 4-5 weeks of all-out war! What we develop now will be all we have for the final 4-5 weeks.
The carbon to nitrogen (C:N) ratio indicates how much carbon is in a substance relative to its nitrogen, affecting nitrogen availability in soil through microbial activity. A high C:N ratio (like in straw or corn residue) requires soil microbes to use a significant amount of nitrogen for decomposition, temporarily tying it up and making it unavailable to plants. A low C:N ratio results in a more rapid release of nitrogen for plant use.
The carbon-to-sulfur C:S ratio in plant residue determines whether soil microbes will immobilize or mineralize sulfur (S) during decomposition. This affects the availability of sulfate SO42, the primary form of S that plants can absorb. Mineralization is the process by which microbes decompose organic matter and release excess nutrients, like sulfate, into the soil in an inorganic, plant-available form. Immobilization is the reverse process, where microbes absorb inorganic sulfate from the soil to meet their own nutritional needs, making it unavailable to plants.
Glucose typically uses more oxygen than sucrose in a medium because it can be metabolized more directly, while sucrose must first be broken down into glucose and fructose, which can involve additional energy costs and a slower overall process. However, the efficiency of oxygen use can vary depending on the specific organism and conditions, as some bacteria, for instance, can use sucrose for a growth advantage under certain circumstances by producing exopolysaccharides that are more efficient at oxygen extrusion.
Why glucose is generally more oxygen-efficient:
•Glucose is a monosaccharide and can be used directly by many organisms in cellular respiration.
•It does not require an initial enzymatic step to break it down before entering the metabolic pathway, unlike sucrose.
•Due to its direct use, glucose can lead to a faster rate of oxygen consumption and carbon dioxide production in comparison to sucrose under typical aerobic conditions.
Why sucrose might seem to use more oxygen in certain contexts:
•When sucrose is metabolized, it is first broken down into glucose and fructose. This initial hydrolysis is an extra step that requires enzymes.
•The fructose component is metabolized differently from glucose, and its specific metabolic pathway can affect the overall oxygen demand.
•Some organisms may have regulatory mechanisms that lead to a higher initial oxygen demand when switching from glucose to sucrose, especially if the organisms have specific metabolic pathways that are optimized for sucrose.
•While glucose may be used faster, sucrose might provide a growth advantage under certain oxygen-limited conditions due to the specific metabolic pathways and products it can generate.
Seems my initial concept of sucrose was inaccurate. Really need to study up on all of this in the coming months. Take care.
“A cat has 9 lives”
“On cloud 9”
“Dressed to the nines”
To go “the whole nine yards”
“A stitch in time saves nine”
“Nine-ness” seems to be synonymous with the maximum, with the furthest extent of what’s possible. With fullness, completion, and when every effort has been exhausted.
In the ancient world (which is, let’s face it, is where numbers and their spiritual power were understood SO much more than they are today) the number 9 resonated with sacred structure and the furthest limitations of this world before human experience meets the Divine. Perhaps more than any other, the number nine had an extra special significance, which spread far and wide. It features across pretty much all cultures, worldwide, rippling through culture, mythology, history, law and time.
Nine is the central number in the ancient Celtic tradition.
Nine expresses through the triple Goddess (see Number 3) and in myths of the nine Celtic maidens or sorceresses. In fact, stories of nine mystical women presiding over nature spread from England, Ireland and Wales to Scandinavia, Iceland, and even as far as Kenya. Even today, it’s tradition for nine groups of nine men to dance around Beltane fires. The limit of winter (which is what Beltane
Almost all of the mythological tales from around the world have patterns of the number 9 weaving throughout.
The Northern European sagas tell of Odin, who rules over the nine Norse worlds. His trial to win the secrets of wisdom for mankind was to hang on the Yggdrasil tree for nine days.
Demeter, the Greek Goddess of the Earth searched for nine days for her daughter Persephone (who was in the underworld with Hades). Demeter is often depicted holding nine pieces of corn. Once recovered, Persephone was obliged to spend three months per year below the ground, and nine months above.
Native American, Mayan and Aztec myths tell of a total of nine cosmic levels (and many of the temples comprise 9 stories).
And in ancient China, nine was the most auspicious number of divine power: the Chinese had nine sacred rites, nine social laws, nine classes of officials in the government and built nine-story pagodas.
In astrology, the planet Mars vibrates to the frequency of the nine.
The ninth sign of the Zodiac is Sagittarius (where the Sun sails from November 22nd – December 21st)
InTarot, card number nine is the Hermit.
In Hinduism, nine is the number of Brahma.
In the Greek Sagas, the city of Troy was under siege for nine years.
9
Likes
82
Share

@wolfvb
Follow
🌿 Week Update: The Frost is Landing! ❄️
The tent is starting to smell incredible! We are officially in the "bulk up" phase. I’m really seeing the benefits of the Bio-Bloom and Top-Max combo this week as the calyxes are swelling and the trichome production is kicking into high gear.
The Details:
Development: My main colas are starting to transition, with pistils turning a lovely orange, while the secondary sites are still pushing fresh white growth.
But the blue cheese is acting strange she started to stretch from a side pransh, while the main thing still short and very compact.
Structure: The LST clips have been lifesavers for keeping the height manageable in this tent. I’m focusing on keeping the airflow high with the fan to support these heavy tops.
Health: The leaves are holding a beautiful, deep green no signs of deficiencies or burn yet with the current 2-2-1 ml/L feed.
Next Steps:
I’m going to keep a close eye on those trichomes over the next two weeks. For now, it’s all about patience and keeping the environment stable while they finish stacking.


Likes
5
Share


@RnDgrows
Follow
A great week with the buds really swelling in size and the smell getting more potent!
Gave it a last bit of molasses and continued with the flush.
Trichomes are milky with a few clear still.
Super excited to harvest soon!!!
Processing
Likes
11
Share


@Torsfarmer
Follow
going fine try trim away most fan leaves.
Last day week 8.
2 more days with Nutrients then i am going last time with just Nordic spring water 💯🙏💪💪
Likes
52
Share


@Salokin
Follow
The High intensity was to strong (clearly my fault) in the beginning which stunted her overall stretch, she however still delivered super dense, terpene and trichome loaded buds.


Likes
2
Share


@GhostBlvckPhant0m
Follow
Week 6 Veg. The Wock smell is getting stronger by the day. Strong candy terps with gas, Straight GAS that stings the nose bit makes you want to take an even bigger huff. I can already tell she’s going to be stanky once flower starts. One thing to note about Wockesha is that she is a super compact plant with thick foliage once topped. I’ve started to introduce the bloom nutrients at 1tbsp/g. since I’ll be flowering in the next 3 to 4 weeks, I’m adding early to ensure that all nutrients in my living soil will be broken down and readily available to all plants as soon as bloom starts.
Likes
21
Share


@DreamIT
Follow
-Sponsored by:
AMSTERDAM MARIJUANA SEEDS-💡VIPARSPECTRA💡-💐GREEN BUZZ LIQUIDS💐-🛠️WEDRYER🛠️
🏁18/6 hello growerz, with today I start the resumption of diaries on GD. I have 13 new genetics in germination and as many diaries. I start by putting the seeds in water for 24 hours, after a day I will put the two seeds in two different jiffies, one with humic acid from greenhouseseeds and the other with just plain water. Get comfortable and follow the updates 😉👋🦄
19/6 The seeds were divided and placed in two different jiffies, one with humic acid and one with water only.
21/6 after another 24 hours in the dark the jiffies were moved under the lamp. let's start the dances!
23/6 the seed in the jiffy with only water is sounted earlier and waits to sprinkle, the brother in the humic acid makes me wait longer
24/6 the seed with humic acid is not preparing to rise, but we are confident
25/6 still no second seed, I start to worry :(
30/6 now I begin to lose hope for the unborn even if I hold on and wait 24 hours before looking for the seed in the jiffy. instead I present a new personal logo, created by a friend who I cannot name for obvious reasons
__________________________________________
Personal advertising (contains affiliate links)
__________________________________________
🦄 Professional site, exceptional genetics for over 25 years and a new and very nice mascot!
✅https: //bit.ly/Amsterdammarijuanaseeds
__________________________________________
Did you know that Green Buzz Liquids fertilizers are 100% vegan? A complete line of products ready to give the best to each of your plants! Visit the site and see my journals to see how they work 🦄
🤯 And with the code "dreami t" you will immediately receive a 15% discount on your purchases
✅https: //bit.ly/GreenBuzzLiquidsPro
__________________________________________
👀 Are you looking for a good lamp to start with? 👀
🌞Viparspectra has something more than the others, take a look at their site.
⏩ Use "GDVIP" for an extra discount or "DREAMIT3" for an extra 5 %% discount
👀 Search for it on Amazon
✅Amazon USA: https://amzn.to/30xSTVq
✅Amazon Canada: https://amzn.to/38udUVe
✅Viparspectra UE: bit.ly/ViparspectraUE
✅Viparspectra USA: bit.ly/ViparspectraUS
______________________________________________
🌈 Tired of blowing on your weed hoping it dries quickly? Check out the Wedryer website! You will find a well-made accessory that will help your weed dry in just 8-10 days without the annoying risk of finding mold or other annoyances! (no affiliate links)
✅https: //bit.ly/Wedryer_
______________________________________________
📷🥇Follow the best photos on Instagram 🥇📷
https://www.instagram.com/dreamit420/
Backup
https://www.instagram.com/dreamit4200/
🔻🔻Leave a comment with your opinion if you pass by here🔻🔻
🤟🦄💚 Thank you and good growth 💚🦄🤟


Likes
33
Share


@Rap_a_cap
Follow
Pre-flowering stage, stretching phase.
Today exactly 14.41 hours of light.
Average week's temperatures 80°F
High humidity, some stormy days, hew heat wave is coming.
Afghan is a massive plant and is almost ready to flower. Branches are very thick and sticky. Great smell. Starting to defoliate the bottom canopy.
No issues, no pests, no need 4 food.

Likes
3
Share


@MicroHidroGrow
Follow
Día 26. Estamos en la 4ta semana. Por ahora mantengo la solución y la planta sigue creciendo pero ya está casi para cortar los esquejes. La semana que viene seguro estoy cortando, y ya tengo que preaparar todo para pasar al otro modulo del infoor.
Decidi dejar de aplicar HST y apliqué una recnica con colgantes que bajan las ramas y las mantienen perpendiculares al piso. De esta forma las ramas laterales empiezan a subir. Está técnica me ha dado muy buenos resultados anteriormente.
El crecimiento ha sido acelerado y las ramas estan bastante gruesas.
Mañana voy a cambiar la solución. Vengo realmente contento con los resultados. Este experimento me va a permitir saber cuanto puedo llegar a sacar de este espacio y ver si me permite armar un ciclo para poder llegar a la próxima cosecha con remanente para poder ir guardando variedades diferentes. De paso ya tengo una referencia de cuantas semanas toma hasta poder cortar esquejes, y así saber en que momento poner la próxima semilla.
Puse unas semillas bastardas que tenía, y las pienso mandar a la terraza a florecer directamente en el invierno. Otra experiencia que si bien no ha dado grandes resultados, ha sumado al stock. La semana pasada no llegué a subir mucho. Pero mañana hago un update de cómo se han movido las ramas bajas. En el último video se muestran bien las ramas que pretendo convertir en esquejes. Seguro saque varios, así que habrá para regalar si logramos que enraizen varios.
De por cierto las manchas blancad que se ven, es tierra de distomeas que ha quedado desde la aplicación en 2da semana.
Día 28. Termina la 4ta semana de crecimiento con un muy buen ritmo. Hoy cambié la solución y mantuve la formulación anterior (1g/L de feeding grow y 0,5g/L de green jungle bioestimulante de crecimiento). La planta está fuerte y ramificada. Sostengo que los esquejes se van a cortar un poco antes de lo previsto. Calculando que son 5 semanas de crecimiento y 1 semana de enraizamiento de esquejes, voy a tomar 6 semanas para preparar la próxima madre. Así que siendo esta variedad de unas 10/11 semanas de flora, voy a poner a crecer la nueva madre en la 4ta semana de floración. La planta tiene distancia internodal corta/media por lo que observo, así que es un detalle a tener en cuenta. Ya me empieza a dar la ansiedad de ver que todo va saliendo y quiero ya poder pasar a floración. Va a ser jna nueva experiencia hacer una planta desde semilla en hidroponía, ya que siempre hacía sólo esquejes y la madre la pasaba a tierra a florar en otro lado, debido a que por las raíces no podía sacarla del sistema que tengo ahora. Pero resolví eso y voy a ver por primera vez la potencia de la hidroponia en una planta desde semilla. Le hice corte apical a las dos ramas más largas esperando ver una mayor ramificación, ya que tengo un espacio de 1,2m x 0,55m por llenar y administrar. Espero que todo siga en marcha. Nos vemos en la 5ta semana desde mañana.
Likes
12
Share


@Crimm
Follow
3 of the 4 plants didn't do much stretching at all. I'm excited to compare the harvest between all of them too see which yields more. The one plant that did stretch seems like it will take a little bit longer than the others to be ready, but I am not sure. Had I known they wouldn't have stretched much I would have considered some light defoliation to increase light pen but this will be a nice experiment. As of 11/23 the plants have stopped doing any vertical growing and I can tell the buds are starting to fatten up a bit and getting frosty. I am leaving the tent open now 24/7 to help control the humidity, trade-off is I can smell the plants from my office two stories up. The sent is very fresh and fruity so it's not so bad. We will see how my family feels when they visit for Thanksgiving 😆
Likes
28
Share


@DutchFarmer
Follow
101/10 results really happy so far will update with nuggets pictures soon
🌱✨ New Timelapse Video Alert! 🌟
I’m excited to share my latest marijuana grow timelapse on YouTube, showcasing incredible genetics like Square One, Robin Hood, Exotic, and Elev8 in action. 🌿 Watch as these beauties flourish from seed to harvest in 1-litre pots, producing an astonishing 1kg of dry weight! 😱🔥
This grow is all about precision, passion, and next-level results—perfect for growers, enthusiasts, and anyone who loves seeing plants thrive! 🌿💪
👉 Click the link in bio to watch the full video and see the magic unfold! 🎥📲 Don’t forget to like, share, and comment your thoughts—it helps the channel grow! 🚀
🌟 A Huge Thank You to Greenplanet, Atami, and All My Amazing Sponsors! 🌟
I want to take a moment to express my deepest gratitude to each and every one of you for sponsoring my videos, including this one and the exciting projects to come. Your support means the world to me and plays such a vital role in making all of this possible. 🙏🎥
To Greenplanet and Atami, your contributions have truly provided me with the "base nutrients" 🌱 I need to grow, both creatively and professionally. And the "additives" 💡 you bring to the table continue to push my work to new heights!
🌐 Follow me on:
🐦 Grow diaries:
📹 YouTube:

Violet BAG · Robin Hood Seeds

Tropicana Cherry · Relentless Genetics

Miami Madness · Solfire Gardens

Cherry Gar-see-ya R1 · ETHOS Genetics

Strawneapple · Exotic Genetix
Black Valentine · LIT Farms (Lost In Translation)

Sugar Cane · In House Genetics

Gorilla Cookies Auto · Fast Buds
Banana Purple Punch Auto · Fast Buds

Cereal Milk · Cookies Seed Bank
Processing
Likes
31
Share


@GanjaFarmerGrow
Follow
The Purple color is just amazing...
The Citrus smell is mind blowing...
She is comming to an end very soon...
last week of feeding and then she goes into the flush...
Fingers crossed untill the end🙏
Likes
16
Share


@EaRtH
Follow
1.3. - Entering one of the final weeks. Creamatics will be getting pure water from now and Fritters will be feeded at least this week. Buds are looking great, they're smelly and dense 😎
4.3. - Creamatics are almost ready, I will leave them for few more days. Fritters still have one week left at least. Aroma is really strong and I can feel it all over the room. Buds are fat and frosty 🍏 Watered 💧
6.3. - Today was probably last feeding day for Fritters and tomorrow I'm going to harvest the Creamatics as it will be the last day of 10th week. Looking forward to see the results. Watered 💧
7.3. - Week wrap-up: Harvest day for Creamatics! Fritters are still fattening, so I guess they have one more week of flushing left 🍏
1.3. - 7.3. 2024
Likes
4
Share


@2x2UkGrow420
Follow
Had to tie branches up to take weight, gonna be a beast 😬🔥👊🏻 Fully flushed and ready for the chop!