
Likes
Comments
Share


@Ganjagrandaddy
Follow
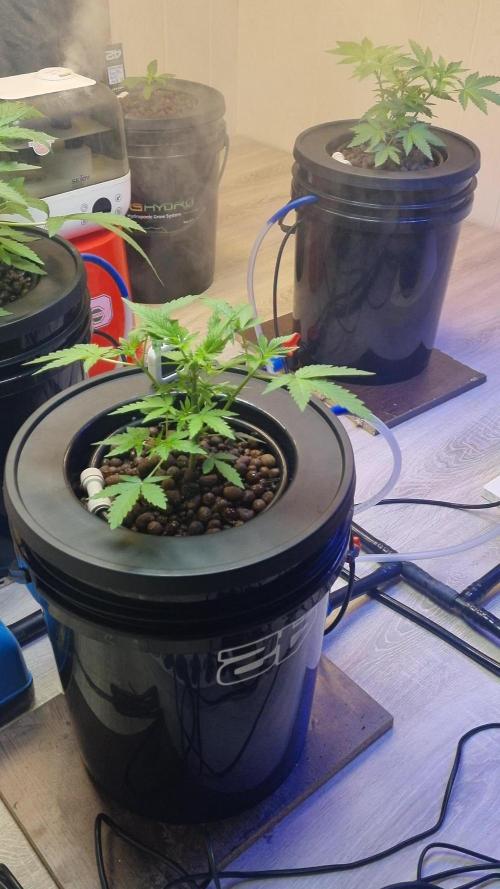
Day 14 : Hi all , hope we are well and healthy.
The new Exotic girls are doing their breeder very proud. All have settled in to their pots and are on their 3rd nodes now with upright and straight out leaves.
They are all in a good position directly under the sp3000. inhave kept them at a good 24 inches away so far and will see how they reach up during this week. I plan to top them to encourage a wider plant each pot dependant on how they grow. If they stay smaller in height then I may pull them over to create a 5-way manifold for chunky mains.
All in all a nice steady week
I will be starting to feed them Mega crop in a day or two to get their leaf colour to the most energising I can. I am watering on the outer edges mainly, this should encourage the roots to spread to the whole pot and give a strong foundation for big buds hopefully.
Be safe folks.


Processing
Likes
81
Share


@NugLife420
Follow
I received my Mars Hydro lights and they helped a lot. 2 TS-1000's. I supper cropped some of the 12/12 from seed and it looks like something trampled through the garden. Lol. The rest are really stretching now. I hope I the larger ones don't get rootbound. 🤞😁😁😁

Likes
1
Share


@Slackerbucks
Follow
I purchased these seeds along with 100+ others (individual seeds, not packs) in late 2006 and early 2007 by sending Western Union money orders to the UK in birthday cards along with my seed order. My only recourse was crossing my fingers and hoping that my seeds would eventually arrive. What I found was that the “Buy it Now” option on Seedbay turned out to be pretty reliable. They used to have a Nirvana 4 pack deal for a very reasonable price ($50, I think). European seed producers at the time were very guarded with the lineage in their crosses, but the common thought was that Nirvana was taking known elite Dutch cultivars of the time and breeding them with a Skunk #1 male and producing ‘knock offs’. AK-48 was AK-47xSk1, Blue Mystic = Blueberry x Sk1, Bubblicious = Bubble GumxSk1, Jock Horror = Jack x Sk1. The point being, there ended up being a lot of variation in packs, but also some keepers were there to be found. I did some growing at that time, but ended up buying a ton of seeds that I never used. As a daily user for almost 30 years now, self sufficiency made/makes a lot of sense. A couple years ago I decided to get back into growing my own herb after being disappointed and underwhelmed with the quality of flower from the dispensaries.

Likes
4
Share


@Lazuli
Follow
It took its time to fmower but damn what a tree.. the big bud and overdrive really helped push the weight
Likes
35
Share


@eldruida_lamota
Follow
Venga familia, va la novena semana de vida y tercera semana de floración de estas Frosted Guava de Zamnesia.
Que color que sanas se ven como se nota que Agrobeta es de lo mejor, las niñas están de 10.
La humedad está en su punto, y por fin puedo controlar la temperatura en 25 grados.
Ya vamos viendo cómo progresan estas próximas semanas y van formándose esas flores.
Os comento que tengo un descuento y para que compréis en la web de Zamnesia de un 20%, el código es ZAMMIGD2023
The discount 20% and the code is ZAMMIGD2023
https://www.zamnesia.com/
Mars hydro:
Code discount: EL420
https://www.mars-hydro.com/
Agrobeta:
https://www.agrobeta.com/agrobetatiendaonline/36-abonos-canamo
Hasta aquí es todo, buenos humos 💨💨💨.

Likes
13
Share


@Nazgul420
Follow
Těším se přátelé.
Tento kmen jsem měl jednou venku a byla to chuťovka.
😁😁😁

Likes
2
Share


@Jmaninthemidde420
Follow
Plants are all transplanted. Lost a couple to rodents but these were all free seeds and clones so I’m not too worried
Likes
24
Share


@Weedzoks
Follow
La plante est passé en 12/12 pour lancer la floraison des féminisées
Flo 8: Arrosage engrais complets et taille secondaires
Flo 12: Arrosage eau
Likes
40
Share


@MrJones
Follow
47th Parallel Crowly's Comet
╰⊰🔹Popped Seeds 03.10.24🔹╰⊰
🌞Environment - 78F / 50% RH
🌾Training - Defoliating the buds as needed, a little at a time; they should be pretty clean by the time harvest comes.
⚱️2-Gallon 📊6.2 PH
💧 Feeding - Using Horti Late Bloom 0-24-26, Cal 12-0-0
🌞Mars Hydro FC-4800
🕷️ IPM - CannControl from Mammoth and Mosquito Bits
╰⊰🔹WEEKLY REPORT🔹╰⊰
📝 Notes - I am having issues with the Air Conditioner in my grow room, so the temps are higher than I would like. As a result, the girls are drinking heavily; they don't like the heat as well but seem to be doing ok. The flowers are becoming oily and frosty and have a strong smell. The terpenes produce a gassy citrus scent with notes of garlic and herbs. It's the strong, aging orange aroma - quite impressive!
🗓️06.22.24 Flushing 2x Daily with H20 PH @ 6.2; they are drinking heavy with the higher temperatures.
🗓️06.23.24 Flushing 2x Daily with H20 PH @ 6.2; they are drinking heavy with the higher temperatures.
🗓️06.24.24 Flushing 2x Daily with H20 PH @ 6.2; they are drinking heavy with the higher temperatures.
🗓️06.25.24 Flushing 2x Daily with H20 PH @ 6.2; they are drinking heavy with the higher temperatures.
🗓️06.26.24 Flushing 2x Daily with H20 PH @ 6.2; they are drinking heavy with the higher temperatures.
🗓️06.27.24 Flushing 2x Daily with H20 PH @ 6.2; they are drinking heavy with the higher temperatures.
🗓️06.28.24 Flushing 2x Daily with H20 PH @ 6.2; they are drinking heavy with the higher temperatures.
📝Fertigation injects fertilizers into an irrigation system to supply dissolved nutrients and water to crops.
╰⊰🔹STRAIN INFO🔹⊱╮
Crowley's Comet / https://www.47thgenetics.com/product-page/crowley-s-comet-10-fem-birdseeds
It's everyone's favorite piece of space rock, Crowley's Comet! The culmination of reversing our Matterhorn cut off Mr. Crowley to Intergalactic Runtz, and the results were out of this world (I had to do it). These ladies were slow to start, but once they hit their stride, they put any worries we had to rest. Compact, short-framed, and robust. They pack beautifully boulder-like flowers that reek of garlic and sickly sweet cotton candy. Dark green to a mosaic of purples, yellows, and silvers. Frost production is off the charts, the internode spacing is tight, and they certainly will impress in their last few weeks of flower. This is one of our favorite crosses in the new fem lineup. If you're looking for your hype fix, here you go.
Yield: Heavy to XL
Flower Time: 63 days
Feeding Schedule: Heavy
Likes
22
Share


@donovanliam
Follow
Have had some nice growth. The brown dotts on lower leafs have gone away(fixed the nutrients) have a stronger led light coming friday so maybe it will help the bloom.

Likes
8
Share

@MrWeedWorld
Follow
Diese Woche ein bisschen die großen Blätter ausgeschnitten das die Triebe mehr Licht bekommen.


Likes
10
Share


@Medgrow93
Follow
The Wonder Pie were showing signs of deficiencies so I added 2ml/L of liquid worm castings to see if it helps, also top-dressed diatomaceous earth to help get rid of the fungus gnats. Will top dress the powdered nutrients again in 1-2 weeks. Also foliar sprayed them with Sugar Candy Syrup to help with the deficiencies. I'll go with bigger plants next time because I think I won't get much from these smaller plants. Other than that, just waiting for them to do their thing and hopefully harvest in 5 weeks or so.
Likes
7
Share


@603grower
Follow
These girls were in the back of the tent, and probably received less love and the girls upfront. I diddnt have any issues with them. Of the two plants I got 140 grams dried and trimmed. She definitely need a cure right now I’m not getting any smell. Even through out the whole grow the other plants over powered her. I wasn’t a big fan of this pheno. I’m definitely gonna pop some more beans try to find one with more terps. But the smoke is very potent. I smoked some once dried and this shit put me on my ass. I’ll update in a month after the cure In the grove bags. She had a 15 day dry

Likes
40
Share


@Kitties_and_Colas
Follow
~_~_~_~_~_~_~_~_~_~_~_~_~_~_~_~_~_~_~_~_~_~_~_~_~_~_~_~_~_~_~_~_~_~_~_~_~_~_~_~_~_~_~_~_~_~_~_~_~_~_~_~_~_~_~_~_~_~_~_~_~_~_~_~_~_~_~_~_~_~_~_~_~_~_~_~_~_~_~_~_~_~_
❤️💡🌱😽💨
Its been an awesome week! Their color is returning after a few heavy doses of calmag and buds are forming fast.. We still have the Solux 350 at 75% but hung low (we have 2 large tents iin this room and we're trying to keep heat at a min) and its doing an AMAZING job
..we removed a few more large fans from the tops and cleaned the lower section of new growth..not too much else to report it's been a nice easy week..thanks as always for dropping by and happy harvests everyone!!
⚡Hortibloom/Solux 350⚡
Specifications ⚙️:
Diodes: Samsung LM281 Pro / Osram DR (1,440 total)💡
Driver: Inventronics 350 watt🔌
PPF: 1015 μmol/s ☢️
PPE: 2.9 µmol/j 〰️〰️
Lifespan: 50k+ hrs ⌛
Weight: 14.3lbs lbs (6.5kg)
Veg Coverage: 5 x 5 ft 🌱
Flowering Coverage: 4 x 4 ft 🌼
-Uses an aluminum heatsink (no fan), quiet while operating 👂⬇️
-IP65 waterproof ratings, tolerant to high humidity grow environments 💦
-May be daisy-chained via RJ14 and managed from a single controller 💡~💡~💡~💡~💡
🌎 https://hortibloom.com/products/solux-350-led-grow-light
~_~_~_~_~_~_~_~_~_~_~_~_~_~_~_~_~_~_~_~_~_~_~_~_~_~_~_~_~_~_~_~_~_~_~_~_~_~_~_~_~_~_~_~_~_~_~_~_~_~_~_~_~_~_~_~_~_~_~_~_~_~_~_~_~_~_~_~_~_~_~_~_~_~_~_~_~_~_~_~_~_~_
Likes
14
Share

@Chubbs
Follow
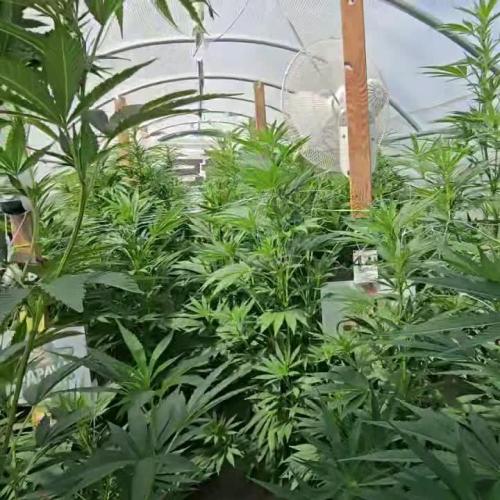
Wow, another week done. It's become an absolute jungle in my greenhouse. A few of the GG4/Sherbets tops had to be mainlined since they're hitting the top of the greenhouse at 7ft8in tall. The smell is definitely getting stronger every day and it goes from super pungent, to sweet, to almost tropical. They're all still looking nice and healthy. The Athena Blended Line works wonders with my well water as the plants couldn't be happier.
All in all Happy Growing.


Likes
11
Share


@MRTHC
Follow
.... Really good week but the work continues. The stretch is on. The 2 ladies on the extreme left has a proper stretch going on. It may be due to those are the girls I mainlined or it could be the blurple lights that both of them are under. Still removing some of the thick lower growth below the netting. its think but i remove just a little everynight for a gentle reduction in foliage. Not pictured here but on Day 12 white hairs were beginning to show. A few issues with high humidity during lights on or high heat when the dehumidifier is on. No strain specific smells as yet. Huge difference observed between the mainlined strains ( Orange Sherbert and Green Gelato) and the other LST strains in the tent. The stems of the mainlined strains tend to be fatter and there is a significant reduction on foliage on the mainlined strains. The LST strains (Blue Gelato 41 and the Vanilla Kush) are more bushy, squat with heavy foliage. Also not so much as a long stretch.

Likes
141
Share


@bioaccessory
Follow
Полёт в штатном режиме, к концу второй недели сделал пересадку растений в горшки по 12,5л.(можно было на пару дней позже, но и так пойдет).
В процессе использовал средство Jellyfish Plant Success, которое попало ко мне практически случайно, и вот тут не обошлось без сюрпризов можно сказать в прямом эфире - после полива смесью нелицеприятного вида(внутри кокоса и на корни я тоже обильно посыпал) буквально прямо на глазах на поверхности кокоса начали формироваться желеобразные сгустки по типу гидрогеля, размером с горох(см. видео). Поначалу я даже не знал, как реагировать, настолько это было неожиданно.😵 Здравый смысл да и само название(!) продукта подсказывали, что так и должно быть 😐, вот серьёзно, как-будто большую медузу бросили в миксер, а затем высыпали мне на субстрат. Подозреваю, что внутри субстрата творилось то же самое.
Прошли сутки, комочков желе стало меньше, но растворились не все. Теперь я уже вижу, что с растихами всё в порядке, значит всё так и было задумано 😇
Если и дальше всё пойдет по плану - в конце недели будем резать, заходите посмотреть.
Спасибо, что заглянули, и будьте здоровы! 🙏
Продолжение следует ...😶
