
Processing
Likes
Comments
Share


@stickygrowz
Follow
everything appears to be going well. if you have any suggestions please put them in comments. thanks 😊


Likes
17
Share


@Drtomb
Follow
Week 6 has been a goos solid week of stacking. No problems to report and everything is moving along as expected. Subscribe to follow the journey.

Likes
18
Share

@Cauli
Follow
Finally, this week they got some light.
Plants seemed to enjoy it and made a nice jump in bud size this week.
And, there were some small caterpillars this week which wanted to eat the buds.
Had to remove them, no big deal.

Likes
27
Share


@Salokin
Follow
Again a very uneventful week. All muted were removed from the mix and only cannazym and boost were given until Wednesday and then only RO water.


Likes
46
Share


@Rollex420
Follow
- 17-05-21 (Day 1)
// //
- 18-05-21 (Day 2)
three of the girls got out of the soil correctly!😊
while the Runtz sprout is the only one that still remains in its seed despite she already opened it for 2/3 day now..🤔
its root seems to struggle to grow or pierce the soil ..
I'm helping her by keeping the humidity higher since I put this bag, we'll see what happens 🤷♂️🏻
..Any advice will be welcome 🙏🏻
as always have a nice day and happy growing to everyone! 😊☮️💚
19-05-21 (Day 3)
..Unfortunately the Runtz Muffin is dead, was unable to come to life like her little sisters.
After three days, i tried to help her removing her seed husk.. but there was nothing to do 😢
So here is a new start!! 😊
I put this Lemon Tree “Freebie” seed to germinate aaand to replace the poor Runtz Muffin. 😕🙌🏻
We'll see how it goes this time.. 🤞🏻🍀
Sending positive vibes for you and your garden ☮️💚
20-05-21 (Day 4)
All the girls are doing great and continuing their grow.
The Lemon Tree is doing great too with its germination, that in just six hours the seed has opened!
Now I’ll wait that the sprout grow a tiny root of (1,5/2cm) at least, to pass it into the soil.
Happy grow fam. Stay smoky 😙💨
21-05-21 (Day 5)
With today the girls are in their fifth day of growth. 🙌🏻
Bio-heaven (amino-acids) added to the recipe (1ml/1L)
As you know after the death of Runtz Muffin, I have been germinating the Lemon Tree for two days now, today is the third day for her after an excellent germination, I have transferred it from the paper towel to the soil to make it grow.
Let’s see how she will grow, Despite being a week behind, I hope she grows strong, healthy and fast🤞🏻
Have a good weekend, lift up and relax. Peace ☮️ 💚
22-05-21 (Day 6)
The Lemon tree is officially out of the soil, ready to grow! 🙌🏻💚
The other girls are fine, they are on their sixth day of life and they love the environment where they are growing up.
..Plus they are always listening to music (Lo-Fi) 24/7 ☺️
I hope they like it.. 🤷♂️🏻😆
That's all for today. Have a good weekend gromies!! 🧑🏻🌾👩🌾🏻☮️💚
23-05-21 (Day 7)
Today last day of the first week for the girls and first day of life for the Lemon Tree!
The nourishment for them is always the same, except for the Lemon Tree which for the moment I am just spraying water to irrigate it.
..In this round I expect great things!
Happy growing to everyone! ☮️💚
Likes
25
Share


@RastaMouse
Follow
All going really well so far they popped out the ground and doing there thing I ordered a co2 bag that should be here in a day or so, and apart from that I m happy no signs of bugs or deficiency’s


Likes
6
Share


@FumateAlgoo
Follow
Arrancamos este nuevo cultivo con una variedad buenísima. Vamos en la primera semana después de que germinaron, solo regando un poco y manteniendo el ambiente bien húmedo. Por ahora las tengo dentro de un propagador, y más adelante voy a preparar un buen sustrato para poder trasplantarlas bien.

Likes
49
Share


@AsNoriu
Follow
Day 71. Girls just perfect ;)))
As any grower i would want, bigger, fatter, stronger, but they are in that range anyway, now main thing not to screw up ;)))
Girls on nute, water, water+calmag, water+silicaAcid, water+molasses rhythm and just love life !
Day 72. Got more presents, thank You Zamnesia ! Asked for 4 strains, got 2 ;))) Still 10 beans and full grow by one house, like i always try to do. Always wanted to try out Runtz, all grows that i saw - was sick ! Kalini Asia - new taste and strain for me 4sure !
Day 76. All is good , they are missing CalMag from those lights a bit and with such amount of buds, but should be fine. Todays watering was only with CalMag, ph 6.5. Next watering full nute blast, should be fun to observe, they are starving a bit , so i hope for huge grow rate after.
Tried 4 month cured weed at a friends, he had to chop girl on week 6 of flower, with nutes still being fed. After an hour head pain , ash was still black ...
I would never try not to flush ....
Happy growing !
Likes
13
Share

@masterofsmeagol
Follow
7/20 Went over this morning to plants soaking wet and heavy rain. Went back around 4pm and plants actually look really good. The rain has stopped for a bit and the girls looked great. Apart from some septoria leaves I needed to defoliate on the first plant I treated. I also noticed a few others on other plants so it's spreading albeit slowly. I treated the three in the middle with their second dose of Plant Doctor at 3tsp/1gal. One gallon administered to each plant via root drench. I think I may treat the other plant showing signs with a diy Dr. Zymes using citric acid as the active ingredient. That way I Gould start treatment right away without having to rely fully on plant doctor. Plus it would kill any pests. Ive seen damage but the birds do a number on them. I dont want to spray my plants with a bunch of chemicals if I don't have too. I shouldve replaced the pallets and cleaned the cage better. I think I did a good job sanitizing as I have no wpm. Just this septoria I probably got when the lady mowing the lawn cut all tjis fucking grass and blew it in my pen, throwing bird seed and I'm sure tons of disease into my grow bags. I literally had to harvest a bunch if fucking sunflowers. It looked like my plants had been mulched. Just with small disease carrying shrubs. At some point some of this stuff has to be on purpose. You CAN'T be that stupid. A couple kushes in the back look hungry. I think I may need to up my feed. I've written to much. I'll keep this updated. Thanks if you made it this far.
7/21 I guess it rained last night. Oh well. It was blue skies for hours before dark. It must've rained late/early morning. I'm sure the app of plant doctor will be fine. Like I said I'm considering using citric acid as a foliar spray to help with the septoria and clean up any pests. I don't have enough pests to warrant spraying. I just don't want to put all my eggs in the plant doctor basket. Today is overcast and windy. The wind has really assisted in spreading this virus. I remove anything I see infected immediately and since these plants are reveges they have plenty of leaves. Plants are really stretching. I know I talk about the septoria a lot but realistically if someone looked through my garden they'd have a hard time spotting it. I don't want to exaggerate the problem but I don't like dealing with ANY fungus or molds.
7/22 It was 55° this morning when I went over. I defoliated some septoria leaves and a few that were fading or damaged. I saw almost a whole leaf eaten so it's probably a good idea to move forward with citric acid. I can add that to the plants I've already treated with plant doctor. This is the first year it's been so noticeable. It's the reveg 10th planet that started this off. Oh well. I've dealt with MUCH worse. Plants LOOK good (other than septoria leaves (on bottom of plant). Today is water day for me but it's been raining and it's a lot cooler today. Bags still had weight to them. I want them to have a proper wet dry cycle. Temps top out at 75° so I'll monitor during the day and if something NEEDS WATER I'll give it to it. I'm suprised I have ZERO WPM. The septoria is much more identifiable but pm is usual present in these conditions bur I don't have a spot of it. I may do some defoliation today. I also need to add supports for flowering but one thing at a time.
EDIT: Went over around noon. 70°. Bags seem to be holding weight (it was easier to tell as ONE plant was substantially lighter than the rest) so I decided to hold off on watering. At least until tonight. There are three plants (at least that are going to NEED water). They look phenomenal now though and we've had lots of rain. Plan is to go over later and get the light ones and mix the water for the others so I can administer it in the morning quickly. I have an early doctor's appointment but I don't to overwater or water unnecessarily just because. But when you grow alone sometimes you need to do things when your able. I have people there that would help if I asked. And I have before but its late . I'm very grateful. I defoliated quite a few septoria leaves. They were all from the bottom of the plant. A couole wete bottom interior. I know there are worse things to contend with but still a pain.
EDIT #2 WENT BACK AT FOUR AND PLANTS LOOKED FANTASTIC AND STILL HELD WEIGHT. THE REVEG MK ULTRA IN EARLY FLOWER "MAY" HAVE STARTED TO DROOP AND "SEEMED" LIGHT. THE LARGE SPECIAL KUSH FUETHEST IN FLOWER BY THE DOOR WAS ALSO EXRRENELY LIGHT. I HAVE AN EARLY DOCTORS APPOINTMENT BUT DONT WANT TO OVER WATER MY PLANTS JUST BECAUSE IM IN A HURRY. ITS COOLER THIS WEEK. 70 TODAY AND HIGH OF 80 TOMORROW BUT DAD SAID THATS NOT UNTIL THE AFTERNOON. I MIXED UP ENOUGH WATER TO WATER EVERYTHING IN THE MORNING IF IT NEEDS IT. I HAVE AN IMPORTANT DOCTORS APPOINTMENT EARLY THAT WILL TAKE ME AWAY AND IM FEELING A LITTLE ILL SO I WANTED TO GET DONE WHAT I COULD TODAY. WATERED THE TWO THAT NEEDED IT WITH TWO GALLONS A PIECE (30GAL REVEG MK ULTRA AND THE BIG SPECIAL KUSH IN FRONT I DIDNT TOP THATS FLOWERING THE FASTEST. EVERYTHING ELSE CAN WAIT.
7/24 Surprisingly the plants still held weight this morning! The looked pretty good too! However its going to be highs in the 80's for the next 7 days. Since the plants still had some heft to them I watered everything just a gallon. I gave the 10s a half gallon and skipped the 50gal container plant. I think this is a good happy medium. I'm still seeing random septoria leaves but still no WPM. I defoliate daily sometimes a couple times. I need to get a minute to myself and add a foliar spray. I'll start with a dih Dr. Zymes while I'm looking into other products like bicilus (i have bt but its a different bicilus) or trichodermia. I need to feed sometime this week too.
7/25 Plants looked great this morning. I watered the 10th planet on the end that hadn't been watered in forever. I think I had been overwatering during those 100° days. I didn't water today as everything looks great and they don't seem to need it. I'll check later today. I did water the pink kush beside the 50 as it was much lighter (1/2 gal) to get it on par with the others. I'm starting to see pest damage as well so I think an app of Dr. Zymes would be a good idea. Both for pests and septoria. Plants are REALLY stretching. One special Kush is far ahead of the others.
EDIT:WENT OVER AT NOON AND 4PM. PLANTS LOOKED GREAT APART FROM MIRE SEPTORIA ON THE 10TH PLANET. I NEED TO WATERING DIFFERENT IN THESE TEMPS. IT WAS BREEZY AND 80° BUT THE BAGS DIDNT FEEL TOTALLY LIGHT AND THE PLANTS LOOKED AWESOME! THE HUGE EARLY FLOWERING SPECIAL KUSH IS PRETTY DAMN LUGHT BUT ITS PRAYING AMD LOOKING GREAT. I DECIDED TO WATER AND FEED IN THE MORNING AND HOPFULLY APPLY A DR. ZYMES PRODUCT ON THE ENTIRE GARDEN IN THE EVENING. PLANTS LOOK HUNGRY AND I HAVE RANDOM PESTS. ITS MOSTLY FOR THE FUNGACIDE ASPECT. PLANT SOCTOR SEEMS TO BE WORKING GREAT ON TWO OUT OF THE THREE I USED IT ON. THE THIRD IS A REVEG AND HAS TONS OF FOLIAGE I NEED TO ADDRESS AND CLEAN OUT. IT SEEMS LIKE IT WILL SPIT OFF SOME SEPTORIA LEAVES A DAY OR TWO BEFORE ANOTHER APP IS DUE. I'M LOOKING INTO MY OPTIONS. IF ANY OF YOU HAVE A SURE DIRE WAY TO DEAL WITH LEAF SEPTORIA IN EARLY FLOWER HIT ME UP! IM NOT TOO WORRIED THOUGH. I CAN SUPPRESS IT ENOUGH IF I HAVE TO EVEN IF I GOTTA SPRAY THE LEAVES WITH THAT 9.0PH ALKALINE WATER.
7/26 Supposed to be REALLY hot with thunderstorms. I watered the two thirstiest with a gallon and a half. Everything else got a gallon (but the 10th planet on the end that was still heavy and the 50). I fed everything too. I SHOULD'VE done the DIY Dr. Zymes spray but I wanted to keep feeding and adding an unknown foliar spray seperate in case of any reactions. A day before plant doctor is due to be applied again the 10th planet in the 20 starts showing signs of septoria again. I've defoliated quite a few septoria leaves. I'm not giving up. I assume I'll do something tonight and I MAY just look to see what I can find on Amazon. Luckily my plants still look beautiful. I hope it continues and I can stay on top of it.
7/27 Wow everything looked amazing this morning. EVERYTHING. The runt in the 50 has septoria but it was such nice fine Kong branches. I haven't treated tjat plant with anything. Plant Doctor app is due tomorrow. That product is working wonders and saving my crop. I'll pull a leaf or two here or there but this keeps it suppressed at least. For the most part. I think I might just treat everything with preventative doses and ANYTHING I've seen with a spot a cure dose (even though I know it's not "cured" but it's "supressed"). Plants I think are almost over the stretch. I have one special kush pheno that is much further in flower than the others. I can't wait to see what the flowers look like.


Likes
7
Share


@B4niTa
Follow
Harvest after 77days, before harvest she get 8 days only water and 1time flush 60l. Easy grow, and she have a nice smell
Soon update

Likes
2
Share


@Organic473
Follow
This girl already has a sweet smell without flowers
I’m thinking this is one of my new favorite strain to grow I need to buy some more seeds. She grows very vigorous also.

Likes
31
Share


@The_Doctor_Green
Follow
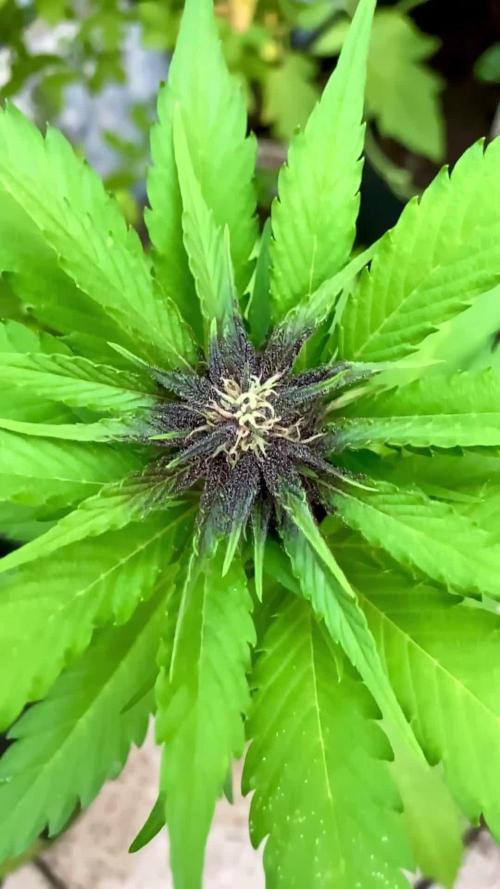
Esta semana he regado solo con oro negro 2ml x litro de agua y organic power 1ml x litro de agua el resto de la semana solo con agua, he medido las ppm y en el drenaje me ha dado 1040.
Me preocupa un poco el color de los tallos de las hojas que están de color morado, pero solo a las de maceta, a la que esta en tierra la veo bien, es mas le he sacado las ramas bajas para que no gaste energía en criar esos coquitos que salen pequeños.
Processing
Likes
7
Share


@Mr_nugs_lover_David
Follow
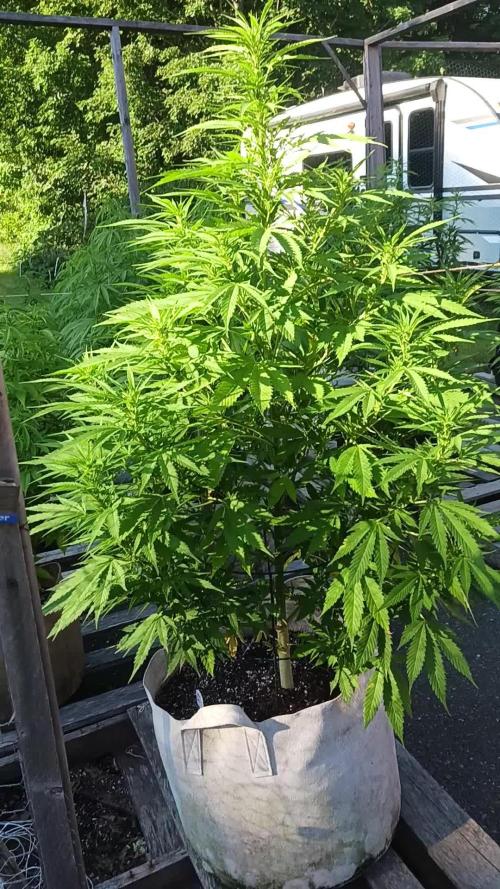
Beautiful looking seedling, very healthy and developing at a fair pace, let's see what awaits us in this diary!! She's developing super fast each day just like her sisters in this run, let's see how she keeps developing! I only use pure water and watch them grow thanks to the amazing living soil blend that I'm working with called FLO Living soil blend, very recomended to all the organic gardeners out there!! I have Transplanted this big girl after just 17 days since she was planted, she is very well developed and so ai took the decision to transplant her and all her sisters in this run, let's see how she performs! 💚❤️💛👨🌾🔝

Likes
42
Share


@MadeInGermany
Follow
Unfortunately, I had to find out that my account is used for fake pages in social media.
I am only active here on growdiaries.
I am not on facebook instagram twitter etc All accounts except this one are fake.
Flowering day 20
since time change
to 12/12.
Hi everyone 😃.
The lady continues to develop very nicely :-).
The buds get thicker and look tastier 😅.
This week it was poured 2 times with 1.2 l each time.
The tent was cleaned and everything checked for functionality.
Have fun and stay healthy 🙏🏻
You can buy This Strain at :
www.Zamnesia.com
☝️🏼☝️🏼☝️🏼☝️🏼☝️🏼☝️🏼
Strain
Gelato clone from mother (Zamnesia )
☝️
Genetics: Wedding Cake x Gelato x Gelato 33
Vega lamp:
2 x Todogrow Led
Quantum Board 100 W
💡
Bloom Lamp :
2 x Todogrow Led
Cxb 3590 COB 3500 K 205W
💡💡☝️🏼
Soil :
Canna Coco Professional +
☝️🏼
Fertilizer:
Green House Powder Feeding
☝️🏼🌱
Water:
Osmosis water mixed with normal water (24 hours stale that the chlorine evaporates) to 0.2 EC. Add Cal / Mag to 0.4 Ec Ph with Organic Ph - to 5.5 - 5.8 .


Likes
9
Share


@Cestlaweed
Follow
Se instaló malla scrog, first time.
Se riega foliar con delta 9.
Entrando a floracion.
Se accidentó una glueberry que mantenia un alambre en su tallo, el sustrato se seco demasiado y el tallo cedió. Quedaron buenos brazos restante por lo tanto será interesante ver el desarrolla de esa planta versus sus hermanas.
Primera semana de LSD-25


