


Likes
1
Share


@GERGrowDesigns
Follow
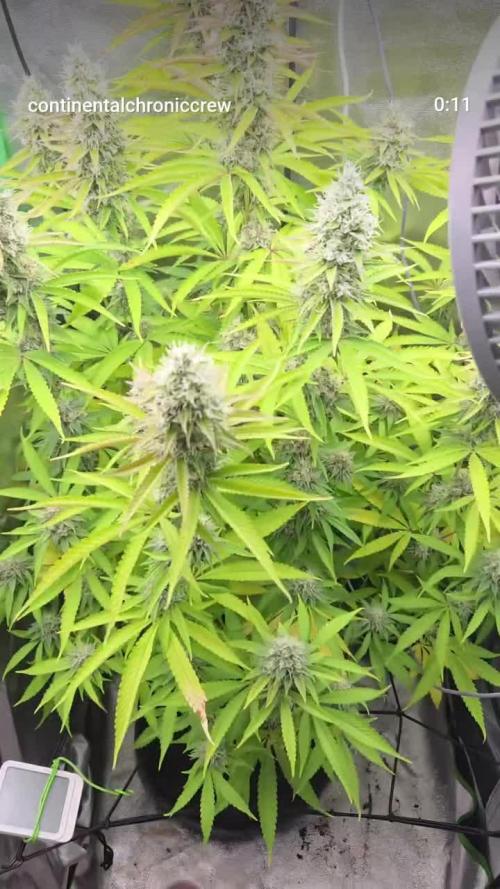
Welcome to veg Week 4 of Sweet Seeds Mental Rainbow F1
I'm excited to share my grow journey with you from my
Sweet Seeds Project . It's going to be an incredible ride, full of learning, growing, and connecting with fellow growers from all around the world!
For this Project , I’ve chosen the Feminized Photo strain Mental Rainbow F1 :
Here’s what I’m working with:
• 🌱 Tent: 120x60x80
• 🧑🌾 Breeder Company: Sweet Seeds
• 💧 Humidity Range: 60
• ⏳ Flowering Time: 7-8weeks
• Strain Info: 22-30%THC
• 🌡️ Temperature: 26
• 🍵 Pot Size: 0.5l
• Nutrient Brand: Narcos
• ⚡ Lights : 600W x 2
A huge thank you to Sweet Seeds for allowing me to try my Best with this amazing collection from Photo Strains they managed to Sponsore . Big thanks for supporting the grower community worldwide! Your genetics and passion speak for themselves!
I would truly appreciate every bit of feedback, help, questions, or discussions – and of course, your likes and interactions mean the world to me as I try to stand out in this exciting competition!
Let’s grow together – and don’t forget to stop by again to see the latest updates!
Happy growing!
Stay lifted and stay curious!
Peace & Buds!

Likes
19
Share


@Ezzjaybruh
Follow
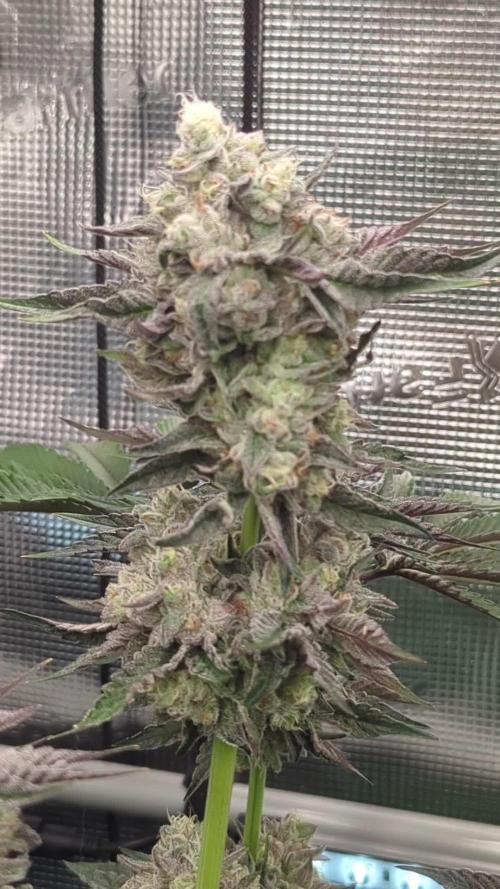
Excellent strain from Gnostic
((Forum GSC x Black Raspberry Trainwreck) x Gorilla Wreck)
Gorgeous color on both of these - more so shined thru on the pheno 2.
Pheno 1 leaned more sativa as far as stretch and airyness of bud, structure of bud. Yielded 70 grams dry
Pheno 2 had insanely tight buds, more trich density.. terps a bit stronger on this one too. Raspberry shining thru
Likes
12
Share


Likes
6
Share


@RDWCGrowing
Follow
Huston I think we have an issue.. So the temp in the tent has been getting up to 90% for 4 consecutive days as well as the humidity has risen to 77. I know that it is from my room conditions now that I am running 3 lights in the room and it is causing the overall room temperature to rise. I have ordered a portable AC unit for my grow room and it will be here next Thursday so I can only hold on. Heavy defoliation commenced to try and bring the humidity and temp down as best that I can. The Maui Wowi hermied on me under the heat stress.. but it is too big to let it go so I am plucking Balls daily from anything I see. Also I had to chop the Blue cheese down it was dying from lack of light because you guessed it the Maui Wowi has stolen the show and light.

Likes
35
Share


@Jacks_Pot
Follow
The 4th week of 12/12 went without any issues.
Flowering is going on nicely and lots of white pistels are filling up the canopy.
They still grew a little but the biggest stretch is over.
This week the Runtz were fed once (ph 6,4 – ec 1,63) and on other days I gave ph adjusted tapwater (ph 6,4 – ec 0,5)
or nothing if the airpots were still moist enough. Next week I'll start giving them some pk 13/14 for extra phosphorus and potassium
and Remo nutrients Magnifical for some more calcium & magnesium.
I've noticed that the left and right Runtz have a bit less green in their leafs and I think overwatering is the issue.
Gonna give these ones less water and I'll see what the Magnifical will do.
Temperatures stayed between 19 – 24 °C ( 66 – 75 °F) and humidity between 46 – 59 %
I've raised the power of the airfan from 40% to 55% to lower humidity levels
and next week a dehumidifier will enter the grow tent to lower levels even more.
The cobs were lowered to 56cm (22 inch) and dimmed to 284 watt.
See you next week! ✋
Do you want to grow this strain?
👉 https://www.zamnesia.com/6000-zamnesia-seeds-runtz-feminized.html 👈


Likes
1
Share


@hazemaze
Follow
Bisher guter Stretch, nodien Abstand super. Bisher keine Mängel. Kein Überschuss.

Likes
2
Share


@Mr_nugs_lover_David
Follow
She's doing very well so far,smells super nice,definitely I'll grow more autos by gea seeds,I had the pleasure to grow autos by this awesome seedbank and can't wait to grow more of them,never let me down,let's see how she ends up.💚💛❤️🌱


Likes
9
Share


@Skinnytalls420
Follow
It’s look beautiful didn’t get very big but the buds are beautiful looks like it’s gonna be some sticky icky lost of crystals can’t wait to smoke it!!!

Likes
45
Share


@Theia
Follow
Such a wonderful plant. Great shape no stress (yet) stacking well and getting frosty. She has a great sweet smell with a definite berry fruit smell that leaves my mouth watering. Very different from the funk coming from the purple urkle..
Another thankful shout to lassos for putting me straight with my pH issues. If you want to know about it it's in my other diaries. All we need to know is PH is back to what it should be.
That's all.
Thanks for looking.
Stay safe😷😷
Grow well🌱🌿🌼

Likes
13
Share


@HashCakes
Follow
Finally starting to show some preflower but I'm calling this a veg week. Nutes the same still.
Processing
Likes
14
Share


@Patillac31
Follow
Start of week 7, scheduled feeding in the morning. Drinking about 3qts every 2-3 days. I'm excited about the floral smell that GSC is starting to emit. I've been reading about 9-10 week flower times. I've also found amber tric's (>10%). Ordered new batteries for my jewelers loop ³⁰×, ⁶⁰×. I'm excited to get a closer look.
More pictures and videos will be uploaded as the week progresses.
Also added my lady friends Calla Lilies to the mix since the bulbs were sprouting in a dark closet.
☆Day 47 I'm going to try and get another 3 weeks out of this girl. Buds are visually changing daily.
Any questions or suggestions drop me a line! Happy Gardening 🌱✌️🖖

Likes
3
Share


@PalmaGrow
Follow
Excelente genética excelentes olores y aromas un terreno delicioso, productora al 100% tiene una muy buena capacidad de producir cogollos robustos y compactos
26/10/2024 fecha de la cosecha.
Likes
3
Share

@PapaTerps
Follow
Zhampagne - Compound Genetics
Day 93
🚿 She was watered twice this week, with 3L of RO tap water pH'd to 6.5. She has begun her flushing stage and is now only receiving plain water, she is currently drying back and will be harvested in the next few days!
✂️ No work on her this week, she isn't very bushy and she is nearing the end of her lifecycle, so the next time she will see my scissors will be harvest day 🙌🏻
🌸 She has big dence flower that bulked up so quick and has now spent the last couple of weeks maturing! The majority of her trichomes have turned milky clear, but some of her pistils have yet to fully mature - I think she will be ready for harvest this week, but I will wait until she has fully matured before I cut her down 👍🏻

Likes
6
Share


@JackSkellington
Follow
19/05/2021
la mattina dopo aver lollipoppato ho trovato le teste delle apicali tutte a curvate verso giù credo sia dovuto allo stress.....
oggi andrò a visionare se si sono riprese dal stress dubito
proverò a risolvere l overfert alzando tutta la lampada in cima al box(poca luce=poco mangiare) per 4 giorni....
e cercherò di guardare un po le radici delle baby perchè ho il sospetto che l overfert si un conseguenza di troppa irrigazione d acqua....
se cosi non fosse credo che laverò il terreno tutte le mie bimbe sperando iniziano a schiarirsi un po dal quel verde scuro altrimenti niente fioritura....
restate connessi
21/05/2021
ho alzato la lampada a 90cm per farle riprendere dal forte stress lo tenuta cosi per 48 ore...
andrò il 24 a vedere cosa e successo...

Likes
7
Share


@Huntress007
Follow
She moved into flowering just fine and is now moving forward in that stage! She just recently was defoliated so pics are before and after!

Likes
16
Share


@Chubbs
Follow
420 Fastbuds
Gelato Auto
Week 7
These girls are doing good but absolutely refuse to go into flower it seems like. I'm going to give them another week to see if I start seeing preflower sites if not I'll put them outside with my outdoor plants to try and force them. Either way they're looking good and still showing no signs of any major issues. All In all Happy Growing
Likes
9
Share


@Goldbud
Follow
Week 5 flowering just ended. See the nice time lapse movie of the last 10 days.
