Likes
Comments
Share
@Dunk_Junk
Follow
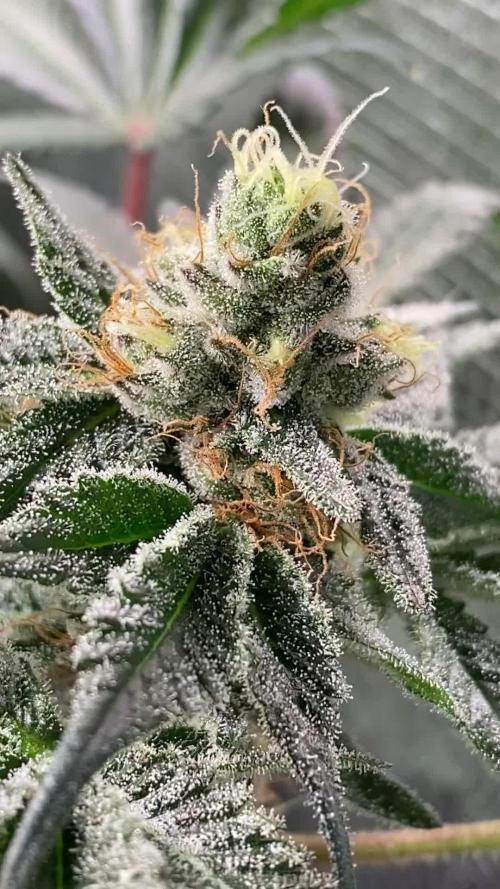
Trichomes are milky but the pistils have too many white ones still. Flowers have slowed down in their growth. Another week to go maybe.
Likes
2
Share
This is the last day of her life. Shes getting a bath of sun with 40c outside. After she will finish in the dark until i harvest her tomorrow Shes trying to get pollinated by throwing some new pistils here and there, but trichomes are cloudy mostly with amber tone. Not a lot of clear one.
Processing
Likes
5
Share
@Ensign420
Follow
Week 02 Introduction This week has been a bit of a struggle. Had my first experience dealing with slime and brown algae. But I think adding enzymes and increasing the beneficial bacteria helped to fix the issue. Also experienced nutrient burn for the first time. My nutrient solution strength got as high as 671 PPMs. So backed it down to about 430 PPMs during the end-of-week reservoir change. Also cut Hydroguard (expired?), CaliMagic, and Superthrive from this grow. Now she's still stunted, but is starting to recover. Hopefully... [START OF WEEK 02] Day 01 - Monday - 08/10/20 - Total Days: 008 ----------------------------------- - [0830]: Still looks a bit yellow. But getting larger! --- Solution strength was at 248 PPMs. --- Just topped off with a bit of distilled water --- PH went up to 6.1 so PH'd down to 5.8 --- Ran the top feed for a bit to wet the hydroton. - [2130]: She's looking even more yellow now. --- Even the new leaves are really yellow. --- Decided to add more base nutes. --- Added 4ml of Sensi A --- Added 4ml of Sensi B --- Now at about --- Solution Strength went up to 304 PPM. --- PH was at 6, --- Also raised the water level a bit more. --- I really hope it's a nutrient deficiency and not an over-watering issue. --- Please live! Day 02 - Tuesday - 08/11/20 - Total Days: 009 ----------------------------------- - [0830]: Looking less droopy. But still yellow. --- Decided to do a reservoir change. --- 4.5gal of distilled water --- 8ml of Sensi Grow A --- 8ml of Sensi Grow B --- 8ml of Voodoo Juice --- 4ml of B-52 --- 4ml of CaliMagic --- 4ml of Hydroguard --- 4 drops of Superthrive --- PH'd down to 5.8 --- Solution strength: 302 PPM --- Since I didn't want to risk over-watering the rockwool, I did not to do a top feed, may do one tonight after the sleep cycle (lights are still set to go off at 10am and back on at 4pm). --- As I was doing a reservoir change, I noticed that the tubes and bucket were a bit slimy. Didn't really stink or anything. Is this normal? Maybe due to the Hydroguard and Voodoo Juice? --- I hope she gets better soon! - [2215]: Getting larger! But still yellow. --- Also can see a root growing through the net pot! Tiny little thing but it's there! Will have to start dropping water once more appear. --- After looking over a few DWC diaries using AN nutes, seems like my solution strength is still too low. Most around this stage average around 500 PPMs with about 4ml per gallon. --- Top fed for a minute to wet the top of the hydroton. --- Solution strength went down to 263 PPM. --- Added 8ml more of Sensi A --- Added 8ml more of Sensi B --- Now base nutes are at 16ml for 4.5 gal of water. --- PPMs went up to 411. --- Still lower than 500 PPMs, but that's okay. --- PH was at 6. Not sure if I should adjust PH using AN nutes. So going to not ajdust unless PH goes above 6.1. Day 03 - Wednesday - 08/12/20 - Total Days: 010 ----------------------------------- - [0830]: Looks like more root growth! --- She still looks yellow. But leaves are perky. --- PH was at 6.2 so lowered down to 5.8. --- Solution strength was at 394 PPMs --- Since roots are still growing, I decide to lower the water level a bit. Now water level is a bit below the net pot. - [2200]: Root is getting longer! --- Slime is returning. Not sure why. --- Solution strength: 357 PPMs --- PH: 6.1 --- Decided to add an enzyme along with more beneficial bacteria to hopefully cure the slime. --- Added 16ml of Sensizym --- Added 5ml of Hydroguard --- Added 8ml of Voodoo Juice --- New solution strength: 430 PPMs --- New PH: 6.1 --- Top fed for a minute. --- This slimy residue is really freaking me out! I hope the added enzymes will help eliminate the slime. --- Going to do a full reservoir sterilization/nutrient change over the weekend. Please survive until then girl! Day 04 - Thursday - 08/13/20 - Total Days: 011 ----------------------------------- - [0930]: I think the enzymes worked! There is little to no slime now! --- Although I think the root was also dissolved in the process. It's now just a little stub sticking just below the net pot. The enzyme is also suppose to dissolved dead roots too but guess that root was too weak? Not sure what happened there. But I think the slime is cured! --- Solution strength went down to 395 PPMs. Decided to add more base nutrients. --- Added 8ml of Sensi A --- Added 8ml of Sensi B --- Added 4ml of B-52 --- Solution strength went up to 598 PPMs. --- PH was at 6.1 --- As long as the PH is between 5.5 and 6.3, I'm not going to use PH Up or Down. But still will monitor PH levels. - [1715]: Checked up on her after her nap and shes looking alive but stunted. But no slime! --- Decided to add some sugars to help maintain the enzymes and beneficial bacteria. --- Solution strength was at 587 PPMs. --- PH was at 6.2 --- Added 8ml of Bud Candy --- Solution strength went up to 671 PPMs. --- PH also went up to 6.3 --- Lowered water level a bit to hopefully promote more root growth. --- Top fed for a minute. --- She is getting bigger, but still looks yellow. Day 05 - Friday - 08/14/20 - Total Days: 012 ----------------------------------- - [0915]: Leaves look a little burnt on the tips. Still no slime. --- Going to back off on the PPMs to hopefully fix the nutrient toxicity. --- Solution strength was at 632 PPMs --- PH was at 6.3 --- Added/Removed water until PPMs were at 536. --- PH was still at 6.3 --- Raised water up a bit, then top fed for a minute. - [2200]: Looking better. Still yellow though. --- Solution strength: 514 PPMs --- PH: 6.5 --- Added PH down. --- New solution strength: 518 PPMs --- New PH: 5.2 --- PH was kind of high. So decided to PH down. Had to use quite a bit to bring it down. But eventually got it to drop down to 5.3. A little low, but so far, the PH has always gone up so wanted to start it really low. --- Ran the top feed for a minute to re-saturate the top of the hydroton. Day 06 - Saturday - 08/15/20 - Total Days: 013 ----------------------------------- - [0830]: She looks stunted. leaves are still yellow. --- Solution strength: 514 PPMs --- PH: 5.6 --- Top fed for a minute. --- Not sure what to do at this point. Going to do another reservoir change soon. Hoping she lives until then. - [2145]: Looking pretty much the same. --- A bit of slime has returned. Since I've been diluting the nutrient solution, the enzyme ratio has dropped. So I guess this is expected. --- Also noticed that slime build up was on the air-stones. Never really checked the stones so not sure how long that has been there. Looks brown too, which can't be good. --- Going to do an H202 sterilization of the system (minus the net pot) tomorrow so did not add anything. --- Lowered the water level to below the net pot. --- Then top fed for a minute. Day 07 - Sunday - 08/16/20 - Total Days: 014 ----------------------------------- - [0900]: STERILIZATION DAY! --- Decided to skip today's night cycle for a deep clean. --- I'm hoping that skipping a night cycle won't be too stressful. --- Temporarily moved her to a new bucket. --- Used about a half of gallon of straight distilled water to flush out the net pot. --- Drained the system and wiped up all the brown sludge. Also removed the air stones and cleaned up all the goo. --- Filled the system with 2 gallons of distilled water and at least 30ml of food grade hydrogen peroxide (35% strength). --- Yea its a lot, but since I'm not going to sterilize the system overnight, I went with a really high doseage. Basically I kept adding until I started to see little bubbles start to form. --- Then I ran the water pump. - [0915]: Boiled the air stones in tap water for about 10 min. Then reconnected them to the airlines. --- I let the air stones and hose soak in the sterilization solution for about 5 minutes so the peroxide can absorb into the stones. Then ran the air stone to help mix and agitate the solution. --- Occasionally, I'd repeat the process of turning the air pump off for a few minutes to let the stones soak. - [1000]: Covered the top two row of holes of the net pot with some aluminum tape. Hopefully this solves the light leaking in through the hydroton. - [1200]: Used an old toothbrush and scrubbed the pump clean. Then drained the system. --- Refilled with more distilled water and peroxide. Again added a lot. --- Ran system again to sterilize even more. - [1530]: Drained the system and refilled with distilled water to rinse. --- Ran the system for a few minutes, then drained and rinsed again. --- Did this a few more times over about an hour. - [1630]: Added 4 gallons of fresh distilled water. --- Added 15ml Sensi Grow A --- Added 15ml Sensi Grow B --- Added 12ml of B-52 --- Added 16ml of Voodoo Juice --- Added 16ml Sensizym --- Solution strength was at 430 PPMs --- PH was at 5.6 --- I was going to add Hydroguard, but I think the bottle is expired. Since 2017 or 2018!? I think Hydroguard is good for up to 2 years from the date on the bottle or 6 months after opening. So not going to use from now on. I wonder if this could have contributed to the slime build up. --- Also removed the CaliMagic and Superthrive too. Going to only use AN products to eliminate the chance of incompatible nutrients. --- Placed her back in the bucket and top fed for a minute. --- Here's hoping for the best. Going to let it ride until morning! Please feel better! [END OF WEEK 02]
Likes
34
Share
@ROM101
Follow
Couple more weeks of feeding then flush. This girl is stacking hard and buds are forming rock solid.
Processing
Likes
37
Share
Hello growers and tokers! 👋 👩‍🌾 🧑‍🌾.🔥💨 This is one is living it up! Transplanted to final pot, an 11L fabric pot like all the other strains. Great root system going on.. I added 5 grams of Micro Vita from TopCrop to the soil. I took the pictures with my phone so you can't really appreciate the details but the roots are thick and strong. It sucks this one won't get as much veg time as the others so I'll definitely be growing this one again and with a full veg cycle. Looks to be a very promising strain! One Love!
Likes
1
Share
@kalmiata
Follow
I would like to title week 10 the tragedy 😂 There was an issue with the drip irrigation I set up when leaving for 5 days for Christmas. The plants received no water for the duration of my vacation. After watering (and praying) last night, they’ve perked back up significantly. Roots still looking good. Reduced light intensity, defoliated the dead stuff, and going to start babying them a bit before a much needed transplant.
Processing
Likes
4
Share
@Joedirt
Follow
Slow grow so far... I’ve been out of town for two weeks and had another hand taking care of her, which she didn’t like. So far so good. Great earthy smell coming off her...
Likes
10
Share
@Stork
Follow
Day 30 Wed PH 5.7 EC 0.6 DLI 18h PPFD Water 24c Day 31 Thu Add Ph Up PH 5.3 - 5.9 EC 0.6 DLI 18h PPFD Water 21 Day 32 Fri Add water Ph Up PH 5.5 - 5.7 EC 0.6. - 0.6 DLI 18h PPFD Water 22c
Likes
22
Share
unfortunately I broke a branch during the lst session 25/11 😥 👍Orange Bud Autoflowering Seeds AIRE POTS CULTURE ( VRAIMENT sativa) Orange Bud is a Sativa-dominant hybrid that will give you the burst of energy you need to get your day started. Instead of grabbing the orange juice in the morning, opt for Orange Bud instead as it's the perfect wake-and-bake strain. As its name suggests, Orange Bud will produce big beautiful buds covered with orange hairs. https://marshydro.eu/collections/ts-series/products/ts-1000/ https://marshydro.eu/products/100x100x180cm-grow-tent/
Likes
3
Share
Girls are coming along well transplanted set 1&2... seem to be loving it....we getting there
Likes
13
Share
@quigley
Follow
Day 15: 3 nodes now visible on both plants. Day 16: Lights lowered. Canopy now at 20000 lux. At 22" from the canopy, my light is hanging lower than recommended by HLG but I am using a lux meter to ensure the amount of light isn't too much for my plants. I'm at home almost all day almost everyday so it's the perfect time for daily lowering of the lights and monitoring carefully. Day 17: Lowered light to increase LUX readings by another 50%. Canopy now at 30000LUX. One more lowering should bring us into optimal amount of light. Noticed a slight amount of curling on leaves last night so upped the ProCal just slightly. I make my mix using pre dosed calmag & potassium silicate water. I adjusted the final EC with this water to ensure calmag levels remain high enough to prevent the coco from "stealing" it in its own cation exchange points. Ended up adding Green Planet GPH Uptake to the lineup today for the PM feeding. Will continue at recommended dosage going forward. Also picked a foliar calmag. Made a foliar spray with recommended dose of GP Ocean Magic as well; adjusted pH to appropriate level. Did one application then ditched the Ocean Magic as you're only to use this as a foliar once weekly. Made calmag foliar spray and am now regularly using this in my mister. This will allow me to adjust with plain water as to keep the EC down and my nutrient mix stronger. Also had a revelation! Root Guard and GPH Uptake have very minimal impact on EC so therefore can be added after dilution as to insure a full dose of each of these are being applied at each feeding. Day 18: Ladies doing so great now in veg phase of growth. Calmag and Ocean Magic foliar application yesterday and continued Calmag applications throughout the day seem to have really given them a boost. Adding GPH Uptake seems to be a great addition to the lineup. It will take a few more days to truly notice the results.Looking like only a few more days until the Lamb's Breath sees its first round of LST. Noticing a bit of leaf curl on both plants. I have been fertigating with a litre of solution twice daily. I am going to reduce to once daily for at least today. Will try for smaller feeding tomorrow morning and see if I can still achieve the required 10-20% runoff with an EC no higher than 300 points more than inflow. Ceasing foliar calmag applications until plant stops showing signs of oxygen deficiencies, especially the Blue Diesel. Added a Wyze cam to the setup which is awesome. I can check the ladies all the time with out opening up and disturbing their environment. (THIS IS THE POINT WHERE LIGHT BURN WAS FIRST VISIBLE BUT I WASN'T AWARE!) Day 19: EC rose dramatically as i skipped evening fertigation (Day 18). This is NOT a recommended course of action. I was trying to adjust for what looks like oxygen deprivation to the root system of the Blue Diesel (IT WAS ACTUALLY TOO MUCH LIGHT!). I think this plant is lagging behind the Lamb's Breath a bit due to being bleached (TOO MUCH LIGHT!). I believe this may be the root problem (hahahaha!) and why it is a bit behind the Lamb's Breath. Droopy leaves are usually indicative of an over saturation of water in your media. I will fertigate 3 times today to correct EC issues. Still keeping EC to just under 1000 microsiemens. Reducing volume of solution given to the Blue Diesel by half. Day 20: Started LST on the Lamb's Breath. Slowly raising EC back up to ~1000 for the Blue Dream. Lowered the light by about an inch and shuffled the plants just a bit to get optimal light saturation. Everything chugging along at this point now. Day 21 & 22: Soooo I lowered my light too much. Started noticing signs of light burn on the LB. Watched some videos, read some articles then found my manufacturer's recommended hanging height. This HLG 100 V2 should be at 24" for veg stage. So thats where it got put back up to. Measured 20000LUX on the meter still which is within optimal range. I'm sure with the light up higher, the penetration to the lower canopy will be better due to the reflective walls of the tent. I removed the first pipe cleaner of LST on the LB to let it grow up toward the light a bit more. The one day of being tied down has had a dramatic effect on the production of branches lower down. I'll (probably) let it ride out for this week to allow unfettered growth before starting to tie down new branches. Days 23-26: Everything rolling. Figured out optimal EC is around 800 for inflow for both plants. Thinking this may be the optimal inflow EC for the Green Planet Line. Decided to pick up an HLG 65 V2 4000K light as well as an HLG 135w RSpec. Both are KILLER lights for sure. The 65 has really helped in veg phase. I would highly recommend it! Optimal light hanging height ended up being around 24" for the 65 which is manufacturers recommended height. Can't wait to see what the 135w fixture can do. Day 27: Switched lights to the HLG 135w RSpec today. Lowered light down to 90 watts so the lights aren't too much of a change from one day to the next. They are about 50% brighter than the HLG 65 V2 4000K when hung up to the maximum height my tent will allow. It looks to be a sweet light and the plants are getting new hues of green showing almost immediately.
Likes
14
Share
@Wenz004
Follow
F-MILF takes 70 % of my tent now...wtf Hope all this green gives some good buds at the end. Deficiency from last week is under control...added some Silicate from TA...no idea if that helped or anything else...of course...there is too much light photons for the above area...but wtf I cannot do the plant smaller...lamp is on 75% now und lower would be bad for lower buds. NL untopped (F-MILF) getting this week: (TA nutrients mentioned above are for NL topped from other tent...pictures follow) Aptus Topbooster 6 drops/l (increased) Aptus P-boost 12 drops/l (increased) Aptus regulator 3 drops/l Aptus All in one 0.6 ml/l Aptus CaMg 0.6 ml/l TA Silicate 0.4g/l 4-6 litre each day nutrified (thats a real problem) F-MILF cannot get enough...just makes me poor that fat big milf
Likes
Comments
Share
@Stecl
Follow
Organic, Die letzten 2 Wochen nur mit Wasser gegoßen
Likes
158
Share
Put some extra puppy pics of duke there at the end i found. Glad I took like 20 pics a day of him since we got him in February 2020.. Couple cool videos of Dukie.. one of him jumping as a puppy in slow mo. One playing with a ball
Likes
2
Share
Blütewoche 3 – Radikale Entlaubung & Pflanzenpflege Zeitraum: Vom 05. Juni bis 12. Juni Zu Beginn dieser Woche habe ich mich an eine großflächige Entlaubung gemacht, da sich das Blätterdach der Pflanze sehr üppig entwickelt hatte. Diesmal war es ein richtiger Radikalschnitt – es ging ordentlich Blattmasse verloren. Ziel war, mehr Licht an die unteren Triebe zu bringen und die Luftzirkulation zu verbessern. Um der Pflanze bei der Regeneration unter die Arme zu greifen, habe ich 6 Liter Wasser mit EM1 (Effektive Mikroorganismen) gegossen, um das Bodenleben zu stärken und die Pflanze vital zu halten. Verlust von Trieben: Leider sind mir beim Entlauben drei Äste abgebrochen. Zwei davon haben es nicht überlebt – eine jedoch hat sich erstaunlicherweise wieder erholt. Trotz des Verlusts konnte ich keine ernsthafte Beeinträchtigung der Gesamtstruktur erkennen. Beobachtung möglicher Mangelerscheinung: Zwischenzeitlich sah es kurzzeitig nach einem leichten Mangel aus. Blätter wurden von innen heller, am äußeren Rand dunkler, und wölbten sich etwas nach innen. Doch schon einen Tag später sah die Pflanze wieder völlig normal aus, also alles im grünen Bereich. Wurmhotel & Spezialfutter für die Würmer: Um das Bodenleben zusätzlich zu fördern, habe ich meinen Würmern etwas hochwertiges Wurmfutter gegönnt, bestehend aus: - gemahlenem Pilznährmalz - Kälbmehl - Neemcake - Algenkalk - Naturpur Grieß Davon streue ich wöchentlich eine Hand voll über die Erde sowie gezielt in die Wurmhotels. Und siehe da, zwei Tage später war alles restlos verschwunden! Die Würmer waren deutlich aktiv und sichtbar am Futtern. Sehr erfreulich zu sehen, wie lebendig und gesund das Mikrobiom im Boden ist. Allgemeiner Zustand & Wachstum: Im weiteren Verlauf der Woche habe ich die Äste weiter nach außen gezogen, um die Fläche optimal auszunutzen. Durch die Entlaubung kam nun spürbar mehr Licht an die unteren Bereiche, die Triebe entwickelten sich prächtig und schossen sichtbar in die Höhe. Maße am Ende der Woche: Breite: ca. 65 cm Höhe: ca. 15 cm Blütenentwicklung: Die Pflanze befindet sich jetzt klar in der Anfangsphase der Blüte. Die Blütenansätze sind deutlich sichtbar und zeigen ein gleichmäßiges, gesundes Wachstum. Die Pflanze wirkt insgesamt sehr vital und kräftig. Bis zur nächsten Woche!
Likes
7
Share
@Snipes420
Follow
She is almost finished. About 45% cloudy on trichomes others are mostly clear except the brown hairs those have some amber on big main bud sites. She does still make new pistols with white hair but not so many white hair pistols left (only lower canopy) I will be checking if she starts drinking less water and nugs stop fattening up. Plant has a strong tangy smell and is very sticky on budsites and sugar leaves. Her leavs do show some sort of problem/stress. The yellowing is either a nutrient problem/ph problem or yellowing due to age but i assume first one. Shes only getting water atm no nutrients
Likes
5
Share
@Qatan26
Follow
Started removing leaves that were dying. Had to tie one plant down she grew bigger then expected and was getting to close to the light
Likes
20
Share
@SkunkyDog
Follow
Hallo zusammen 🤙. Sie erhalten 25 Prozent Rabatt in unserem Shop Mindestbestellwert beträgt 75 Euro https://greenbuzzliquids.com/en/shop/ Code: GD42025