
Likes
Comments
Share


@alwaysdown
Follow
Throughout the week I top dressed each with 3 tbsp of dry fert and more super soil. Giving em cal mag water also just because my other set of plants want it as well.
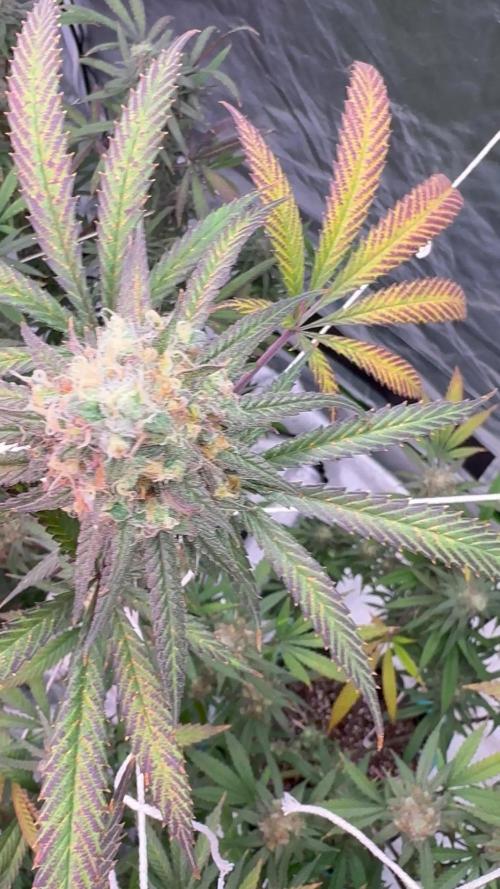
Bit of discoloration throughout the canopy, since these girls only got 3-4 weeks left I'm not worried. Might try a different combo of dry ferts with a higher P/K for flowering since they went through veg no prob.
Got another cycle of Mephisto illuminautos on week 1 so I'll post those for my next grow.
Think the Gelato will be ready to be pulled in 1-2 weeks and the NL/LSD in 3-4.
peace


Likes
10
Share

@Ninjabuds
Follow
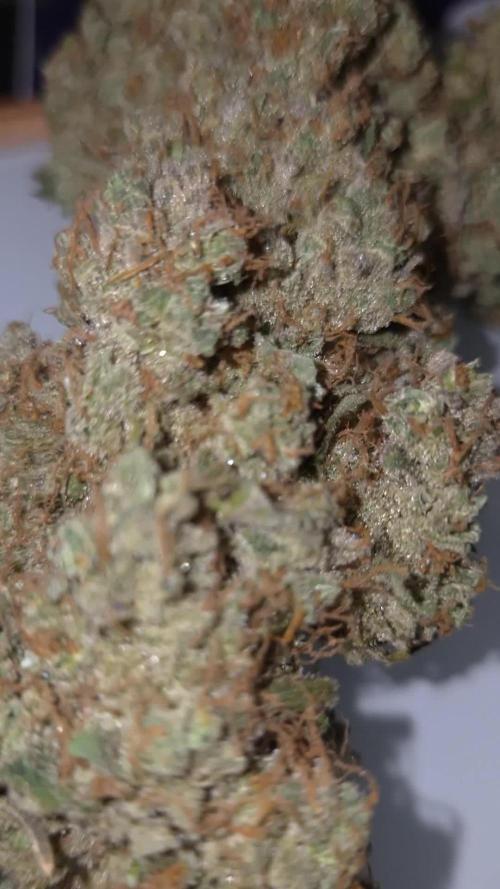
This plant was a beast all around from the start it had some crazy strong vigor. I could see the plant being able to grow outdoors if you steak up the branches in late flower. The buds were huge and very round and dense. The tricomb density was ok it wasn’t a frost party or anything but it’s got some big white tricomb heads. The smell is amazing super strong candy gelato smells with some gas skunk on the back end. Other than needing tied with string it using steaks in late flower it was a great plant. Still a 10/10
Likes
27
Share


@Bread_n_Buds
Follow
Really sublime strain released the day of the harvest. Casually, means a lot for me… is still not test #2 but Sticky Broccoli. What e Epic Name.
Please notice the long shape i’m a tall guy and take a look to me next this baby.
There are loves that are destined to be brief but intense and loves that are destined to last forever. Sticky Broccoli is one of those things I have done that I will hardly forget in my life, when I am old and have superpowers for all the THC smoked, I will tell the story of these monsters.
ATTENTION: I have divided the harvests of the two plants because they are widely documented by many photos so as to give you greater possibility of distinction. The other plant is entirely published in the week before the harvest.
They were born in the ideal period, I told my boss also favored by the moon, in an ideal super tropical place comparable to California in terms of climate, they ate Plagron the best that the market can offer in terms of organic fertilization and they grew in a newly bought organic soil that was not recycled. The conditions were really all there but we still went beyond all expectations.
From the first moment they stood out for being the fastest, voracious with a metabolism at full blast always thanks to the Plagron additives and these impressive genetics. We remember the excellent parents Sticky beast and Green Crack as heritage I would say not bad at all.
I let them vegetate a bit too much or rather 4/5 weeks are not that much but while the others have remained almost normal plants these have broken through. I say broken through because the main cola of the tallest was pushing decisively on the roof of the 220 cm growbox. Truly animalistic the few friends who saw it have widened their eyes. A Wonder or rather two.
The main cola is standing by miracle but it is very big and very full of very very resinous grass.
This harvest of 23 plants all Zamnesia has proved surprising from many aspects, an exaggerated quantity of grass, autoflowering that have touched 100 grams and all above 50 always very little mold and probably because I too much hold of some paints. But the thing that literally amazed me, because unfortunately these days we have to be amazed by this too, ZERO HERMAPHRODITES. Let's think carefully about what we do guys when we plant, we never put seeds found in the grass and we plant seeds from breeders who work well.
Zamnesia is distinguishing itself guys I'm here and I'll prove it to you if you have any questions or doubts please write to me for anything.
Released to the public today 23/12/2024 remember this name: Sticky Broccoli, there is also an auto version like almost all Zamnesia strains and I promise you that it will become a masterpiece soon. Everyone will want a seed, I don't like to do Nostradamus, I recognize quality.
Zamnesia Strain Description // Our breeders love to challenge themselves to develop cutting-edge varieties and Sticky Broccoli is a perfect example of their mastery. Combining high-yielding genetics like Sticky Beast with pungent Green Crack has resulted in a 90% indica strain that is extremely tasty and has 23% THC. Inside the grow room, the plants perform excellently. Growers will appreciate the high yields and the extraordinary beauty of the buds: fragrant, vibrant and glistening with resin. Smokers will be enchanted by the seductive aromas and intense effects that emerge almost instantly after the first toke.
- Get a seed of this fantastic strain --- https://www.zamnesia.io/it/10818-zamnesia-seeds-sticky-broccoli.html
The plant has eaten the 100% Organic feeding of Plagron: Alga Grow and Alga Bloom as basic nutrients, the rooting Power Roots, the amino acids of Sugar Royal, the Enzymes of Pure Zym that eat the dead parts in the soil, Power Buds that always gives us immense satisfaction with rapidity of start of flowering and composition of the buds, the legendary Green Sensation that now needs no introduction, a name a guarantee.
The fertilizer kits that you can find on the Zamnesia website are perfect for this purpose, there is everything. Choose them based on their mineral/organic composition and the soil you have chosen.
at the link --- https://www.zamnesia.io/it/11457-plagron-easy-pack-natural.html
The quantity was measured using the sheet prepared on purpose on the Plagron website based on the soil chosen: Plagron Pro Mix + Perlite.
at the link --- https://plagron.com/en
Secret Jardin DF16 ventilation system and all the fans too make wind into
at the link --- https://www.secretjardin.com/it/
The light was supplied by MarshHydro and the growbox too
at the link --- https://www.mars-hydro.com
A fantastic selection of seeds, a headshop and a selection of exceptional accessories on the world of cannabis, many other things about mushrooms, health, well-being and all the beautiful things that nature offers only on the Zamnesia website
at the link --- https://www.zamnesia.com
Likes
81
Share


@SlowpokeFuegobud
Follow
Hello my wee little blueberry lovers! ❤️
Foliar sprayed with Nutrispray on day 20. 💦 Potted them girls, look at the roots!! 💪
Topped on day 21. ✂️
Watered on day 17 and after potting. 💧
Thanks @Green_Buzz_Nutrients for sponsoring my grow, those products really do their job! 💚 If you want to give them a try, there's a generous discount code in my setup description. ⬇️
_______________________________________________________________________________________
BLUEBERRY MUFFIN CANNABIS SEEDS
SIGNATURE STRAIN
INDICA DOMINANT | SWEET STRONG BLUEBERRY SCENT | ENERGIZING | F9 DOUBLE BREEDING LINE FOR HYBRID VIGOR
BLUEBERRIES | MUFFINS | CHAMOMILE
Blueberry Muffin is a company favorite. This seed produces plants that grow uniformly and produce frosty colas highlighted with purple flakes. The buds smell powerfully like fresh baked blueberry muffins, making the name of this strain a piece of… muffin. EMERALD CUP 2017 6TH PLACE!
CANNABIS STRAIN BENEFITS
Available: Reg, Fem
Parentals: Razzleberry x Purple Panty Dropper
Ind / Sat: Indica
Photoperiodic Flowering: 45 Days, Sept.15th-Oct.10th
Flavor / Taste / Smell: Blueberries, Muffins, Chamomile
Effect: Energizing
%THC: 20-28%
Characteristics: Epic Terps, Consistent Yield
https://humboldtseedcompany.com/blueberry-muffin/
________________________________________________________________________
Setup:
140x70x200 cm Spiderfarmer tent
2x Monkey 16W fans (not oscillating)
1x Secret Jardin 30W
1x box fan 50W oscillating (on lowest level)
LED
Full Spectrum 320W AGLEX AGL-320W-MA
5,6 kg
foldable, dimmable
864 pieces Samsung LH301H
864umol/s
2,7umol/J
full spectrum white + RED 660nm + IR 740nm
wavelength range 380-780nm
covering 3x4ft
Green Buzz Nutrients https://greenbuzzliquids.com/
❗ Use code GD42025 for generous 25% discount (for orders of minimum 75€)
Biobizz Lightmix + coco + wormcastings + perlite
Carbon Active Granulate Filter 125/360 cm³/h
PrimaKlima exhaust EC 125-400/240 cm³/h


Likes
6
Share


@SecretHerb-Sanctuary
Follow
Die Naughty Dawg zeigt eine starke Performance. Nach der Umstellung auf 12/12 hat der Stretch begonnen, wobei die Pflanze durch das vorherige Training eine hervorragende Form aufweist. Das Blätterdach ist schön gleichmäßig entwickelt, was eine ideale Lichtverteilung bis in die unteren Bereiche ermöglicht. Die Internodienabstände sind stabil und die allgemeine Vitalität verspricht einen erfolgreichen Übergang in die generative Phase.
Likes
14
Share


@ISCA_Abi_In_Da_HOoD
Follow
hello everyone
we some part in flowering
with 8 Ricky G-41s and we find ourselves with 4 beautiful little females and 4 males that I cut at the beginning of the week.
our ratios and 50/50 isn't crazy or I'm not lucky with girls.
kisses to all and happy Growing


Likes
23
Share

@Grow_Mary_Green
Follow
Hi meine lieben, 🤗
Willkommen zur Ernte...
... was soll ich sagen. Das Ergebnis kann sich sehen lassen 😇
Der Grow selbst, war recht einfach. Es gab keine Komplikationen ausser der Zeitdruck zum Cup 😅 (war echt knapp)
Die Sticky Broccoli selbst, ist schon außergewöhnlich. Sie Sieht nicht nur aus wie Brokkoli 🥦 sie richt auch extrem Blumig mit einem hauch an Würziger Note...


Likes
49
Share


@masterofsmeagol
Follow
7/25 Did two videos this morning. One where I was only going to water the 3 gallons I had mixed up but it's going to be very hot this week. Didn't want to make the same mistake as last time so I watered everything AT LEAST A GALLON. I need to bump up the volume during these really hot, humid days abd it doesn't get worse then this. Things are getting dusty. Found an inch worm and some minor pest damage. Once it cools down ill spray something. Also noticing small nitrogen deficiency that takes a leaf and moves up the plant a little bit. I'm going to need to start nutes this week. I'll keep this updated. Went back over around one and everything was looking fantastic! Took a few pictures and defoliated a few leaves.
UPDATE: I GOT A MESSAGE FROM DAD SAYING MY PLANTS LOOKED DROOPY. I HADNT MADE IT OVER FOR MY NIGHTLY INSPECTION BUT HAVING WATERED YESTERDAY I WAS THINKIBG OF SKIPPING IT. GOT THERE AND SAW THE FIRST 10TH PLANET DROOPY. ALL THE TENTH PLANETS LOOK RELATIVELY THE SAME BUT ONE OF THEM IS MY "CANARY IM A COAL MINE" AS IT DROOPS WAY BEFORE THE OTHERS. THE TWO BLUE CHEESES IN 20S THAT DRY OUT FASTER GOT TWO GALLONS AS DID MY 10TH PLANET CANARY AND MY BIG BLUE IN THE 50. ITS BEEN 90S AND SUNSHINE AND ITS ONLY GOING TO GET HOTTER. I HAVE THINGS GOING ON IN THE MORNING SO I WONT HE ABLE TO WATER. I NOTICED MORE NITROGEN DEFICIENCY RISING IN THE BLUECHEESE THAT DRINKS ALL THE WATER. OBVIOUSLY ILL NEED TO ADD NUTES SOONER THAB LATER CONSIDERING IM IN FLOWER BUT THE PLANTS ARE STILL A NICE GREEN AMD ONLY LOSING VERY FEW LEAVES. I ACTUALLY SAW A COUPKE BURNT LEAF TIPS ON A COUPKE PLANTS AFTER I WATERED WITH THE KELP ME/YOU. THIS SOIL IS AWESOME. WHAT IS THIS? WEEK 16 AND STILL GOING STRONG. WHEN I DO DECIDE TO START NUTES ILL TEST IT ON THAT BLUE CHEESE THATS FURTHER IN SENESCENCE. I TOOK A QUICK VIDEO ILL UPLOAD TOMORROW.
7/26 Had a bear come around my cage and getting into out bird feeders. Bent the iron shelerds hook all the way to the ground! Getting AMMONIA now to try and keep him away. Bags were heavy this morning but it's going to be really hot again. It'll be on the 90s the next few days so I need to be very careful. After we get through this I'll do an app of BT. Garden looks fantastic!
UPDATE: ANOTHER SCORCHER OF A DAY WENT BACK TO THE GARDEN. NOTHING WAS DROOPING SAVE FOR MY CANARY. THAT AND ANOTHER WERE BONE DRY. THE TWO PLANTS IN THE MIDDLE OF THE CAGE ARE SURROUNDED ON ALL SIDES SO I ASSUME THATS WHY THEY DONT SRY OUT AS QUICK. I GAVE EVERYTHING IN THE GARDEN ONE GALLON EXCEPT THE 10 GALLON PURPLE PUNCH, AND THE TWO IN THE MIDDLE. ONE TENTH PLANET ONE BLUEBERRY CHEESE. I ONLY GAVE THOSE 1/2 TO 3/4 GALLON. THE TWNTH PLANET IN THE MIDDLE IN THE THIRTY LOOKED HAPPY AND WAS STILL HEAVY TOO. I GAVE THAT A HEARTY HALF GALLON AND I WOULDNT EVEN HAVE DONE THAT IF TOMORROW AND FRIDAY WERENT GOING TO BE THE HOTTEST DAYS OF THE WEEK. I DEFOLIATED SOME. I NEED TO DO MORE BUT I HAD TO BEAR PROOF. I SOAKED THE BOTTOM BOARDS OF THE CAGE IN BLEECH. VERY CAREFUL NOT TO GET ANY ON THE PALLETS OR GROW BAGS OR ANYWHERE IT COULD GET TO PLANTS. I TACKED DRIER SHEETS TO THE CAGE. I CUT A COUPLE PILL CASES IN HALF AND SOAKED THEM IN BLEECH AND DROVE THEM IN BY THE WOODS WHERE HE WNTERED AND BY THE FEEDERS HE EMPTIED. PUT UP ANOTHER CAMERA FACING THE OPPOSITE DRECTION SO I CAN SEE HIM NO MATTER WHAT. I WOULD STAY AWAY MR. BEAR.
7/27 Plants are looking FANTASTIC this morning. Soil is still damp this morning and bags are heavy as hell. They look super happy. Obviously my watering situation depends on the weather. Today and tomorrow are supposed to be the hottest days so I wanted to make sure the plants had sufficient water before this. I'll let them dry out totally before watering again. There's another four lined plant big somewhere that sat there and destroyed another leaf. I'm AT LEAST spraying with BT after this heat wave. Supposed to rain a little today with thunderstorms. I haven't got my supports up yet but if i need to I coukd throw my tarps up real quick. Don't think I'll need to though. These are some tough freaking plants and I am super proud of how they've turned out thus far.
UPDATE: WENT BACK OVER AND RE APPLIED BLEECH TO THE RAGS AND ON THE PERIMETER OF MY CAGE. I TACKED A FEW MORE DRYER SHEETS UP. REASON I DID THIS WAS BECAUSE WEVE BEEN GETTING HORRIBLE THUNDER STORMS WITH TORRENTIAL RAIN. THE WEATHER MAN HAD BEEN WRONG SEVERAL TIMES WARNING OF THUNDER STORMS AND WE WOULDNT GET SHIT. THIS TIME IT WAS PRETTY BAD. TOOK A SHORT VIDEO. IT WAS SUPPOSED TO BE THE HOTTEST DAYS TODAY AND TOMORROW. I DIDNT NOTICE ANY BREAKAGE AND I DONT SEE ANY ON MY CAMS. IM SURE ITS NOT THAT MUCH RAIN AND THOSE NAHS WILL DRY OUT SOON. I NEED TO GET MORE PH DOWN AND DECIDE WHAT IT IS IM GOING TO DO FOR NUTES IN FLOWER AND MAKE UP MY MIND.
7/28 Huge thunderstorms all day yesterday and through the night with high wonds. Plants made it through unscathed despite the lack of a trellis. Today is supposed to be the hottest of these days. I think the hear wave ends today. I really need to get my supports up. I'm super lucky to not have had any breaks during the storm. I have a couple of videos I did but I didn't upload them earlier and now that I'm back in the woods I doubt they'll upload now. I'll give it a shot. If not I'll put them up tomorrow. OH! I found that four lined plant bug that had been fucking up my leaves and squished him. Well I hope it was him. If not I killed a sibling at least.
UPDATE: JUST WOW. This morning all drooped over from the storm went over at 4 and its still 90 and they seem to have grown sic inches and jumped forward WAY more into flower. I am amazed. I'll upload a photo or two but I took a video I'll put up tomorrow. Super stoked. Oh and you can give me a red smile face for not using nutes every week @growdiaries but you point out the deficiency then I'll fix it.
7/29 Plants looking fantastic this morning.
UPDATE: PLANNED ON NOT GOING TO THECGROW TOMOGHT SEEING THAT IT HAD RAINED SO HARD AMD THAT WE ARE SUPPOSED TO GET RAIN TONIGHT. I GET THERE AT ABOUT FIVE AND MY CANARY AND A FEWCOTHERS WERE DROOPING! IT WAS IN THE 80S ALL DAY. I GAVE EACH PLANT A GALLON OF WATER. THE GROW BAGS ON THE TEO WORST PLANTS WERE SUBSTANTIALLY LIGHTER THAN THE REST. I HOPE IM NOT OVERWATERING. THE PLANTS SEEMED TO PICK BACK UP AFTER WATERING BUT ILL HAVE TO WAIT UNTIL TOMORROW TO UPLOAD MY PICTURES AND VIDEOS. I NEEDED TO ADD TEMPORARY SUPPORTS TO A COUPLE DIFFERENT PLANTS. IM CERTAINLY GLAD I GOT THE URGE TO GO OVER. WHAT A CHANGE IN A FEW HOURS
7/30 Plants are really growing fast and transitioning quick to flower. We got almost no rain so I'm glad I watered like I was supposed to even though the bags had some heft to them. I'm noticing more pest damage. I'm thinking a bt spray tonight might be beneficial. I'll look through what I've got on hand. I may just give them an application of spinosid but we'll see. I still need to move things and put my supports up. Medical problems have slowed me down.
UPDATE: Went to check the plants around 3 and they looked great. Bags were still heavy and a little bit moist. I think with the added rain some of the plants may have been overwatered. I should have only watered tue bags that felt light. There is only one plant now that looks a little overwatered and even that is looking good. I found some more minor pest damage. Winds were fairly high. I wondered about my trellis netting but it hadn't been sanitized and my plants are very healthy so I decided to wait. I watched them dance like willows in the wind. I know it won't be like that with big ol colas on them but for right now it's working out just fine. Goal for next week is to move the front row back and move things around to better utilize space, possibly spray for pest and add supports for final flowering after I get the plants situated how I want them. If I do it right I may be able to lst some. Also took a 2 minute video but I cant upload until tomorrow.
7/31 I'm wondering about my watering habits. This morning I watered a couple blue cheese and purple punch plants with just a half gallon as they were light and looked drooping. I'm wonderingvif I'm overwatering. Some plants still seem heavy while others are light? I think the plants may have been overwatered due to the torrential rain and my taking less time hand watering. Hopefully I won't come home from this doctors appointment to wilted plants but I really doubt it. 10th planet requires far less water than the two other strains. Even specific phenos require more water and its difficult with the different size containers but im working with what ive got. I need more ph down and I've gotta get these plants supported. These are some massive plants. Store was closed. Dispensary was opened. Showed my buddy the video then it started raining. By the time I got there the plants looked horrible. Everything was droopy but a couple were really bad. A few weren't bad at all. Actually the one in the ten needed it. I think I just need to give more water at a time and document how I water each plant individually. I also need to take into consideration the weather. Hard to do when it's so unpredictable. I'll wait for them to dry out and then I plan to start low doses of big bloom and grow big but I need to wait for them to dry out first. Then next watering they'll get some nutes. It's sunny now so I may go check my plants. I may also put a fan out for a while on the bags. That might help them out.

Likes
2
Share


@Greenzfingerz
Follow
Strong smelling bud purple tones thoughout the buds. Dense but could have been bigger had to turn watts down to 800 so limited the size. Good strain to grow easy did a few early techniques Lst topping etc update once dry and total Yeild 10xplants two lights 400x2hps
Likes
57
Share

@Hologram
Follow
BEELZEBUB is ready 2b harvested!
Next update is gonna be a harvest. after drying a bit so i can make a 'smokereport' (i use vaporizer) at the same time
The R is now back in the months (septembeR) so its gonna b RRRainy and cold..
luckily the sun is still shining now and then (yeah) ..butshe has 2b harvested soon, the weather is not getting any better..
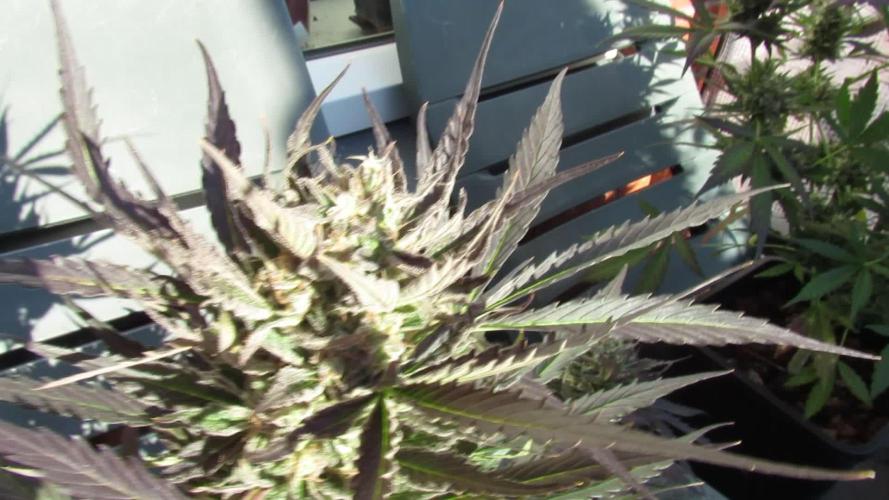
can see that on her leafs.. beautiful puprle and autumn colours..
Her buds are very solid and demonic, i can even smell some brimstone LOL (nah just my imagination going wild i guess
😸
Happy growing4all✊
***KISS! growingtechnique: Keep It Simple, Stupid!✊

Likes
25
Share


@PEAKYPLANTERS
Follow
Hello everyone, fellow growers!
my girls continue the vegetative phase without problems with the sog technique.
We are testing a new line of fertilizers and so far they are doing pretty well.
excellent nuggets are expected!
Likes
5
Share


@RastaRick
Follow
Keeping natural form. Blackberry gum is huge as I heard from others. Did some heavy defoliation.. first time ever so it's an experiment. Flooded my tent with no tray... Needed to redo connections on the tubing... Then flooded with a new tray, needed to secure the AQUAVALVES on one autopot base.... Looking good. Still running 24 hrs... Rock and roll 🤘
Likes
7
Share


@braxat420
Follow
No pruning, no lollipopping, nothing. She's growing wild and loving it. Smell is starting to come in and it's really satisfying.

Likes
5
Share


@MediciGrade
Follow
Transplanted into the 3 gallon medical buckets from thebucketcompany. Everything still going smoothly. Plants are happy under the gavita at 40% power and 50 inches above the top of the plants.
Likes
Comments
Share


@UkCaliGrower
Follow
Beautiful Lemon Kush by female seeds😍all of the airy buds went in with trim to create some CannaButter😍 there is 5oz from wetness, hopefully cure 2oz. Next ones are purple lemonade by fast buds

Likes
25
Share


@DrGanj
Follow
COntinued to apply small amounts of pressure with LST but aside from that, letting her do her thing.
Had to leave her for a few days and she got dehydrated, after a feed she perked up again but she's now started sucking all the nutes out of her lower growth. She has a lot so I'm hoping it doesn't affect the harvest. Would have preferred this to begin with my flush.
For more content on all my grows please check out my Instagram! Link is on my profile!