


Likes
Comments
Share


@happyphenos
Follow
Plants are filling out nicely. Thick crystal production and smells very sweet and fruity in the tent as soon as you crack the zipper. Can't wait to see if we get some fading.


Likes
7
Share

@DogDoctorOfficial
Follow
🌱 Animal Mints — Week 3 VEG Report
12/12 from seed | Vegetative phase ongoing
General Overview
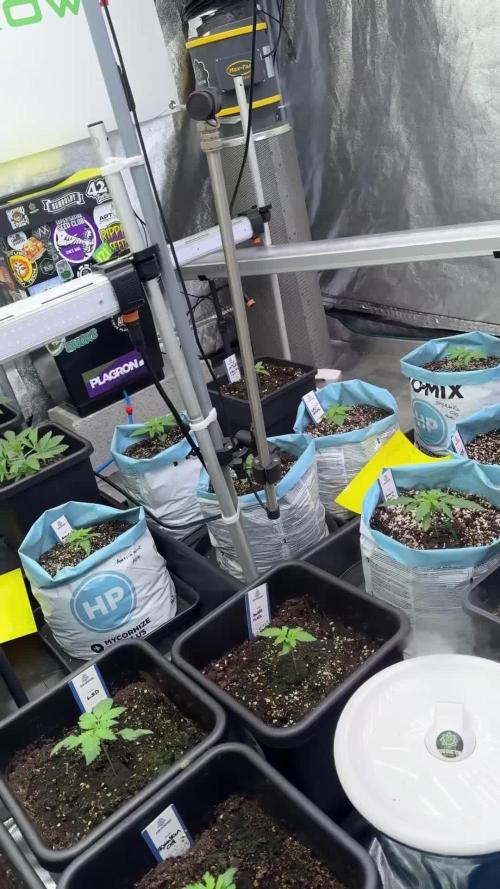
Week 3 of vegetative growth closes with Animal Mints standing out for exceptional leaf detail, natural structure, and active branching behavior. Both plants are thriving, each expressing itself according to its own timeline, yet sharing the same healthy rhythm seen across the room.
This is one of those cultivars where detail becomes the story.
⸻
Growth & Structure
• Stage: Vegetative
• Flowering signs: None confirmed
• Pre-flower: Possible very early indication on one plant (not yet definitive)
Plant A — with prior vegetative period
• Veg history: ~15 days under 18h light
• Node count: ~8
• Size: Significantly larger (as expected)
• Branching: Strong and active
• Leaf size: Large, dominant, highly detailed
On this plant, light leaf bending / leaf tucking has begun.
Large fan leaves are gently tucked or repositioned underneath the canopy to:
• Improve light penetration
• Encourage lower branch development
• Balance apical dominance
• Promote a more even structure
This is not aggressive training — no topping, no tying, no stress.
It’s a soft, observational approach, simply guiding leaves out of the way so the plant can express its natural branching potential.
⸻
Plant B — 12/12 from seed
• Node count: ~4
• Size: Smaller, as expected
• Branching: Surprisingly active for its size
• Training: None
Even without any intervention, lower branches on this plant are already reaching upward naturally, showing excellent hormonal balance and structural intent.
⸻
Leaf Expression & Detail
Animal Mints truly shines in leaf morphology:
• Extremely fine serration detail
• Subtle curves along each leaf finger
• Clean edges, no deformation
• Deep, lush green coloration
The level of detail is remarkable — almost sculptural — and clearly genetic rather than environmental stress–related.
⸻
Training Status (Clarified)
• Leaf bending / tucking:
• Applied only on the larger, vegged plant
• Gentle, non-stressful
• Focused on opening the canopy
• No other training performed:
• No topping
• No LST
• No defoliation
The goal remains support, not control.
⸻
Veg vs 12/12 Comparison
This folder offers a clear and valuable comparison:
• The plant that received a veg period is larger and more developed
• The plant run 12/12 from seed is smaller, but structurally similar
• Both show strong natural branching
Notably, the vegged plant is still not flowering, despite already spending three weeks under 12/12. This suggests the plant is still prioritizing structure and energy storage.
⸻
📸 Photo Documentation
This week includes studio-style photos, including images of the plants held close during documentation.
One of the photos features the Plagron jacket, included as a natural thank-you for the nutrition program and gear used throughout the grow.
⸻
Environment — Room Conditions (Week 3)
• Photoperiod: 12/12 from seed
• Day temperature: ~26 °C
• Night temperature: ~18 °C
• Relative Humidity: 60–65%
• VPD: In optimal vegetative range
• Airflow: Gentle, constant, non-stressful
• Solution temperature: ~21 °C
• Substrate temperature: ~21 °C
Environmental stability remains consistent across the room.
⸻
💡 Lighting
• PPFD: ~600–700 (plant-size dependent)
• Plants growing naturally into the light
• No stretch, no light stress
⸻
💧 Watering & Nutrition
• Watering method: Hand-watered
• pH: 6.0
• EC: 1.0
Nutrient program:
• Plagron Terra Grow
• Power Roots
• Pure Zym
• Sugar Royal
Foliar:
• Vita Race
• Used selectively and intentionally
⸻
🔍 What to Expect / What Not to Expect (Next Week)
What to expect:
• Continued vegetative expansion
• Stronger lower branch response on the vegged plant
• Possible clearer pre-flower signals
• Increased structural definition
What not to expect (yet):
• Full flowering
• Explosive stretch
• Need for aggressive training
⸻
Final Thoughts
Animal Mints closes Week 3 as expressive, detailed, and naturally structured. Leaf morphology and autonomous branching are already setting the tone, while gentle leaf tucking is helping guide the canopy without disrupting the plant’s rhythm.
No forcing.
No shortcuts.
Just support, observation, and respect for the process.
FOR DISCOUNT CODES AND MORE JUST FOLLOW THE LINK https://website.beacons.ai/dogdoctorofficial
📲 Don’t forget to Subscribe and follow me on Instagram and YouTube @DogDoctorOfficial for exclusive content, real-time updates, and behind-the-scenes magic. We’ve got so much more coming, including transplanting and all the amazing techniques that go along with it. You won’t want to miss it.
GrowDiaries Journal: https://growdiaries.com/grower/dogdoctorofficial
Instagram: https://www.instagram.com/dogdoctorofficial/
YouTube: https://www.youtube.com/@dogdoctorofficial
⸻
Explore the Gear that Powers My Grow
If you’re curious about the tech I’m using, check out these links:
🔆 Lighting & Environmental Control
• Future of Grow — Advanced LED lighting technology
https://www.futureofgrow.com/
DISCOUNT CODE: DOG20
• Lumiflora — Under-canopy LED lighting
https://lumiflorade.com/
• TrollMaster — Environmental controllers and automation gear (past collaboration)
⸻
Genetics
• Zamnesia Seeds — Genetics used in this project
https://www.zamnesia.com/
⸻
🌱 Soil, Substrates, Boosters & Root Support
• Plagron — Substrates, bio mixes, and supportive products
https://plagron.com/en/
⸻
🎒 Storage, Curing & Preservation
• Grove Bags — Curing and storage solutions
https://grovebags.com/
⸻
📸 Photography Equipment & Tools
(Not sponsors, but part of my creative toolkit)
• Sony A6700
• Sony full-frame macro lens + few more
• Stacking photography workflow - learning
• iPhone (for behind-the-scenes shots)
We’ve got much more coming as we move through the grow cycles. Trust me, you won’t want to miss the next steps, let’s push the boundaries of indoor horticulture together!
As always, this is shared for educational purposes, aiming to spread understanding and appreciation for this plant. Let’s celebrate it responsibly and continue to learn and grow together.
With true love comes happiness. Always believe in yourself, and always do things expecting nothing and with an open heart. Be a giver, and the universe will give back in ways you could never imagine.
💚 Growers love to all 💚
📸 P.S. – The Eye Behind the Lens
All photos in this diary (for now — except for the ones showing the camera, which I took with an iPhone) are taken with a Sony A6700 paired with a Sony full-frame macro lens and a few more.
Photography is part of the story — it’s how we share the fine textures, the glow, and the quiet details that words can’t always capture.
I’ve also started experimenting with photo stacking — a technique where multiple images, each taken at a slightly different focus point, are layered together to create one perfectly sharp image from front to back.
It’s not digital enhancement or AI; it’s pure photography — a way to reveal the plant’s beauty in microscopic depth, from trichome to petal.
You’ll even see a few shots of "ghost me" capturing the shots — camera, lens, setup — because every grow deserves not just to be cultivated, but documented like art.
FOR DISCOUNT CODES AND MORE JUST FOLLOW THE LINK https://website.beacons.ai/dogdoctorofficial
NEW DISCORD - Official Server Invite Link : https://discord.gg/ksjAkA5T74


Likes
4
Share

@Ninjabuds
Follow
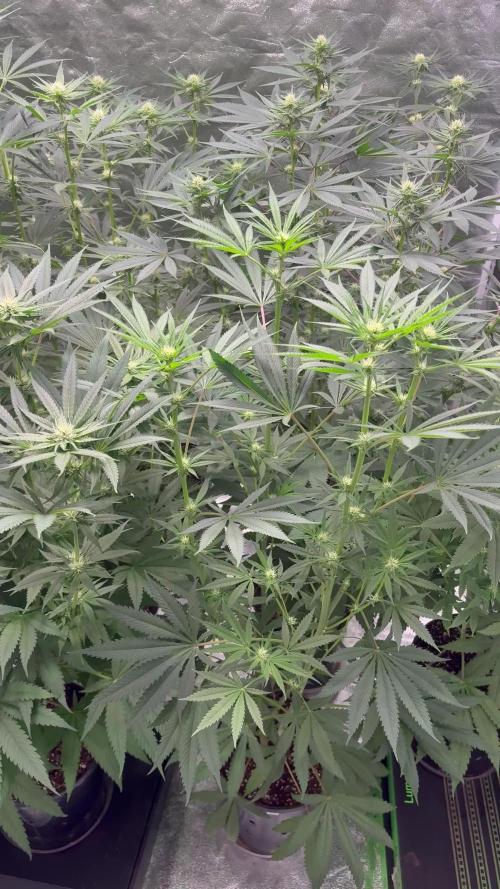
Week three of flower is off to an amazing start! At day 22, the ladies are looking incredibly healthy. They're praying like crazy, reaching for the light, and stacking nodes like it's their job. The buds are starting to plump up, and the trichome production is getting intense. I'm so excited to see how they develop over the next few weeks!


Likes
14
Share


@playerkiller69
Follow
Everything got a lot more darker and golden with temp drop technique i show earlier and water temp 60f and flushing too soon to harvest I’ll show next time how the buds look


Likes
52
Share


@00110001001001111O
Follow
Room setup rundown, examples of bud, et al in pictures... Some minor tweaks since these pictures were taken
Seedlings/Clones lights - Viparspectra XS1500 x1
Vege lights - DIY 630umol/s PAR x3
Flower Lights - 650w 3400K 1900umol/s PAR x2
Substrate - 50/50 sphagnum peat moss and vermiculite in 5-gallon pots
Climate Control - Luckily, the lights, winter and normal furnace use all equate to a decent temperature. A humidifier is needed early and later a dehumidifier is needed The last 4-5 weeks of flower phase.
Irrigation - I use 6 pressure compensating emitters per 5-gallon pot..
Basic process - 16/8 vege and 12/12 ligth schedule - Updated 2026
Sow up to 2x as many seeds as needed. These sit in a 1020 tray under the xs1500 until potting up to 1-gallons. After potting up, a couple 226-watt DIY lights are turned on to cover entire 4x4 area. Everything is hand-watered up to this point. Weak plants are removed as needed to get down to 8 plants that will go into final pots. This takes just over 3 weeks.
Once in the 5-gallon pots (slightly under-filled), they move to the 4x8 platform under two 650w lights running at 60% and a slightly closer hanging distance than normal for a minimum of 10 days before flip to flower - usually ~14. Some light training with scrog to get the canopy level and allow 10-12 future vertical branches per plant to space out a bit.
Cuttings for any feminized breeding cycles are taken after 30-35 days. Some light pruning of lower growth occurs. Flip to flower is generally 35-38 days after sprouting, but the second grow cycle can sometimes be delayed by the first.
After flip to flower, lights set to 100% with normal hanging distance, and fertilizer concentration is reduced. Now, the vertically growing 10-12 branches per plant are spaced out the last few inches with minimal training. The scrog provides the anchor. If necesary, some minimal pruning is employed to avoid future congestion. Some pruning is inevitable, but the goal is not to waste time and resources on growth that is not producing fruit.
Average and better plants will be 180-250+ grams. Weak plants will fall short of that. Even culling the weak early on in vege will result in 1-2 weak plants per crop, on average.
Drying / Curing - Into mesh racks for 10-14 days. I wet trim and cut down to similarly sized buds for even drying. Temps are controlled around 65F and RH is controlled at 57-60%. Then, into some 5-gallon buckets with gamma seal lids and (3) 2-way 67g boveda humidipaks (58% or 62%) in each bucket. These are burped until moisutre levels are confidently at equilibrium. Once i figure out what I prefer to smoke, large portions of both harvests will be vacuum sealed - still kept in the sealed, rh-controlled 5-gallon buckets. Only cut open a couple at a time to keep everything fresh throughout the year.
Cost - 0.33 cents (USD) per gram produced. This includes an accelerated depreciation expense for all equipment used, fertilizer, water, electricity for all equipment used, new filters and other yearly purchases - bti, ph strips, sticky traps, etc. I'm a finance guy, so these numbers are comprehensively accurate and purposely err slightly on high side of cost. The only facet not included is the cost of my labor.
Tip:
Reconstituting 2-way humidipaks -- tray, humidity dome and a heat mat are used. Set some wet paper towel on bottom of tray. change these out daily. I use upside down seedling pots so that the humidipaks don't directly touch the wet towels. Set heat mat to 80F or causes condensation to form on dome, and the 67-gram packs can gain abut 0.20 to 0.25 grams per hour. Weigh them as you go until they get back to 67 grams and remove from dome for use or storage.
Anything that has precipitated (hardness inside), will mostly go back into solution over a few days, but some small portion may not. Shaking or otherwise moving the pebbles around in the solution will help speed that process up. If those solids inside build up over time, that's when you'll need to replace them. A few pebbles inside of a 67g pack won't matter much.
The key is providing a closed 100% RH environment without directly wetting the packs. Rate of absorption is fairly slow, and will vary by pack size. You may not get 100% of it back into solution, but as long as those solids don't build up much, they'll work fine.
This process also reduces any bud smell that may be clinging to them... assuming they dried out significantly and not just topping them off with a few grams of moisture.
Don't try to max out their weight unless you are certain you only need 1-way RH control. Othwerwise, you don't want them fully saturated. So, do weight and keep track of their progress.
Likes
2
Share


@Greenthumby
Follow
Week 10, Day 1... Now its 2 Months since The Ladys startet growin (April 21 ) and I think IT will be 1-2 Weeks to The Harvest,
Trichome are Milky.

Likes
2
Share


@Comfrey
Follow
Das Pflänzchen wird zur Pflanze. Bis jetzt läuft es gut. Die Entscheidung, in den Kompost 20% Kokosfasern einzumischen war richtig.
Dieser Strain war eine spanische gratis
Samenspende des Saatgutlieferanten meiner Wahl. 😊 5 Samen haben sie beigelegt. Beim ersten Versuch habe ich die Samen draußen zum Keimen bringen wollen, das hat gar nicht geklappt. Alle vier Strains sind noch unter der Erde verfault. Es war zu kalt und zu nass.

Likes
12
Share


@rickhaZe
Follow
Dia 32: agregamos mas sustrato a cada planta y realizamos poda de hojas bajas y nudos mas desfavorable
Dia 35: agregamos la primera dosis de blossom blaster pro.
6 ml en 6 litro de agua, aplicamos 500ml a cada planta.
Dia 37: aplicamos 500ml de agua por planta.
Dia 38: sesión de fotos a todos los ejemplares de este cultivo y rotación de las plantas dentro de la carpa, todos los dias hago estos movimientos para que todas capten la misma luminosidad y el sustrato se seque mas parejo.
Dia 39: aplicaremos monster bloom en el cultivo, la solución será de 1.8g (ya que es en polvo) en 6 litros de agua

Likes
1
Share

@MetallicaDave
Follow
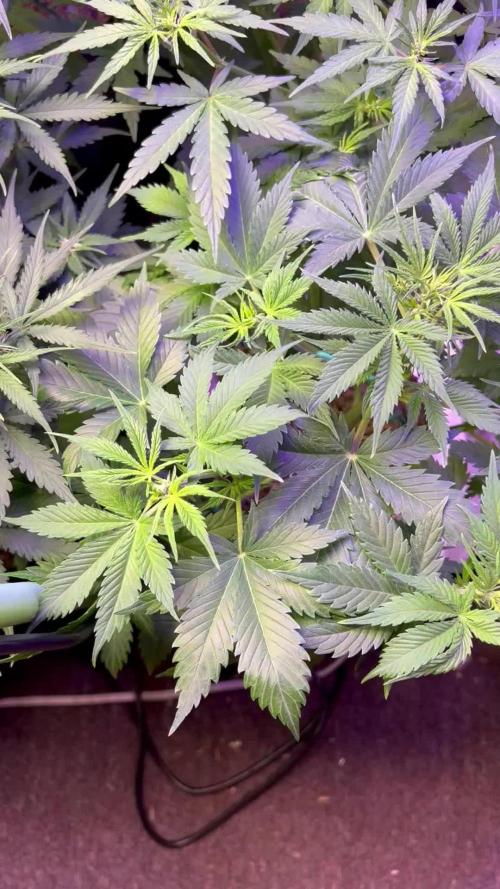
Stretches and grew like Weeds second full week of flower good internoadal distance PH is 6.6 doing low nutrient numbers my last autoflowers grow till next FALL I’m getting some BReal seeds from Barney’s Farm Feminized and Photo my tent will only hold 3 big 5 Gallon pots and maybe an LB each

Likes
27
Share


@HAPPY91
Follow
Mars Hydro TS 3000
Dimensions:
25.3" x 22.8" x 2.7"
Weight:
11.3lb
Coverage:
4x4 feet
Watts Consumed:
~450w
Light Intensity:
Up to 1150 uMol @ 18" height
Spectrum:
Full White + Infrared
LED Brand:
Unbranded LEDs
Voltage:
120; 240; 277
Warranty:
3 Years
Week 14 6/23/2021-6/29/2021:
Day 90 6/23:
Played Santana Radio. Drank 0.5 gallons plain water=22 ppm 6.2 ph 73 f. 69.6-79.0 46%-70%
Day 91 6/24:
Played Reggae Radio. Drank 0.5 gallons Fish Brew water=16 ppm 6.4 ph 74 f. 68.9-77.5 48%-65%
Day 92 6/25:
Played Slipknot Radio. Nothing today. 70.9-81.7 48%-74%
Day 93 6/26:
Played High Octane Radio. Drank 0.5 gallons plain water=16 ppm 6.5 ph 78 f. 74.7-83.3 46%-61%
Day 94 6/27:
Played My Likes Radio. Drank 0.5 gallons plain water=19 ppm 6.4 ph 81 f. 76.3-84.2 48%-63%
Day 95 6/28:
Played Reggae Radio. Drank 0.5 gallons plain water=21 ppm 6.0 ph 80 f. 75.9-84.4
Day 96 6/29:
Played Santana Radio. 71.6-80.6 45%-71%

Likes
20
Share


@Santica_Garden
Follow
End of the 2st week of life for the WiFi Punch, so out of the 7 seeds I popped, all 7 Germinated but 2 of them didn't flourish so...... I'm left with 5. Which is still great because I only plan on running 4 😎🔥👍🏾

Likes
22
Share


@Stork
Follow
Day 1
I don't understand why her growth is progressing so slowly; it seems like she's being rather lazy about it, and I have a gut feeling that she is growing slowly because of the humidity
PH 6.0
EC 0.6
DLI /19h /
PPFD /
Water 25c
Day 2
Refresh the water and add 10 L nuts
PH 5.8
EC 0.8
DLI /19h /
PPFD /
Water 25c
Day 3
PH 6.2/5.8
EC 0.8
DLI /19h /
PPFD /
Water 23c
Day 4 Thu
Add AC water to lower the EC
PH 6.2/5.8
EC 0.9/0.7
DLI /19h /
PPFD /
Water 22c
Day 5 Fri
Add AC water
PH 6.1/5.9
EC 0.8/0.7
DLI /19h /
PPFD /
Water 23c
Day 6 Sat
PH 5.9
EC 0.8
DLI /19h /
PPFD /
Water 21c
Day 7 Sun
PH 5.9
EC 0.8
DLI /19h /
PPFD /
Water 21c
Likes
15
Share


@AK1210
Follow
The bud sites are just covered in tricomes, I had my magnifying glass out to check the colour and most are milky but not as much as I thought by going by the pistol coloring, as they are mostly brown.
There is a more of a spicy dank smell to her now and the fan leaves have mostly died or are close to dying.
Hopefully I can start the flush process soon but will not do this till I'm happy with the tricome colouring.

Likes
20
Share


@ButterfliesLittleFarm
Follow
Hello Diary,
Cherry Pie has finished its last week, I harvested it two days after taking the photo.
73 days since I put the seeds in the ground.
65 days since the start of the vegetation.
Really very fast.
But the result is impressive as you can see in the photos.
The flowers are large and dense, the branches bend slightly under their weight.
The main cola is especially large and full of large flowers covered in trichomes.
The flowers are very hard to the touch and sticky under the fingers, especially the flowers on the main cola.
The leaves have started to turn autumn yellow which is also an indicator of its maturity.
The smell is very intense at this stage, the whole room smells like plants when I open the grow box.
Watering was standard, every three days.
This week I stopped adding nutrients, I just lowered the p.H. to 6.0 and water the plants with clean water.
After taking the photos, I left it in the grow box for two more days to drink all the water from the soil to make it easier to dry.
Before cutting, I removed all the leaves from the plant to also make drying faster and have less work to trim the dried flowers.
After cutting, I left it upside down in the grow box to dry.
Now all that remains is to see how much it has really rewarded me. See you when that happens.
Here's what the last week looked like.
19/09/2024 - Day 57.
Watering.
I prepared 9 liters of water, lowered the pH to 6.0 and used that amount to water all three plants on the farm.
22/09/2024 - Day 60.
Watering.
I repeated the same procedure as three days earlier.
24/09/2024 - Day 62.
I watered them all with 1.5 liters of water each plant so that they were fresh for the photo shoot.
25/09/2024 - Day 63.
End of the last, 9th week since Cherry Pie began its journey. Photo shoot.
27/09/2024 - Day 65.
Cherry Pie has been harvested.
That's almost all from me for this diary, there is still the final report that follows after drying and testing. Thank you all once again for your support and comments.
Likes
2
Share

@Bear_Grows_Green
Follow
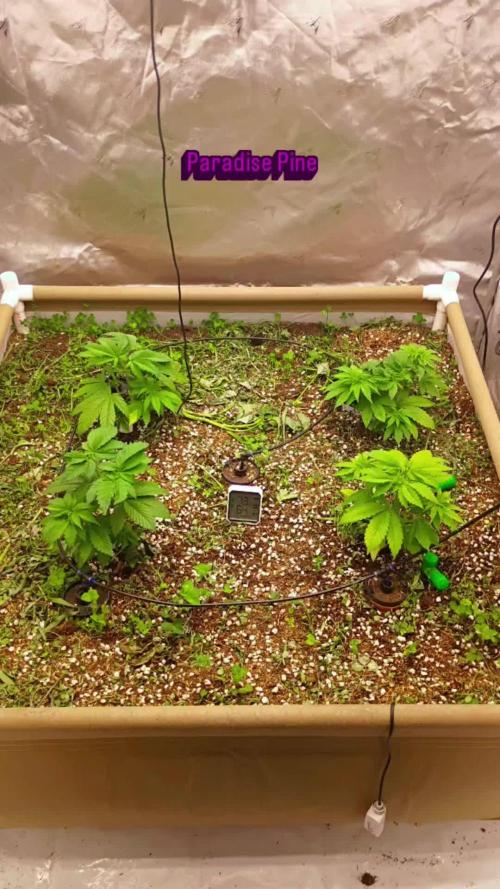
12/11Might be a day early but I'm calling it the start of a new week. The ladies have been looking super unhappy last couple days determined they were root bound so got em put into their final home this morning. Chop and dropped cover crop put thin layer of mixture of BAD worm castings and Coast of Maine lobster compost and watered in with goodies. Set the ppfd to 300 and vpd closer to 1.0
12/13 everyone is looking happier but a bit hungry mixed up light foliar mainly for one girl but gave it to all of em. Inoculated the bed with BB+, Gnarly barley, and Kashi Gold, put down straw layer and watered in some wdg3000.
12/16 top dressed around each plant with craft blend and ocean blend and a mixture of castings and compost. Then watered in a quart each with all the goodies
Likes
4
Share


@GeminiCQC
Follow
ABxRKO is about 42.5" tall, and has been top dressed with about 3tsp of grow dots to give it a phosphorus boost in flower
HBSS is about 26.5" tall and has been top dressed with about 2tsp grow dots as I believe it is fighting a phosphorus deficiency. She is giving all the smells, a bright red starburst like fruity smell with a stark citrus note.

Likes
24
Share


@TerpTurtle
Follow
Week 2 from flip & All is well, plants are starting to uptake more water-about to get loud&wild.
Small stretch!
Likes
54
Share


@FavoriteCookie
Follow
Hey Guys!
Here we go again.. I have been busy this week so i am letting the pictures and video speak for itself😎. I took PH and PPM and checked the RH so you can check where i am right now (i just did it to check the bigger rig so everything works)👌. I also upped the nuts a bit just to get them to 1000 ppm 😊. What we want is perfect condition and we are getting there slowly but surely...🙏🙌😏
Edit: Lets talk about this GSC, She is catching up even though she took some calcium and magnesium deficiency early but she will still be a thick one. Some nutrient problems but nothing serious so i am not worried about it. I will feed some calmag for the GSC and Diesel this week. She is picky in my opinion. But get it right and she will reward with a quality yield i guess. I have learned a lot this grow so for the next harvest she will have slightly better settings. I am thinking that i might invest in better soil and down the nuts and run calmag from start for all my "kushy" strains.
Don't forget to leave a like! Until next time Cheers! 👊


