


Likes
Comments
Share


@PinonAraucano
Follow
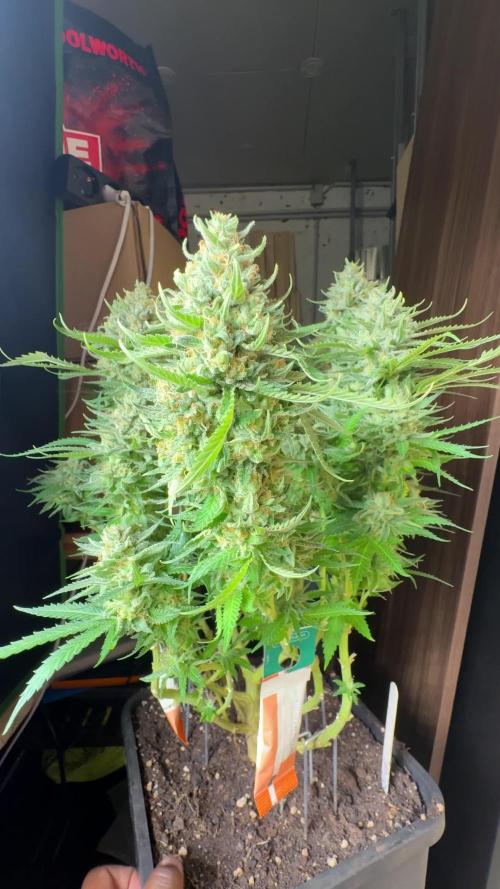
The flowering started! I'm very excited to see those first little white "hairs" in my plants. Everything is going well, the stems are getting thicker and flowers are groing very fast. I'll keep you all updated with this, send me good vibes!



Likes
17
Share


@JerryGallow
Follow
Everything is good now. They are healthy and smell very good! Having some troubles with the humidity, but everything looks very good at day 20 since switch.


Likes
25
Share


@JeyGanesha
Follow
Watermelon zkittlez korngarden seeds.
Questa watermelon ha 50 giorni.ancora non sta tirando fuori i tricomi tipo altre genetiche... cmq cresce bene aspettiamo che arrivi a maturazione per poi giudicare 😜🤣💪ancora qualche settimana e ci siamo peaple
Processing
Likes
5
Share


Likes
4
Share


@Mr_nugs_lover_David
Follow
Looks like she's completely healthy and developing well,I got scared a little bit at first due to three fact that she didn't pop after 48hs in the paper towel,but now that I see her coming up from the soil I'm much more relaxed and expecting the best from this amazing medicinal strain by Dutch passion. I Prepared the soil using bactrex, mycotrex and 2 bio tabs by bio tabs organics. Let's see how this wonderful lady performs.😍💚🌱🤞


Processing
Likes
8
Share


@weed_gastro
Follow
unstoppable :p
Day 29: on the video, the 2 on the right side are the Ayahuasca Purps, the other ones are Peyote critical.
getting real bushy, need to defoliate soon
day 32: they got their first feeding, I only use a minimal amount of blooming nutrients.
day 33: plucked some leaves , cuz there was no airflow at all, also installed a new ventilator.
day 36: had to pluck some leaves again
Likes
8
Share


@Aranseed
Follow
Este cultivo cada vez se esta viendo mas hermoso. Tercera semana de floración y aun mantienen su buen color (punto culmine en que la gran mayoría de los cultivadores noveles tienden a tener excesos o carencias). Como se puede apreciar, la automática fue distribuida solo en la parte inferior de la malla mientras que las fotodependientes ocupan toda la parte superior, distribuidas para que tengan la mejor producción posible. En la próxima semana, ya comenzaremos a aplicar PK Booster para darles en engorde que necesitan nuestras niñas.




Likes
14
Share


@BruWeed
Follow
Esta cepa quería cultivarla hace un año aprox y por cosas de la vida no pude y hace cuatro o cinco meses aproximadamente pude darme el lujo de cultivarla.
Su germinacion fue perfecta, sin ningún tipo de problemas y en esa etapa la deje dos semanas en Enraizamiento.
En etapa de crecimiento la deje cinco semanas, ya que nunca había dejado más de tres, yo creo que haberla dejado bastante tiempo en crecimiento ayudo para que se desarrollarse de forma correcta y ayudar a la hora de floración para sacar los cogollos que saco.
Y en etapa de floración la deje nueve semanas, tampoco tuve problemas en toda esa etapa.
Me sorprendió su fácil cultivo, lo unico que tuve que hacer fue regalarla con sus despectivos fertilizantes.
Tema enfermedades o plagas por suerte no tuvo en todo su desarrollo.
Como siempre digo super recomiendo el banco de semillas BSF Seed ya que la calidad es de 10 puntos. Estoy super conforme con los resultados, en húmedo los cocos pesan 196g, utilicé una lámpara led de sólo 100w, en un indor de 1.60mX60x60.
Los fertilizantes que siempre utilizó y me ayudan a sacar los resultados logrados son de Top Crop, y uso toda su línea de fertilizantes para cada etapa de la planta. Super recomendable también!
En las últimas imágenes se puede apreciar las raíces densas que desarrollo durante todo el cultivo. Y utilizó macetas de la marca Root House de 10L.
Saludos a todos y a esperar que la weed se seque para poder ya meterlos en el frasco y que se empiecen a curar.


Likes
38
Share


@Cariboo_OG
Follow
Utopia Haze is a rare heavily sativa dominant hybrid (90% sativa/10% indica) strain created through back crossing Brazilian Sativa strains. This tasty little bud took home 1st Place for Best Sativa in the 2008 High Times’ Cannabis Cup and for good reason – with its potent 18-22% average THC level and long lasting cerebral effects, Utopia Haze is one powerhouse smoke. The Utopia Haze high comes on soon after you finish your first toke, hitting you with a strong cerebral lift that infuses you with a sense of hazy relaxation.
Type: Feminised/Photoperiod
Cultivation: Indoor/Outdoor
Flowering Time (days): 70-75
Indoor Yield (g): Up to 650
Feminised Outdoor Harvest Month: October
Feminised Outdoor Harvest Month Week: 3rd-4th week
Aroma: Citrus, Woody, Pungent, Mint
Effect: Cerebral Lift, Hazy Relaxation, Sleepy
Welcome Everyone to the Final Entry of my Utopia Haze Grow !
There is so much to discuss ! I have been extremely busy as of late trying to get this Harvest together, but i am happy to have it here for you now !
I Seriously under estimated the amount of time, help from others, and my own necessary skills to pull this off.. and i still kind of screwed it up lol !
But its worth noting i have never actually done this before and trying to document it during....was extremely hard.
It is next to impossible to work an iPhone with rubber gloves on !
First I want to discuss everything step by step so before you jump straight into the comments on how the end product is so small in "quantity"
Rest assured i am happy with its"quality"...and thats all that matters to me because Life is a journey not a destination! and i have learned so much from this grow that I couldn't be any happy even if i messed some things up :)
But at the very least I hope you read through this entry in its entirety with an open mind and focus more on the process, rather than just the outcome!
I ran out of Ice & i was only able to wash three times..(normally I've heard you should go sometimes 5-6 washes)
Preparation is Key & things will be much better next round :)
Photos 1-22
These are pretty self explanatory but for those of you just tuning in now.. this is what happens to a very happy plant when you don't have the necessary tools to monitor key components of growing cannabis.. Ph, as well as EC levels play a very key role in the outcome of your grow lol that being said I was just able to save this plant by purchasing both tools but that doesn't mean the plant didn't suffer because of the prior events.. This was a Huge reason behind me choosing to turn this harvest into what i would consider
"Solventless Hash Rosin" from "Ice water extracted Bubble hash".
Pictures 23
The idea here is the process of using "fresh Frozen Cannabis" this has been discussed many a time online on such sites as instagram and here on grow diaries as well.. I personally have Never tried the process so i decided to try it out and make a judgement for myself..
Video 24
The Cannabis has now been in the freezer for 72 hours making it very well frozen.. as you can tell i struggled getting it all into the 25u Screen Wash Bag. One thing of note i would do differently is i will de-stem my next batch as i also believe this played a part in the amount of plant matter that escaped through the sieves.
Photo/Video's 25-28
The idea here is "ice water Seiving" & especially with the bags that I am using here that are only have screen material on the bottom portion of the bag it is very important to have spaces in-between the screens to allow the water to pass directly through the screens into the bottom bucket with the least amount of resistance.. because the hash is so extremely temperature dependant if it gets warm on the side of the bag.. it will stick there and not make it to the bottom to become use able product..
29
You do not need to use as much Ice as i used here lol... the idea is to keep everything very cold..i certainly achieved that but at the sacrifice of using so much that i ended up grinding product and producing "contaminants" but in the end they are just plant matter that i would be smoking when i rolled up my joint either way so.. I'm not super disappointed..
But it should be noted that what you want to achieve here is a Layering effect where you have the wash bag between two small layers of ice while the "water current" washes the Trichomes away allowing them to be separated by the screens setup below :)
Before Starting the machine you should allow some time (i.e.;10-12minutes pre soak to allow the product to become saturated) before the first cycle.
By video 32 I have just ran out of ice lol..
Video 33-34
Here I have a tip for you.. to separate the screens that you sieve through.. cut 5 gallon buckets to stretch them across nice and tight.. it'll make scooping your Bubble that much easier ! i learned this from the many "Frenchy" videos I have watched :)
Picture 35
Here in lays the problem for most people.. drying your hash without loosing vast amounts of "Terpenes" whilst also stay ever vigilant against mold !
Thanks to all those videos I've watched on youtube.. id like to think this was one of my most successful parts of this process..
Things to Note; Terpenes start to seriously evaporate at temperatures 68F or 20C
you need to stay as cold as possible whilst bringing the Relative Humidity in the space down into the 40-30% to stay away from that nasty mold !
I used my cold storage room in the basement.. with a dehumidifier running to keep the space at 45% RH & staying at a constant 15c.
All while spreading the hash as thin as possible across parchment paper, on top of the white screens with a fan moving air across both sides of the paper.
Pictures 36-38
These are some macros i took in the middle of my drying session I fell in love with the colour.
Yes i know the black spots are plant material but they will get caught when i bag the hash & squish the oil out.
Thing to Note; at this stage it is important to ensure you 'micro plane" the hash down as fine as you can whilst staying weary of the temperature... any "chunks" will hold pockets of moisture.. that lead to potential problems..ie; mold ...
Picture/Video 39-41
Successfully planed bubble hash ready to be bagged and Squished !
Picture 42
Ive decided to follow Pedro.. from Pedros Grow Room and double bag to be on the safe side so i don't have any blow outs.
So thats One 25u bag inside one 160u bag ! :)
Pictures 43
This is almost 3 grams of the bubble hash from above, already melting in the bag.. this is where i ran into trouble again lol things started getting to warm in the house and i was only able to get one of the three squish's i did on video :( things started getting sticky.
Picture 44
This is basically just a photo of the equipment I'm using; 3x5 LowTemp Cage in the frame I built myself, with a 20Ton bottle jack.
Something to note here is this is an older Lowtemp model with only a single heating zone which is which i have it closed here heating Both sides of the press :)
As well as the importance of having adequate pressure on your plates.. my rig is very overkill for the size of hash bags..lol
Video 45
Here is the lovely press video.. its didn't quite work the way i wanted either lol my directional folding wasn't quite tight enough for a big "drip" :)
&the Press was set to 65°c
Photo's 46-50 are pretty self explanatory :) I had a blow out.. but still managed to pull an 80% return from the hash once squished...& yes it tasted amazing :)
Was it worth it in the end... that could be debated.. for some..i understand..its not your thing, but for those of us that are interested in making our own concentrates.. free from Solvents...
I wouldn't make it any other way :)
If even ONE of you reading this diary finds it helpful to reference for ANYTHING.....even if its "what not to do" ill consider it a success !
Thanks again for tagging along on this garden adventure.. its been one heck of a journey !
Much Love from B.C. Canada,
Until Next time,
Cariboo
Likes
11
Share


@GrowerMario
Follow
Dievčatám očividne LST zachutilo , vypadaju nádherne zdravo a plne síl na následne kvitnutie . Svetlo @MedicGrow ide zatiaľ na 60% , postupne budem pridávať až na 100% . Taktiež vidieť , že výživa od @AdvancedNutrientsLtd im veľmi chuti a prospieva . Ďakujem aj @Fast_Buds za úžasne genetiky v tomto stane . 💚
Likes
57
Share


@TheBudWhisperer
Follow
Week 8 of flower is in the books and this show is quickly coming to an end. I said last week we had about 7-10 days and I was spot on at the 10 day mark. I was only wrong about the order. The cheese is ready to chop before the rest and the gorilla cookies, cherry Bomb and lemon haze will follow in due course. The cheese is a beast and it’ll take a little time to get it all run through the bowl trimmer. At least the big one goes first. Her tallest colas have foxtailed like mar, despite the late supercrop. You can tell where the sweet spot for the light is at about 10” distance from the canopy. Any closer than that and the tails begin to show prominently. It’s a good example of just how close you can get to these fixtures with a little bit of prior experience. It’s been noted for the next run😎👍😎. The res. is on an h2o2 only flush for the remainder until the rest are ready to come down. Not a moment too soon either - the pollen chucking project has stalled out waiting for these girls to finish and now that we’ll have a little extra room, we can start running our cuts in the aerocloner🤟. Not long at all now folks. Thanks for tagging along through all this. Learned a bunch about this system and we’re back to hardware mode to make some serious improvements for the next run🤙😎. I love hardware mode😉.
Background/Repetitive Nonsense
The strain line up on this grow is look’n quite saucy 😈. We’ve got 2 FB strains this time around - Gorilla Cookies (seems we always have some GSC cross in the works). Mainly because the colours look stellar and remind me of a sugar breathe we did last year that was 🔥. The other FB is their original Cheese strain... because we already smoked all our cheese... and we really like our cheese...😉. Emerald triangle was kind enough to include a freebie of Lemon Haze. Wasn’t really big on the list but we haven’t done a haze strain to write home about yet so worth a go👍. The last is a Cherry auto from Bomb seeds that we’ve been trying to get to for months. Let’s just hope that she’s not a dud like the last bean.
The new digs for this run are courtesy MarsHydro👊. Their 2x4 single grow tent, paired with a shiny new 240w QB courtesy ViparSpectra.
These folks were kind enough to discuss a collaboration and as a result, here we are to test out the gear with an inaugural run of autos. Each week, we’ll try to expand on some of the benefits of each, as well as any limiting factors or considerations that need attention when pondering purchase.
Already I can say that both are high quality products in terms of overall craftsmanship.
MarsHydro 2x4 Grow Tent:
Excellent construction in terms of durability. Reinforced stitching on the zippers and corners ensures zero tearing. Conveniently placed screen vents and intake/exhaust ports. The ceiling exhaust port only exists on the right side. Perfect for me but not great if you’re running exhaust from the top on the left side (left side wall port makes up for this however). The aluminum frame is rigid enough to support the weight of the lights and accessories. Once you have some weight in the tent, she’s go’n nowhere and you can assemble and break it down in record time if moving or stashing the grow op.
Only limiting factors I’ve noticed is that temp. Control will be an issue for a tent. It just doesn’t have the same insulating ability as a wood cabinet or other permanent enclosed space. No worries, this is offset by a small desktop heater and keeps the environment exactly where desired. The other issue was a production problem - the ceiling vent was accidentally stitched into the corner seams on the assembly line. Again, no real issue - just pulled it out with no damage or fraying to the tent or port👍.
Website link here:
https://www.mars-hydro.com/grow-tent/buy-mars-hydro-grow-tent-24x48x70-2-x-4-cabinet-closet-grow-box-upgraded-diamond-1680d-mylar-for-sale
ViparSpectra 240w Quantum Board:
This thing is sleek and slick in terms of design. Closest comparable to it that I’ve seen would be spiderfarmers line of qbs. They feature the same top-o-the-line components and roughly similar spectrums. Where VS takes the advantage is in the convenience of the dimmer nob which is easily accessible and works great at 50% with no strobing👍. The heat sink is also larger which contributes to lower temps. That’s not a good thing in my case but beneficial for most folks.
I can already say that this will be a great fixture through all stages of growth. Where I know this light will excel will be in the veg. Stage for sure. Dimming function gives seedlings a much better chance of success with the ability to use lower lighting levels early on and the coverage area on a 240w is great. The average grower will find this panel suitable and fitting to their needs in a 2x4 grow space although I’d suggest 2 units if going any larger than that. The total output in this space equates to about 30w/sq.ft. Which is a decent amount of coverage based on power vs. Growprint. Ideal for veg. Certainly but, in flower - I tend to run closer to 50-60w/sq.ft to achieve higher yields. Again, similar fixtures have performed admirably in the past and while this wouldn’t be considered an “entry-level” fixture, I’d recommend that any grower new to the game not skimp on lighting and start with one of these. The price points are a great value for quality LED tech. These days, so there’s little reason to even consider a lesser fixture👍.
I have no detail on limiting factors for this light as yet but have heard that stock branded fixtures don’t necessarily incorporate enough red diodes. I’ve seen no issue myself but confess - I’m no lighting guru.
Website link:
https://www.viparspectra.com/collections/xs-series/products/xs-series-xs2000
***8% discount when using code: “ItBudWhisper”***
Happy to have you along for the ride if you made it this far through my opening rant!!😎🤟😎🤟😎


Likes
35
Share


@SAC87
Follow
Flower day 7ish
Hey Growers
I did a minor defoliation to remove the beastly fan leaves and the ones in the mud. I also did a bit more LST to even the canopy as much as possible. As it seems, I have no more control haha. One or 2 plants have stretched more than I’d have like but the entire canopy is pretty even.
The SF4000 is about 8” off the top of the tent at 78%.
They start to droop for end of day about 3 hours before lights out, I was concerned something was wrong as I’ve never really seen drooping that much in healthy plants.
Just gonna keep cruising along and hopefully things will be good in the end. I’ll keep my eyes open for any problems.
Happy Growing 🌱👍🏻