


Likes
Comments
Share


@Hoso_sake1
Follow
La mia dragonessa mi ha completamente soddisfatto.
60 giorni di Vegetativa
80 giorni di Fioritura
LST
Tante e lunghe cime apicali dense e brillanti per la quantità di resina prodotta. Nelle foto anche qualche piccolo lavoro di estrazione di Rosin Tech/BubbleHash into Frenchy Cannoly Style!
Spero vi piacciano!

Likes
116
Share


@Kitties_and_Colas
Follow
~_~_~_~_~_~_~_~_~_~_~_~_~_~_~_~_~_~_~_~_~_~_~_~_~_~_~_~_~_~_~_~_~_~_~_~_~_~_~_~_~_~_~_~_~_~_~_~_~_~_~_~_~_~_~_~_~_~_~_~_~_~_~_~_~_~_~_~_~_~_~_~_~_~_~_~_~_~_~_~_~_~_~_
12/26
😻We're almost there! We started our preharvest flush last week and color is fading fast.. one plant from the group was ready (she's drying now) that plant has been ahead of the bunch this entire time..the rest of the girls should be ready to come down by next week but we're watching trichs close just in case they turn fast..The SP-3000 by MarsHydro has been an amazing addition to the grow room, our clones and seedlings couldn't be happier..It took some trial, error and a few burnt tips to dial in distance but I'm very happy we've found the perfect spot in time for a decent harvest this round but our upcoming Bruce Banger grow will be absolutely epic!! Thanks as always for the love and support, happy harvests everyone!!
⚡Mars Hydro/SP-3000⚡ Specifications ⚙️:
Diodes: Samsung LM301B / Osram 660nm (960 total!)
Driver: Meanwell 300watt 🔌 (300W±5% @AC120V-277V)
PPF: 824umol/S ☢️
PPE: 2.8 µmol/j 〰️〰️
Lifespan: >50k hrs ⌛
Veg Coverage: 3 x 5 ft 🌱
Flowering Coverage: 2 x 4 ft 🌼
Weight: 10.1 lbs (4.6kg)
-The SP-3000 uses an aluminum heatsink (no fan) and the driver can be placed outside the tent 🌡️⬇️
-IP65 waterproof ratings, tolerant to high humidity grow environments 💦 ..
-Up to 15 can be daisy-chained together and all controlled from a single light! 💡~💡~💡~💡~💡
~_~_~_~_~_~_~_~_~_~_~_~_~_~_~_~_~_~_~_~_~_~_~_~_~_~_~_~_~_~_~_~_~_~_~_~_~_~_~_~_~_~_~_~_~_~_~_~_~_~_~_~_~_~_~_~_~_~_~_~_~_~_~_~_~_~_~_~_~_~_~_~_~_~_~_~_~_~_~_~_~_~_~_
12/28
This is some potent bud lol..I made a tincture with the plant we cut down a few days ago and it's a chemical weapon lol...the smoke is amazing too, these buds are completely covered in crystals, they just melt in the pipe and this stuff gives me a slight head rush .. we might chop the rest down later today❤️🌱
😽💨
~_~_~_~_~_~_~_~_~_~_~_~_~_~_~_~_~_~_~_~_~_~_~_~_~_~_~_~_~_~_~_~_~_~_~_~_~_~_~_~_~_~_~_~_~_~_~_~_~_~_~_~_~_~_~_~_~_~_~_~_~_~_~_~_~_~_~_~_~_~_~_~_~_~_~_~_~_~_~_~_~_~_~

Processing
Likes
7
Share


@SybDarret
Follow
They are 45 and 50 cm
Both of them look pretty, each one is different from the other but they are beautiful 😍
Taller still being fat, her leaves are turning darker and i like it.
The smaller have more branches, so i think in the end they both will yield about the same, or maybe smaller yields more. Let's see.
Both plants don't look like other diaries i've been following 😯
They have a strong fruity sweet smell, But not as strong as PE.
Watered yesterday with nutrients, i'm not sure if keep feeding them or not. I guess if i give them one more week (maybe cut them on feb 11) their colas may gain some weight, specially lower buds.
Added a video of each plant, i hope you enjoy 😺


Processing
Likes
9
Share


@Mr_nugs_lover_David
Follow
This girl looks fantastic on tje beginning of the 2nd wewk of flower she's developing beautiful flowers,she's being fed 100% organically I applied my lactobacillus serum and also bat guano liquid by guanokalong she's doing very good so far,let's see how she ends up however I think that she's a very good automatic plant to train with lst she's getting pretty big and bushy,she's responding very well. Peace cannalovers 💚✌️💎🌱❤️💛 I love the Short size of the internodes by the way and her smell noe on her final days of 2nd week is starting to get very stinky but very very citrusy and sweet at the same time is a very special genetic for sure
Processing
Likes
9
Share


@russrahl
Follow
Girls are looking great so far! I added about 2ml/g to the reservoir and the plants responded well. Got a good explosion of growth over the last few days. I was able to start LST training the largest of the 4 today and the other 3 will be a day or 2 until they will be ready to start LST. Had some Ph issues during week 4 because my pen decided to go wonky. I tried to calibrate it again and had a hard time. So I busted out an older one and decided to calibrate it and see if it worked still... calibrated in a few min and sure enough res ph was well bellow 5. So water was changed as it was time anyway and ph’d proper just before lights out so we will see what happens tomorrow.

Likes
11
Share


@Ninjabuds
Follow
The Blackberry Moon Rocks are looking promising. One of them is growing into this beautiful little bush, and I think it's almost ready to harvest. The other plant is stacking up buds, but I'm thinking it's still a couple of weeks away.
The past few weeks have been so beautiful, watching the plants grow and change. It's amazing how something so small and fragile can turn into something so strong and vibrant. Now that they're getting ready to bloom, it feels a little bittersweet. I'm so excited to see the finished product, but I'll definitely miss having them around while they're growing.

Likes
1
Share

@ProfessorWeed
Follow
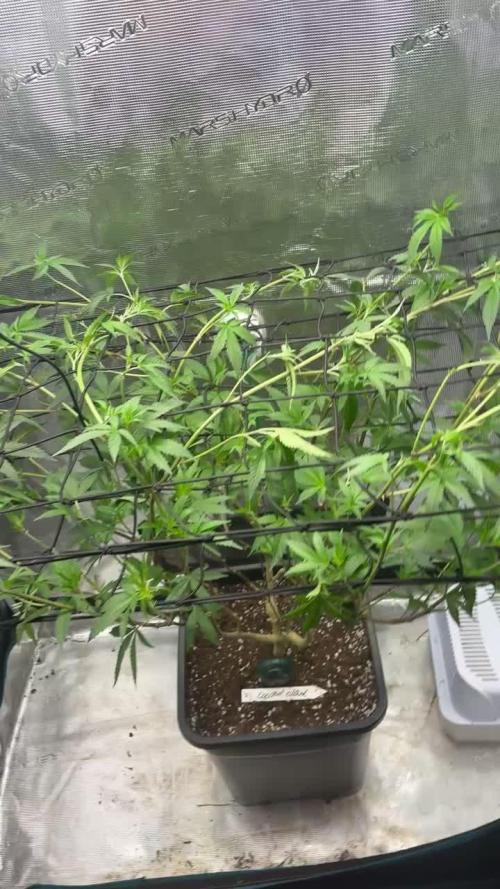
Sie ist nun ins große Zelt umgezogen.
Sie füllt den gesamten Platz aus.
Am Ende habe ich sie getoppt damit die großen Triebe nicht alle an der Zeltwand rechts und links sind sondern sich über das gesamte Zelt verteilen.
Sie hat das Training sehr gut überstanden und nach 2 Tagen sich schon wieder aufgestellt als wäre nichts gewesen.
Likes
Comments
Share

@PicoDeGallo
Follow
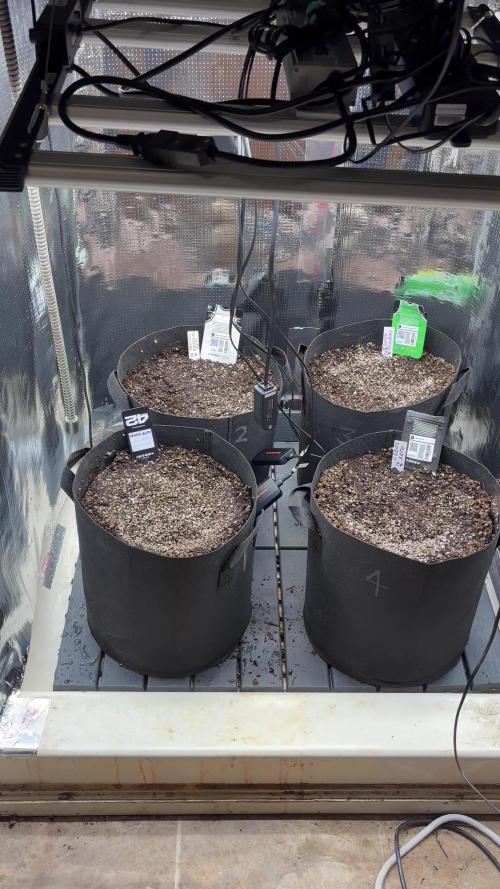
Day 1) 70% Peat 30% Perlite. Water ph is at6.3.
4 different seeds. Bag 1 Gelato Auto, Bag 2 Mexican Airline Auto . Bag 3 Gorilla Cookies Auto , Bag 4 LSD-25 Auto.
Will add auto drip next week.
Likes
10
Share


Processing
Likes
166
Share


@iMeus
Follow
Hello again my friends! I uploaded longer vids this time for the Vlogs, you don't have to watch em they're there for ya if you're interested :)
~Update~
To start off the girls look great, I'm excited that I'm back where I was when my "First Grow" failed. What's interesting to me is seeing the big difference in the SSH, the 2 previous girls I had were veracious growers, 3 1/2 days of germination and they had a tap root longer than an inch! This one is not so aggressive and has stronger sativa genetics, thin not phat. The others have been doing well, no pest yet which I'll be doing a bleach wipe down of my side of the garage to reduce the chances of an invasion.
~Note~
I'll be updating later this week with a short vid showing the progress. If you happen to watch my longer vlogs let me know what you think down in the comments, I appreciate the feedback ya'll provide. Have a blessed day, much love
Meus <3
~Update 9-19-18 [Mainline]~
So things went well, I'm looking forward to seeing if the clones take. Check out the vid if you wanna see my first attempt at mainlining! The next update will be Tuesday, see ya then!

Likes
2
Share


@Trinidad
Follow
15.06.25. Day 30.
Plants are looking healthy. Lots of growth in past week. She is showing preflower so I switched to flowering nutrients. First reservoir change out since I placed them into buckets. One plant topped herself because of rapid growth, I did not pull back training wire on main node and so the branch snapped where it was tied down. She is entering stretch now so I took of training wire on all plants.
18.06.25. Day 33!
Defoliation, lilipop.
22 06.25. Day 37
Plants are now taking up all the space in tent. They need to stop growing. I think I should take out some more vegetation from the bottom.
25.06.25 Day 40
Fresh reservoir change out.


Likes
145
Share


@Kynareth
Follow
Apparently the plants have stopped growing taller and now the buds are going fat which is a really good new :D:D:D - The buds are developing good amounts of resin too
The smell is stronger now , i don't what is the smell like but it is definitely nice .
Day 72 and according to seed vendor it will be ready between 70 and 80 days from germinating so this weekend i will move it outside the tent to observe the trichomes
Day 73 - I moved the plants outside to see how it goes and i have decided to remove plant 1 from the tent(is wich i did the topping) due to small size which made nearly impossible to develop buds. The others are great and the 2 where i super cropped multiple times are mora than 100 cm each so i think their real height should be 120cm in a bigger tent. Buds are going heavy everywhere


Likes
47
Share


@inversi0n
Follow
This week I was trying to find a good balance at feeding. I found out, that none of my nutrients had Zn and i started to see deficit of it, so i needed[ to but it. Choose between Advanced Nutrients Revive and General Hydro Micro. Obviously the second one, it has much more other useful elements. Also i bought another CalMag, since i noticed that it might be lack of Mg also. FloraGro also helps with Mg. FloraBloom just cause I already have two base nutrients from them and I'll be needed more bloom later.
By the end of the week the feeding was:
1 time pH Perfect Micro, Grow, Bloom in double amounts, B52, CalMags, Sensizym and bacterias.
2 time FloraMicro, Grow, Bloom, BigBud in double amounts, B52, CalMags, Sensizym and bacterias.
I think because I changed her diet and now it has much higher ppm, she started to drink less. Kind of more nutrients she can take from the same amount of water, so she doesn't need that much. I think.
Also it was quiet hard to change solution alone my myself, when the plant is that big. (Day 3) She always wanted to fall down during it 😁
I changed light schedule to 18/6 as it's more common for me, she will definitely have enough time to sleep. And so I couldn't blame light timing for delaying flowering.
Finally she begins to proper flowering, now I'm wondering how many time she'll be needing to finish, I guess 6 more weeks.
By the way, she is growing almost in a perfect cube, her width is about 60cm, while the height is around 67cm
Still defoliating, but every 2nd day now. That means she stopping producing leaves and starts focusing on buds, which is great.
Covering the ground actually helped me, now i almost don't see Sciaras anymore
Likes
120
Share


@OrganicNature420
Follow
Germination date 🌱 02/12/2021
Day 45 19/01/2022
Strain 🍁 Barneys Farm Biscotti Mintz
(Biscotti x Mintz)
THC% • 30% 🤤
💡 Mars Hydro FC-E6500
• Power draw 650W + 5%
• Max coverage 5 x 5
• LED 3978 pcs high quality chips
• Max Yield 2.5g / watt
• Noise level 0 DB
• Removable Driver & Light bars
• Daisy chain
• Fast cool system
https://marshydroled.co.uk/ 🇬🇧
PROMO CODE • (organicnature420) DISCOUNT
https://www.mars-hydro.com/ 🇺🇲
PROMO CODE • (ORG420) DISCOUNT 👍🏻
⛺ Mars Hydro 150 x 150 x 200cm
📤📥 AC infinity 6inch
💧 10lt dehumidifier
❄️ 3.1kw air con system
💉 Nutrients GreenBuzzLiquids 🇩🇪
⭐⭐⭐⭐⭐
Organic Grow Liquid • 1-4ml until 2wk flower
Organic Bloom Liquid • 2-4ml flower stage
Organic More PK • 2-4ml +wk3 of flower
Organic Calmag • 1-2ml/lt whole grow
Fast Plants Spray • first 2wks at night lights off
More Roots • 2-5ml veg +2wks flower
Fast Buds • 5ml 12days before flower until wk1
Humic Acid Plus • 2-5ml whole grow
Growzyme • 2-5ml whole grow
Big Fruits • 2-5ml flower stage
Clean Fruits • 5ml flush 1wk
Ph powder
Root Gel
Living Organics
https://greenbuzzliquids.com/
PROMO CODE • organicnature420 15% off ✌️🏼
🥥 Growing Media • Coco Coir
Notes 📝
No complaints. Girls have a had a trim and all looking level under the net. Can't wait for results on these 2 girls. Tents going to be packed full Buds 💚✌️🏼🌱
Discount codes in bio for Mars and GreenBuzzLiquids 👍🏻 game changers 🏆
Likes
9
Share


Likes
2
Share


@High_Grade_Dadli
Follow
So far so good transplant to a 15 gal...good thing I didn't wait till nxt week...top soil sink to the bottom and was hand for the roots to get tru
Likes
23
Share


@Firepharmer
Follow
Tents all set up now with 2 futur vert flora max 660watts 1 futur vert uva led bar..


Likes
5
Share


@LeedsCityFarmz
Follow
Buds seriously starting to fatten up, put out some serious trichomes and smell this week. Smell has intensified quite alot since last week soon as you open the tent the smell smacks you in the face. More trichomes by the day looking like a serious smoke. Upped the EC to 2 for this week to try and get a much out of these as possible. I won't be going any higher than a 2 EC so I don't fry my plants. Some orange hairs starting to appear on both the cereal milk and wedding cake.